2018 JEEP CHEROKEE buttons
[x] Cancel search: buttonsPage 149 of 312

WARNING!
• When entering a turn lane or highway offramp; when driving on roads that are
winding, icy, snow-covered, slippery, or
have steep uphill or downhill slopes.
• When towing a trailer up or down steep
slopes.
• When circumstances do not allow safe
driving at a constant speed.
The Cruise Control system has two control
modes:
•
Adaptive Cruise Control mode for main-
taining an appropriate distance between
vehicles.
• Normal (Fixed Speed) Cruise Control
mode for cruising at a constant preset
speed. For additional information, refer
to “Normal (Fixed Speed) Cruise Control
Mode” in your Owner’s Manual for fur-
ther information.
Normal (Fixed Speed) Cruise Control will not
react to preceding vehicles. Always be aware
of the mode selected. You can change the
mode by using the Cruise Control buttons.
The two control modes function differently.
Always confirm which mode is selected.
PARKSENSE REAR PARK
ASSIST
ParkSense Sensors
The four ParkSense sensors, located in the
rear fascia/bumper, monitor the area behind
the vehicle that is within the sensors’ field of
view. The sensors can detect obstacles from
approximately 12 inches (30 cm) up to
79 inches (200 cm) from the rear fascia/
bumper in the horizontal direction, depend-
ing on the location, type and orientation of
the obstacle.
Enabling And Disabling ParkSense
ParkSense can be enabled and disabled with
the ParkSense switch, located on the switch
panel below the Uconnect display.
When the ParkSense switch is pushed to
disable the system, the instrument cluster
display will show the “PARKSENSE OFF”
message for approximately five seconds. Re-
fer to “Instrument Cluster Display” in “Get-
ting To Know Your Instrument Panel” in your Owner’s Manual for further information.
When the gear selector is moved to REVERSE
and the system is disabled, the instrument
cluster display will show the “PARKSENSE
OFF” message for as long as the vehicle is in
REVERSE.
The ParkSense switch LED will be on when
ParkSense is disabled or requires service.
The ParkSense switch LED will be off when
the system is enabled. If the ParkSense
switch is pushed, and requires service, the
ParkSense switch LED will blink momen-
tarily, and then the LED will be on.
Instrument Cluster Display — Warning
The ParkSense Warning screen will only be
displayed if Sound and Display is selected
from the Customer - Programmable Features
section of the Uconnect System. Refer to
"Uconnect Settings” in “Multimedia” in your
Owner's Manual for further information.
147
Page 251 of 312

Radio Mode
Seek Previous/Next Buttons
Seek Up
Press and release the “Seek Up”button
on the touchscreen to tune the radio to the
next listenable station or channel.
During a Seek Up function, if the radio
reaches the starting station after passing
through the entire band two times, the radio
will stop at the station where it began.
Fast Seek Up
Press and hold the “Seek Up”button on
the touchscreen to advance the radio through
the available stations or channels at a faster
rate, the radio stops at the next available
station or channel when the button on the
touchscreen is released.
Seek Down
Press and release the “Seek Down”but-
ton on the touchscreen to tune the radio to
the next listenable station or channel. During a Seek Down function, if the radio
reaches the starting station after passing
through the entire band two times, the radio
will stop at the station where it began.
Fast Seek Down
Press and hold the “Seek Down”button
on the touchscreen to advance the radio
through the available stations or channel at a
faster rate, the radio stops at the next avail-
able station or channel when the button on
the touchscreen is released.
Store Radio Presets
The Radio stores up to 12 presets in each of
the Radio modes. There are four visible pre-
sets at the top of the radio screen. Pressing
the “All” button on the touchscreen on the
radio home screen will display all of the
preset stations for that mode.
To store a radio preset manually, follow the
steps below:
1. Tune to the desired station. 2. Press and hold the desired numbered but-
ton on the touchscreen for more than two
seconds or until you hear a confirmation
beep.
Media Mode
Audio Source Selection
Uconnect Media Mode
1 — SEEK
Down
2 — SEEK Up
3 — Additional
Functions4 — Info
5 — Pause/Play
6 — Source
7 — Browse
249
Page 256 of 312

CAUTION!
Do NOT attach any object to the touch-
screen, doing so can result in damage to
the screen.
Setting The Time
• Model 3C NAV synchronizes time automati-cally via GPS, so it should not require any
time adjustment. If you do need to set the
time manually, follow the instructions be-
low for Model 3C.
• For Model 3C, turn the unit on, then press the time display at the top of the screen.
Press “Yes.”
• If the time is not displayed at the top of the screen, press the “Settings” button on the
touchscreen. In the Settings screen, press
the “Clock” button on the touchscreen,
then check or uncheck this option.
• Press “+” or “–” next to Set Time Hours and Set Time Minutes to adjust the time.
• If these features are not available, uncheck the Sync Time box. • Press “X” to save your settings and exit out
of the Clock Setting screen.
Background Themes
• Screen background themes are selectablefrom a pre-loaded list of themes. If you’d
like to set a theme, follow the instructions
below.
• Press the “Settings” button on the touch- screen.
• Press the “Display” button on the touch- screen.
• Then press “Set Theme” button on the touchscreen and select a theme.
Audio Settings
• Press of the “Audio” button on the touch-screen to activate the Audio settings screen
to adjust Balance\Fade, Equalizer, and
Speed Adjusted Volume.
• You can return to the Radio screen by pressing the “X” located at the top right.
Balance/Fade
• Press the “Balance/Fade” button on thetouchscreen to Balance audio between the
front speakers or fade the audio between
the rear and front speakers.
• Pressing the “Front,” “Rear,” “Left,” or “Right” buttons on the touchscreen or
press and drag the Speaker Icon to adjust
the Balance/Fade.
Equalizer
• Press the “Equalizer” button on the touch-screen to activate the Equalizer screen.
• Press the “+” or “–” buttons on the touch- screen, or press and drag over the level bar
for each of the equalizer bands. The level
value, which spans between plus or minus
nine, is displayed at the bottom of each of
the Bands.
Speed Adjusted Volume
Press the “Speed Adjusted Volume” button
on the touchscreen to activate the Speed
Adjusted Volume screen. The Speed Ad-
justed Volume is adjusted by pressing the
MULTIMEDIA
254
Page 257 of 312

volume level indicator. This alters the auto-
matic adjustment of the audio volume with
variation to vehicle speed.
Drag & Drop Menu Bar
The Uconnect features and services in the
main menu bar are easily changed for your
convenience. Simply follow these steps:
1. Press the “Apps
” button to open the
App screen.
2. Press and hold, then drag the selected App to replace an existing shortcut in the
main menu bar.
The replaced shortcut will now be an active
App/shortcut on the main menu bar.
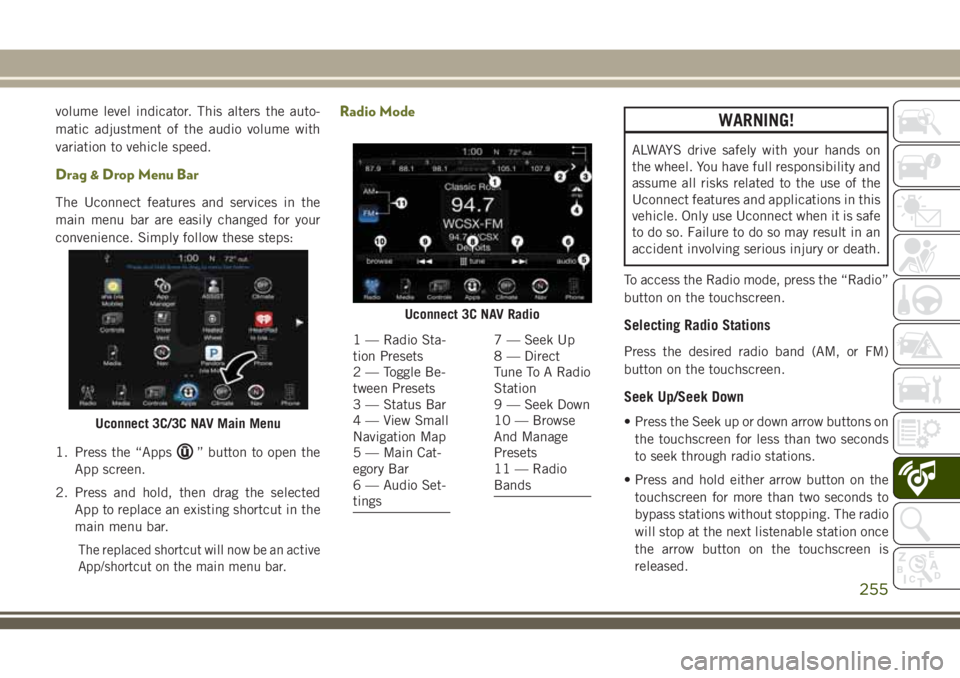
Radio ModeWARNING!
ALWAYS drive safely with your hands on
the wheel. You have full responsibility and
assume all risks related to the use of the
Uconnect features and applications in this
vehicle. Only use Uconnect when it is safe
to do so. Failure to do so may result in an
accident involving serious injury or death.
To access the Radio mode, press the “Radio”
button on the touchscreen.
Selecting Radio Stations
Press the desired radio band (AM, or FM)
button on the touchscreen.
Seek Up/Seek Down
• Press the Seek up or down arrow buttons on the touchscreen for less than two seconds
to seek through radio stations.
• Press and hold either arrow button on the touchscreen for more than two seconds to
bypass stations without stopping. The radio
will stop at the next listenable station once
the arrow button on the touchscreen is
released.Uconnect 3C/3C NAV Main Menu
Uconnect 3C NAV Radio
1 — Radio Sta-
tion Presets
2 — Toggle Be-
tween Presets
3 — Status Bar
4 — View Small
Navigation Map
5 — Main Cat-
egory Bar
6 — Audio Set-
tings7 — Seek Up
8 — Direct
Tune To A Radio
Station
9 — Seek Down
10 — Browse
And Manage
Presets
11 — Radio
Bands
255
Page 259 of 312

lighted, then press the preferred setting until
a check-mark appears next to the setting,
showing that setting has been selected. The
following feature settings are available:
• Display• Engine Off Options
• Voice • Audio
• Clock • Phone/Bluetooth
• Safety & Driving
Assistance • Radio Setup
• Lights • Restore Settings
• Doors & Locks • Clear Personal Data
• Auto-On Comfort • System Information
• Compass
(Uconnect 3)
NOTE:
Depending on the vehicles options, feature
settings may vary.
Refer to “Uconnect Settings” in “Multime-
dia” in the Owner’s Manual for further infor-
mation.
IPOD/USB/SD CARD/MEDIA
PLAYER CONTROL
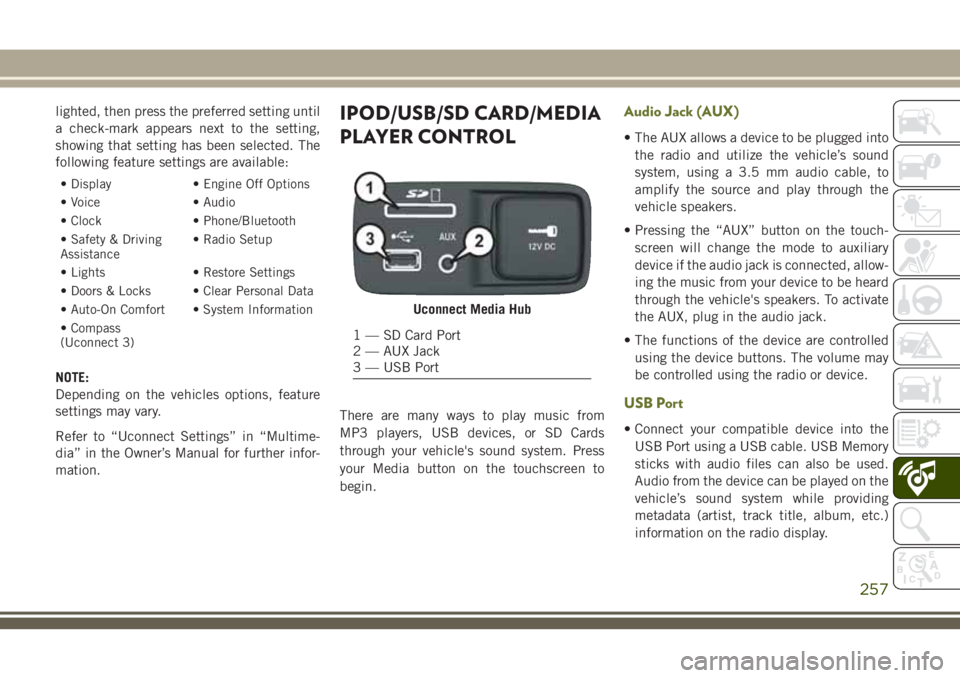
There are many ways to play music from
MP3 players, USB devices, or SD Cards
through your vehicle's sound system. Press
your Media button on the touchscreen to
begin.
Audio Jack (AUX)
• The AUX allows a device to be plugged into the radio and utilize the vehicle’s sound
system, using a 3.5 mm audio cable, to
amplify the source and play through the
vehicle speakers.
• Pressing the “AUX” button on the touch- screen will change the mode to auxiliary
device if the audio jack is connected, allow-
ing the music from your device to be heard
through the vehicle's speakers. To activate
the AUX, plug in the audio jack.
• The functions of the device are controlled using the device buttons. The volume may
be controlled using the radio or device.
USB Port
• Connect your compatible device into theUSB Port using a USB cable. USB Memory
sticks with audio files can also be used.
Audio from the device can be played on the
vehicle’s sound system while providing
metadata (artist, track title, album, etc.)
information on the radio display.
Uconnect Media Hub
1 — SD Card Port
2 — AUX Jack
3 — USB Port
257
Page 261 of 312

4. In the Guidance menu, adjust the NavVolume by pressing the “+” or “–” buttons
on the touchscreen.Finding Points Of Interest
• From the main Navigation menu, press the“Where To?” button on the touchscreen,
then press the “Points of Interest” button
on the touchscreen.
• Select a Category and then a subcategory, if necessary.
• Select your destination and press the “Yes” button on the touchscreen.
Finding A Place By Spelling The Name
• From the Main Navigation Menu press the“Where to?” button on the touchscreen,
press the “Points of Interest” button on the
touchscreen, then press the “Spell Name”
button on the touchscreen.
• Enter the name of your destination.
• Press the “List” button on the touchscreen.
• Select your destination and press the “Yes” button on the touchscreen.
One-Step Voice Destination Entry
• Enter a navigation destination without tak-ing your hands off the wheel.
• Just push the Uconnect Voice Command
button on the steering wheel, wait for
the beep and say something like, "Find
Address 800 Chrysler Drive Auburn Hills
MI."
NOTE:
Destination entry is not available while your
vehicle is in motion. However, you can also
use Voice Commands to enter an address
while moving. Refer to “Uconnect Voice Rec-
ognition Quick Tips” within this chapter for
further information.
Setting Your Home Location
• Press the “Nav” button on the touchscreen in the menu bar to access the Navigation
system and the Main Navigation menu.
• Press the “Where To?” button on the touch- screen, then press the “Go Home” button
on the touchscreen.
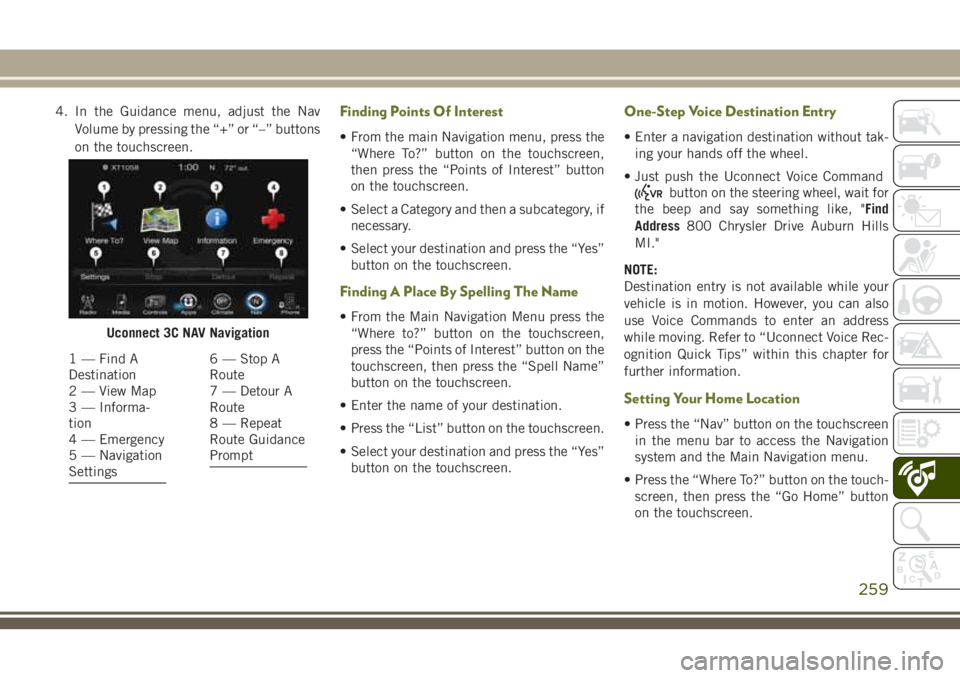
Uconnect 3C NAV Navigation
1 — Find A
Destination
2 — View Map
3 — Informa-
tion
4 — Emergency
5 — Navigation
Settings6 — Stop A
Route
7 — Detour A
Route
8 — Repeat
Route Guidance
Prompt
259
Page 265 of 312

Uconnect Phone Features
The Uconnect Phone feature enables you to
place and receive hands-free mobile phone
calls. Drivers can also place mobile phone
calls using their voice or by using the buttons
on the touchscreen (see Voice Command sec-
tion).
The hands-free calling feature is made pos-
sible through Bluetooth technology — the
global standard that enables different elec-
tronic devices to connect to each other wire-
lessly.
If the Uconnect Phone Button
exists on
your steering wheel, you then have the
Uconnect Phone features.
NOTE:
• The Uconnect Phone requires a mobile phone equipped with the Bluetooth Hands-
Free Profile, Version 1.0 or higher.
• Most mobile phones/devices are compat- ible with the Uconnect system, however
some mobile phones/devices may not be
equipped with all of the required features to
utilize all of the Uconnect system features.
Uconnect Phone (Bluetooth Hands Free
Calling)
The Uconnect Phone feature enables you to
place and receive hands-free mobile phone
calls. Drivers can also place mobile phone
calls using their voice or by using the buttons
on the touchscreen (see Voice Command sec-
tion).
The hands-free calling feature is made pos-
sible through Bluetooth technology — the
global standard that enables different elec-
tronic devices to connect to each other wire-
lessly.
If the Uconnect Phone Button
exists on
your steering wheel, you then have the
Uconnect Phone features.
NOTE:
• The Uconnect Phone requires a mobile phone equipped with the Bluetooth Hands-
Free Profile, Version 1.0 or higher.
• Most mobile phones/devices are compat- ible with the Uconnect system, however
some mobile phones/devices may not be
equipped with all of the required features to
utilize all of the Uconnect system features.
Pairing (Wirelessly Connecting) Your
Mobile Phone To The Uconnect System
Mobile phone pairing is the process of estab-
lishing a wireless connection between a cel-
lular phone and the Uconnect system.
NOTE:
•
To use the Uconnect Phone feature, you first
must determine if your mobile phone and
software are compatible with the Uconnect
system. Please visit
UconnectPhone.com
for complete mobile phone compatibility
information.
• Mobile phone pairing is not available while the vehicle is in motion.
• A maximum of ten mobile phones can be paired to the Uconnect system.
NOTE:
Keep in mind that software updates – either on
your phone or Uconnect system – may interfere
with the Bluetooth connection. If this happens,
simply repeat the pairing process. However,
first, make sure to delete the device from the
list of phones on your Uconnect system. Next,
be sure to remove Uconnect from the list of
devices in your phone’s Bluetooth settings.
263
Page 274 of 312

Get Started
1. VisitUconnectPhone.com to check device
and feature compatibility and to find de-
vice pairing instructions.
2. Reduce background noise. Wind and pas- senger conversations are examples of
noise that may impact recognition.
3. Speak clearly at a normal pace and vol- ume while facing straight ahead.
4. Each time you give a Voice Command, you must first push either the VR or Phone
button, wait until afterthe beep, then say
your Voice Command.
5. You can interrupt the help message or system prompts by pushing the VR or
Phone button and saying a Voice Com-
mand from current category.
All you need to control your Uconnect system
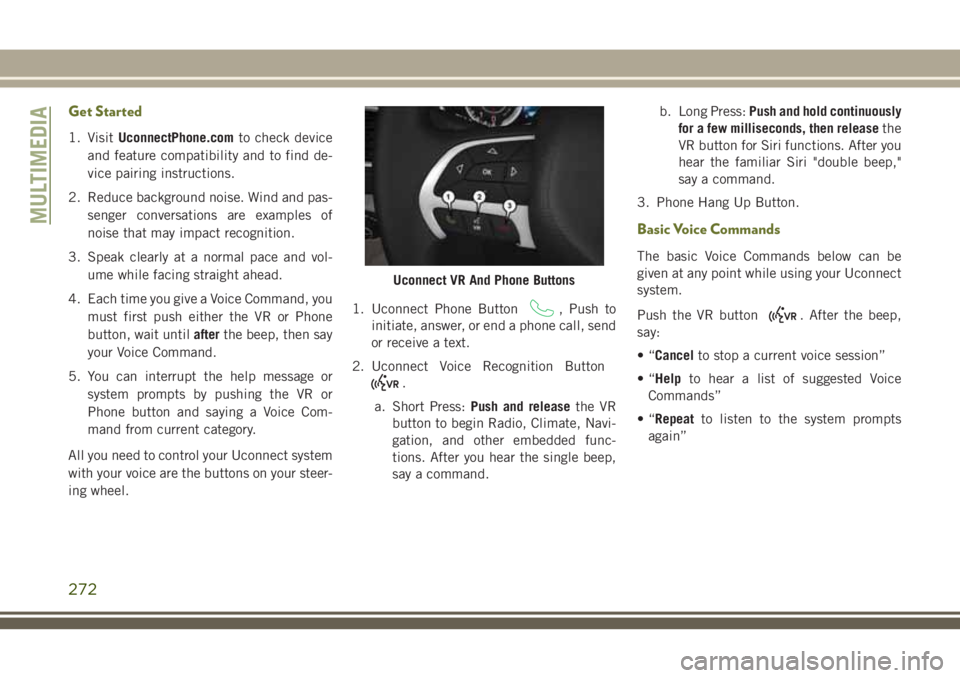
with your voice are the buttons on your steer-
ing wheel. 1. Uconnect Phone Button
, Push to
initiate, answer, or end a phone call, send
or receive a text.
2. Uconnect Voice Recognition Button
.
a. Short Press: Push and release the VR
button to begin Radio, Climate, Navi-
gation, and other embedded func-
tions. After you hear the single beep,
say a command. b. Long Press:
Push and hold continuously
for a few milliseconds, then release the
VR button for Siri functions. After you
hear the familiar Siri "double beep,"
say a command.
3. Phone Hang Up Button.
Basic Voice Commands
The basic Voice Commands below can be
given at any point while using your Uconnect
system.
Push the VR button
. After the beep,
say:
•“ Cancel to stop a current voice session”
•“ Help to hear a list of suggested Voice
Commands”
•“ Repeat to listen to the system prompts
again”
Uconnect VR And Phone Buttons
MULTIMEDIA
272