2018 INFINITI QX80 key
[x] Cancel search: keyPage 63 of 284

AUDIO MAIN BUTTONS (Type B) (if so equipped)
Push to turn the audio system on/off.
Turn to adjust the volume.
Plays the CD or DVD (if so equipped).
Push to switch to the radio mode. The
radio band will shift in the order of AM,
FM and SXM (SiriusXM) each time the
button is pushed.
Each time the button is pushed, an
available audio source will be selected.
Push to scan when scannable source isplaying. Push again to stop scanning.
Page 67 of 284
![INFINITI QX80 2018 Infiniti Connection Selecting audio source
1. Turn on the audio source menu screen bytouching [Source] on the upper left
corner of the audio screen.
2. Select an item from the audio source menu screen.
. Pushing <RADIO>/ INFINITI QX80 2018 Infiniti Connection Selecting audio source
1. Turn on the audio source menu screen bytouching [Source] on the upper left
corner of the audio screen.
2. Select an item from the audio source menu screen.
. Pushing <RADIO>/](/manual-img/42/35074/w960_35074-66.png)
Selecting audio source
1. Turn on the audio source menu screen bytouching [Source] on the upper left
corner of the audio screen.
2. Select an item from the audio source menu screen.
. Pushing
equipped) can also change the audio
source.
“Names and functions of audio
control buttons” (page 3-14)
. If the audio system has been turned off
while one of the audio sources was
playing, turning the audio system back
on will play the audio source that was
playing when the system was turned off. .
The audio source can also be changed
with the source bar on top of the audio
screen.
Audio source bar
The audio source can be changed with the
source bar on top of the audio screen. The
source bar display can be turned on/off.
Example
Turning source bar on/off:
You can select whether the source bar on
top of the audio screens is displayed or not.
1. Touch [Source] on the upper left corner
of the audio screen.
2. Touch [Show Source Bar] to turn the indicator on/off.
Editing source bar:
The audio sources to be displayed on the
source bar can be changed. 1. Touch [Source] on the upper left corner
of the audio screen.
2. Touch [Edit Source Bar].
3. Touch one of the keys on the source bar and then touch one of the audio sources
from the source list to register the audio
source in the source bar.
3. Audio system
3-19
Page 71 of 284
![INFINITI QX80 2018 Infiniti Connection Radio controls
Touch [Control] on the AM, FM or SXM screen to display the control screen.
The following items are available.
Available setting items may vary depending on the models and specifications INFINITI QX80 2018 Infiniti Connection Radio controls
Touch [Control] on the AM, FM or SXM screen to display the control screen.
The following items are available.
Available setting items may vary depending on the models and specifications](/manual-img/42/35074/w960_35074-70.png)
Radio controls
Touch [Control] on the AM, FM or SXM screen to display the control screen.
The following items are available.
Available setting items may vary depending on the models and specifications.
FM/AM:
[Station List]Touch to display the available station list.
While listening to FM radio, Auto Update is not performed.
[Scan] Touch to scan tune the stations.
“Radio operation” (page 3-21)
[HD Radio Mode] When this item is turned on, the analog and digital reception switches automatically. When
this item is turned off, the reception is fixed in the analog mode.
[HD Radio Info] Touch to display the HD Radio information such as name of song, artist and album.
This item is available when [RDS-Info] is not active.
[Tag]
(HD Radio broadcasts only) Touch to register the tag information for iTunes® Tagging. If an iPod® is plugged in after
the registration, the tag information can be stored in an iPod® and be used to purchase the
songs via iTunes®.
[RDS-Info] (FM only) Touch to display the RDS information.
This item is available when [HD Radio Info] is not active.
SXM:
[Categories] Touch to display the category list.
[Direct Tune] Touch to display the keypad to enter the frequency and directly tune to the channel.
“Radio operation” (page 3-21)
[Scan] Touch to scan tune the channels.
“Radio operation” (page 3-21)
3. Audio system
3-23
Page 75 of 284

DIGITAL VERSATILE DISC (DVD)
PLAYER (if so equipped)
Precautions
.Use DVDs with the region code “ALL” or
the code applicable to the DVD player.
(The region code is displayed as a small
symbol printed on the top of the DVD).
This vehicle-installed DVD player can
only play DVDs with the applicable
region code.
. Images cannot be displayed when the
ignition switch is in the ON position.
. Some VIDEO-CD functions may not be
supported with this system.
. Available menus and functions may vary
depending on the type of disc.
How to view DVD operation screen
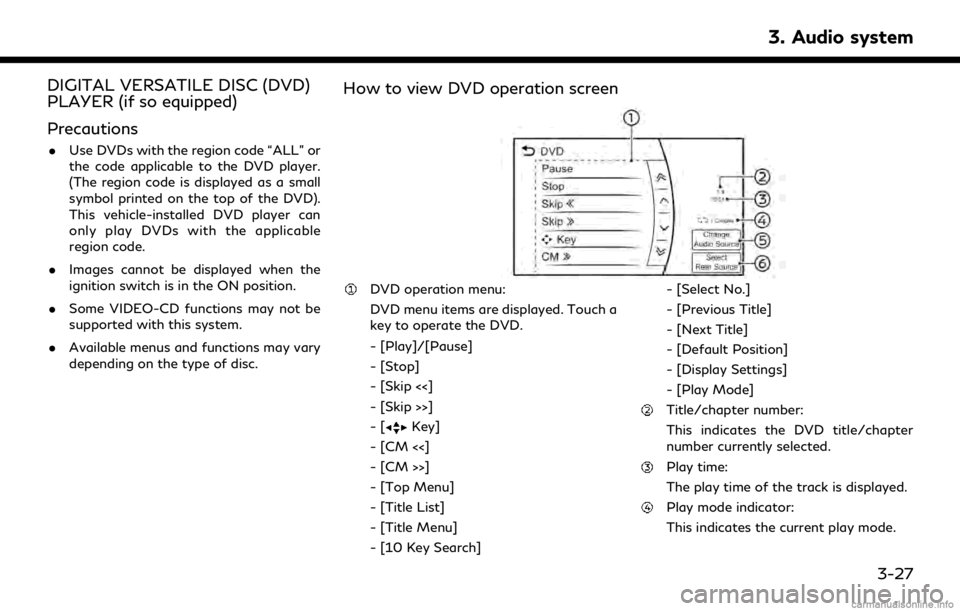
DVD operation menu:
DVD menu items are displayed. Touch a
key to operate the DVD.
- [Play]/[Pause]
- [Stop]
- [Skip <<]
- [Skip >>]
-[
Key]
- [CM <<]
- [CM >>]
- [Top Menu]
- [Title List]
- [Title Menu]
- [10 Key Search] - [Select No.]
- [Previous Title]
- [Next Title]
- [Default Position]
- [Display Settings]
- [Play Mode]
Title/chapter number:
This indicates the DVD title/chapter
number currently selected.
Play time:
The play time of the track is displayed.
Play mode indicator:
This indicates the current play mode.
3. Audio system
3-27
Page 76 of 284
![INFINITI QX80 2018 Infiniti Connection 3. Audio system
ModeScreen display
[OFF]
OFF
[1 Disc Repeat]
Disc
[1 Chapter Repeat]
1 Chapter
[Disc Random]
Disc
[Change Audio Source]
Touch to display the source select
screen.
“Selecting audio so INFINITI QX80 2018 Infiniti Connection 3. Audio system
ModeScreen display
[OFF]
OFF
[1 Disc Repeat]
Disc
[1 Chapter Repeat]
1 Chapter
[Disc Random]
Disc
[Change Audio Source]
Touch to display the source select
screen.
“Selecting audio so](/manual-img/42/35074/w960_35074-75.png)
3. Audio system
ModeScreen display
[OFF]
OFF
[1 Disc Repeat]
Disc
[1 Chapter Repeat]
1 Chapter
[Disc Random]
Disc
[Change Audio Source]
Touch to display the source select
screen.
“Selecting audio source”
(page 3-19)
[Select Rear Source] (if so equipped)
Touch to display the Mobile Entertain-
ment System screen.
“Controlling the rear system on the
front display” (page 3-62)
INFO:
. The DVD menu list will appear when the
screen is touched while a movie is
playing.
. The availability of the DVD menu items
depend on the type of DVD.
DVD player operation
Loading:
Insert the DVD into the slot with the label
side facing up. The DVD will be guided
automatically into the slot and start play-
back.
When a DVD is loaded, the DVD operation
screen is displayed on the display.
Activation and playing:
Inserting the DVD into the slot will activate
the DVD mode. The DVD mode can also be
selected from the source list or by pushing
“Names and functions of audio control
buttons” (page 3-14)
“Selecting audio source” (page 3-19)
Touch [Play] in the DVD menu to start
playing. Touch [Pause] to pause and touch
[Stop] to stop playing the DVD.
Skipping:
Touch [Skip <<] or [Skip >>] in the DVD menu
to skip to the next or previous track/chapter.
Displaying keys:
Touch [
Key] in the DVD menu to display
operation keys such as [Enter] or [Return], etc. on the display.
Skipping commercial messages:
Touch [CM <<] or [CM >>] in the DVD menu
to skip commercials.
Displaying top menu:
Touch [Top Menu] in the DVD menu to
display the top menu specific to each disc.
For additional information, refer to the disc
instructions.
Displaying title list:
Touch [Title List] in the DVD menu to display
the title list.
Displaying title menu:
Touch [Title Menu] in the DVD menu to
display the title menu specific to each disc.
For additional information, refer to the disc
instructions.
Selecting track/chapter/menu number:
Touch [10 Key Search] or [Select No.] in the
DVD menu to display the keyboard screen.
Enter the track/chapter or menu number
you wish to play.
3-28
Page 103 of 284

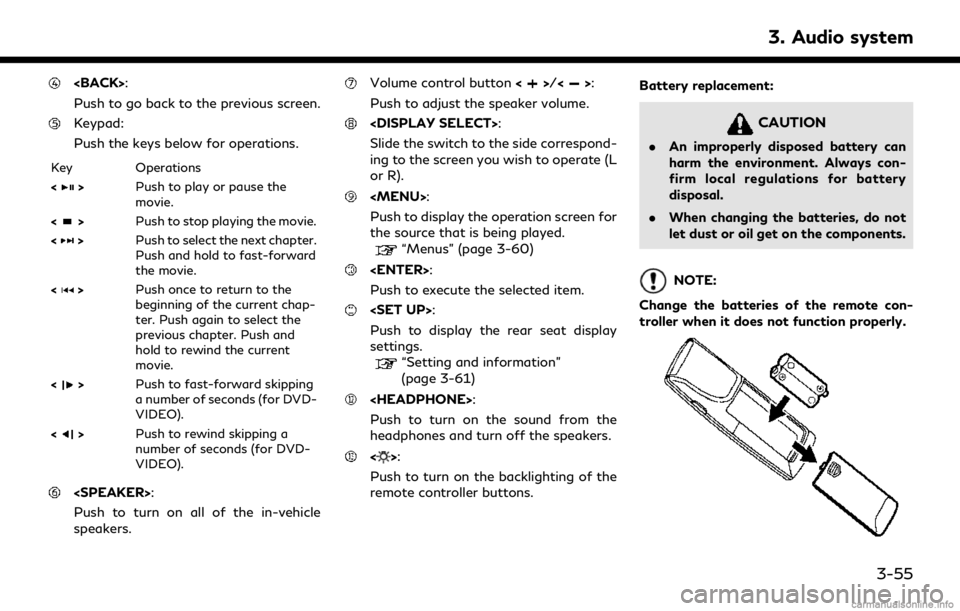
Push to go back to the previous screen.
Keypad:
Push the keys below for operations.
Key Operations
<
>Push to play or pause the
movie.
<
> Push to stop playing the movie.
<
> Push to select the next chapter.
Push and hold to fast-forward
the movie.
<
> Push once to return to the
beginning of the current chap-
ter. Push again to select the
previous chapter. Push and
hold to rewind the current
movie.
<
> Push to fast-forward skipping
a number of seconds (for DVD-
VIDEO).
<
> Push to rewind skipping a
number of seconds (for DVD-
VIDEO).
Push to turn on all of the in-vehicle
speakers.
Volume control button <>/<>:
Push to adjust the speaker volume.
Slide the switch to the side correspond-
ing to the screen you wish to operate (L
or R).
Page 109 of 284
![INFINITI QX80 2018 Infiniti Connection .[10key Search] (DVD only)
Select [10key Search] and push
<ENTER> to open the number entry
screen. Enter the number you want to
search for and select [OK] with the
remote controller. The selected Titl INFINITI QX80 2018 Infiniti Connection .[10key Search] (DVD only)
Select [10key Search] and push
<ENTER> to open the number entry
screen. Enter the number you want to
search for and select [OK] with the
remote controller. The selected Titl](/manual-img/42/35074/w960_35074-108.png)
.[10key Search] (DVD only)
Select [10key Search] and push
screen. Enter the number you want to
search for and select [OK] with the
remote controller. The selected Title/
Chapter will be played.
. [Audio] (DVD, USB (DivX) only)
Select a preferred language for the audio
output.
. [Subtitle] (DVD, USB (DivX) only)
Choose the preferred subtitle language
setting.
. [Angle] (DVD only)
If the DVD contains data of different
angles, the angle of the image can be
changed.
. [File Browser] (USB only)
The data contained in the USB can be
browsed. The tracks are automatically
categorized by playlists, songs, artists,
composers, genres, etc.
. [Play Mode] (USB only)
Select a preferred play mode from
[Normal]/[Repeat]/[Shuffle]. .
[Aspect Ratio]
Aspect can be selected from Normal,
Wide, Cinema and Full.
. [Select No.] (Video-CD only)
Select a section number you wish to play.
SETTING AND INFORMATION
Various settings for the Mobile Entertain-
ment System such as aspect ratio, language,
etc. can be changed on the rear displays.
Push
select the preferred item to change the rear
display settings and to view the system
information.
Available items
. [System Settings]
. [Display Settings]
. [Information]
System settings
To change the settings of the Mobile
Entertainment System, push
the remote controller and select [System
Settings].
Select the preferred item and adjust the
setting using the remote controller. Available items:
. [Aspect Ratio]
Select the image size from Normal, Wide,
Cinema and Full.
. [Language]
The language displayed on the screen
can be changed. Select [Manual] and
then select a preferred language from
the list. To apply the same language that
is applied to the front display, select
[Auto].
The language of the rear menu screens
can be set independently from the front
display. The rear display language set-
tings will be applied to both the rear left
and rear right displays.
. [Operation Guide]
When this item is turned on, an explana-
tion for the menu highlighted on the
screen will appear at the bottom of the
screen.
. [DivX® VOD]
DivX® VOD license information can be
viewed.
3. Audio system
3-61
Page 118 of 284

4. Bluetooth® Hands-Free Phone
Microphone:
The microphone is located near the map
light.
CONNECTING BLUETOOTH®
HANDS-FREE PHONE
The cellular phone must be connected to the
Bluetooth® Hands-Free Phone System be-
fore commencing operation. Up to 5 cellular
phones can be connected to the system.
“Pairing Bluetooth® device”
(page 2-31)
PHONE
Phone selection
Select one of the connected devices for
operation.
1. Push<
>and then touch [Select
Phone]. A list of the connected cellular
phones is displayed.
2. Select one of the connected cellular phones from the list.
3. When selection of the device is success- ful, a message on the display indicates
that the cellular phone was selected.
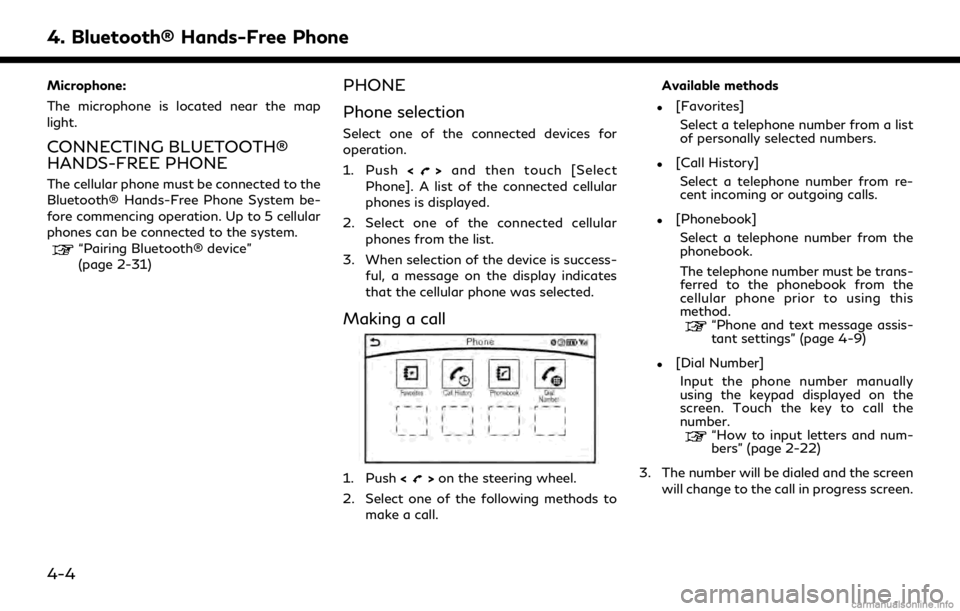
Making a call
1. Push <>on the steering wheel.
2. Select one of the following methods to make a call. Available methods
.[Favorites]
Select a telephone number from a list
of personally selected numbers.
.[Call History]Select a telephone number from re-
cent incoming or outgoing calls.
.[Phonebook]Select a telephone number from the
phonebook.
The telephone number must be trans-
ferred to the phonebook from the
cellular phone prior to using this
method.
“Phone and text message assis-
tant settings” (page 4-9)
.[Dial Number]Input the phone number manually
using the keypad displayed on the
screen. Touch the key to call the
number.
“How to input letters and num-
bers” (page 2-22)
3. The number will be dialed and the screen will change to the call in progress screen.
4-4