Page 17 of 24

14
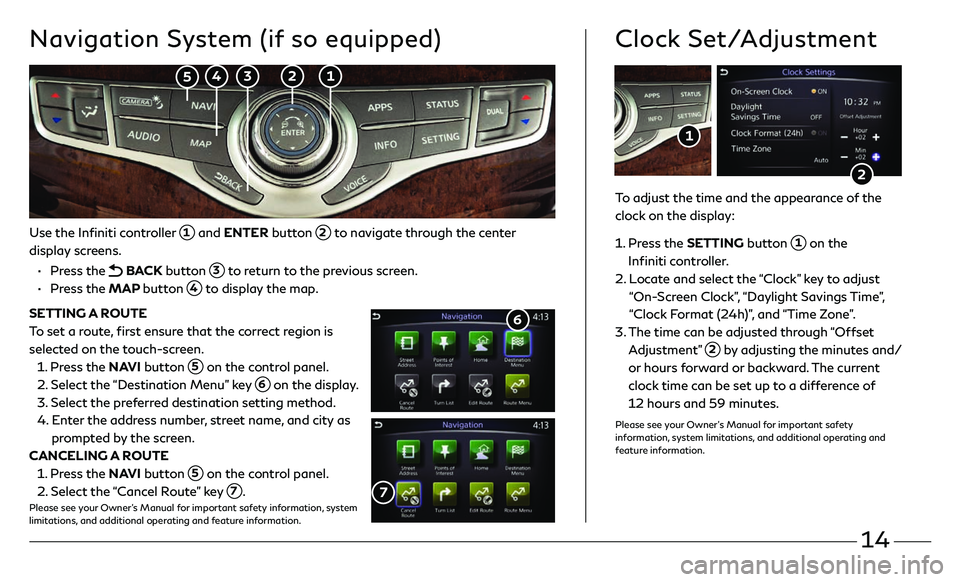
Use the Infiniti controller 1 and ENTER button 2 to navigate through the center
display screens.
• Press the BACK button 3 to return to the previous screen.
• Press the MAP button 4 to display the map.
SETTING A ROUTE
To set a route, first ensure that the correct region is
selected on the touch-screen.
1. Press the NAVI button 5 on the control panel.
2. Select the “Destination Menu” key 6 on the display.
3. Select the pr eferred destination setting method.
4. Enter the address number, street name, and city as
prompted by the screen.
CANCELING A ROUTE
1. Press the NAVI button 5 on the control panel.
2. Select the “Cancel Route” key 7.Please see your Owner’s Manual for important safety information, system
limitations, and additional operating and feature information.
7
Navigation System (if so equipped)
6
To adjust the time and the appearance of the
clock on the display:
1 . Press the SETTING button 1 on the
Infiniti controller.
2. Locate and select the “Clock” key to adjust
“On-Screen Clock”, “Daylight Savings Time”,
“Clock Format (24h)”, and “Time Zone”.
3. The time c an be adjusted through “Offset
Adjustment” 2 by adjusting the minutes and/
or hours forward or backward. The current
clock time can be set up to a difference of
12 hours and 59 minutes.
Please see your Owner’s Manual for important safety
information, system limitations, and additional operating and
feature information.
Clock Set/Adjustment
2
1
2 1 3 4 5
Page 18 of 24

15
Infiniti InTouch™ Services (if so equipped)
Available services include, but are not
limited to:
• Automatic Collision Notification
• Alarm Notification
• Maintenance Alert
• Scheduled Main tenance Notification
• Report Stolen Vehicle
• Emergency Call
• Remote Door Lock/Unlock
• Remote Engine Start/Stop
• Remote Horn/Lights
• My Schedule
• Destination Send-to-Vehicle
• Connected Search
• Drive Zone
• Maximum Speed Alert
• Mobile Information Service
• Valet Alert
The following services can also be accessed
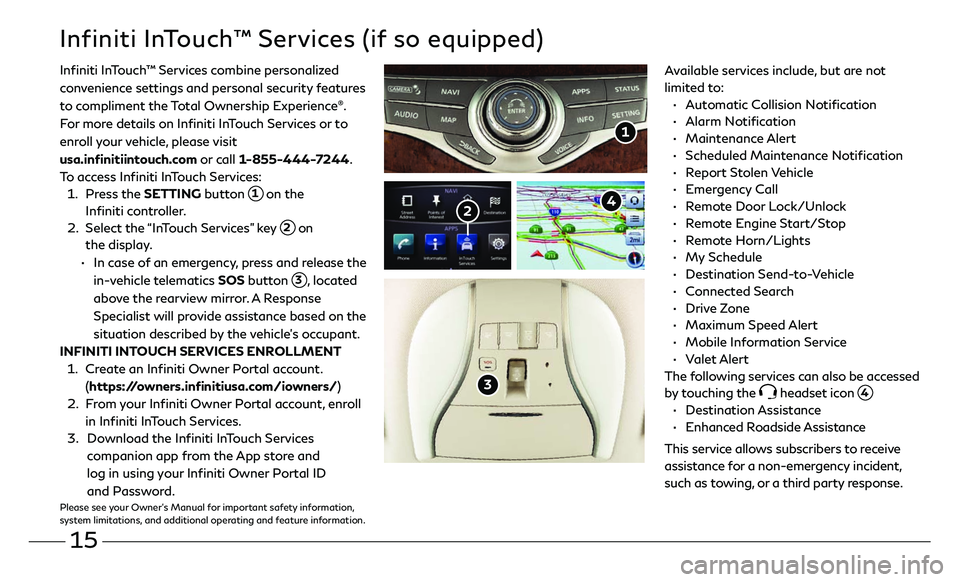
by touching the
headset icon 4.
• Destination Assistance
• Enhanced Roadside Assistance
This service allows subscribers to receive
assistance for a non-emergency incident,
such as towing, or a third party response.
1
Infiniti InTouch ™ Services combine personalized
convenience settings and personal security features
to compliment the Total Ownership Experience®.
For more details on Infiniti InTouch Services or to
enroll your vehicle, please visit
usa.infinitiintouch.com or call 1-855-444-7244.
To access Infiniti InTouch Services:
1. Press the SETTING button 1 on the
Infiniti controller.
2. Select the “InTouch Services” key 2 on
the display .
• In case of an emergency, press and release the
in-vehicle telematics SOS button
3, located
above the rearview mirror. A Response
Specialist will provide assistance based on the
situation described by the vehicle’s occupant.
INFINITI INTOUCH SERVICES ENROLLMENT
1. Create an Infiniti Owner Portal account.
(https://owners.infinitiusa.com/iowners/)
2. From your Infiniti Owner Portal account, enroll
in Infiniti InTouch Services.
3. Download the Infiniti InTouch Services
companion app from the App store and
log in using your Infiniti Owner Portal ID
and Password.
Please see your Owner’s Manual for important safety information,
system limitations, and additional operating and feature information.
3
4 2
Page 19 of 24

16
Infiniti Mobile Entertainment System (MES) (if so equipped)
With this entertainment system, you can play video files on
both the front and rear display screens.
Watching a DVD:
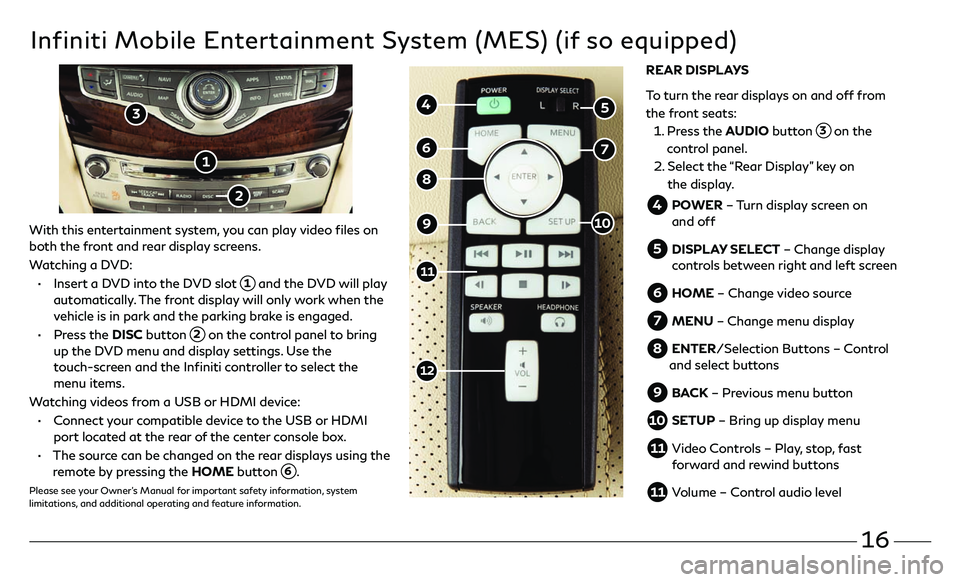
• Insert a DVD into the DVD slot 1 and the DVD will play
automatically. The front display will only work when the
vehicle is in park and the parking brake is engaged.
• Press the DISC button 2 on the control panel to bring
up the DVD menu and display settings. Use the
touch-screen and the Infiniti controller to select the
menu items.
Watching videos from a USB or HDMI device:
• Connect your compatible device to the USB or HDMI
port located at the rear of the center console box.
• The source can be changed on the rear displays using the
remote by pressing the HOME button 6.
Please see your Owner’s Manual for important safety information, system
limitations, and additional operating and feature information.
1
4 POWER – Turn display screen on
and off
5 DISPLAY SELECT – Change display
controls between right and left screen
6 HOME – Change video source
7 MENU – Change menu display
8 ENTER/Selection Buttons – Control
and select buttons
9 BACK – Previous menu button
10 SETUP – Bring up display menu
11 Video Controls – Play, stop, fast forward and rewind buttons
11 Volume – Control audio level
4
11
8
7 6
5
9
12
REAR DISPLAYS
To turn the rear displays on and off from
the front seats:
1. Press the AUDIO button 3 on the
control panel.
2. Select the “Rear Display” key on
the display.
3
2
10