2018 Hyundai Sonata radio
[x] Cancel search: radioPage 1 of 26

NP150-C2018(Rev 05/25/17)Printing 05/27//17
☐ BLUE LINK - pages 25-27
- Assist with creating MyHyundai.com account
- Assist with Blue Link enrollment
- Show Blue Link Users Manual & tear out Voice Commands/Quick Tip Card
- Encourage customers to press the Blue link button
☐ TIRE PRESSURE MONITORING SYSTEM (TPMS) - page 39
☐ OPENING THE TRUNK- page 11
• To activate wipers move the switch down
to one of the three positions (INT, LO, HI)
• To adjust "INT" speed move switch
• To spray washer fluid pull lever toward you
• Push lever up for a single wiper pass
☐ WINDSHIELD WIPER / WASHER - page 09
INT
LO
HI
MIST
OFF
NOTE: Tire pressure may vary in colder temperatures causing the low
tire pressure indicator to illuminate. Inflate tires according to the Tire
Pressure Label located on the driver’s side door pillar.
LOW TIRE PRESSURE INDICATOR /
TPMS MALFUNCTION INDICATOR
Looking For more detailed information? This Quick Reference Guide does not replace your vehicle’s
Owner’s Manual. If you require additional information or are unsure of a specific issue,We recommend that you always refer to the vehicle’s Owner’s Manual or contact your authorized Hyundai dealer. The information contained in this Quick Reference Guide is correct at the time of printing; however, specifications and equipment can change without notice. No warranty or guarantee is being extended in this Quick Reference Guide, and Hyundai reserves the right to change product specifications and equipment at any time without incurring obligations. Some vehicles are shown with optional equipment.
☐ HOW TO DEFROST - page 18- 21
1 Press the front defrost button.
2 Set to warmest temperature setting.
3 Set to highest fan speed.
WALK THE CUSTOMER THROUGH EACH OF
THE FOLLOWING KEY DELIVERY FEATURES
=
Roadside Assistance: 1-800-243-7766
Consumer Affairs: 1-800-633-5151
Sirius XM®Radio: 1-800-967-2346
Blue Link: 1-855-2BLUELINK (1-855-225-8354)
Quick Reference Guide
HYUNDAI
SONATA
MAINTENANCE
Scheduled Maintenance(Normal Usage)2.4 GDI1.6/2.0 T-GDI
Engine Oil and FilterReplace7,500 or 12 mos.Replace6,000 or 12 mos.Fuel AdditivesAdd7,500 or 12 mos.Add6,000 or 12 mos.Tire RotationPerform7,500Perform6,000Vacuum HoseInspect7,500 or 12 mos.Inspect6,000 or 12 mos.
Air Cleaner FilterInspect7,500 or 12 mos.Inspect6,000 or 12 mos.Replace22,500 or 36 mos.Replace18,000 or 36 mos.Climate Control Air Filter(for Evaporator and Blower Unit)Replace7,500 or 12 mos.Replace6,000 or 12 mos.
Air Conditioning Refrigerant
Inspect7,500 or 12 mos.Inspect6,000 or 12 mos.
Brake Hoses & LinesDrive Shafts & BootsFront Brake Disc/Pads, CalipersRear Brake Disc/PadsSteering Gear Box, Linkage & Boots /Lower Arm Ball Joint, Upper Arm Ball JointSuspension Mounting BoltsExhaust Pipe & Muffler
Inspect15,000 or 24 mos.Inspect12,000 or 24 mos.
Fuel Tank Air FilterVapor Hose & Fuel Filler Cap, Fuel TankBrake FluidParking BrakeFuel FilterFuel Lines, Fuel Hoses and ConnectionsInspect30,000 or 48 mos.Inspect24,000 or 48 mos.
Drive BeltInspect
First
Inspect
First60,000 or 72 mos.60,000 or 72 mos.
Subsequent, everySubsequent, every15,000 or 24 mos.12,000 or 24 mos.Spark PlugsReplace97,500Replace42,000
CoolantReplace
First
Replace
First120,000 or 120 mos.120,000 or 120 mos.
Subsequent, everySubsequent, every30,000 or 24 mos.30,000 or 24 mos.Valve ClearanceInspect60,000 or 72 mos.Inspect60,000 or 72 mos.Ecoshift Dual Clutch Transmission Fluid-Inspect24,000 or 48 mos.Automatic Transmission FluidNo checks or services required for Normal Usage driving.
*Check the engine oil regularly between recommended oil change intervals.We recommend Quaker State oil.
*See Owner's Manual for details regarding Severe Usage maintenance recommendations.
1. Make sure the shift lever is in P (Park).
2. Then do one of the following :
- Press the button on the trunk emblem
after unlocking the door by remote key
or smart key.
- Press the trunk unlock button of remote
key or smart key for more than 1 second.
- Press the button on the trunk itself with
the Smart Key in your possession.
- With vehicle unlocked, press the button.
Page 14 of 26

Quick Reference Guide I 2524 I Quick Reference Guide
MULTIMEDIA
Pairing tutorials, phone compatibility and
operational tips can be found through the
Smart QR code using the QR reader
application on your Smartphone.
BLUETOOTH PHONE PAIRING
BLUETOOTH PHONE OPERATION
Phone setup (pairing phone)
2. Press “Add New” on the radio screen.
3. Select the car name shown on your mobile phone to pair.
4. Enter the passkey or accept the authorization popup on your phone.
(The default passkey is 0000.)
5. Bluetooth is connected.
1. Turn Bluetooth® on from your mobile phone. Press the PHONE
button in the head unit or button on the steering wheel remote
control.
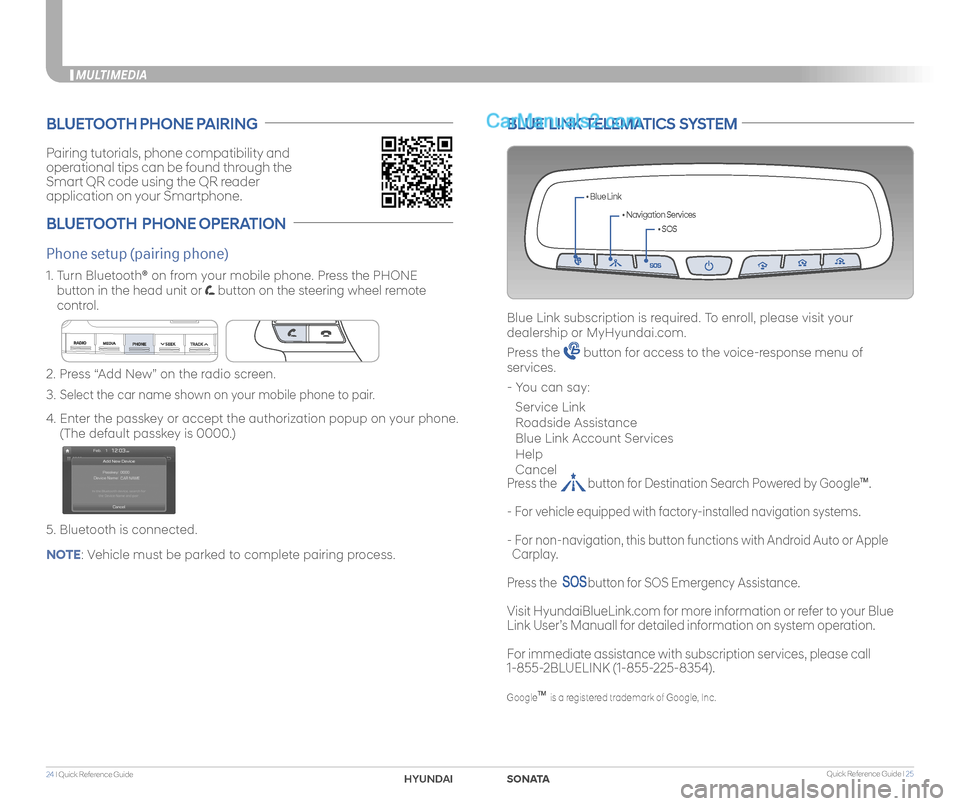
BLUE LINK TELEMATICS SYSTEM
• SOS
• Navigation Services
• Blue Link
Blue Link subscription is required. To enroll, please visit your
dealership or MyHyundai.com.
Press the button for access to the voice-response menu of
services.
- You can say:
Service Link
Roadside Assistance
Blue Link Account Services
Help
Cancel
Press the button for Destination Search Powered by GoogleTM.
- For vehicle equipped with factory-installed navigation systems.
- For non-navigation, this button functions with Android Auto or Apple
Carplay.
Press the button for SOS Emergency Assistance.
Visit HyundaiBlueLink.com for more information or refer to your Blue
Link User’s Manuall for detailed information on system operation.
For immediate assistance with subscription services, please call
1-855-2BLUELINK (1-855-225-8354).
GoogleTM is a registered trademark of Google, Inc.
NOTE: Vehicle must be parked to complete pairing process.
SONATAHYUNDAI
Page 16 of 26

Quick Reference Guide I 2928 I Quick Reference Guide
MULTIMEDIA
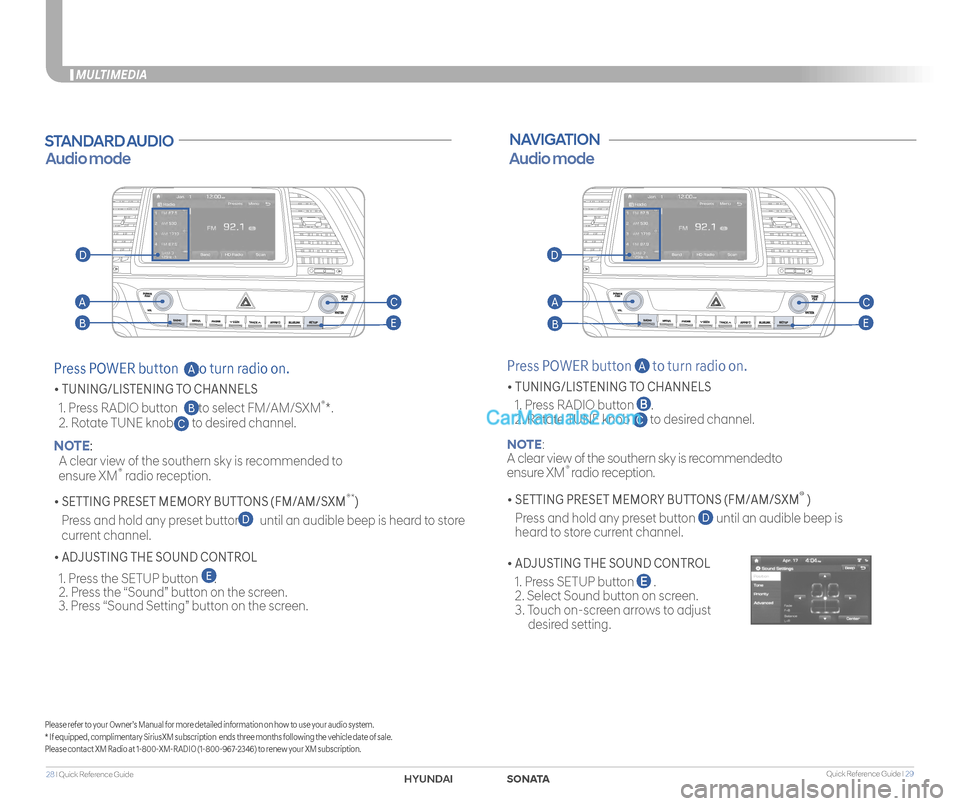
STANDARD AUDIO
Audio mode
Press POWER button to turn radio on.
• TUNING/LISTENING TO CHANNELS
1. Press RADIO button to select FM/AM/SXM®*.
2. Rotate TUNE knob to desired channel. NOTE:
A clear view of the southern sky is recommended to
ensure XM® radio reception.
• SETTING PRESET MEMORY BUTTONS (FM/AM/SXM®*)
Press and hold any preset button until an audible beep is heard to store
current channel.
• ADJUSTING THE SOUND CONTROL
1. Press the SETUP button . 2. Press the “Sound” button on the screen. 3. Press “Sound Setting” button on the screen.
C
D
E
B
A
Please refer to your Owner’s Manual for more detailed information on how to use your audio system.* If equipped, complimentary SiriusXM subscription ends three months following the vehicle date of sale.Please contact XM Radio at 1-800-XM-RADIO (1-800-967-2346) to renew your XM subscription.
NAVIGATION
Press POWER button A to turn radio on.
• TUNING/LISTENING TO CHANNELS
1. Press RADIO button .
2. Rotate TUNE knob C to desired channel.
NOTE:
A clear view of the southern sky is recommendedto
ensure XM® radio reception.
• SETTING PRESET MEMORY BUTTONS (FM/AM/SXM® )
Press and hold any preset button D until an audible beep is
heard to store current channel.
• ADJUSTING THE SOUND CONTROL
1. Press SETUP button .
2. Select Sound button on screen.
3. Touch on-screen arrows to adjust
desired setting.
Audio mode
AA
BB
CC
EE
DD
SONATAHYUNDAI