2018 Hyundai Sonata fuse
[x] Cancel search: fusePage 15 of 522

1-4
Your vehicle at a glance
I
IN
N T
TE
ER
R I
IO
O R
R
O
O V
VE
ER
R V
V I
IE
E W
W
1. Door lock/unlock button ....................3-15
2. Driver position memory system ........3-20
3. Side view mirrors control switch ........3-40
4. Central door lock switch ....................3-16
5. Power window switches ....................3-45
6. Power window lock switch ................3-47
7. Hood release lever ............................3-52
8. Instrument panel illumination
control switch ....................................3-65
9. Blind spot detection system button* ....5-90
10. Lane keeping assist system button* ................................................5-75
11. Fuel filler door opener button ..........3-59
12. Trunk release button ........................3-54
13. ESC OFF button ..............................5-43
14. Fuse box ..........................................7-56
15. Steering wheel ................................3-22
16. Steering wheel tilt/telescope lever ......3-23
17. Seat ..................................................2-4
18. Brake pedal ....................................5-28
19. Accelerator pedal
* : if equipped
OLF017003NThe actual shape may differ from the illustration.
Page 17 of 522

1-6
Your vehicle at a glance
E
EN
N G
GI
IN
N E
E
C
C O
O M
M P
PA
A R
RT
TM
M E
EN
N T
T
1. Engine coolant reservoir ...................7-26
2. Radiator cap .....................................7-27
3. Brake fluid reservoir ..........................7-29
4. Air cleaner.........................................7-31
5. Engine oil dipstick .............................7-23
6. Engine oil filler cap ...........................7-24
7. Windshield washer fluid reservoir .....7-30
8. Fuse box ...........................................7-57
9. Battery ..............................................7-37
OLF017006N
The actual engine room in the vehicle may differ from the illustration.
Page 132 of 522

3-47
Convenient features of your vehicle
3
Information
The automatic reverse feature is only
active when the "Auto Up" feature is
used by fully pulling up the switch to
the second detent.
Do not install any accessories on
the windows. The automatic
reverse feature may not operate.
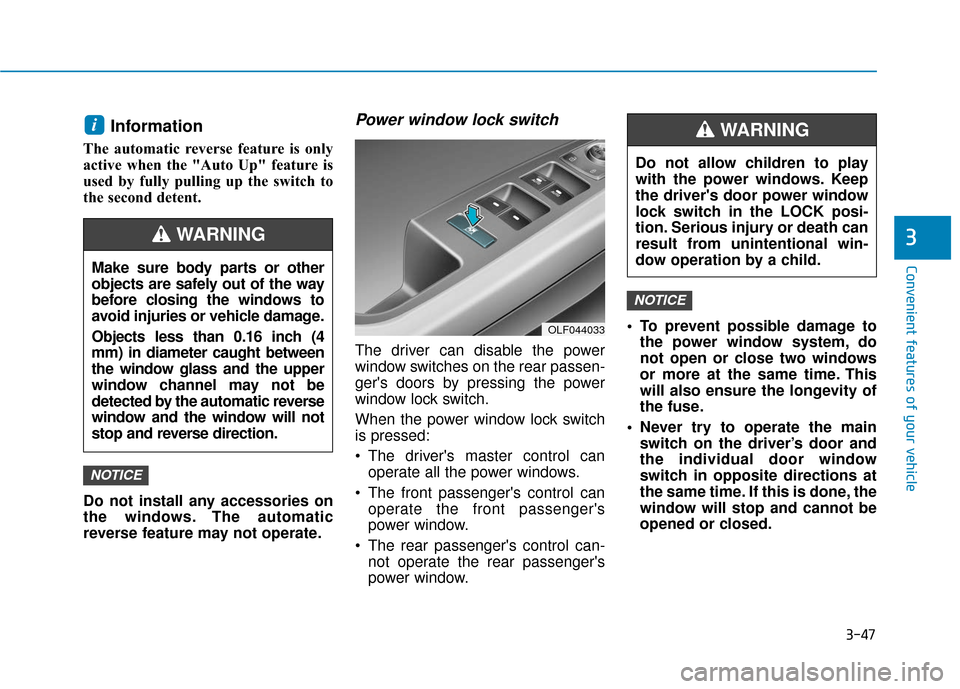
Power window lock switch
The driver can disable the power
window switches on the rear passen-
ger's doors by pressing the power
window lock switch.
When the power window lock switch
is pressed:
The driver's master control canoperate all the power windows.
The front passenger's control can operate the front passenger's
power window.
The rear passenger's control can- not operate the rear passenger's
power window. To prevent possible damage to
the power window system, do
not open or close two windows
or more at the same time. This
will also ensure the longevity of
the fuse.
Never try to operate the main switch on the driver’s door and
the individual door window
switch in opposite directions at
the same time. If this is done, the
window will stop and cannot be
opened or closed.
NOTICE
NOTICE
i
OLF044033
Do not allow children to play
with the power windows. Keep
the driver's door power window
lock switch in the LOCK posi-
tion. Serious injury or death can
result from unintentional win-
dow operation by a child.
WARNING
Make sure body parts or other
objects are safely out of the way
before closing the windows to
avoid injuries or vehicle damage.
Objects less than 0.16 inch (4
mm) in diameter caught between
the window glass and the upper
window channel may not be
detected by the automatic reverse
window and the window will not
stop and reverse direction.
WARNING
Page 136 of 522

3-51
Convenient features of your vehicle
Resetting the sunroof
Sunroof needs to be reset if the fol-
lowing occurs :
- Battery is discharged or discon-nected or the related fuse has
been replaced or disconnected
- The one-touch sliding function of the sunroof does not normally
operate
Reset procedure :
1. Place the ignition switch to the ON position or start the engine. It is
recommended to reset the sun-
roof while the engine is running.
2. Push the control lever forward. The sunroof will close completely
or tilt depending on the condition
of the sunroof.
3. Release the control lever until the sunroof does not move. 4. Push the control lever forward
about 10 seconds.
- When the sunroof is in the close position :
The glass will tilt and slightly move up and down.
- When the sunroof is in the tilt position:
The glass will slightly move up and down.
Do not release the lever until the
operation is completed.
If you release the lever during opera-
tion, start the procedure again from
step 2. 5. Within 3 seconds, push the control
lever forward until the sunroof
operates as follows:
Tilt down → Slide Open → Slide
Close.
Do not release the lever until the
operation is completed.
If you release the lever during opera-
tion, start the procedure again from
step 2.
6. Release the sunroof control lever after all steps have completed.
(The sunroof system has been
reset.)
Information
• If the sunroof is not reset when thevehicle battery is disconnected or
discharged, or the sunroof fuse is
blown, the sunroof may not operate
normally.
• For more detailed information, we recommend that you contact an
authorized HYUNDAI dealer.
i
3
Page 164 of 522

3-79
Convenient features of your vehicle
If the service interval is activated and
the time and distance is adjusted,
messages are displayed in the fol-
lowing situations each time the vehi-
cle is turned on.
- Service in: Displayed to inform the driver theremaining mileage and days to
service.
- Service required : Displayed when the mileage anddays to service has been reached
or passed.
Information
If any of the following conditions
occur, the mileage and number of days
to service may be incorrect.
- The battery cable is disconnected.
- The fuse switch is turned off.
- The battery is discharged. 7. Other Features
Fuel Economy Auto Reset
- Off: The average fuel economy will
not reset automatically whenever
refueling.
- After Ignition: The average fuel economy will reset automatically
whenever it has passed 4 hours
after turning OFF the engine.
- After recharging: The average fuel economy will reset automatically
when refueling.
For more information, refer to
"Trip Computer" in this chapter.
Fuel Economy Unit
To select the fuel economy unit.
(km/L, L/100, MPG)
Temperature Unit
To select the temperature unit.
(°C,°F)
Tire Pressure Unit
To select the tire pressure unit.
(psi, kPa, bar) 8. Reset
You can reset the menus in the User
Settings Mode. All menus in the User
Settings Mode are initialized, except
language and service interval.
i
3
Page 166 of 522

3-81
Convenient features of your vehicle
Press START button again (for smart key system)
This warning message illuminates
if you can not operate the Engine
Start/Stop button when there is a
problem with the Engine Start/Stop
button system.
It means that you could start the engine by pressing the Engine
Start/Stop button once more.
If the warning illuminates each time you press the Engine Start/
Stop button, we recommend that
you have the vehicle inspected by
an authorized HYUNDAI dealer.
Press START button with key(for smart key system)
This warning message illuminates
if you press the Engine Start/Stop
button while the warning message
"Key not detected" is illuminating.
At this time, the immobilizer indica- tor light blinks.
Check BRAKE SWITCH fuse (for smart key system and auto-matic transaxle)
This warning message illuminates
if the brake switch fuse is discon-
nected.
It means that you should replace the fuse with a new one. If that is
not possible, you can start the
engine by pressing the Engine
Start/Stop button for 10 seconds in
the ACC position.
Shift to P or N to start engine(for smart key system and auto-matic transaxle)
This warning message illuminates
if you try to start the engine with
the shift lever not in the P (Park) or
N (Neutral) position.
Information
You can start the engine with the shift
lever in the N (Neutral) position. But,
for your safety, we recommend that
you start the engine with the shift
lever in the P (Park) position.
Door, Hood, Trunk Open
It means that any door, hood, or
trunk is open.
i
3
OLF047584
Before driving the vehicle, you
should confirm that the door/
hood/trunk is fully closed.
Also, check there is no door/
hood/trunk open warning light
or message displayed on the
instrument cluster.
CAUTION
Page 167 of 522

3-82
Sunroof Open (if equipped)
This warning message illuminates if
you turn off the engine when the sun-
roof is open.
Turn on FUSE SWITCH
This warning message illuminatesif the fuse switch located on the
fuse box under the steering wheel
is OFF.
It means that you should turn the fuse switch on.
For more details, refer to "Fuses"
in chapter 7.
Low Tire Pressure
This warning message illuminates if
the tire pressure is low with the igni-
tion switch or the Engine/Start Button
in ON position.
For more information, refer to
"Tire Pressure Monitoring System
(TPMS)" in chapter 6.
Low Washer Fluid
This warning message illuminates if the washer fluid level in the reser-
voir is nearly empty.
It means that you should refill the washer fluid.
Low Fuel
This warning message illuminatesif the fuel tank is nearly empty.
- When the low fuel level warninglight is illuminates.
- When the trip computer displays "--- mile (or km)" as distance to
empty.
Add fuel as soon as possible.
Engine has overheated
This warning message illuminates when the engine coolant tempera-
ture is above 248°F (120°C). This
means that the engine is overheat-
ed and may be damaged.
If your vehicle is overheated, refer
to "Overheating" in chapter 6.
Convenient features of your vehicle
OLF047696
Page 240 of 522

3-155
Convenient features of your vehicle
3
(Continued)
Push the plug in as far as it willgo. If good contact is not made,
the plug may overheat and the
fuse may open.
Plug in battery equipped electri- cal/electronic devices with
reverse current protection. The
current from the battery may
flow into the vehicle’s electri-
cal/electronic system and cause
system malfunction.Clock
With AVN system (if equipped)
You can set the clock by using the
Navigation system.
GPS Time check
The clock is automatically updated
through the navigation system.
GPS Time non-check
The clock can be manually adjusted.
1. Select the "System Settings" on the "INFO/Setup" screen.
2. Select the "Date/Time".
3. Select the "Set time" by rotating the controller on the center con-
sole panel.
4. Select the "Time Format" to the 12 hour or 24 hour format.
For more information, please refer to
the manual that was separately sup-
plied with your vehicle.
Do not adjust the clock while
driving, you may lose your
steering control and cause an
accident that results in severe
personal injury or death.
WARNING
OLF047238L