2018 Hyundai Sonata Maintenance 7-7
[x] Cancel search: Maintenance 7-7Page 411 of 522

7
Maintenance
7
Maintenance
Engine Compartment ............................................7-3
Maintenance Services ...........................................7-6
Owner's Responsibility .....................................................7-6
Owner Maintenance Precautions..................................7-6
Owner Maintenance ..............................................7-7
Owner Maintenance Schedule .......................................7-8
Scheduled Maintenance Services........................7-9
Normal Maintenance Schedule
(Gamma 1.6 T-GDI/Theta 2.0 T-GDI)..........................7-10
Maintenance Under Severe Usage Conditions
(Gamma 1.6 T-GDI/Theta 2.0 T-GDI)..........................7-13
Normal Maintenance Schedule (Theta 2.4 GDI) ......7-15
Maintenance Under Severe Usage Conditions
(Theta 2.4 GDI) .................................................................7-18
Explanation of Scheduled Maintenance Items ..7-20
Engine Oil and Filter.......................................................7-20
Drive Belts........................................................................\
.7-20
Fuel Filter ........................................................................\
..7-20
Fuel Lines, Fuel Hoses and Connections ..................7-20
Vapor Hose and Fuel Filler Cap ...................................7-20
Air Cleaner Filter .............................................................7-20
Spark Plugs .......................................................................7\
-20
Valve Clearance ...............................................................7-21
Cooling System ................................................................7-21
Engine Coolant .................................................................7-21 Automatic Transmission Fluid ......................................7-21
Ecoshift Dual Clutch Transmission Fluid ...................7-21
Brake hoses and Lines ..................................................7-22
Brake Fluid ........................................................................\
7-22
Parking Brake...................................................................7-22
Brake Discs, Pads, Calipers and Rotors .....................7-22
Exhaust Pipe and Muffler.............................................7-22
Suspension Mounting Bolts ..........................................7-22
Steering Gear Box, Linkage &
Boots/Lower Arm Ball Joint .........................................7-22
Drive Shafts and Boots .................................................7-22
Air Conditioning Refrigerant ........................................7-22
Engine Oil ..............................................................7-23
Checking the Engine Oil Level .....................................7-23
Checking the Engine Oil and Filter .............................7-25
Engine Coolant .....................................................7-26
Checking the Engine Coolant Level ............................7-26
Changing Engine Coolant ..............................................7-28
Brake Fluid ............................................................7-29
Checking the Brake Fluid Level ...................................7-29
Washer Fluid .........................................................7-30
Checking the Washer Fluid Level................................7-30
Parking Brake .......................................................7-30
Checking the Parking Brake .........................................7-30
7
Page 412 of 522

7
Air Cleaner ............................................................7-31
Filter Replacement ..........................................................7-31
Climate Control Air Filter ....................................7-33
Filter Inspection ...............................................................7-33
Wiper Blades.........................................................7-35
Blade Inspection ..............................................................7-35
Blade Replacement .........................................................7-35
Battery...................................................................7-37
For Best Battery Service ..............................................7-38
Battery Recharging ........................................................7-38
Reset features .................................................................7-39
Tires and Wheels .................................................7-40
Tire Care ........................................................................\
....7-40
Recommended Cold Tire Inflation Pressures ...........7-41
Check Tire Inflation Pressure ......................................7-42
Tire Rotation...................................................................\
..7-43
Wheel Alignment and Tire Balance ............................7-44
Tire Replacement ............................................................7-44
Wheel Replacement ........................................................7-45
Tire Traction .....................................................................7-4\
5
Tire Maintenance ............................................................7-46
Tire Sidewall Labeling ....................................................7-46
Tire Terminology and Definitions................................7-50
All Season Tires ...............................................................7-53Summer Tires ...................................................................7-53
Snow Tires ........................................................................\
7-53
Radial-Ply Tires ...............................................................7-54
Low Aspect Ratio Tires..................................................7-54
Fuses ......................................................................7-\
56
Instrument Panel Fuse Replacement..........................7-57
Engine Compartment Panel Fuse Replacement.......7-58
Fuse/Relay Panel Description ......................................7-60
Light Bulbs ............................................................7-68
Headlamp, Position Lamp, Turn Signal Lamp and
Side Marker Light Bulb Replacement ........................7-69
Side Repeater Lamp Replacement ..............................7-72
Rear Combination Light Bulb Replacement ..............7-72
High Mounted Stop Lamp .............................................7-74
License Plate Light Bulb Replacement ......................7-75
Interior Light Bulb Replacement .................................7-75
Appearance Care..................................................7-77
Exterior Care ....................................................................7-77\
Interior Care .....................................................................7-8\
2
Emission Control System ....................................7-85
Crankcase Emission Control System ..........................7-85
Evaporative Emission Control System Including
Onboard Refueling Vapor Recovery (ORVR)............7-85
Exhaust Emission Control System ..............................7-86
California Perchlorate Notice.............................7-89
Page 417 of 522
7-7
7
Maintenance
O
OW
W N
NE
ER
R
M
M A
AI
IN
N T
TE
EN
N A
AN
N C
CE
E
The following lists are vehicle checks
and inspections that should be per-
formed by the owner or an author-
ized HYUNDAI dealer at the frequen-
cies indicated to help ensure safe,
dependable operation of your vehi-
cle.
Any adverse conditions should be
brought to the attention of your deal-
er as soon as possible.
These Owner Maintenance vehicle
checks are generally not covered by
warranties and you may be charged
for labor, parts and lubricants used.
Performing maintenance work
on a vehicle can be dangerous.
If you lack sufficient knowledge
and experience or the proper
tools and equipment to do the
work, have it done by an author-
ized HYUNDAI dealer. ALWAYS
follow these precautions for
performing maintenance work:
Park your vehicle on level
ground, move the shift lever
into the P (Park, for automatic
transmission vehicle) posi-
tion, apply the parking brake,
place the ignition switch in
the LOCK/OFF position.
Block the tires (front and back)
to prevent the vehicle from
moving.
Remove loose clothing or jew-
elry that can become entan-
gled in moving parts.
(Continued)
WARNING (Continued)
If you must run the engine
during maintenance, do so
out doors or in an area with
plenty of ventilation.
Keep flames, sparks, or smok-
ing materials away from the
battery and fuel-related parts.
Page 480 of 522

7-70
Maintenance
Always handle them carefully, and avoid scratches and abrasions. If
the bulbs are lit, avoid contact with
liquids.
Never touch the glass with bare hands. Residual oil may cause the
bulb to overheat and burst when lit.
A bulb should be operated only when installed in a headlamp.
If a bulb becomes damaged or cracked, replace it immediately
and carefully dispose of it.
1. Open the hood.
2. Disconnect the negative batterycable.
3. Remove the headlamp bulb cover by turning it counterclockwise.
4. Disconnect the headlamp bulb socket-connector. 5. Unsnap the headlamp bulb retain-
ing wire by pressing the end and
pushing it upward.
6. Remove the bulb from the head- lamp assembly.
7. Install a new headlamp bulb and snap the headlamp bulb retaining
wire into position by aligning the
wire with the groove on the bulb.
8. Connect the headlamp bulb sock- et-connector.
9. Install the headlamp bulb cover by turning it clockwise.
Information
The headlamp aiming should be
adjusted after an accident or after the
headlamp assembly is reinstalled at an
authorized HYUNDAI dealer.
Headlamp (LED type)
If the light bulb does not operate, we
recommend that the system be
checked by an authorized HYUNDAI
dealer.
i
OLF077070
OLF077069
■Low beam
■High beam
Page 481 of 522

7-71
7
Maintenance
Turn signal lamp
1. Open the hood.
2. Disconnect the negative batterycable.
3. Remove the socket from the assembly by turning the socket
counterclockwise until the tabs on
the socket align with the slots on
the assembly.
4. Remove the bulb from the socket by pressing it in and rotating it
counterclockwise until the tabs on
the bulb align with the slots in the
socket. Pull the bulb out of the
socket. 5. Insert a new bulb by inserting it
into the socket and rotating it until
it locks into place.
6. Install the socket in the assembly by aligning the tabs on the socket
with the slots in the assembly.
7. Push the socket into the assembly and turn the socket clockwise.
Side marker
1. Open the hood.
2. Disconnect the negative batterycable.
3. Remove the socket from the assembly by turning the socket
counterclockwise until the tabs on
the socket align with the slots on
the assembly.
4. Remove the bulb from the socket by pulling out the bulb.
5. Insert a new bulb.
OLF077074OLF077052N
Page 482 of 522

7-72
Maintenance
Daytime running lamp/
Position lamp
If the LED lamp does not operate,
have the vehicle checked by an
authorized HYUNDAI dealer.
Side Repeater Lamp
Replacement
If the LED lamp does not operate,
have the vehicle checked by an
authorized HYUNDAI dealer.
Rear Combination Light Bulb
Replacement
(1) Stop/Tail lamp
(2) Turn signal lamp
(3) Tail lamp
(4) Back-up lamp
(5) Rear side marker (LED) (if equipped)
OLF077053OLF077060
Page 483 of 522
7-73
7
Maintenance
Stop/Tail lamp and Turn signal
lamp (Bulb type)
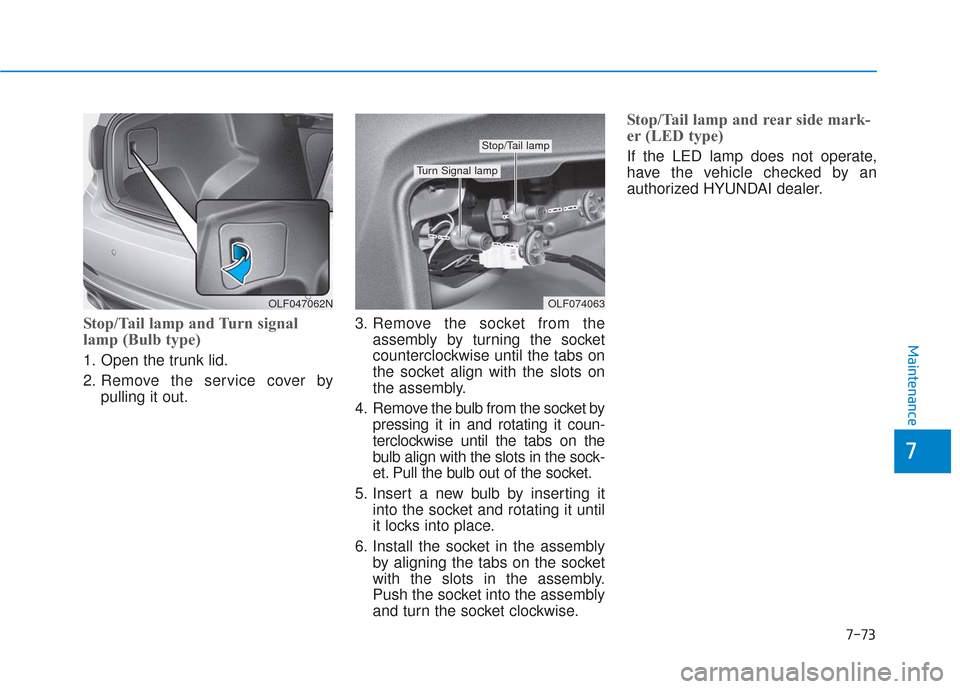
1. Open the trunk lid.
2. Remove the service cover bypulling it out. 3. Remove the socket from the
assembly by turning the socket
counterclockwise until the tabs on
the socket align with the slots on
the assembly.
4. Remove the bulb from the socket by pressing it in and rotating it coun-
terclockwise until the tabs on the
bulb align with the slots in the sock-
et. Pull the bulb out of the socket.
5. Insert a new bulb by inserting it into the socket and rotating it until
it locks into place.
6. Install the socket in the assembly by aligning the tabs on the socket
with the slots in the assembly.
Push the socket into the assembly
and turn the socket clockwise.
Stop/Tail lamp and rear side mark-
er (LED type)
If the LED lamp does not operate,
have the vehicle checked by an
authorized HYUNDAI dealer.
OLF074063
Stop/Tail lamp
Turn Signal lamp
OLF047062N
Page 484 of 522

7-74
Maintenance
Backup lamp and Tail lamp
1. Open the trunk.
2. Loosen the retaining screw of thetrunk lid cover and then remove
the cover.
3. Disconnect the connector and then remove the screws by turning
the screws counterclockwise. 4. Remove the bulb by pulling it
straight out.
5. Insert a new bulb by inserting it into the socket and rotating it until
it locks into place.
6. Install the socket into the assem- bly by aligning the tabs on the
socket with the slots in the assem-
bly. Push the socket into the
assembly and turn the socket
clockwise.
7. Reinstall the trunk lid cover by pushing in the screw.
High Mounted Stop Lamp
1. Remove the rear seat cushionassembly.
2. Remove the rear seat back assembly.
3. Slightly remove the rear door weather-strip.
4. Remove the rear door scuff trim.
5. Remove the rear pillar trim.
6. Remove the rear seat belt lower anchor.
OLF077065OLF077064N
OLF077055