2018 Hyundai Sonata inflation pressure
[x] Cancel search: inflation pressurePage 399 of 522

6-28
9. Switch off the compressor.
10. Detach the hoses from thesealant bottle connector and
from the tire valve.
Return the Tire Mobility Kit to its stor-
age location in the vehicle.
Distributing the sealant
11. Immediately drive approximately 4~6 miles (7~10 km or about 10
minutes) to evenly distribute the
sealant in the tire.
Do not exceed a speed of 50 mph
(80 km/h). If possible, do not fall
below a speed of 12 mph (20 km/h).
While driving, if you experience any
unusual vibration, ride disturbance or
noise, reduce your speed and drive
with caution until you can safely pull
off of the side of the road.
Call for road side service or towing.
When you use the Tire Mobility Kit,
the tire pressure sensors and wheel
may be damaged by sealant, have it
inspected at an authorized dealer. Checking the tire inflation pres-
sure
1. After driving approximately
4~6 miles (7~10 km or about
10 minutes), stop at a safe loca-
tion.
2. Connect hose (9) of the compres- sor directly to the tire valve.
3. Plug the compressor power cord into the vehicle power outlet.
What to do in an emergency
OLF067020
Do not attempt to drive your
vehicle if the tire pressure is
below 29 psi (200 kpa). This
could result in an accident due
to sudden tire failure.
CAUTION
Do not leave your vehicle run-
ning in a poorly ventilated area
for extended periods of time.
Carbon monoxide poisoning
and suffocation can occur.
WARNING
Page 400 of 522

6-29
What to do in an emergency
4. Adjust the tire inflation pressure tothe recommended tire inflation.
With the ignition switched on, pro- ceed as follows.
- To increase the inflation pres- sure:
Switch on the compressor, posi-
tion to [I]. To check the current
inflation pressure setting, briefly
switch off the compressor.
- To reduce the inflation pres- sure:
Loosen the screw cap (8) on the
compressor hose.
Information
The pressure gauge may show higher
than actual reading when the com-
pressor is running. To get an accurate
tire pressure, the compressor needs to
be turned off.
With tire mobility kit
(if equipped) - Type B
For safe operation, carefully read
and follow the instructions in this
manual before use.
(1) Compressor
(2) Sealant bottle
The Tire Mobility Kit is a temporary
fix to the tire and we recommend that
the system be inspected by an
authorized HYUNDAI dealer.
i6
When you use the Tire Mobility
Kit including sealant not
approved by HYUNDAI, the tire
pressure sensors may be dam-
aged by sealant. The sealant on
the tire pressure sensor and
wheel should be removed when
you replace the tire with a new
one and inspect the tire pres-
sure sensors at an authorized
dealer.
CAUTION
OLF067014
Page 403 of 522

6-32
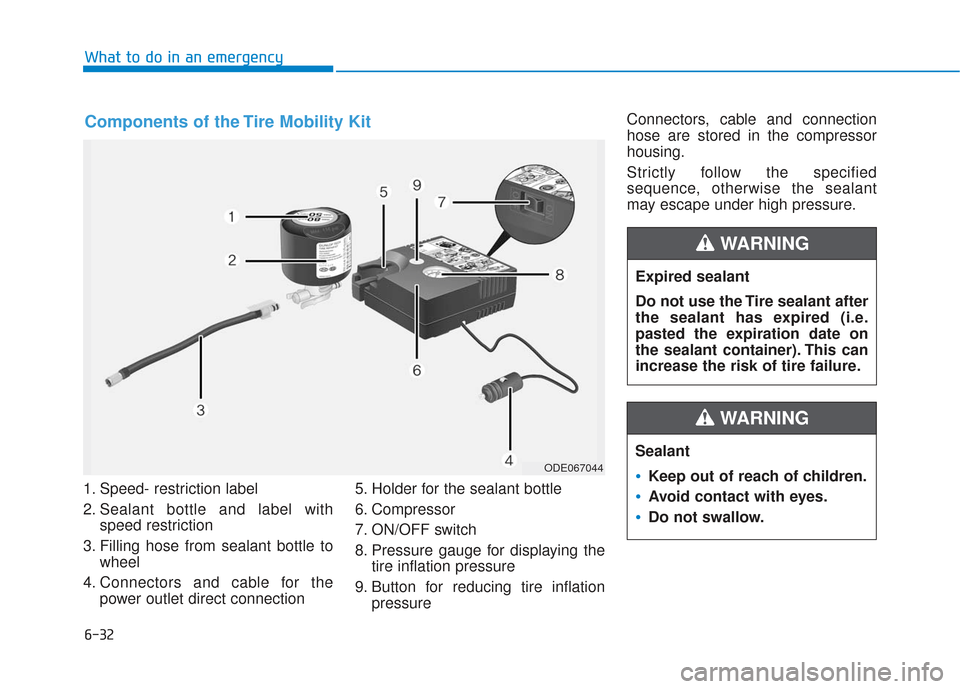
1. Speed- restriction label
2. Sealant bottle and label withspeed restriction
3. Filling hose from sealant bottle to wheel
4. Connectors and cable for the power outlet direct connection 5. Holder for the sealant bottle
6. Compressor
7. ON/OFF switch
8. Pressure gauge for displaying the
tire inflation pressure
9. Button for reducing tire inflation pressure Connectors, cable and connection
hose are stored in the compressor
housing.
Strictly follow the specified
sequence, otherwise the sealant
may escape under high pressure.
What to do in an emergency
ODE067044
Expired sealant
Do not use the Tire sealant after
the sealant has expired (i.e.
pasted the expiration date on
the sealant container). This can
increase the risk of tire failure.
WARNING
Sealant
Keep out of reach of children.
Avoid contact with eyes.
Do not swallow.
WARNING
Components of the Tire Mobility Kit
Page 405 of 522

6-34
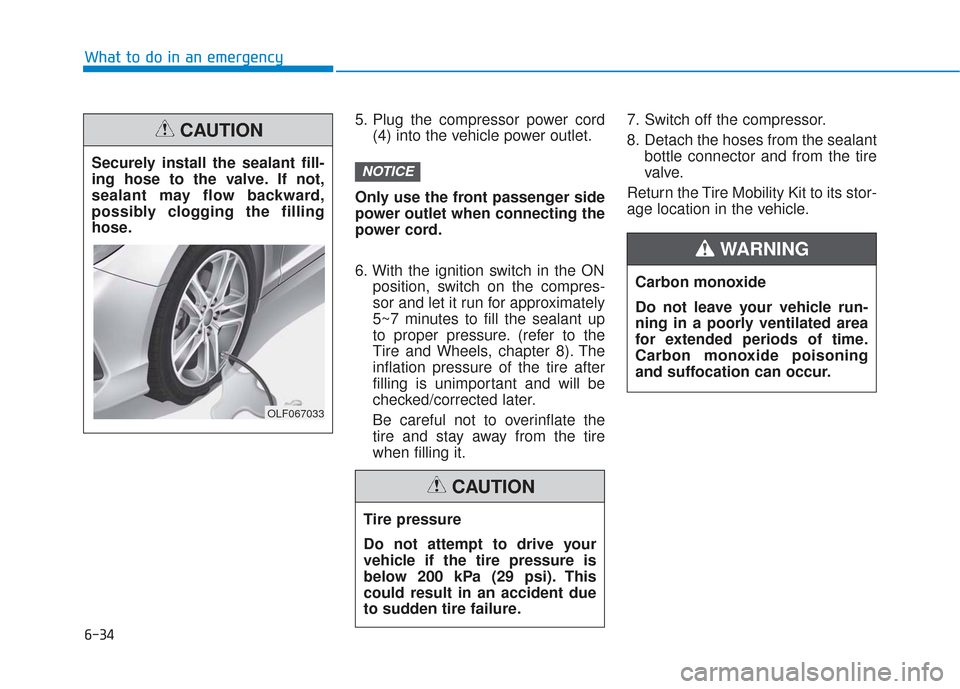
5. Plug the compressor power cord(4) into the vehicle power outlet.
Only use the front passenger side
power outlet when connecting the
power cord.
6. With the ignition switch in the ON position, switch on the compres-
sor and let it run for approximately
5~7 minutes to fill the sealant up
to proper pressure. (refer to the
Tire and Wheels, chapter 8). The
inflation pressure of the tire after
filling is unimportant and will be
checked/corrected later.
Be careful not to overinflate the
tire and stay away from the tire
when filling it. 7. Switch off the compressor.
8. Detach the hoses from the sealant
bottle connector and from the tire
valve.
Return the Tire Mobility Kit to its stor-
age location in the vehicle.
NOTICE
What to do in an emergency
Securely install the sealant fill-
ing hose to the valve. If not,
sealant may flow backward,
possibly clogging the filling
hose.
CAUTION
OLF067033
Tire pressure
Do not attempt to drive your
vehicle if the tire pressure is
below 200 kPa (29 psi). This
could result in an accident due
to sudden tire failure.
CAUTION
Carbon monoxide
Do not leave your vehicle run-
ning in a poorly ventilated area
for extended periods of time.
Carbon monoxide poisoning
and suffocation can occur.
WARNING
Page 406 of 522

6-35
What to do in an emergency
Distributing the sealant
9. Immediately drive approximately7~10 km (4~6 miles or, about
10min) to evenly distribute the
sealant in the tire. Do not exceed a speed of 80 km/h
(50 mph). If possible, do not fall
below a speed of 20 km/h (12 mph).
While driving, if you experience any
unusual vibration, ride disturbance or
noise, reduce your speed and drive
with caution until you can safely pull
off of the side of the road.
Call for road side service or towing.
When you use the Tire Mobility Kit,
the tire pressure sensors and wheel
may be damaged by sealant, remove
the sealant stained with tire pressure
sensors and wheel and inspect in
authorized dealer.
Checking the tire inflation
pressure
1. After driving approximately 7~10
km (4~6 miles or about 10 min),
stop at a safety location.
2. Connect the filling hose (3) of the compressor directly to the tire
valve.
6
OLMF064106OIGH067043
OLF067035
Page 407 of 522

6-36
3. Plug the compressor power cordinto the vehicle power outlet.
4. Adjust the tire inflation pressure to the recomended tire inflation.
With the ignition swithched on, proceed as follows.
- To increase the inflation pres- sure : Switch on the compres-
sor. To check the current inflation
pressure setting, briefly switch
off the compressor.
- To reduce the inflation pres- sure: Press the button (8) on the
compressor.
Do not let the compressor run for
more than 10 minutes, otherwise
the device will overheat and may
be damaged.
Information
The pressure gauge may show higher
than actual reading when the com-
pressor is running. To get an accurate
tire reading, the compressor needs to
be turned off.
i
NOTICE
What to do in an emergency
The tire inflation pressure must
be at least 220 kPa (32 psi). If it
is not, do not continue driving.
Call for road side service or
towing.
WARNING
If the inflation pressure is not
maintained, drive the vehicle a
second time, refer to
Distributing the sealant. Then
repeat steps 1 to 4.
Use of the TMK may be ineffec-
tual for tire damage larger than
approximately 4 mm (0.16 in).
We recommend that you con-
tact an authorized HYUNDAI
dealer if the tire cannot be made
roadworthy with the Tire
Mobility Kit.
CAUTION
Tire pressure sensor
The sealant on the tire pressure
sensor and wheel should be
removed when you replace the
tire with a new one and inspect
the tire pressure sensors at an
authorized dealer.
When reinstalling the repaired
or replaced tire and wheel on
the vehicle, tighten the wheel
lug nut to 11~13 kgf·m (79~94
lbf·ft).
CAUTION
Page 412 of 522

7
Air Cleaner ............................................................7-31
Filter Replacement ..........................................................7-31
Climate Control Air Filter ....................................7-33
Filter Inspection ...............................................................7-33
Wiper Blades.........................................................7-35
Blade Inspection ..............................................................7-35
Blade Replacement .........................................................7-35
Battery...................................................................7-37
For Best Battery Service ..............................................7-38
Battery Recharging ........................................................7-38
Reset features .................................................................7-39
Tires and Wheels .................................................7-40
Tire Care ........................................................................\
....7-40
Recommended Cold Tire Inflation Pressures ...........7-41
Check Tire Inflation Pressure ......................................7-42
Tire Rotation...................................................................\
..7-43
Wheel Alignment and Tire Balance ............................7-44
Tire Replacement ............................................................7-44
Wheel Replacement ........................................................7-45
Tire Traction .....................................................................7-4\
5
Tire Maintenance ............................................................7-46
Tire Sidewall Labeling ....................................................7-46
Tire Terminology and Definitions................................7-50
All Season Tires ...............................................................7-53Summer Tires ...................................................................7-53
Snow Tires ........................................................................\
7-53
Radial-Ply Tires ...............................................................7-54
Low Aspect Ratio Tires..................................................7-54
Fuses ......................................................................7-\
56
Instrument Panel Fuse Replacement..........................7-57
Engine Compartment Panel Fuse Replacement.......7-58
Fuse/Relay Panel Description ......................................7-60
Light Bulbs ............................................................7-68
Headlamp, Position Lamp, Turn Signal Lamp and
Side Marker Light Bulb Replacement ........................7-69
Side Repeater Lamp Replacement ..............................7-72
Rear Combination Light Bulb Replacement ..............7-72
High Mounted Stop Lamp .............................................7-74
License Plate Light Bulb Replacement ......................7-75
Interior Light Bulb Replacement .................................7-75
Appearance Care..................................................7-77
Exterior Care ....................................................................7-77\
Interior Care .....................................................................7-8\
2
Emission Control System ....................................7-85
Crankcase Emission Control System ..........................7-85
Evaporative Emission Control System Including
Onboard Refueling Vapor Recovery (ORVR)............7-85
Exhaust Emission Control System ..............................7-86
California Perchlorate Notice.............................7-89
Page 418 of 522

7-8
Maintenance
Owner Maintenance Schedule
When you stop for fuel:
Check the engine oil level.
Check coolant level in the enginecoolant reservoir.
Check the windshield washer fluid level.
Check for low or under-inflated tires.
While operating your vehicle:
Note any changes in the sound ofthe exhaust or any smell of
exhaust fumes in the vehicle.
Check for vibrations in the steering wheel. Notice if there is any
increased steering effort or loose-
ness in the steering wheel, or
change in its straight-ahead posi-
tion.
Notice if your vehicle constantly turns slightly or "pulls" to one side
when traveling on smooth, level
road.
When stopping, listen and check for unusual sounds, pulling to one
side, increased brake pedal travel
or "hard-to-push" brake pedal.
If any slipping or changes in the operation of your transmission
occurs, check the transmission
fluid level.
Check the automatic transmission /ecoshift dual clutch transmission
P (Park) function.
Check the parking brake.
Check for fluid leaks under your vehicle (water dripping from the air
conditioning system during or after
use is normal).
At least monthly:
Check coolant level in the enginecoolant reservoir.
Check the operation of all exterior lights, including the stoplights, turn
signals and hazard warning flashers.
Check the inflation pressures of all tires including the spare for tires
that are worn, show uneven wear,
or are damaged.
Check for loose wheel lug nuts.
Be careful when checking your
engine coolant level when the
engine is hot. This may result in
coolant being blown out of the
opening and cause serious
burns and other injuries.
WARNING