Page 288 of 522

5-38
Driving your vehicle
To release:
Press the accelerator pedal with the
shift lever in D (Drive) or Manual shift
mode, the Auto Hold will be released
automatically and the vehicle will
start to move. The indicator changes
from green to white.
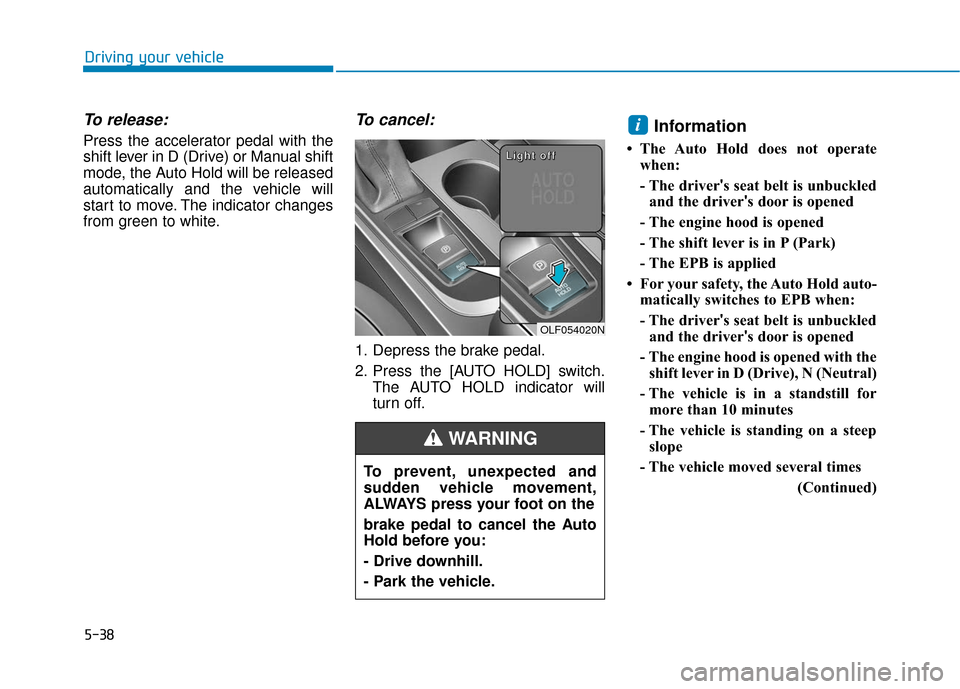
To cancel:
1. Depress the brake pedal.
2. Press the [AUTO HOLD] switch.The AUTO HOLD indicator will
turn off.
Information
• The Auto Hold does not operatewhen:
- The driver 's seat belt is unbuckled
and the driver's door is opened
- The engine hood is opened
- The shift lever is in P (Park)
- The EPB is applied
• For your safety, the Auto Hold auto- matically switches to EPB when:
- The driver 's seat belt is unbuckled
and the driver's door is opened
- The engine hood is opened with the shift lever in D (Drive), N (Neutral)
- The vehicle is in a standstill for more than 10 minutes
- The vehicle is standing on a steep slope
- The vehicle moved several times (Continued)
i
To prevent, unexpected and
sudden vehicle movement,
ALWAYS press your foot on the
brake pedal to cancel the Auto
Hold before you:
- Drive downhill.
- Park the vehicle.
WARNING
OLF054020N
L
L
L
L
i
i
i
i
g
g
g
g
h
h
h
h
t
t
t
t
o
o
o
o
f
f
f
f
f
f
f
f
Page 378 of 522

6-7
What to do in an emergency
6
If your temperature gauge indicates
overheating, you experience a loss
of power, or hear loud pinging or
knocking, the engine may be over-
heating. If this happens, you should:
1. Pull off the road and stop as soonas it is safe to do so.
2. Place the shift lever in P (Park) and set the parking brake. If the air
conditioning is ON, turn it OFF.
3. If engine coolant is running out under the vehicle or steam is com-
ing out from the hood, stop the
engine. Do not open the hood until
the coolant has stopped running
or the steaming has stopped. If
there is no visible loss of engine
coolant and no steam, leave the
engine running and check to be
sure the engine cooling fan is
operating. If the fan is not running,
turn the engine off. 4. Check for coolant leaking from the
radiator, hoses or under the vehi-
cle. (If the air conditioning had
been in use, it is normal for cold
water to be draining from it when
you stop.)
5. If engine coolant is leaking out, stop the engine immediately and
call the nearest authorized
HYUNDAI dealer for assistance.
I IF
F
T
T H
H E
E
E
E N
N G
GI
IN
N E
E
O
O V
VE
ER
R H
H E
EA
A T
TS
S
While the engine is
running, keep hands,
clothing and tools
away from the mov-
ing parts such as the
cooling fan and drive
belt to prevent seri-
ous injury.
WARNING
Page 480 of 522

7-70
Maintenance
Always handle them carefully, and avoid scratches and abrasions. If
the bulbs are lit, avoid contact with
liquids.
Never touch the glass with bare hands. Residual oil may cause the
bulb to overheat and burst when lit.
A bulb should be operated only when installed in a headlamp.
If a bulb becomes damaged or cracked, replace it immediately
and carefully dispose of it.
1. Open the hood.
2. Disconnect the negative batterycable.
3. Remove the headlamp bulb cover by turning it counterclockwise.
4. Disconnect the headlamp bulb socket-connector. 5. Unsnap the headlamp bulb retain-
ing wire by pressing the end and
pushing it upward.
6. Remove the bulb from the head- lamp assembly.
7. Install a new headlamp bulb and snap the headlamp bulb retaining
wire into position by aligning the
wire with the groove on the bulb.
8. Connect the headlamp bulb sock- et-connector.
9. Install the headlamp bulb cover by turning it clockwise.
Information
The headlamp aiming should be
adjusted after an accident or after the
headlamp assembly is reinstalled at an
authorized HYUNDAI dealer.
Headlamp (LED type)
If the light bulb does not operate, we
recommend that the system be
checked by an authorized HYUNDAI
dealer.
i
OLF077070
OLF077069
■Low beam
■High beam
Page 481 of 522

7-71
7
Maintenance
Turn signal lamp
1. Open the hood.
2. Disconnect the negative batterycable.
3. Remove the socket from the assembly by turning the socket
counterclockwise until the tabs on
the socket align with the slots on
the assembly.
4. Remove the bulb from the socket by pressing it in and rotating it
counterclockwise until the tabs on
the bulb align with the slots in the
socket. Pull the bulb out of the
socket. 5. Insert a new bulb by inserting it
into the socket and rotating it until
it locks into place.
6. Install the socket in the assembly by aligning the tabs on the socket
with the slots in the assembly.
7. Push the socket into the assembly and turn the socket clockwise.
Side marker
1. Open the hood.
2. Disconnect the negative batterycable.
3. Remove the socket from the assembly by turning the socket
counterclockwise until the tabs on
the socket align with the slots on
the assembly.
4. Remove the bulb from the socket by pulling out the bulb.
5. Insert a new bulb.
OLF077074OLF077052N