Page 141 of 570
Features of your vehicle
38
4
WARNING
For emergencies, be fully
aware of the location of the
emergency liftgate (tailgate)
safety release lever in this
vehicle and how to open the
liftgate (tailgate) if you are
accidentally locked in the lug-
gage compartment.
No one should be allowed to occupy the luggage compart-
ment of the vehicle at any
time. The luggage compart-
ment is a very dangerous
location in the event of a
crash.
Use the release lever for emergencies only. Use
extreme caution, especially
while the vehicle is in motion.
Page 143 of 570
Features of your vehicle
40
4
Power windows
The ignition switch must be in the ON
position for power windows to operate.
Each door has a power window
switch that controls that door's win-
dow. The driver has a power window
lock switch which can block the oper-
ation of passenger windows. The dri-
ver’s door has a master power win-
dow switch that controls all the win-
dows in the vehicle. The power win-
dows can be operated for approxi-
mately 30 seconds after the ignition
key is removed or turned to the ACC
or LOCK position. However, if the
front doors open, the power windows
cannot be operated within the 30
second period.
✽ ✽
NOTICE
• In cold and wet climates, power
windows may not work properly
due to freezing conditions.
• While driving with the rear win- dows down or with the sunroof (if
equipped) in an open (or partially
open) position, your vehicle may
demonstrate a wind buffeting or
pulsation noise. This noise is a
normal occurrence and can be
reduced or eliminated by taking
the following actions. If the noise
occurs with one or both of the
rear windows down, partially
lower both front windows
approximately one inch. If you
experience the noise with the sun-
roof open, slightly reduce the size
of the sunroof opening.
Window opening and closing
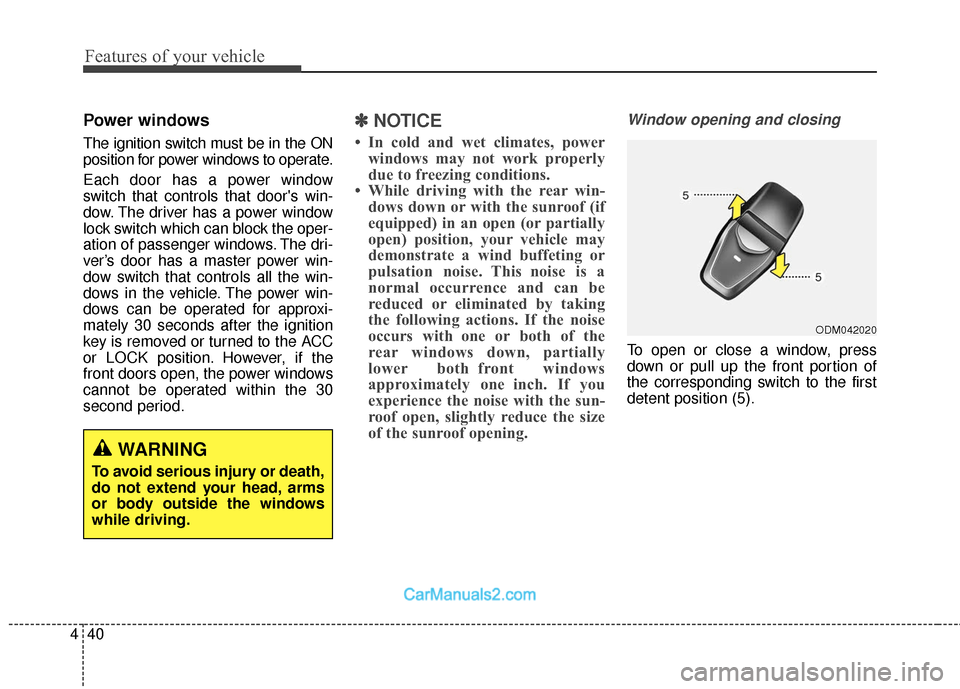
To open or close a window, press
down or pull up the front portion of
the corresponding switch to the first
detent position (5).
ODM042020
WARNING
To avoid serious injury or death,
do not extend your head, arms
or body outside the windows
while driving.
Page 151 of 570
Features of your vehicle
48
4
(Continued)
When refueling, always shut
the engine off. Sparks pro-
duced by electrical compo-
nents related to the engine
can ignite fuel vapors causing
a fire. Once refueling is com-
plete, check to make sure the
filler cap and filler door are
securely closed, before start-
ing the engine.
DO NOT use matches or a lighter and DO NOT SMOKE or
leave a lit cigarette in your
vehicle while at a gas station
especially during refueling.
Automotive fuel is highly
flammable and can, when
ignited, result in fire.
If a fire breaks out during refu- eling, leave the vicinity of the
vehicle, and immediately con-
tact the manager of the gas
station and then contact the
local fire department or 911.
Follow any safety instructions
they provide.(Continued)
When using an approvedportable fuel container, be sure
to place the container on the
ground prior to refueling. Static
electricity discharge from the
container can ignite fuel vapors
causing a fire. Once refueling
has begun, contact with the
vehicle should be maintained
until the filling is complete.
Use only approved portable
plastic fuel containers designed
to carry and store gasoline.
Do not use cellular phones while refueling. Electric cur-
rent and/or electronic interfer-
ence from cellular phones can
potentially ignite fuel vapors
causing a fire.
(Continued)CAUTION
Make sure to refuel your vehi-cle according to the "Fuelrequirements" suggested insection 1.
If the fuel filler cap requires replacement, use only a gen-uine HYUNDAI cap or theequivalent specified for yourvehicle. An incorrect fuel fillercap can result in a seriousmalfunction of the fuel systemor emission control system.
Do not spill fuel on the exterior surfaces of the vehicle. Anytype of fuel spilled on paintedsurfaces may damage the paint.
After refueling, make sure the fuel cap is installed securelyto prevent fuel spillage in theevent of an accident.
Page 170 of 570
467
Features of your vehicle
Reprogramming a single
HomeLink®button
To program a device to HomeLink
®
using a HomeLink®button previously
trained, follow these steps:
1. Press and hold the desired HomeLink
®button. DO NOT
release the button.
2. The indicator light will begin to flash after 20 seconds. Without
releasing the HomeLink
®button,
proceed with "Programming" step
2.
For questions or comments, contact
HomeLink
®at www.homelink.comor
1-800-355-3515. Erasing HomeLink
®buttons
Individual buttons cannot be erased.
However, to erase all three pro-
grammed buttons:
1. Press and hold the two outer HomeLink
®buttons until the indi-
cator light begins to flash after 10
seconds.
2. Release both buttons. Do not hold for longer than 20 seconds.
The Integrated HomeLink
®Wireless
Control System is now in the training
(learn) mode and can be pro-
grammed at any time following the
appropriate steps in the
Programming sections above. FCC ID: NZLTLMHL4
IC: 4112A-TLMHL4
This device complies with Part 15
of the FCC Rules.
Operation is subject to the following
two conditions:
1. This device may not cause harm-
ful interference, and
2. This device must accept any inter- ference received, including inter-
ference that may cause undesired
operation.
CAUTION
The transceiver has been testedand complies with FCC andIndustry Canada rules. Changesor modifications not expresslyapproved by the party responsi-ble for compliance could voidthe user's authority to operatethe device.
Page 172 of 570

469
Features of your vehicle
Remote control
The electric remote control mirror
switch allows you to adjust the posi-
tion of the left and right side view mir-
rors.To adjust the position of the mirrors:
1. Place the ignition switch in the ON
position.
2. Move the lever(1) to R (right) or L (left) to select the right side mirror
or the left side mirror.
3. Press a corresponding point on the mirror adjustment control to
position the selected mirror up,
down, left or right.
4. After the adjustment, position the lever in the center to prevent inad-
vertent movement.
CAUTION
If the mirror is jammed with ice,do not adjust the mirror by force.Use an approved spray de-icer(not radiator antifreeze) torelease the frozen mechanism ormove the vehicle to a warmplace and allow the ice to melt.
WARNING
Do not adjust or fold the side
view mirrors while the vehicle is
moving. This could result in
loss of control, and an accident
which could cause death, seri-
ous injury or property damage.
CAUTION
Do not scrape ice off the mirrorface; this may damage the sur-face of the glass. If ice shouldrestrict movement of the mirror,do not force the mirror foradjustment. To remove ice, usea deicer spray, or a sponge orsoft cloth with warm water.
OANNCO2076
CAUTION
The mirrors stop moving when they reach the maximumadjusting angles, but themotor continues to operatewhile the switch is pressed.Do not press the switch longerthan necessary, the motormay be damaged.
Do not attempt to adjust the side view mirrors by hand.Doing so may damage the mir-ror.
Page 184 of 570
481
Features of your vehicle
ItemsExplanation
Smart Cruise Control
Response (if equipped)Choose the sensitivity of the smart cruise control.
For more details, refer to "Advanced Smart Cruise Control System" in chapter 5.
Rear Cross Traffic Alert (RCTA) (if equipped)If this item is checked, the rear cross traffic alert function will be activated.
For more details, refer to "Blind Spot Detection System" in chapter 5.
Automatic Emergency
Braking (AEB) (if equipped)To activate or deactivate the AEB system.
For more details, refer to "Automatic Emergency Braking (AEB)" in chapter 5.
Driving Assist (if equipped)
Page 216 of 570
4113
Features of your vehicle
Rear parking assist system
(if equipped)
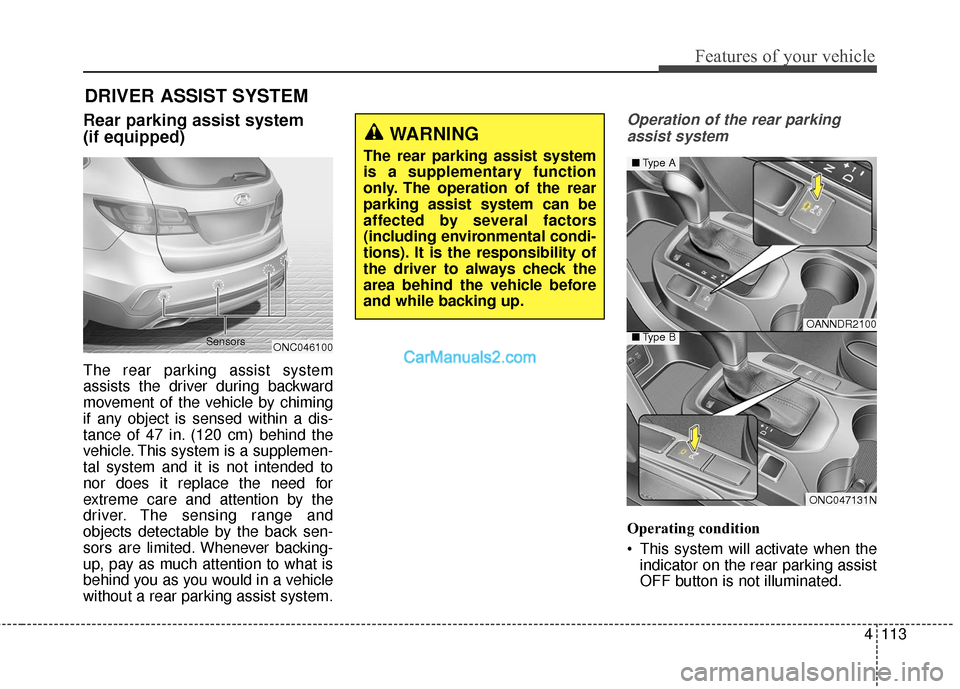
The rear parking assist system
assists the driver during backward
movement of the vehicle by chiming
if any object is sensed within a dis-
tance of 47 in. (120 cm) behind the
vehicle. This system is a supplemen-
tal system and it is not intended to
nor does it replace the need for
extreme care and attention by the
driver. The sensing range and
objects detectable by the back sen-
sors are limited. Whenever backing-
up, pay as much attention to what is
behind you as you would in a vehicle
without a rear parking assist system.
Operation of the rear parkingassist system
Operating condition
This system will activate when the indicator on the rear parking assist
OFF button is not illuminated.
DRIVER ASSIST SYSTEM
WARNING
The rear parking assist system
is a supplementary function
only. The operation of the rear
parking assist system can be
affected by several factors
(including environmental condi-
tions). It is the responsibility of
the driver to always check the
area behind the vehicle before
and while backing up.
ONC046100
Sensors
OANNDR2100
ONC047131N
■
Type A
■Type B
Page 219 of 570
Features of your vehicle
116
4
Self-diagnosis (if equipped)
When you shift the gear to the R
(Reverse) position and if one or more
of the below occurs you may have a
malfunction in the rear parking assist
system.
You don't hear an audible warning
sound or if the buzzer sounds inter-
mittently.
If this occurs, have your vehicle
checked by an authorized HYUNDAI
dealer as soon as possible.
WARNING
Your new vehicle warranty does
not cover any accidents or dam-
age to the vehicle or injuries to
its occupants due to a rear
parking assist system malfunc-
tion. Always drive safely and
cautiously.
WARNING
Pay close attention when the
vehicle is driven close to
objects on the road, particularly
pedestrians, and especially
children. Be aware that some
objects may not be detected by
the sensors, due to the object’s
distance, size or material, all of
which can limit the effective-
ness of the sensor. Always per-
form a visual inspection to
make sure the vehicle is clear of
all obstructions before moving
the vehicle in any direction.