2018 Hyundai Santa Fe warning light
[x] Cancel search: warning lightPage 394 of 570
Driving your vehicle
102
5
Remember, your vehicle does not
require extended warm-up. After
the engine has started, allow the
engine to run for 10 to 20 seconds
prior to placing the vehicle in gear.
In very cold weather, however, give
your engine a slightly longer warm-
up period.
Don't "lug" or "over-rev" the engine. Lugging is driving too slowly in too
high a gear resulting engine buck-
ing. If this happens, shift to a lower
gear. Over-revving is racing the
engine beyond its safe limit. This
can be avoided by shifting at the
recommended speeds.
Use your air conditioning sparingly. The air conditioning system is
operated by engine power so your
fuel economy is reduced when you
use it.
Open windows at high speeds can reduce fuel economy.
Fuel economy is less in crosswinds and headwinds. To help offset
some of this loss, slow down when
driving in these conditions. Keeping a vehicle in good operating
condition is important both for econ-
omy and safety. Therefore, have an
authorized HYUNDAI dealer perform
scheduled inspections and mainte-
nance.
WARNING - Engine off
during
motion
Never turn the engine off to
coast down hills or anytime the
vehicle is in motion. The power
steering and power brakes will
not function properly without the
engine running. Instead, keep
the engine on and downshift to
an appropriate gear for engine
braking effect. In addition, turn-
ing off the ignition while driving
could engage the steering wheel
lock resulting in loss of vehicle
steering which could cause
serious injury or death.
Page 395 of 570
5103
Driving your vehicle
Hazardous driving conditions
When hazardous driving conditions
are encountered such as water,
snow, ice, mud, sand, or similar haz-
ards, follow these suggestions:
Drive cautiously and allow extradistance for braking.
Avoid sudden braking or steering.
When braking with non-ABS brakes pump the brake pedal with
a light up-and-down motion until
the vehicle is stopped. If stalled in snow, mud, or sand, use
second gear. Accelerate slowly to
avoid spinning the drive wheels.
Use sand, rock salt, tire chains, or other non-slip material under the
drive wheels to provide traction
when stalled in ice, snow, or mud.
Reducing the risk of a rollover
This multi-purpose passenger vehicle
is defined as a Sports Utility Vehicle
(SUV). SUV's have higher ground
clearance and a narrower track to
make them capable of performing in a
wide variety of off-road applications.
Specific design characteristics give
them a higher center of gravity than
ordinary vehicles. An advantage of the
higher ground clearance is a better
view of the road, which allows you to
anticipate problems. They are not
designed for cornering at the same
speeds as conventional passenger
vehicles, any more than low-slung
sports vehicles are designed to per-
form satisfactorily in off-road condi-
tions. Due to this risk, driver and pas-
sengers are strongly recommended to
buckle their seat belts. In a rollover
crash, an unbelted person is more like-
ly to die than a person wearing a seat
belt. There are steps that a driver can
make to reduce the risk of a rollover.
If at all possible, avoid sharp turns or
abrupt maneuvers, do not load your
roof rack with heavy cargo, and
never modify your vehicle in any way.
SPECIAL DRIVING CONDITIONS
WARNING - Downshifting
Downshifting with an automatic
transaxle, while driving on slip-
pery surfaces can cause an
accident. The sudden change in
tire speed could cause the tires
to skid. Be careful when down-
shifting on slippery surfaces.
WARNING - ABS
Do not pump the brake pedal on
a vehicle equipped with ABS.
Page 409 of 570

5117
Driving your vehicle
Turn signals when towing a trailer
When you tow a trailer, your vehicle
has to have a different turn signal
flasher and extra wiring. The green
arrows on your instrument panel will
flash whenever you signal a turn or
lane change. Properly connected,
the trailer lights will also flash to alert
other drivers you're about to turn,
change lanes, or stop.
When towing a trailer, the green
arrows on your instrument panel will
flash for turns even if the bulbs on the
trailer are burned out. Thus, you may
think drivers behind you are seeing
your signals when, in fact, they are
not. It's important to check occasion-
ally to be sure the trailer bulbs are still
working. You must also check the
lights every time you disconnect and
then reconnect the wires.
Do not connect a trailer lighting sys-
tem directly to your vehicle's lighting
system. Use only an approved trailer
wiring harness.
An authorized HYUNDAI dealer can
assist you in installing the wiring har-
ness.
Driving on grades
Reduce speed and shift to a lower
gear before you start down a long or
steep downgrade. If you don’t shift
down, you might have to use your
brakes so much that they would get
hot and no longer operate efficiently.
On a long uphill grade, shift down
and reduce your speed to around 45
mph (70 km/h) to reduce the possi-
bility of engine and transaxle over-
heating.
Operating your vehicle in D (Drive)
when towing a trailer will minimize
heat build up and extend the life of
your transaxle.WARNING
Failure to use an approved trail-
er wiring harness could result
in damage to the vehicle electri-
cal system and/or personal
injury.
Page 422 of 570
What to do in an emergency
26
ROAD WARNING
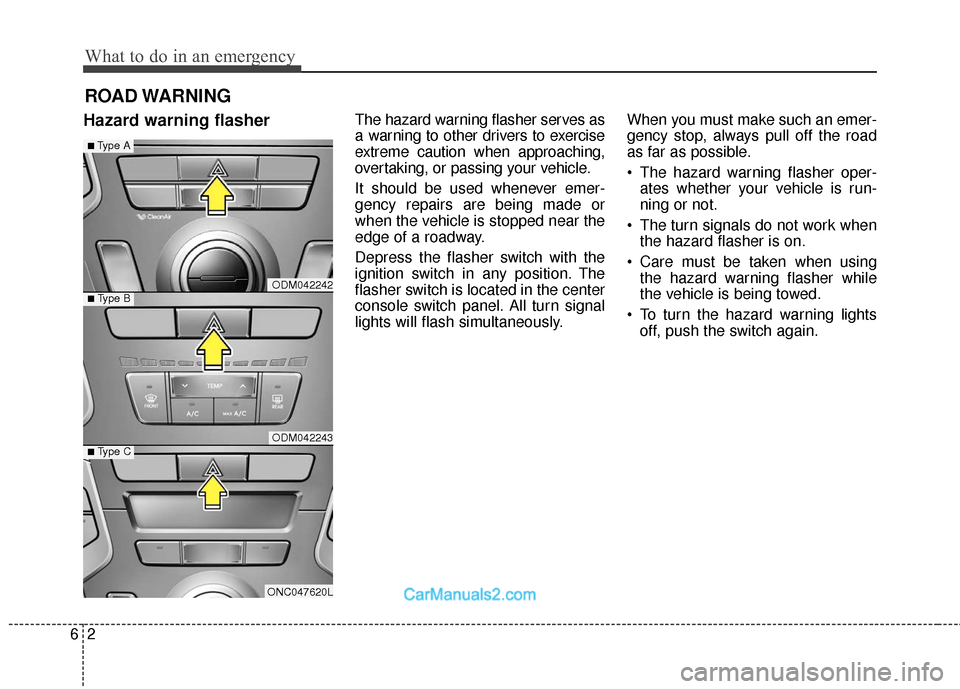
Hazard warning flasherThe hazard warning flasher serves as
a warning to other drivers to exercise
extreme caution when approaching,
overtaking, or passing your vehicle.
It should be used whenever emer-
gency repairs are being made or
when the vehicle is stopped near the
edge of a roadway.
Depress the flasher switch with the
ignition switch in any position. The
flasher switch is located in the center
console switch panel. All turn signal
lights will flash simultaneously.When you must make such an emer-
gency stop, always pull off the road
as far as possible.
• The hazard warning flasher oper-
ates whether your vehicle is run-
ning or not.
The turn signals do not work when the hazard flasher is on.
Care must be taken when using the hazard warning flasher while
the vehicle is being towed.
To turn the hazard warning lights off, push the switch again.
ODM042242
ODM042243
■Type A
■ Type B
ONC047620L
■ Type C
Page 424 of 570
What to do in an emergency
46
IF THE ENGINE WILL NOT START
If engine doesn't turn over or
turns over slowly
1. If your vehicle has an automatictransaxle, be sure the shift lever is
in N (Neutral) or P (Park) and the
emergency brake is set.
2. Check the battery connections to be sure they are clean and tight.
3. Turn on the interior light. If the light dims or goes out when you oper-
ate the starter, the battery is dis-
charged.
4. Do not push or pull the vehicle to start it. See instructions for "Jump
starting".
If engine turns over normally
but does not start
1. Check fuel level.
2. With the ignition switch in the LOCKposition, check all connectors at
ignition coils and spark plugs.
Reconnect any that may be discon-
nected or loose.
3. If the engine still does not start, call an authorized HYUNDAI dealer or
seek other qualified assistance.
WARNING
If the engine will not start, do
not push or pull the vehicle to
start it. This could result in a
collision or cause other dam-
age. In addition, push or pull
starting may cause the catalytic
converter to be overloaded and
create a fire hazard.
Page 431 of 570
611
What to do in an emergency
✽
✽NOTICE
If any of the below happens, have
the system checked by an authorized
HYUNDAI dealer.
1.The low tire pressure telltale/
TPMS malfunction indicator does
not illuminate for 3 seconds when
Engine Start/Stop button is turned
to the ON or engine is running.
2. The TPMS malfunction indicator remains illuminated after blinking
for approximately 1 minute.
3. The Low tire pressure position telltale remains illuminated.
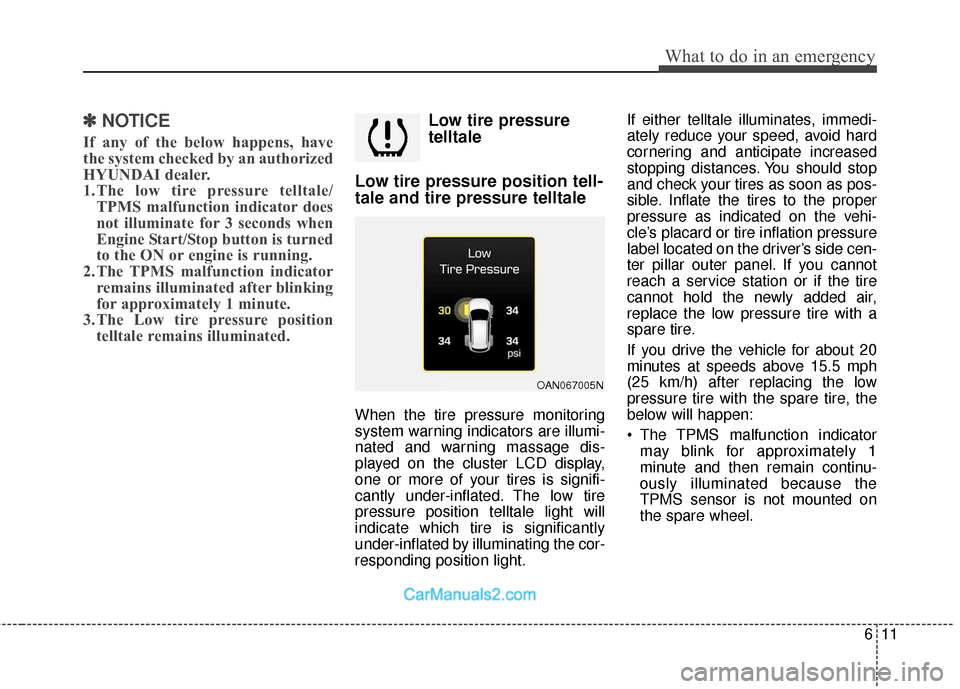
Low tire pressure
telltale
Low tire pressure position tell-
tale and tire pressure telltale
When the tire pressure monitoring
system warning indicators are illumi-
nated and warning massage dis-
played on the cluster LCD display,
one or more of your tires is signifi-
cantly under-inflated. The low tire
pressure position telltale light will
indicate which tire is significantly
under-inflated by illuminating the cor-
responding position light. If either telltale illuminates, immedi-
ately reduce your speed, avoid hard
cornering and anticipate increased
stopping distances. You should stop
and check your tires as soon as pos-
sible. Inflate the tires to the proper
pressure as indicated on the vehi-
cle’s placard or tire inflation pressure
label located on the driver’s side cen-
ter pillar outer panel. If you cannot
reach a service station or if the tire
cannot hold the newly added air,
replace the low pressure tire with a
spare tire.
If you drive the vehicle for about 20
minutes at speeds above 15.5 mph
(25 km/h) after replacing the low
pressure tire with the spare tire, the
below will happen:
The TPMS malfunction indicator
may blink for approximately 1
minute and then remain continu-
ously illuminated because the
TPMS sensor is not mounted on
the spare wheel.
OAN067005N
Page 434 of 570
What to do in an emergency
14
6
A cold tire means the vehicle has
been sitting for 3 hours and driven for
less than 1 mile (1.6 km) in that 3
hour period.This device complies with Part
15 of the FCC rules.
Operation is subject to the following
two conditions:
1. This device may not cause harm-
ful interference, and
2. This device must accept any inter- ference received, including inter-
ference that may cause undesired
operation.
WARNING- TPMS
The TPMS cannot alert you to severe and sudden tire dam-
age caused by external fac-
tors such as nails or road
debris.
If you feel any vehicle instabil- ity, immediately take your foot
off the accelerator, apply the
brakes gradually and with
light force, and slowly move to
a safe position off the road.
WARNING - Protecting
TPMS
Tampering with, modifying, or
disabling the Tire Pressure
Monitoring System (TPMS)
components may interfere with
the system's ability to warn the
driver of low tire pressure con-
ditions and/or TPMS malfunc-
tions. Tampering with, modify-
ing, or disabling the Tire
Pressure Monitoring System
(TPMS) components may void
the warranty for that portion of
the vehicle.
CAUTION
Changes or modifications not expressly approved by the partyresponsible for compliancecould void the user’s authorityto operate the equipment.
Page 440 of 570
What to do in an emergency
20
6
9. Loosen the wheel nuts and
remove them with your fingers.
Slide the wheel off the studs and
lay it flat so it cannot roll away. To
put the wheel on the hub, pick up
the spare tire, line up the holes
with the studs and slide the wheel
onto them. If this is difficult, tip the
wheel slightly and get the top hole
in the wheel lined up with the top
stud. Then jiggle the wheel back
and forth until the wheel can be
slid over the other studs. 10. To reinstall the wheel, hold it on
the studs, put the wheel nuts on
the studs and tighten them finger
tight. The nuts should be installed
with their tapered small diameter
ends directed inward. Jiggle the
tire to be sure it is completely
seated, then tighten the nuts as
much as possible with your fin-
gers again.
11. Lower the car to the ground by turning the wheel nut wrench
counterclockwise.
WARNING
Wheels may have sharp edges.
Handle them carefully to avoid
possible severe injury. Before
putting the wheel into place, be
sure that there is nothing on the
hub or wheel (such as mud, tar,
gravel, etc.) that prevents the
wheel from fitting solidly
against the hub.
If there is, remove it. If there is
insufficient contact on the
mounting surface between the
wheel and hub, the wheel nuts
could come loose and cause
the loss of a wheel. Loss of a
wheel may result in loss of con-
trol of the vehicle. This may
cause serious injury or death.