2018 Hyundai Kona steering
[x] Cancel search: steeringPage 365 of 523
5-111
Driving your vehicle
5
When the clutch is overheated,
the safe protection mode
engages. If the safe protection
mode engages, the gear posi-
tion indicator on the cluster
blinks with a chime sound.
At this time, a warning message
will appear on the LCD display
and driving may not be smooth.
If you ignore this warning, the
driving condition may become
worse.
To return to normal driving con-
ditions, stop the vehicle on a flat
road and apply the foot brake for
a few minutes before driving off.Parking on hills
Generally, if you have a trailer
attached to your vehicle, you should
not park your vehicle on a hill.
However, if you ever have to park your
trailer on a hill, here's how to do it:
1. Pull the vehicle into the parkingspace.
Turn the steering wheel in the direction of the curb (right if head-
ed down hill, left if headed up hill).
2. Shift the vehicle to P (Park, for dual clutch transmission vehicle)
or neutral (for manual transmis-
sion vehicle).
3. Set the parking brake and shut off the vehicle.
4. Place wheel chocks under the trailer wheels on the down hill side
of the wheels.
5. Start the vehicle, hold the brakes, shift to neutral, release the park-
ing brake and slowly release the
brakes until the trailer chocksabsorb the load. 6. Reapply the brakes and parking
brakes.
7. Move the shift lever to P (Park, for dual clutch transmission vehicle)
or 1st gear (for manual transmis-
sion vehicle) when the vehicle is
parked on a uphill grade and in R
(Reverse) on a downhill.
8. Shut off the vehicle and release the vehicle brakes but leave the
parking brake set.
To prevent serious or fatal
injury:
Do not get out of the vehicle without the parking brake
firmly set. If you have left the
engine running, the vehicle
can move suddenly. You and
others could be seriously or
fatally injured.
Do not apply the accelerator
pedal to hold the vehicle onan uphill.
WARNING
Page 395 of 523
6-28
What to do in an emergency
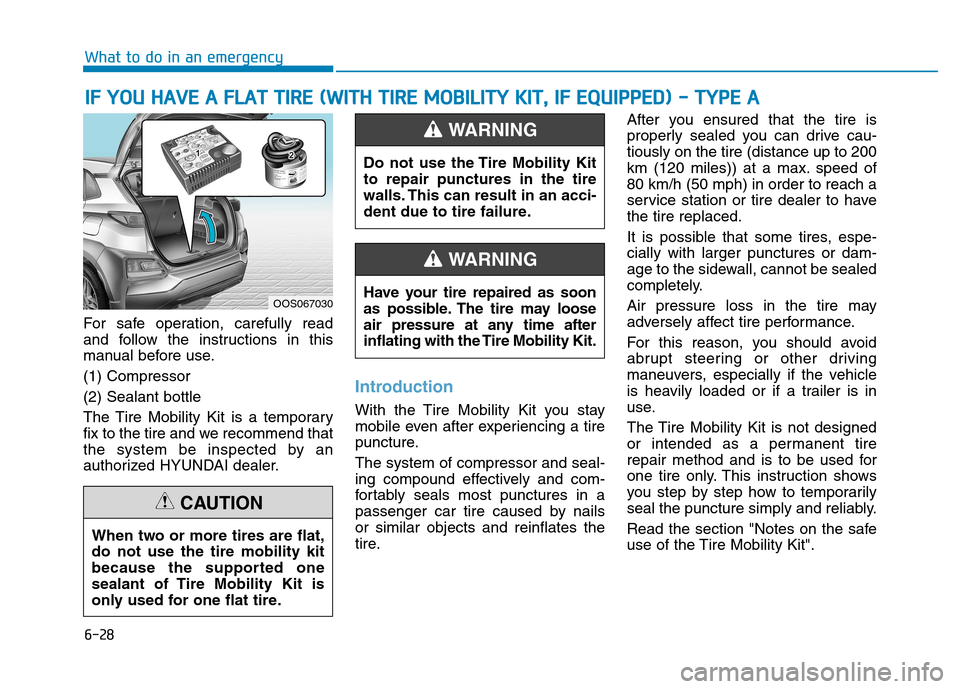
For safe operation, carefully read
and follow the instructions in this
manual before use. (1) Compressor(2) Sealant bottle
The Tire Mobility Kit is a temporary
fix to the tire and we recommend that
the system be inspected by an
authorized HYUNDAI dealer.
Introduction
With the Tire Mobility Kit you stay
mobile even after experiencing a tire
puncture. The system of compressor and seal-
ing compound effectively and com-
fortably seals most punctures in a
passenger car tire caused by nailsor similar objects and reinflates the
tire.After you ensured that the tire is
properly sealed you can drive cau-tiously on the tire (distance up to 200
km (120 miles)) at a max. speed of80 km/h (50 mph) in order to reach a
service station or tire dealer to havethe tire replaced.
It is possible that some tires, espe- cially with larger punctures or dam-
age to the sidewall, cannot be sealed
completely.
Air pressure loss in the tire may
adversely affect tire performance.
For this reason, you should avoid
abrupt steering or other driving
maneuvers, especially if the vehicle
is heavily loaded or if a trailer is in
use.
The Tire Mobility Kit is not designed
or intended as a permanent tire
repair method and is to be used for
one tire only. This instruction shows
you step by step how to temporarily
seal the puncture simply and reliably.
Read the section "Notes on the safe
use of the Tire Mobility Kit".
II
FF YY OO UU HH AAVVEE AA FF LLAA TT TT IIRR EE (( WW IITT HH TT IIRR EE MM OOBBIILL IITT YY KK IITT ,, IIFF EE QQ UUIIPP PPEEDD )) -- TT YY PPEE AA
Do not use the Tire Mobility Kit to repair punctures in the tire
walls. This can result in an acci-
dent due to tire failure.
WARNING
Have your tire repaired as soon
as possible. The tire may loose
air pressure at any time after
inflating with the Tire Mobility Kit.
WARNING
When two or more tires are flat, do not use the tire mobility kit
because the supported one
sealant of Tire Mobility Kit is
only used for one flat tire.
CAUTION
OOS067030
Page 398 of 523
6-31
What to do in an emergency
6
Using the Tire Mobility Kit
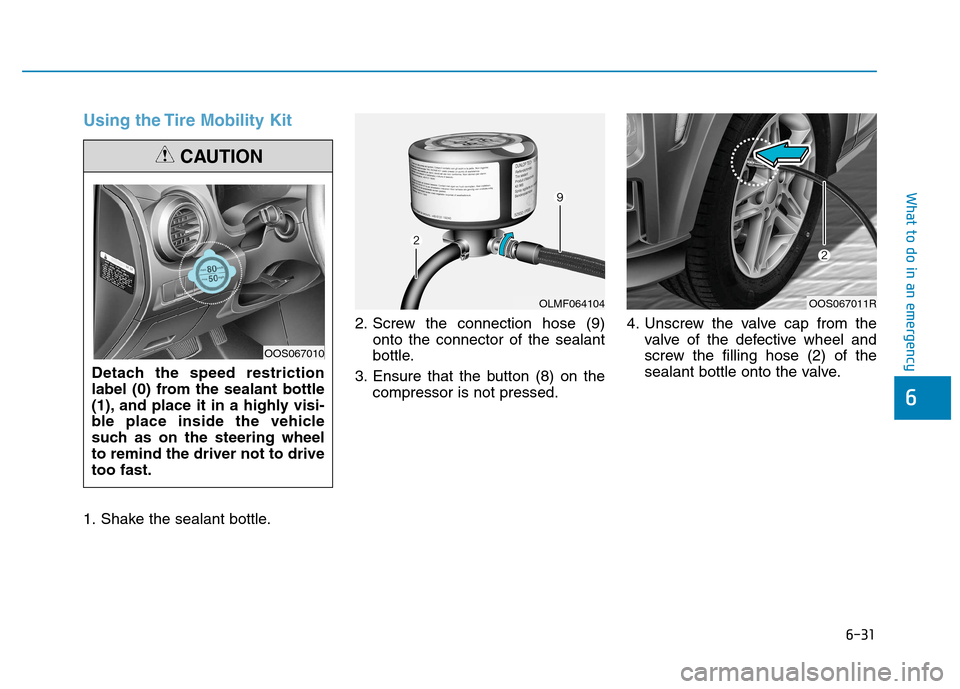
1. Shake the sealant bottle.2. Screw the connection hose (9)
onto the connector of the sealant
bottle.
3. Ensure that the button (8) on the compressor is not pressed. 4. Unscrew the valve cap from the
valve of the defective wheel and
screw the filling hose (2) of the
sealant bottle onto the valve.
Detach the speed restriction
label (0) from the sealant bottle
(1), and place it in a highly visi-
ble place inside the vehicle
such as on the steering wheelto remind the driver not to drivetoo fast.
CAUTION
OLMF064104
OOS067010
OOS067011R
Page 402 of 523
6-35
What to do in an emergency
6
IIFF YY OO UU HH AAVVEE AA FF LLAA TT TT IIRR EE (( WW IITT HH TT IIRR EE MM OOBBIILL IITT YY KK IITT ,, IIFF EE QQ UUIIPP PPEEDD )) -- TT YY PPEE BB
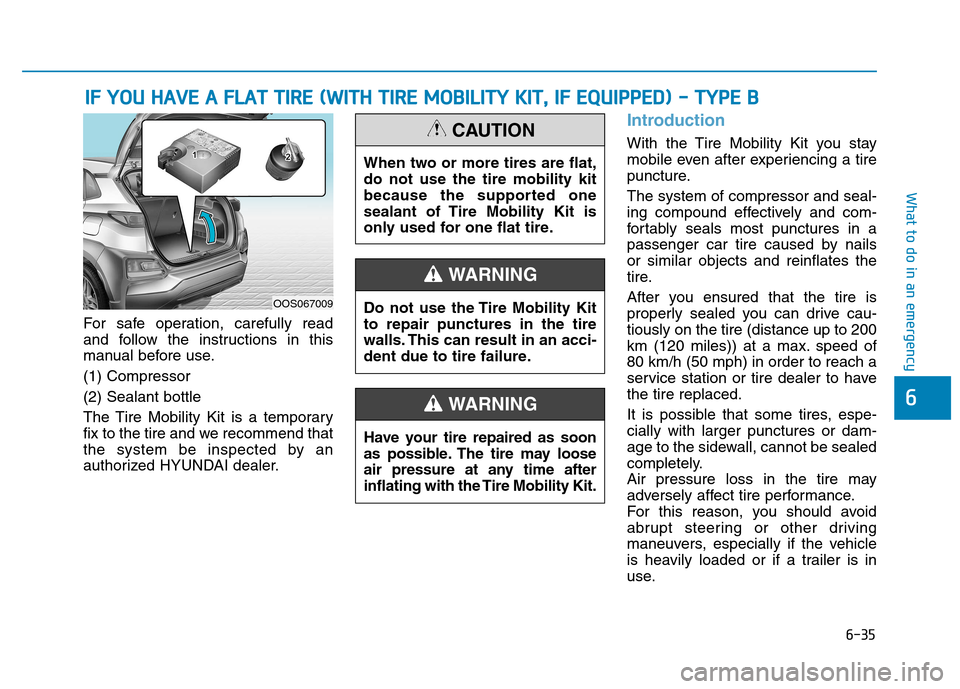
For safe operation, carefully read
and follow the instructions in this
manual before use. (1) Compressor(2) Sealant bottle
The Tire Mobility Kit is a temporary
fix to the tire and we recommend that
the system be inspected by an
authorized HYUNDAI dealer.
Introduction
With the Tire Mobility Kit you stay
mobile even after experiencing a tire
puncture. The system of compressor and seal-
ing compound effectively and com-
fortably seals most punctures in a
passenger car tire caused by nailsor similar objects and reinflates the
tire.
After you ensured that the tire is
properly sealed you can drive cau-tiously on the tire (distance up to 200
km (120 miles)) at a max. speed of80 km/h (50 mph) in order to reach a
service station or tire dealer to havethe tire replaced.
It is possible that some tires, espe- cially with larger punctures or dam-
age to the sidewall, cannot be sealed
completely.
Air pressure loss in the tire may
adversely affect tire performance.
For this reason, you should avoid
abrupt steering or other driving
maneuvers, especially if the vehicle
is heavily loaded or if a trailer is in
use.
Do not use the Tire Mobility Kitto repair punctures in the tire
walls. This can result in an acci-
dent due to tire failure.
WARNING
Have your tire repaired as soon
as possible. The tire may loose
air pressure at any time after
inflating with the Tire Mobility Kit.
WARNING
When two or more tires are flat, do not use the tire mobility kit
because the supported one
sealant of Tire Mobility Kit is
only used for one flat tire.
CAUTION
OOS067009
Page 405 of 523
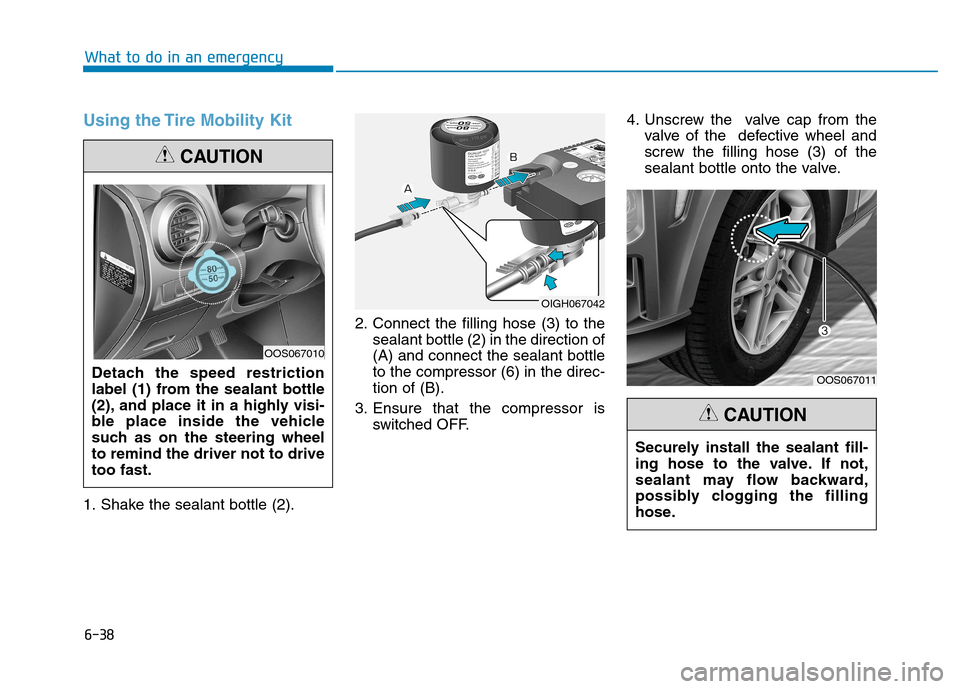
6-38
What to do in an emergency
Using the Tire Mobility Kit
1. Shake the sealant bottle (2).2. Connect the filling hose (3) to the
sealant bottle (2) in the direction of (A) and connect the sealant bottleto the compressor (6) in the direc-tion of (B).
3. Ensure that the compressor is switched OFF. 4. Unscrew the valve cap from the
valve of the defective wheel and
screw the filling hose (3) of the
sealant bottle onto the valve.
Detach the speed restriction
label (1) from the sealant bottle
(2), and place it in a highly visi-
ble place inside the vehicle
such as on the steering wheelto remind the driver not to drivetoo fast.
CAUTION
OOS067010
OIGH067042
OOS067011
Securely install the sealant fill-
ing hose to the valve. If not,
sealant may flow backward,
possibly clogging the filling
hose.
CAUTION
Page 410 of 523
6-43
What to do in an emergency
6
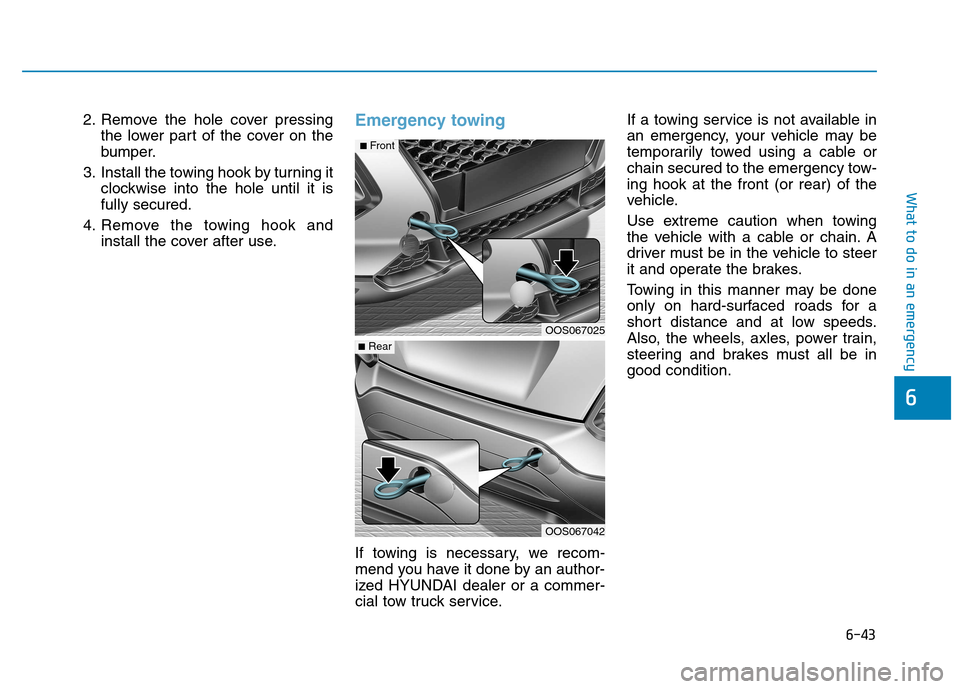
2. Remove the hole cover pressingthe lower part of the cover on the
bumper.
3. Install the towing hook by turning it clockwise into the hole until it isfully secured.
4. Remove the towing hook and install the cover after use.Emergency towing
If towing is necessary, we recom-
mend you have it done by an author-
ized HYUNDAI dealer or a commer-
cial tow truck service. If a towing service is not available in
an emergency, your vehicle may be
temporarily towed using a cable or
chain secured to the emergency tow-ing hook at the front (or rear) of the
vehicle.
Use extreme caution when towing
the vehicle with a cable or chain. A
driver must be in the vehicle to steer
it and operate the brakes.
Towing in this manner may be done
only on hard-surfaced roads for a
short distance and at low speeds.
Also, the wheels, axles, power train,
steering and brakes must all be ingood condition.
OOS067042
OOS067025
■
Rear
■Front
Page 411 of 523
6-44
What to do in an emergency
Always follow these emergency tow- ing precautions:
Place the ignition switch in theACC position so the steering wheel
is not locked.
Place the shift lever in N (Neutral).
Release the parking brake.
Depress the brake pedal with more force than normal as you will have
reduced braking performance.
More steering effort will be required because the power steer-
ing system will be disabled.
Use a vehicle heavier than your own to tow your vehicle.
The drivers of both vehicles should communicate with each other fre-
quently.
Before emergency towing, check that the hook is not broken or dam-aged.
Fasten the towing cable or chain securely to the hook.
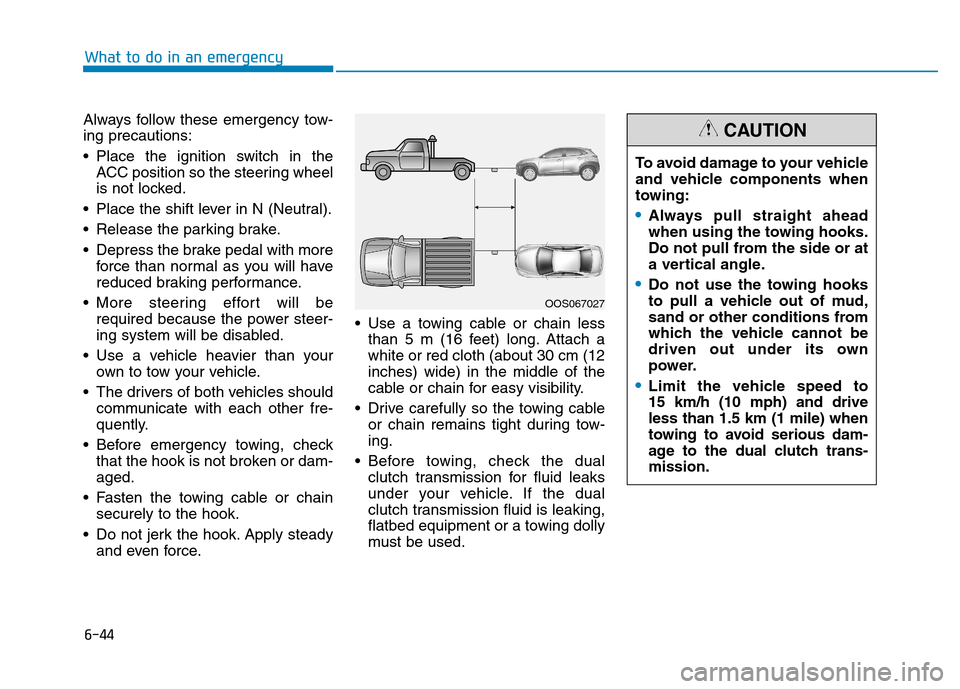
Do not jerk the hook. Apply steady and even force. Use a towing cable or chain less
than 5 m (16 feet) long. Attach awhite or red cloth (about 30 cm (12inches) wide) in the middle of the
cable or chain for easy visibility.
Drive carefully so the towing cable or chain remains tight during tow-ing.
Before towing, check the dual clutch transmission for fluid leaks
under your vehicle. If the dual
clutch transmission fluid is leaking,
flatbed equipment or a towing dolly
must be used.
OOS067027 To avoid damage to your vehicle
and vehicle components when
towing:
Always pull straight ahead
when using the towing hooks.
Do not pull from the side or at
a vertical angle.
Do not use the towing hooks
to pull a vehicle out of mud,
sand or other conditions from
which the vehicle cannot be
driven out under its own
power.
Limit the vehicle speed to 15 km/h (10 mph) and driveless than 1.5 km (1 mile) when
towing to avoid serious dam-
age to the dual clutch trans-mission.
CAUTION
Page 418 of 523
7-6
Maintenance
While operating your vehicle:
Note any changes in the sound ofthe exhaust or any smell of exhaust
fumes in the vehicle.
Check for vibrations in the steering wheel. Notice if there is any
increased steering effort or loose-
ness in the steering wheel, or
change in its straight-ahead position.
Notice if your vehicle constantly turns slightly or “pulls” to one side when
traveling on smooth, level road.
When stopping, listen and check for unusual sounds, pulling to one side,
increased brake pedal travel or
“hard-to-push” brake pedal.
If any slipping or changes in the operation of your transmission
occurs, check the transmission fluid
level.
Check the dual clutch transmission P (Park) function.
Check the parking brake.
Check for fluid leaks under your vehicle (water dripping from the air
conditioning system during or after
use is normal).
At least monthly:
Check coolant level in the enginecoolant reservoir.
Check the operation of all exterior lights, including the stoplights, turn
signals and hazard warning flashers.
Check the inflation pressures of all tires including the spare for tires
that are worn, show uneven wear,or are damaged.
Check for loose wheel lug nuts.
At least twice a year: (i.e., every Spring and Autumn)
Check radiator, heater and air condi- tioning hoses for leaks or damage.
Check windshield washer spray and wiper operation. Clean wiper
blades with a clean cloth damp-
ened with washer fluid.
Check headlamp alignment.
Check muffler, exhaust pipes, shields and clamps.
Check the seat belts for wear and function.
At least once a year:
Clean body and door drain holes.
Lubricate door hinges and hoodhinges.
Lubricate door and hood locks and latches.
Lubricate door rubber weather strips.
Check the air conditioning system.
Inspect and lubricate dual clutch transmission linkage and controls.
Clean the battery and terminals.
Check the brake fluid level.