2018 Hyundai Kona head light
[x] Cancel search: head lightPage 475 of 523
7-63
7
Maintenance
LLIIGG HH TT BB UU LLBB SS
Consult an authorized HYUNDAI
dealer to replace most vehicle light
bulbs. It is difficult to replace vehicle
light bulbs because other parts of the
vehicle must be removed before you
can get to the bulb. This is especially
true for removing the headlamp
assembly to get to the bulb(s).
Removing/installing the headlamp
assembly can result in damage to
the vehicle. Be sure to replace the burned-out
bulb with one of the same wattage
rating. Otherwise, it may cause
damage to the fuse or electricalwiring system.
Information
After heavy driving rain or washing,
headlamp and tail lamp lenses could
appear frosty. This condition is caused
by the temperature difference between
the lamp inside and outside. This is
similar to the condensation on your
windows inside your vehicle when
raining and doesn’t indicate a problem
with your vehicle. If the water leaks
into the lamp bulb circuitry, we rec-
ommend that the system be checked
by an authorized HYUNDAI dealer. Information
The headlamp aiming should be adjust-
ed after an accident or after the head-
lamp assembly is reinstalled at an
authorized HYUNDAI dealer.
Information - Traffic Change
(for Europe)
The low beam light distribution is
asymmetric. If you go abroad to a coun-
try with opposite traffic direction, this
asymmetric part will dazzle oncoming
car driver. To prevent dazzle, ECE reg-
ulation demand several technical solu-
tions (ex. automatic change system,
adhesive sheet, down aiming). These
headlamps are designed not to dazzle
opposite drivers. So, you need not
change your headlamps in a country
with opposite traffic direction.
i
i
i
NOTICE
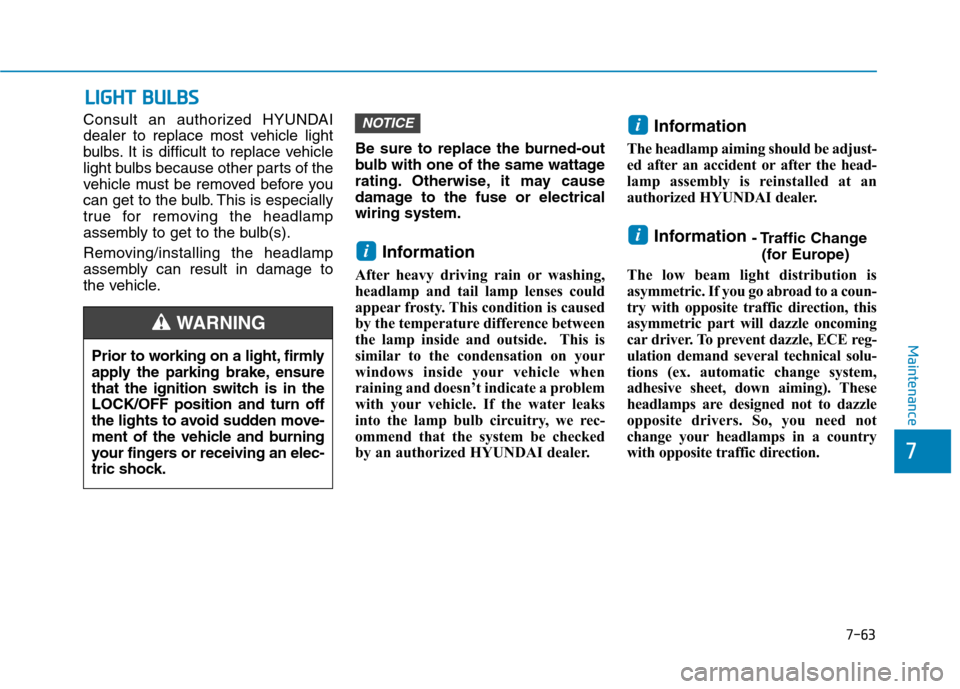
Prior to working on a light, firmly
apply the parking brake, ensure
that the ignition switch is in theLOCK/OFF position and turn off
the lights to avoid sudden move-
ment of the vehicle and burning
your fingers or receiving an elec-
tric shock.
WARNING
Page 476 of 523
7-64
Maintenance
Headlamp, Low beam assist –
Static, position lamp, turn sig-
nal lamp and daytime running
light bulb replacement
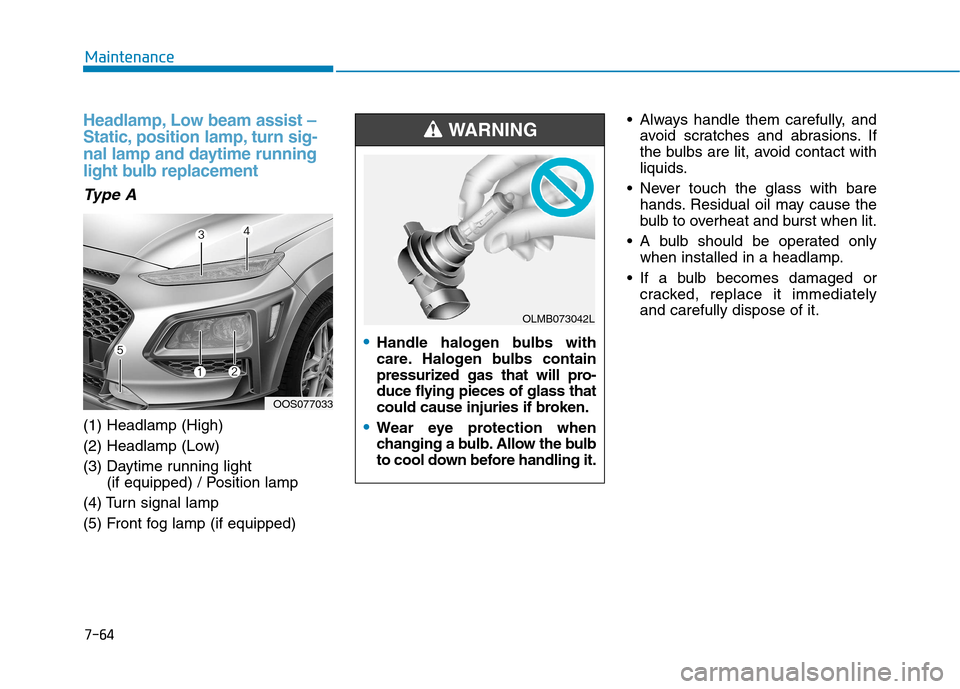
Type A
(1) Headlamp (High)
(2) Headlamp (Low)
(3) Daytime running light (if equipped) / Position lamp
(4) Turn signal lamp
(5) Front fog lamp (if equipped) Always handle them carefully, and
avoid scratches and abrasions. If
the bulbs are lit, avoid contact with
liquids.
Never touch the glass with bare hands. Residual oil may cause the
bulb to overheat and burst when lit.
A bulb should be operated only when installed in a headlamp.
If a bulb becomes damaged or cracked, replace it immediatelyand carefully dispose of it.
OOS077033
Handle halogen bulbs with
care. Halogen bulbs contain
pressurized gas that will pro-
duce flying pieces of glass that
could cause injuries if broken.
Wear eye protection when
changing a bulb. Allow the bulb
to cool down before handling it.
WARNING
OLMB073042L
Page 477 of 523
![Hyundai Kona 2018 Owners Manual 7-65
7
Maintenance
[1] : High beam, [2] : Low beam
Headlamp and position lamp
1. Open the hood.
2. Disconnect the negative batterycable.
3. Remove the bulb cover by turning it counterclockwise.
4. Di Hyundai Kona 2018 Owners Manual 7-65
7
Maintenance
[1] : High beam, [2] : Low beam
Headlamp and position lamp
1. Open the hood.
2. Disconnect the negative batterycable.
3. Remove the bulb cover by turning it counterclockwise.
4. Di](/manual-img/35/16231/w960_16231-476.png)
7-65
7
Maintenance
[1] : High beam, [2] : Low beam
Headlamp and position lamp
1. Open the hood.
2. Disconnect the negative batterycable.
3. Remove the bulb cover by turning it counterclockwise.
4. Disconnect the bulb socket-con- nector. (for low beam and high beam)
5. Remove the bulb from the head- lamp assembly.
6. Install a new bulb.
7. Connect the bulb socket-connec- tor. (for low beam and high beam)
8. Install the bulb cover by turning it clockwise.
Turn signal lamp
1. Open the hood.
2. Disconnect the negative batterycable.
3.Remove the socket (1) from the assembly by turning the socket
counterclockwise until the tabs on
the socket align with the slots on
the assembly.
4.Remove the bulb from the socket by pressing it in and rotating it
counterclockwise until the tabs on
the bulb align with the slots in the
socket. Pull the bulb out of the
socket. 5.Insert a new bulb by inserting it into
the socket and rotating it until it
locks into place.
6.Install the socket in the assembly by aligning the tabs on the socket
with the slots in the assembly.
7.Push the socket into the assembly and turn the socket clockwise.
Daytime running light
If the LED lamp does not operate, we
recommend you to have the vehicle
checked by an authorized HYUNDAI
dealer.OOS077038OOS077034
Page 478 of 523
7-66
Maintenance
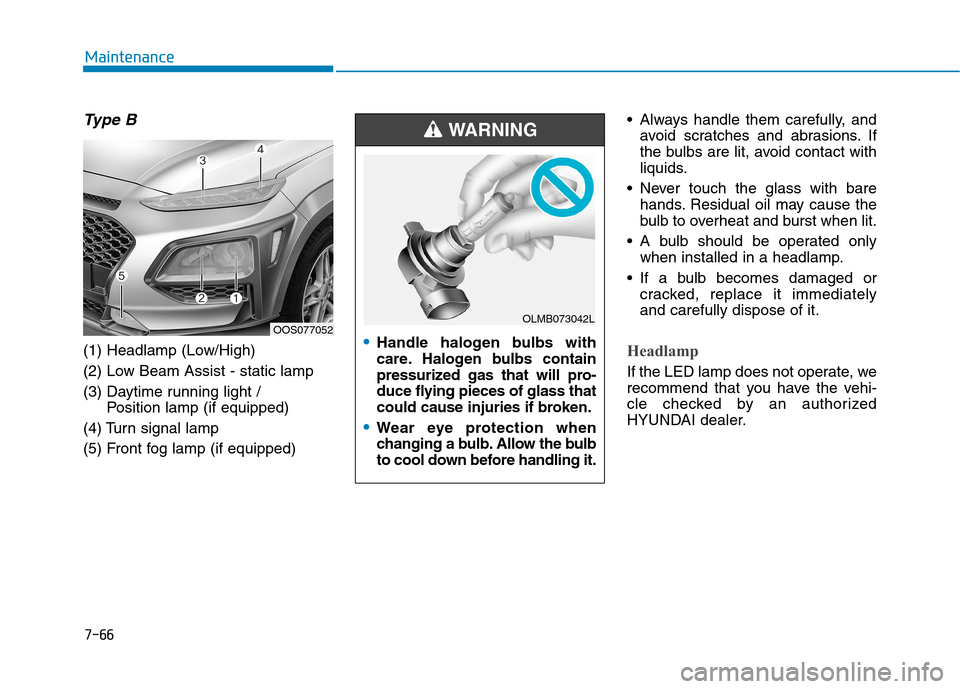
Type B
(1) Headlamp (Low/High)
(2) Low Beam Assist - static lamp
(3) Daytime running light / Position lamp (if equipped)
(4) Turn signal lamp
(5) Front fog lamp (if equipped) Always handle them carefully, and
avoid scratches and abrasions. If
the bulbs are lit, avoid contact with
liquids.
Never touch the glass with bare hands. Residual oil may cause the
bulb to overheat and burst when lit.
A bulb should be operated only when installed in a headlamp.
If a bulb becomes damaged or cracked, replace it immediatelyand carefully dispose of it.Headlamp
If the LED lamp does not operate, we
recommend that you have the vehi-
cle checked by an authorized
HYUNDAI dealer.
OOS077052Handle halogen bulbs with
care. Halogen bulbs contain
pressurized gas that will pro-
duce flying pieces of glass that
could cause injuries if broken.
Wear eye protection when
changing a bulb. Allow the bulb
to cool down before handling it.
WARNING
OLMB073042L
Page 480 of 523

7-68
Maintenance
5.Insert a new bulb by inserting it intothe socket and rotating it until it
locks into place.
6.Install the socket in the assembly by aligning the tabs on the socket
with the slots in the assembly.
7.Push the socket into the assembly and turn the socket clockwise.
Position lamp and daytime running
light
If the LED lamp does not operate, we
recommend that you have the vehicle
checked by an authorized HYUNDAI
dealer.
Front fog lamp (if equipped)
1. Loosen the pin-type retainers of the under cover and then remove the
undercover.
2. Reach your hand into the back of the front bumper.
3. Disconnect the power connector from the socket.
4. Remove the bulb-socket from the housing by turning the socket coun-
terclockwise until the tabs on the
socket align with the slots of thehousing.
5. Install a new bulb-socket into the housing by aligning the tabs on the
socket with the slots in the housing.
Push the socket into the housing
and turn the socket clockwise.
Headlamp and front fog lamp
aiming (for Europe)
Headlamp aiming
1. Inflate the tires to the specified pressure and remove any loads
from the vehicle except the driver,
spare tire, and tools.
2. The vehicle should be placed on a flat floor.
3. Draw vertical lines (Vertical lines passing through respective head
lamp centers) and a horizontal line
(Horizontal line passing throughcenter of head lamps) on thescreen.
OOS077059L
■Halogen type■LED type
OOS077060L/OOS077061L
Page 490 of 523
7-78
Maintenance
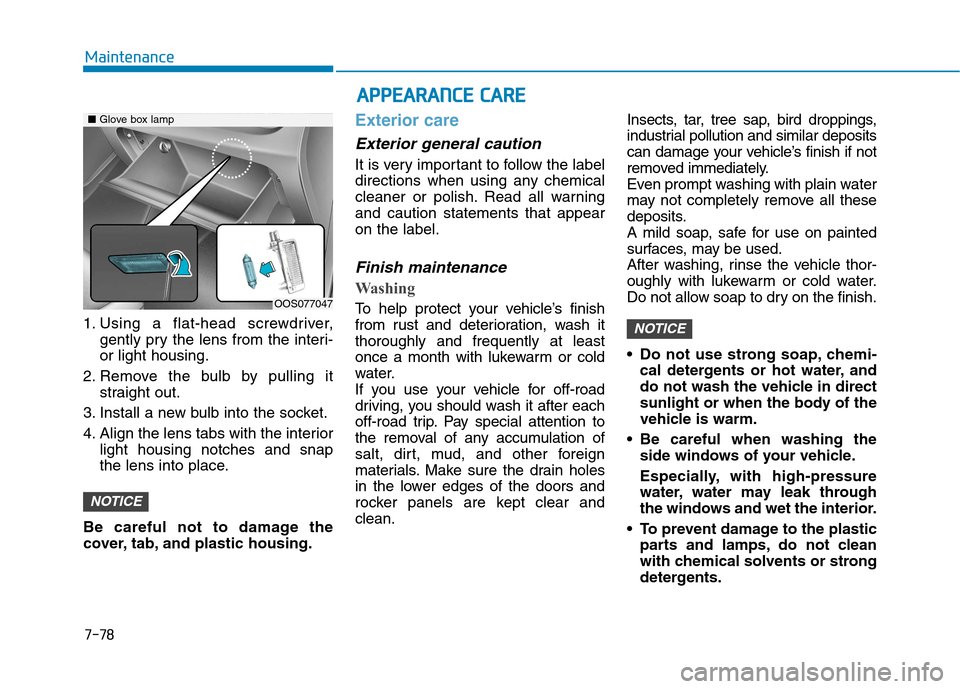
1. Using a flat-head screwdriver,gently pry the lens from the interi- or light housing.
2. Remove the bulb by pulling it straight out.
3. Install a new bulb into the socket.
4. Align the lens tabs with the interior light housing notches and snap
the lens into place.
Be careful not to damage the
cover, tab, and plastic housing.
Exterior care
Exterior general caution
It is very important to follow the label
directions when using any chemical
cleaner or polish. Read all warningand caution statements that appearon the label.
Finish maintenance
Washing
To help protect your vehicle’s finish
from rust and deterioration, wash itthoroughly and frequently at least
once a month with lukewarm or cold
water.
If you use your vehicle for off-road
driving, you should wash it after each
off-road trip. Pay special attention to
the removal of any accumulation of
salt, dirt, mud, and other foreign
materials. Make sure the drain holes
in the lower edges of the doors and
rocker panels are kept clear andclean. Insects, tar, tree sap, bird droppings,
industrial pollution and similar deposits
can damage your vehicle’s finish if not
removed immediately.
Even prompt washing with plain water
may not completely remove all these
deposits.
A mild soap, safe for use on painted
surfaces, may be used.
After washing, rinse the vehicle thor-
oughly with lukewarm or cold water.
Do not allow soap to dry on the finish.
Do not use strong soap, chemi-
cal detergents or hot water, and
do not wash the vehicle in direct
sunlight or when the body of the
vehicle is warm.
Be careful when washing the side windows of your vehicle.
Especially, with high-pressure
water, water may leak through
the windows and wet the interior.
To prevent damage to the plastic parts and lamps, do not clean
with chemical solvents or strong
detergents.
NOTICE
NOTICE
■Glove box lamp
OOS077047
AA PPPPEEAA RRAA NN CCEE CC AA RREE
Page 502 of 523
8
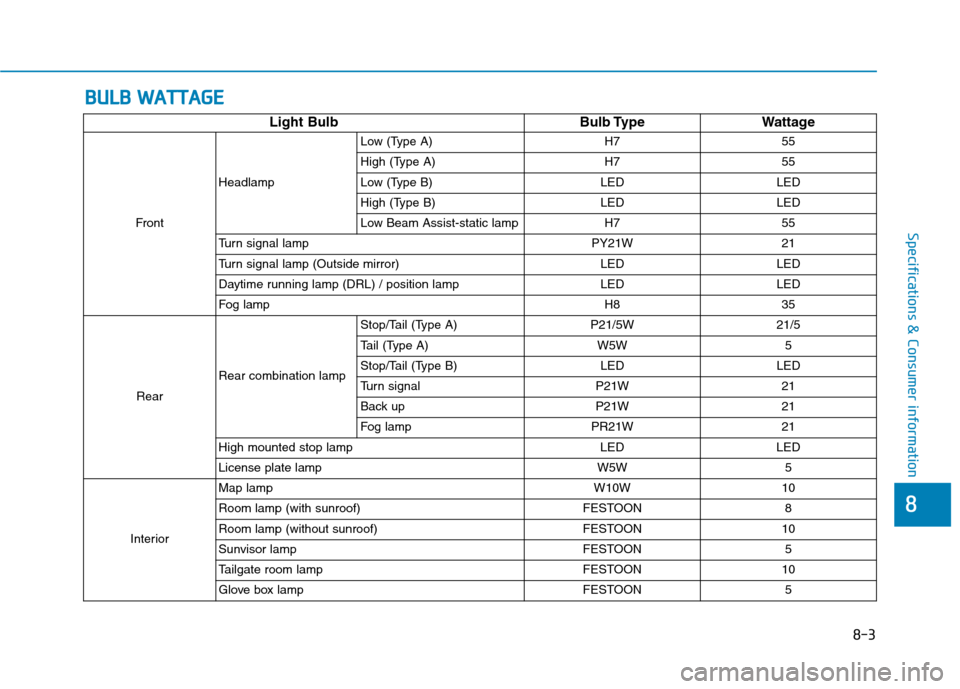
Specifications & Consumer information
BBUU LLBB WW AATTTTAA GG EE
Light Bulb Bulb Type Wattage
Front Headlamp Low (Type A) H7 55
High (Type A) H7 55
Low (Type B) LED LED
High (Type B) LED LED
Low Beam Assist-static lamp H7 55
Turn signal lamp PY21W 21
Turn signal lamp (Outside mirror) LED LED
Daytime running lamp (DRL) / position lamp LED LED
Fog lamp H8 35
Rear Rear combination lamp Stop/Tail (Type A) P21/5W 21/5
Tail (Type A) W5W 5
Stop/Tail (Type B) LED LED
Turn signal P21W 21
Back up P21W 21
Fog lamp PR21W 21
High mounted stop lamp LED LED
License plate lamp W5W 5
Interior Map lamp
W10W 10
Room lamp (with sunroof) FESTOON 8
Room lamp (without sunroof) FESTOON 10
Sunvisor lamp FESTOON 5
Tailgate room lampFESTOON10
Glove box lamp FESTOON 5
8-3
Page 514 of 523
I-3
Emergency Stop Signal (ESS) .................................5-37
Downhill Brake Control (DBC)...............................5-38
Good braking practices ............................................5-40
Brake/clutch fluid .........................................................7-26
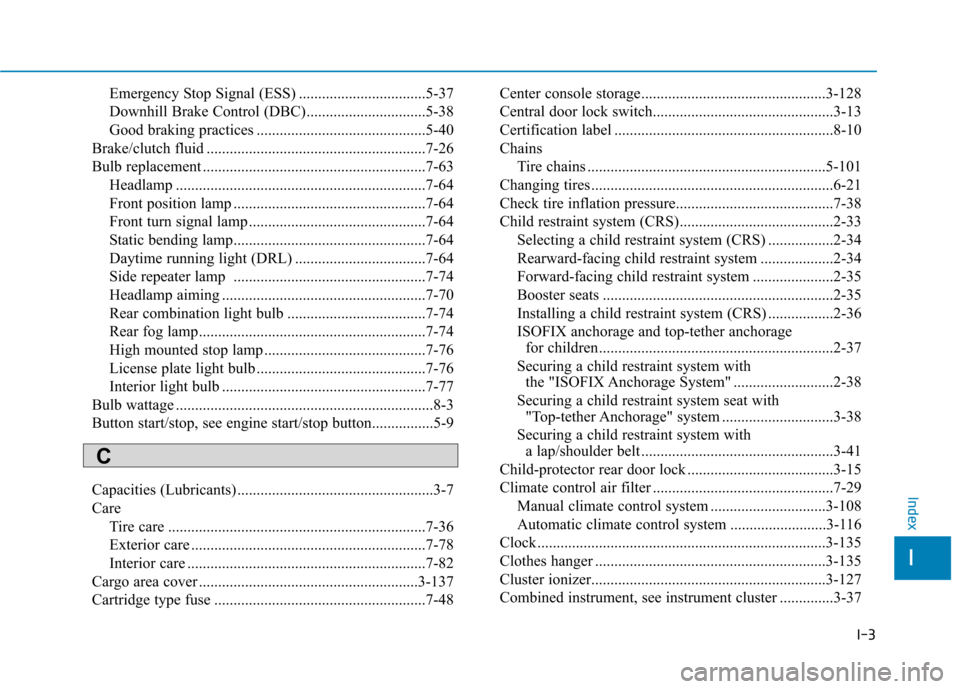
Bulb replacement ..........................................................7-63 Headlamp .................................................................7-64
Front position lamp ..................................................7-64
Front turn signal lamp ..............................................7-64
Static bending lamp..................................................7-64
Daytime running light (DRL) ..................................7-64
Side repeater lamp ..................................................7-74
Headlamp aiming .....................................................7-70
Rear combination light bulb ....................................7-74
Rear fog lamp...........................................................7-74
High mounted stop lamp ..........................................7-76
License plate light bulb ............................................7-76
Interior light bulb .....................................................7-77
Bulb wattage ...................................................................8-3
Button start/stop, see engine start/stop button................5-9
Capacities (Lubricants) ...................................................3-7
Care Tire care ...................................................................7-36
Exterior care .............................................................7-78
Interior care ..............................................................7-82
Cargo area cover .........................................................3-137
Cartridge type fuse .......................................................7-48 Center console storage................................................3-128
Central door lock switch...............................................3-13
Certification label .........................................................8-10
Chains
Tire chains ..............................................................5-101
Changing tires ...............................................................6-21
Check tire inflation pressure.........................................7-38
Child restraint system (CRS)........................................2-33 Selecting a child restraint system (CRS) .................2-34
Rearward-facing child restraint system ...................2-34
Forward-facing child restraint system .....................2-35
Booster seats ............................................................2-35
Installing a child restraint system (CRS) .................2-36
ISOFIX anchorage and top-tether anchorage for children.............................................................2-37
Securing a child restraint system with the "ISOFIX Anchorage System" ..........................2-38
Securing a child restraint system seat with "Top-tether Anchorage" system .............................3-38
Securing a child restraint system with a lap/shoulder belt ..................................................3-41
Child-protector rear door lock ......................................3-15
Climate control air filter ...............................................7-29 Manual climate control system ..............................3-108
Automatic climate control system .........................3-116
Clock ...........................................................................3-135
Clothes hanger ............................................................3-135
Cluster ionizer.............................................................3-127
Combined instrument, see instrument cluster ..............3-37
I
Index
C