2018 Hyundai Kona Key
[x] Cancel search: KeyPage 164 of 523
3-81
Convenient features of your vehicle
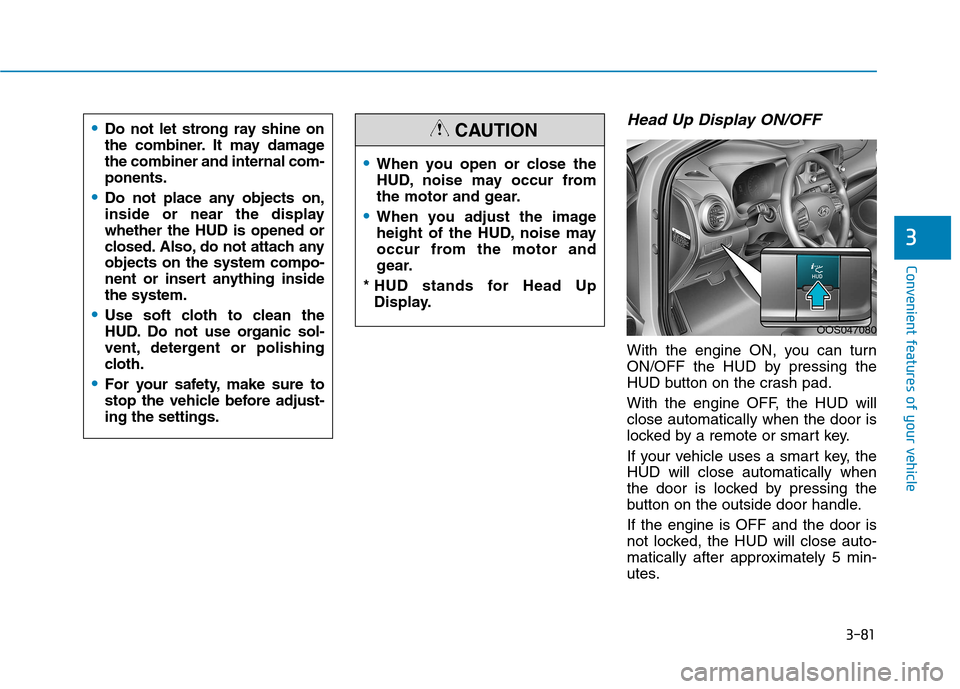
Head Up Display ON/OFF
With the engine ON, you can turn
ON/OFF the HUD by pressing the
HUD button on the crash pad.
With the engine OFF, the HUD will close automatically when the door is
locked by a remote or smart key.
If your vehicle uses a smart key, the HUD will close automatically when
the door is locked by pressing the
button on the outside door handle. If the engine is OFF and the door is
not locked, the HUD will close auto-
matically after approximately 5 min-
utes.
3
When you open or close the
HUD, noise may occur from
the motor and gear.
When you adjust the image
height of the HUD, noise may
occur from the motor and
gear.
* HUD stands for Head Up Display.
CAUTION
OOS047080
Do not let strong ray shine on
the combiner. It may damagethe combiner and internal com-ponents.
Do not place any objects on,
inside or near the displaywhether the HUD is opened or
closed. Also, do not attach anyobjects on the system compo-
nent or insert anything insidethe system.
Use soft cloth to clean the
HUD. Do not use organic sol-
vent, detergent or polishing
cloth.
For your safety, make sure to
stop the vehicle before adjust-ing the settings.
Page 173 of 523
3-90
Convenient features of your vehicle
Battery saver function
The purpose of this feature is to pre-
vent the battery from being dis-
charged. The system automatically
turns off the position lamp when the
driver turns the engine off and opens
the driver-side door.
With this feature, the position lamps
will turn off automatically if the driver
parks on the side of road at night.
If necessary, to keep the lamps on
when the engine is turned off, perform
the following:
1) Open the driver-side door.
2) Turn the position lamps OFF andON again using the light switch on
the steering column.
Headlamp delay function
(if equipped)
If you place the ignition switch to the
ACC or OFF position with the head-lamps ON, the headlamps (and/or
position lamps) remain on for about 5
minutes. However, with the engine off if
the driver’s door is opened and closed,the headlamps (and/or position lamps)
are turned off after 15 seconds. The headlamps (and/or position
lamps) can be turned off by pressing
the lock button on the remote key or
smart key twice or turning the light
switch to the OFF or AUTO position.
However, if you turn the light switch
to the AUTO position when it is dark
outside, the headlamps will not be
turned off.
You can activate or deactivate the
Headlamp Delay function from theUser Settings mode on the LCD dis-
play. For more details, refer to
"LCD Display" in this chapter. If the driver gets out of the vehicle
through other doors (except dri-
ver's door), the battery saver func-tion does not operate and the
headlamp delay function does not
turn off automatically. Therefore, It
causes the battery to be dis-
charged. In this case, make sure to
turn off the lamp before getting out
of the vehicle.
NOTICE
Page 175 of 523
3-92
Automatic type
It automatically adjusts the head-
lamp beam level according to the
number of passengers and loading
weight in the luggage area.
It also adjusts to the appropriate head-
lamp beam level for various situations.
Low Beam Assist-Static light (if equipped)
While driving a corner, for greater
visibility and safety, either the left or
right side Low Beam Assist-Static
light will turn on automatically. The
Low Beam Assist-Static light will turn
on when one of the following condi-
tions occur.
Vehicle speed is less than 10 km/h(6 mph) and steering wheel angle
is turned approximately 80 degrees
with the low beam on.
Vehicle speed is between 10 km/h (6 mph) to 90 km/h (56 mph) and
steering wheel angle is turned
approximately 35 degrees with the
low beam on.
When the vehicle is in reverse with one of the conditions above satis-fied, the light opposite to the direc-
tion the steering wheel is steered
will turn on.
Welcome system (if equipped)
Interior lamp
When the interior lamp switch is in the DOOR position and all doors (and
tailgate) are closed and locked, the
room lamp will come on for 30 sec-
onds if any of the below is performed.
When the door unlock button ispressed on the remote key or
smart key.
When the button of the outside door handle is pressed with the
smart key in possession.
At this time, if you press the door lock
or unlock button, the room lamp will
turn off immediately.
Convenient features of your vehicle
If the function does not work
properly, we recommend that
the system be inspected by an
authorized HYUNDAI dealer. Donot attempt to inspect or
replace the wiring yourself.
WARNING
Page 176 of 523
3-93
Convenient features of your vehicle
Interior lights
Do not use the interior lights for
extended periods when the engine
is turned off otherwise the battery
will discharge.
Interior lamp AUTO cut
The interior lamps will automatically
go off approximately 20 minutes after
the engine is turned off and the
doors are closed. If a door is opened,
the lamp will go off 40 minutes after
the engine is turned off. If the doors
are locked and the vehicle enters the
armed stage of the theft alarm sys-
tem, the lamps will go off five sec-
onds later.
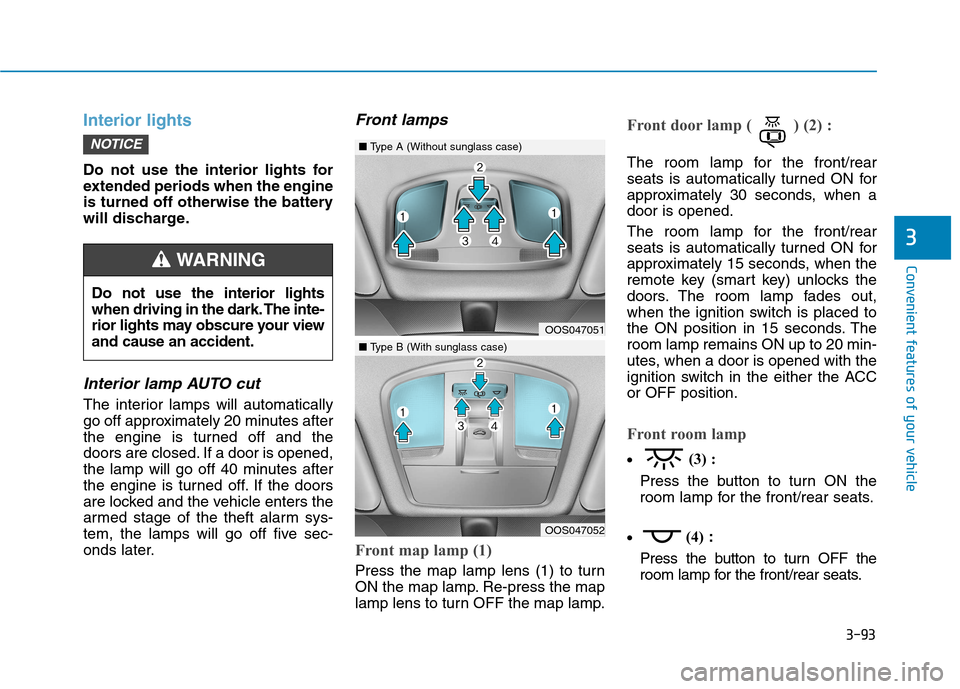
Front lamps
Front map lamp (1)
Press the map lamp lens (1) to turn
ON the map lamp. Re-press the map
lamp lens to turn OFF the map lamp.
Front door lamp ( ) (2) :
The room lamp for the front/rear
seats is automatically turned ON for
approximately 30 seconds, when adoor is opened.
The room lamp for the front/rear
seats is automatically turned ON for
approximately 15 seconds, when the
remote key (smart key) unlocks the
doors. The room lamp fades out,
when the ignition switch is placed to
the ON position in 15 seconds. Theroom lamp remains ON up to 20 min-
utes, when a door is opened with the
ignition switch in the either the ACCor OFF position.
Front room lamp
(3) :
Press the button to turn ON the
room lamp for the front/rear seats.
(4)
:
Press the button to turn OFF the
room lamp for the front/rear seats.
NOTICE
3
Do not use the interior lights
when driving in the dark. The inte-
rior lights may obscure your viewand cause an accident.
WARNING
OOS047051
OOS047052
■ Type A (Without sunglass case)
■Type B (With sunglass case)
Page 216 of 523

3-133
Convenient features of your vehicle
3
Some electronic devices cancause electronic interference
when plugged into a vehicle’s
power outlet. These devices may
cause excessive audio staticand malfunctions in other elec-
tronic systems or devices used
in your vehicle.
Push the plug in as far as it will go. If good contact is not made,
the plug may overheat and the
fuse may open.
Plug in battery equipped electrical/ electronic devices with reverse
current protection. The current
from the battery may flow into the
vehicle's electrical/electronic sys-tem and cause system malfunc-tion.Wireless cellular phone charg- ing system (if equipped)
There is a wireless cellular phone
charger inside the front console.
The system is available when all doors are closed, and when the igni-
tion switch is in the ACC/ON position.
To charge a cellular phone
The wireless cellular phone charging
system charges only the Qi-enabled
cellular phones ( ). Read the label
on the cellular phone accessory
cover or visit your cellular phone
manufacturer’s website to check
whether your cellular phone supports
the Qi technology. The wireless charging process starts
when you put a Qi-enabled cellularphone on the wireless charging unit.
1. Remove other items, including the
smart key, from the wireless charg-
ing unit. If not, the wireless charg-
ing process may be interrupted.Place the cellular phone on thecenter of charging pad.
2. The indicator light is orange when the cellular phone is charging. The
indicator light turns green when
phone charging is complete.
3. You can turn ON or OFF the wire- less charging function in the User
Settings mode on the instrument
cluster. For further information, refer
to the “LCD Display Modes” in this
chapter.
If your cellular phone is not charging:
- Slightly change the position of the cellular phone on the charging pad.
- Make sure the indicator light is orange.
OOS047064
Page 217 of 523
3-134
Convenient features of your vehicle
The indicator light will blink orange
for 10 seconds if there is a malfunc-tion in the wireless charging system.
In this case, temporarily stop the
charging process, and re-attempt to
wirelessly charge your cellular phoneagain.
The system warns you with a mes-
sage on the LCD display if the cellularphone is still on the wireless charging
unit after the engine is turned OFFand the front door is opened.
The wireless cellular phonecharging system may not sup-
port certain cellular phones,
which are not verified for the Qi
specification ( ).
Locate your cellular phone well in the middle of the wireless cel-
lular phone charging system.
Even when your cellular phone
locates slightly to one side, the
charging speed may decrease
and the phone may heat when
charging. The wireless charging process
may temporarily stop, when a
smart key function operates (i.e.
starting the engine, opening the
doors, closing the doors).
For certain cellular phone, the indicator color may not change to
green, even when the wireless
charging process is properlycompleted.
The wireless charging process may temporarily stop, when tempera-
ture abnormally increases inside
the wireless cellular phone charg-
ing system. The wireless charging
process restarts, when tempera-
ture falls to a certain level.
The wireless charging process may temporarily stop when there
is any metallic item, such as a
coin, between the wireless cellu-
lar phone charging system and a
cellular phone.
For certain cellular phones with their own protection, the wireless
charging speed may decrease
and the wireless charging maystop. If the cellular phone has a thick
cover, the wireless charging may
not be possible.
If the cellular phone is not fully contacted into the wireless
charging pad, the wireless charg-
ing may not be possible.
Some magnetic item (credit cards, phone cards, passbook
and tickets) may be damaged
while wireless charging process.
NOTICE
Page 238 of 523
4-17
Multimedia System
4
Operation of HDD, CF, SD andmemory stick devices is not guaran-
teed.
DRM (Digital Rights Management) files cannot be played.
SD-type USB memory, CF-type USB memory, and other USB mem-
ory devices that require adapters
for connection are not supported.
Proper operation of USB HDDs or USB drives with connectors that
loosen due to vehicle vibrations is
not guaranteed. (iStick, etc.)
USB products that are used as key chains or
cell phone accessories
may damage the USB
jack and affect proper
file playback. Please refrain from
use. Use only products with plug
connectors, as shown in the follow-
ing illustration.
When MP3 devices or cell phones are connected simultaneously
through AUX, BT Audio and USB
modes, a popping noise or malfunc-
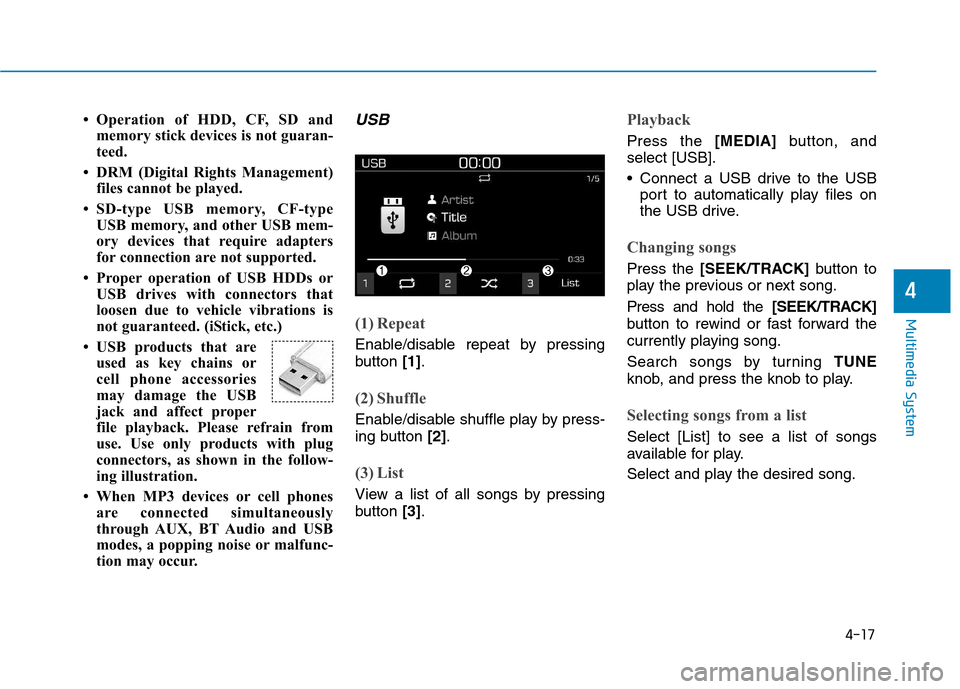
tion may occur.USB
(1) Repeat
Enable/disable repeat by pressing
button [1].
(2) Shuffle
Enable/disable shuffle play by press-
ing button [2].
(3) List
View a list of all songs by pressing
button [3].
Playback
Press the [MEDIA]button, and
select [USB].
Connect a USB drive to the USB port to automatically play files on
the USB drive.
Changing songs
Press the [SEEK/TRACK] button to
play the previous or next song. Press and hold the [SEEK/TRACK]
button to rewind or fast forward the
currently playing song.
Search songs by turning TUNE
knob, and press the knob to play.
Selecting songs from a list
Select [List] to see a list of songs
available for play.
Select and play the desired song.
Page 246 of 523
4-25
Multimedia System
4
Pairing a Bluetooth®device
Information on pairing Bluetooth®
devices
Pairing refers to the process of pairing Bluetooth ®
cell phones or
devices with the system prior to
connection. This is a necessary
procedure for Bluetooth ®
connec-
tion and usage.
Up to five devices can be paired.
Pairing Bluetooth ®
device is not
allowed while vehicle is moving.
Pairing the first Bluetooth ®
device
Press the [PHONE]button on the
audio system or the [CALL]button
on the steering wheel remote control ➟ Search for the vehicle from the
Bluetooth ®
device, and pair ➟Enter
the passkey on the Bluetooth ®
device or approve passkey ➟
Bluetooth ®
pairing completed.
1. When the [PHONE]button on the
audio or the [CALL]button on the
steering wheel remote control is
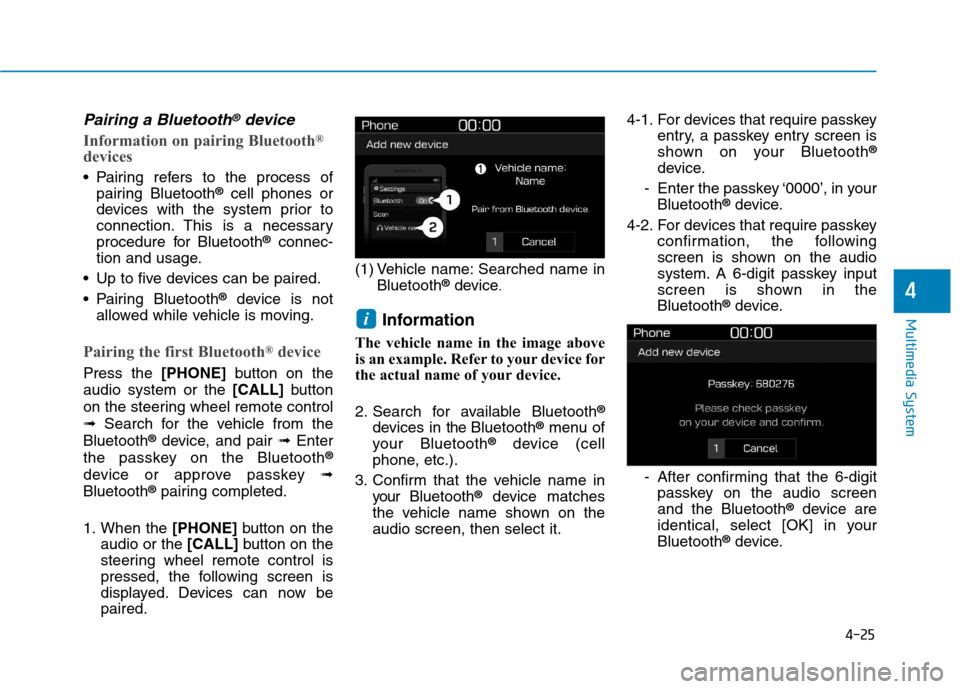
pressed, the following screen is
displayed. Devices can now bepaired. (1) Vehicle name: Searched name in
Bluetooth ®
device .
Information
The vehicle name in the image above
is an example. Refer to your device for
the actual name of your device.
2. Search for available Bluetooth ®
devices in the Bluetooth ®
menu of
your Bluetooth ®
device (cell
phone, etc.).
3. Confirm that the vehicle name in your Bluetooth ®
device matches
the vehicle name shown on the audio screen, then select it. 4-1. For devices that require passkey
entry, a passkey entry screen is
shown on your Bluetooth ®
device.
- Enter the passkey ‘0000’, in your Bluetooth ®
device.
4-2. For devices that require passkey confirmation, the following
screen is shown on the audio
system. A 6-digit passkey input
screen is shown in theBluetooth ®
device.
- After confirming that the 6-digit passkey on the audio screenand the Bluetooth ®
device are
identical, select [OK] in yourBluetooth ®
device.
i