Page 222 of 523

Multimedia System
Multimedia system .................................................4-2AUX, USB and iPod ®
port ...............................................4-2
Antenna ...............................................................................4-2
Steering wheel audio controls .......................................4-3
Bluetooth® Wireless Technology hands-free ..........4-4
Audio / Video / Navigation system (AVN) ..................4-4
How vehicle radio works .................................................4-4
AUDIO (Without Touch Screen) ...........................4-7 Feature of your audio......................................................4-8
Radio...................................................................................4-13
Media..................................................................................4-14
Phone .................................................................................4-23
Setup ..................................................................................4-31
Declaration of conformity ..................................4-33 CE for EU ..........................................................................4-33
4
Page 224 of 523
4-3
Multimedia System
4
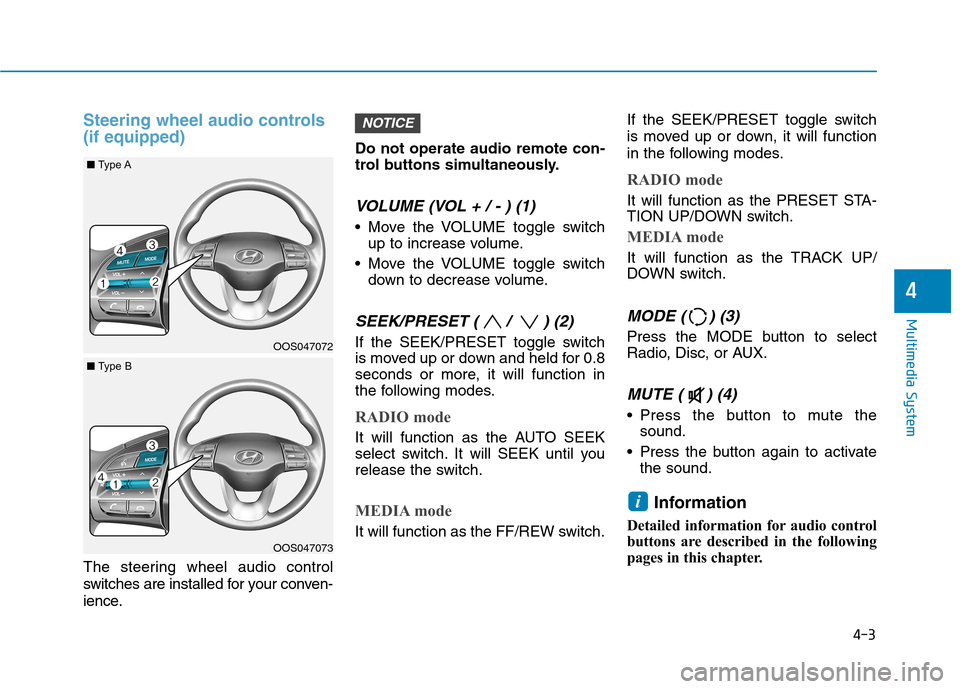
Steering wheel audio controls (if equipped)
The steering wheel audio control
switches are installed for your conven-
ience.Do not operate audio remote con-
trol buttons simultaneously.
VOLUME (VOL + / - ) (1)
Move the VOLUME toggle switch
up to increase volume.
Move the VOLUME toggle switch down to decrease volume.
SEEK/PRESET ( / ) (2)
If the SEEK/PRESET toggle switch
is moved up or down and held for 0.8
seconds or more, it will function in
the following modes.
RADIO mode
It will function as the AUTO SEEK
select switch. It will SEEK until you
release the switch.
MEDIA mode
It will function as the FF/REW switch. If the SEEK/PRESET toggle switch
is moved up or down, it will function
in the following modes.
RADIO mode
It will function as the PRESET STA-
TION UP/DOWN switch.
MEDIA mode
It will function as the TRACK UP/
DOWN switch.
MODE ( ) (3)
Press the MODE button to select
Radio, Disc, or AUX.
MUTE ( ) (4)
Press the button to mute the
sound.
Press the button again to activate the sound.
Information
Detailed information for audio control
buttons are described in the following
pages in this chapter.
i
NOTICE
OOS047072
OOS047073
■ Type A
■Type B
Page 231 of 523
4-10
Multimedia System
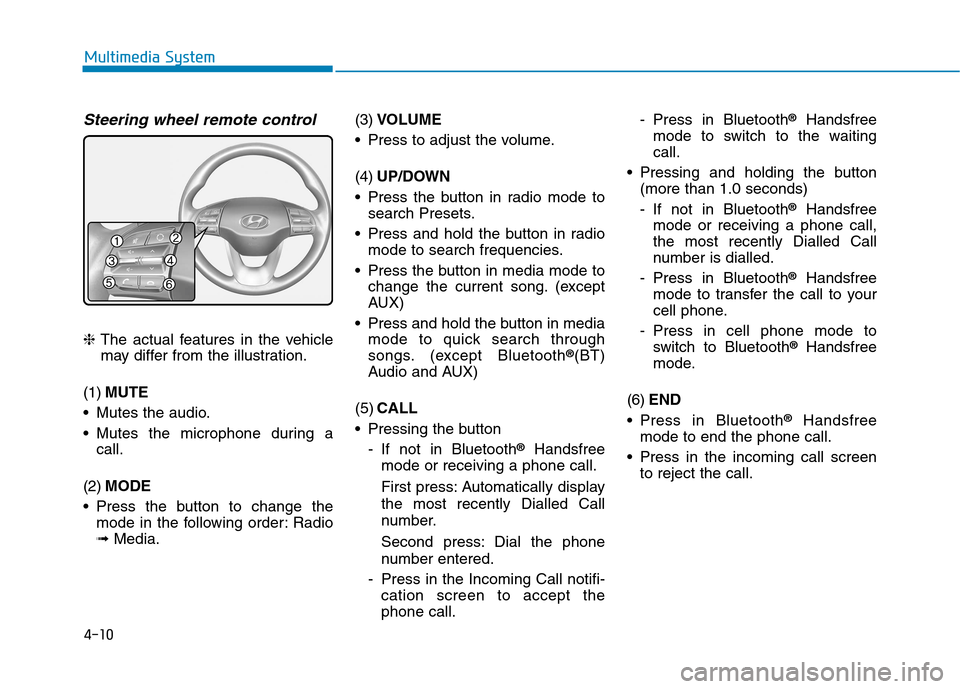
Steering wheel remote control
❈The actual features in the vehicle
may differ from the illustration.
(1) MUTE
Mutes the audio.
Mutes the microphone during a call.
(2) MODE
Press the button to change the mode in the following order: Radio ➟ Media. (3)
VOLUME
Press to adjust the volume. (4) UP/DOWN
Press the button in radio mode to search Presets.
Press and hold the button in radio mode to search frequencies.
Press the button in media mode to change the current song. (except
AUX)
Press and hold the button in media mode to quick search through
songs. (except Bluetooth ®
(BT)
Audio and AUX)
(5) CALL
Pressing the button
- If not in Bluetooth ®
Handsfree
mode or receiving a phone call.
First press: Automatically display
the most recently Dialled Call
number.
Second press: Dial the phone
number entered.
- Press in the Incoming Call notifi- cation screen to accept the phone call. - Press in Bluetooth
®
Handsfree
mode to switch to the waitingcall.
Pressing and holding the button (more than 1.0 seconds)
- If not in Bluetooth ®
Handsfree
mode or receiving a phone call,
the most recently Dialled Call
number is dialled.
- Press in Bluetooth ®
Handsfree
mode to transfer the call to your
cell phone.
- Press in cell phone mode to switch to Bluetooth ®
Handsfree
mode.
(6) END
Press in Bluetooth ®
Handsfree
mode to end the phone call.
Press in the incoming call screen to reject the call.
Page 246 of 523
4-25
Multimedia System
4
Pairing a Bluetooth®device
Information on pairing Bluetooth®
devices
Pairing refers to the process of pairing Bluetooth ®
cell phones or
devices with the system prior to
connection. This is a necessary
procedure for Bluetooth ®
connec-
tion and usage.
Up to five devices can be paired.
Pairing Bluetooth ®
device is not
allowed while vehicle is moving.
Pairing the first Bluetooth ®
device
Press the [PHONE]button on the
audio system or the [CALL]button
on the steering wheel remote control ➟ Search for the vehicle from the
Bluetooth ®
device, and pair ➟Enter
the passkey on the Bluetooth ®
device or approve passkey ➟
Bluetooth ®
pairing completed.
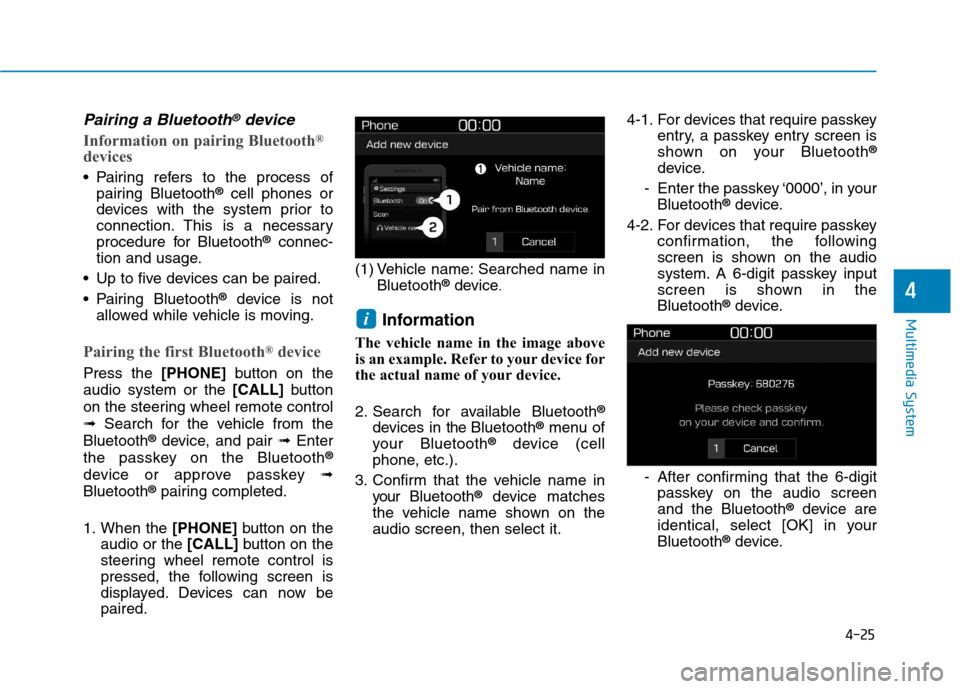
1. When the [PHONE]button on the
audio or the [CALL]button on the
steering wheel remote control is
pressed, the following screen is
displayed. Devices can now bepaired. (1) Vehicle name: Searched name in
Bluetooth ®
device .
Information
The vehicle name in the image above
is an example. Refer to your device for
the actual name of your device.
2. Search for available Bluetooth ®
devices in the Bluetooth ®
menu of
your Bluetooth ®
device (cell
phone, etc.).
3. Confirm that the vehicle name in your Bluetooth ®
device matches
the vehicle name shown on the audio screen, then select it. 4-1. For devices that require passkey
entry, a passkey entry screen is
shown on your Bluetooth ®
device.
- Enter the passkey ‘0000’, in your Bluetooth ®
device.
4-2. For devices that require passkey confirmation, the following
screen is shown on the audio
system. A 6-digit passkey input
screen is shown in theBluetooth ®
device.
- After confirming that the 6-digit passkey on the audio screenand the Bluetooth ®
device are
identical, select [OK] in yourBluetooth ®
device.
i
Page 247 of 523
![Hyundai Kona 2018 Owners Manual 4-26
Multimedia System
Information
The 6-digit passkey in the image
above is an example. Refer to your
vehicle for the actual passkey.
Pairing a second Bluetooth ®
device
Press the [SETUP/CLOCK] bu Hyundai Kona 2018 Owners Manual 4-26
Multimedia System
Information
The 6-digit passkey in the image
above is an example. Refer to your
vehicle for the actual passkey.
Pairing a second Bluetooth ®
device
Press the [SETUP/CLOCK] bu](/manual-img/35/16231/w960_16231-246.png)
4-26
Multimedia System
Information
The 6-digit passkey in the image
above is an example. Refer to your
vehicle for the actual passkey.
Pairing a second Bluetooth ®
device
Press the [SETUP/CLOCK] button
on the audio system ➟Select
[Bluetooth] ➟Select [Connections]
➟ Select [Add new device].
- The pairing procedure from this point is identical to [Pairing the first
Bluetooth device]. Information
Bluetooth ®
standby mode lasts for
three minutes. If a device is not
paired within three minutes, pairing
is canceled. Start over from the
beginning.
For most Bluetooth ®
devices, a con-
nection is established automatically
after pairing. Some devices, howev-
er, require separate confirmation
when connecting after pairing. Be
sure to check your Bluetooth ®
device after pairing to confirm that
it has connected.
Connecting Bluetooth®devices
If there are no connected devices
Press the [PHONE]button on the
audio system or the [CALL]button in
the steering wheel remote control ➟
List of paired Bluetooth ®
devices ➟
Select the desired Bluetooth ®
device
from the list ➟Connect Bluetooth ®
.
ii
Page 258 of 523
5-4
Driving your vehicle
Before entering the vehicle
• Be sure all windows, outside mir-ror(s), and outside lights are clean
and unobstructed.
Remove frost, snow, or ice.
Visually check the tires for uneven wear and damage.
Check under the vehicle for any sign of leaks.
Be sure there are no obstacles behind you if you intend to back up.
Before starting
Make sure the hood, the tailgate,and the doors are securely closed
and locked.
Adjust the position of the seat and steering wheel.
Adjust the inside and outside rearview mirrors.
Verify all the lights work.
Fasten your seat belt. Check that all passengers have fastened their seat belt.
Check the gauges and indicators in the instrument panel and the mes-
sages on the instrument display
when the ignition switch is in theON position.
Check that any items you are car- rying are stored properly or fas-
tened down securely.
BBEEFFOO RREE DD RRIIVV IINN GG
To reduce the risk of SERIOUS
INJURY or DEATH, take the fol-
lowing precautions:
•ALWAYS wear your seat belt.
All passengers must be prop-
erly belted whenever the vehi-
cle is moving. For more infor-
mation, refer to "Seat Belts" in
chapter 2.
Always drive defensively.
Assume other drivers or pedes-
trians may be careless andmake mistakes.
Stay focused on the task of
driving. Driver distraction cancause accidents.
Leave plenty of space between
you and the vehicle in front of
you.
WARNING
Page 260 of 523
5-6
Driving your vehicleI
I GG NN IITT IIOO NN SS WW IITT CCHH
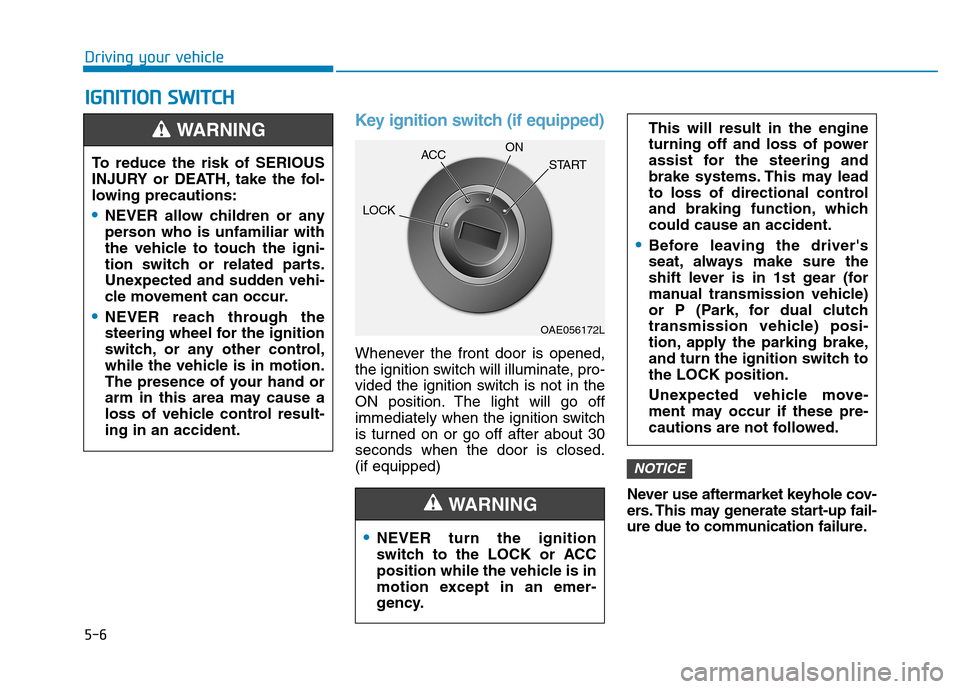
Key ignition switch (if equipped)
Whenever the front door is opened,
the ignition switch will illuminate, pro-
vided the ignition switch is not in the
ON position. The light will go off
immediately when the ignition switch
is turned on or go off after about 30seconds when the door is closed.(if equipped)
Never use aftermarket keyhole cov-
ers. This may generate start-up fail-
ure due to communication failure.
NOTICE
NEVER turn the ignition
switch to the LOCK or ACC
position while the vehicle is in
motion except in an emer-
gency.
This will result in the engine
turning off and loss of power
assist for the steering and
brake systems. This may lead
to loss of directional control
and braking function, whichcould cause an accident.
Before leaving the driver's
seat, always make sure the
shift lever is in 1st gear (for
manual transmission vehicle)
or P (Park, for dual clutch
transmission vehicle) posi-
tion, apply the parking brake,
and turn the ignition switch tothe LOCK position.
Unexpected vehicle move-
ment may occur if these pre-
cautions are not followed.
WARNING
To reduce the risk of SERIOUS
INJURY or DEATH, take the fol-
lowing precautions:
NEVER allow children or any
person who is unfamiliar with
the vehicle to touch the igni-
tion switch or related parts.
Unexpected and sudden vehi-
cle movement can occur.
NEVER reach through the
steering wheel for the ignition
switch, or any other control,
while the vehicle is in motion.
The presence of your hand or
arm in this area may cause a
loss of vehicle control result-ing in an accident.
WARNING
OAE056172L
LOCK
ACC
ON
START
Page 261 of 523
5-7
Driving your vehicle
5
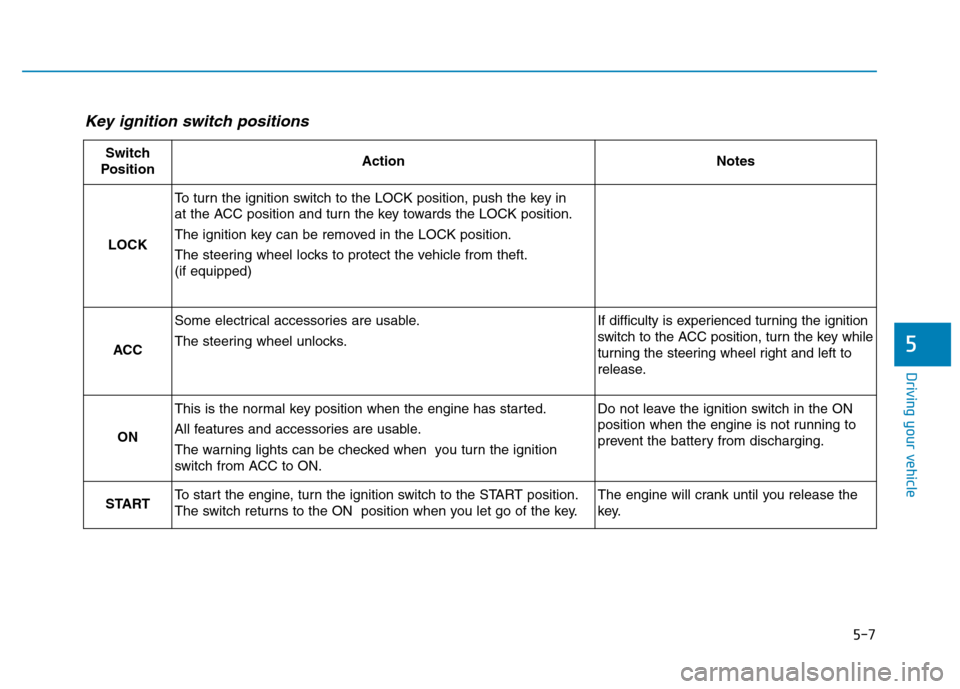
Key ignition switch positions
Switch
PositionActionNotes
LOCK
To turn the ignition switch to the LOCK position, push the key in
at the ACC position and turn the key towards the LOCK position.
The ignition key can be removed in the LOCK position.
The steering wheel locks to protect the vehicle from theft. (if equipped)
ACC
Some electrical accessories are usable.
The steering wheel unlocks.If difficulty is experienced turning the ignition
switch to the ACC position, turn the key while
turning the steering wheel right and left to
release.
ON
This is the normal key position when the engine has started.
All features and accessories are usable.
The warning lights can be checked when you turn the ignition
switch from ACC to ON.Do not leave the ignition switch in the ON
position when the engine is not running to
prevent the battery from discharging.
STARTTo start the engine, turn the ignition switch to the START position.
The switch returns to the ON position when you let go of the key.The engine will crank until you release the
key.