2018 Hyundai Kona steering
[x] Cancel search: steeringPage 161 of 523
3-78
Convenient features of your vehicle
Fuel economy
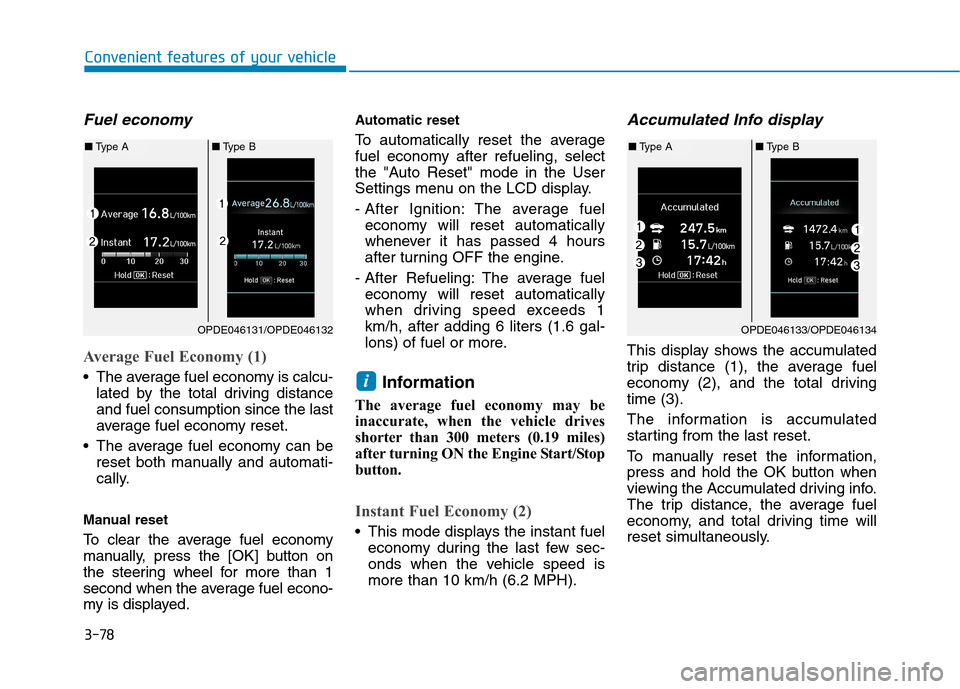
Average Fuel Economy (1)
The average fuel economy is calcu-lated by the total driving distance and fuel consumption since the last
average fuel economy reset.
The average fuel economy can be reset both manually and automati-
cally.
Manual reset
To clear the average fuel economy
manually, press the [OK] button on
the steering wheel for more than 1
second when the average fuel econo-
my is displayed. Automatic reset
To automatically reset the average
fuel economy after refueling, select
the "Auto Reset" mode in the User
Settings menu on the LCD display.
- After Ignition: The average fuel
economy will reset automatically
whenever it has passed 4 hours
after turning OFF the engine.
- After Refueling: The average fuel economy will reset automatically
when driving speed exceeds 1km/h, after adding 6 liters (1.6 gal-
lons) of fuel or more.
Information
The average fuel economy may be
inaccurate, when the vehicle drives
shorter than 300 meters (0.19 miles)
after turning ON the Engine Start/Stop
button.
Instant Fuel Economy (2)
This mode displays the instant fuel economy during the last few sec-
onds when the vehicle speed ismore than 10 km/h (6.2 MPH).
Accumulated Info display
This display shows the accumulated
trip distance (1), the average fuel
economy (2), and the total drivingtime (3).
The information is accumulated
starting from the last reset.
To manually reset the information,
press and hold the OK button when
viewing the Accumulated driving info.
The trip distance, the average fuel
economy, and total driving time will
reset simultaneously.
i
OPDE046131/OPDE046132
■Type A ■Type B
OPDE046133/OPDE046134
■Type A ■Type B
Page 173 of 523
3-90
Convenient features of your vehicle
Battery saver function
The purpose of this feature is to pre-
vent the battery from being dis-
charged. The system automatically
turns off the position lamp when the
driver turns the engine off and opens
the driver-side door.
With this feature, the position lamps
will turn off automatically if the driver
parks on the side of road at night.
If necessary, to keep the lamps on
when the engine is turned off, perform
the following:
1) Open the driver-side door.
2) Turn the position lamps OFF andON again using the light switch on
the steering column.
Headlamp delay function
(if equipped)
If you place the ignition switch to the
ACC or OFF position with the head-lamps ON, the headlamps (and/or
position lamps) remain on for about 5
minutes. However, with the engine off if
the driver’s door is opened and closed,the headlamps (and/or position lamps)
are turned off after 15 seconds. The headlamps (and/or position
lamps) can be turned off by pressing
the lock button on the remote key or
smart key twice or turning the light
switch to the OFF or AUTO position.
However, if you turn the light switch
to the AUTO position when it is dark
outside, the headlamps will not be
turned off.
You can activate or deactivate the
Headlamp Delay function from theUser Settings mode on the LCD dis-
play. For more details, refer to
"LCD Display" in this chapter. If the driver gets out of the vehicle
through other doors (except dri-
ver's door), the battery saver func-tion does not operate and the
headlamp delay function does not
turn off automatically. Therefore, It
causes the battery to be dis-
charged. In this case, make sure to
turn off the lamp before getting out
of the vehicle.
NOTICE
Page 175 of 523
3-92
Automatic type
It automatically adjusts the head-
lamp beam level according to the
number of passengers and loading
weight in the luggage area.
It also adjusts to the appropriate head-
lamp beam level for various situations.
Low Beam Assist-Static light (if equipped)
While driving a corner, for greater
visibility and safety, either the left or
right side Low Beam Assist-Static
light will turn on automatically. The
Low Beam Assist-Static light will turn
on when one of the following condi-
tions occur.
Vehicle speed is less than 10 km/h(6 mph) and steering wheel angle
is turned approximately 80 degrees
with the low beam on.
Vehicle speed is between 10 km/h (6 mph) to 90 km/h (56 mph) and
steering wheel angle is turned
approximately 35 degrees with the
low beam on.
When the vehicle is in reverse with one of the conditions above satis-fied, the light opposite to the direc-
tion the steering wheel is steered
will turn on.
Welcome system (if equipped)
Interior lamp
When the interior lamp switch is in the DOOR position and all doors (and
tailgate) are closed and locked, the
room lamp will come on for 30 sec-
onds if any of the below is performed.
When the door unlock button ispressed on the remote key or
smart key.
When the button of the outside door handle is pressed with the
smart key in possession.
At this time, if you press the door lock
or unlock button, the room lamp will
turn off immediately.
Convenient features of your vehicle
If the function does not work
properly, we recommend that
the system be inspected by an
authorized HYUNDAI dealer. Donot attempt to inspect or
replace the wiring yourself.
WARNING
Page 222 of 523

Multimedia System
Multimedia system .................................................4-2AUX, USB and iPod ®
port ...............................................4-2
Antenna ...............................................................................4-2
Steering wheel audio controls .......................................4-3
Bluetooth® Wireless Technology hands-free ..........4-4
Audio / Video / Navigation system (AVN) ..................4-4
How vehicle radio works .................................................4-4
AUDIO (Without Touch Screen) ...........................4-7 Feature of your audio......................................................4-8
Radio...................................................................................4-13
Media..................................................................................4-14
Phone .................................................................................4-23
Setup ..................................................................................4-31
Declaration of conformity ..................................4-33 CE for EU ..........................................................................4-33
4
Page 224 of 523
4-3
Multimedia System
4
Steering wheel audio controls (if equipped)
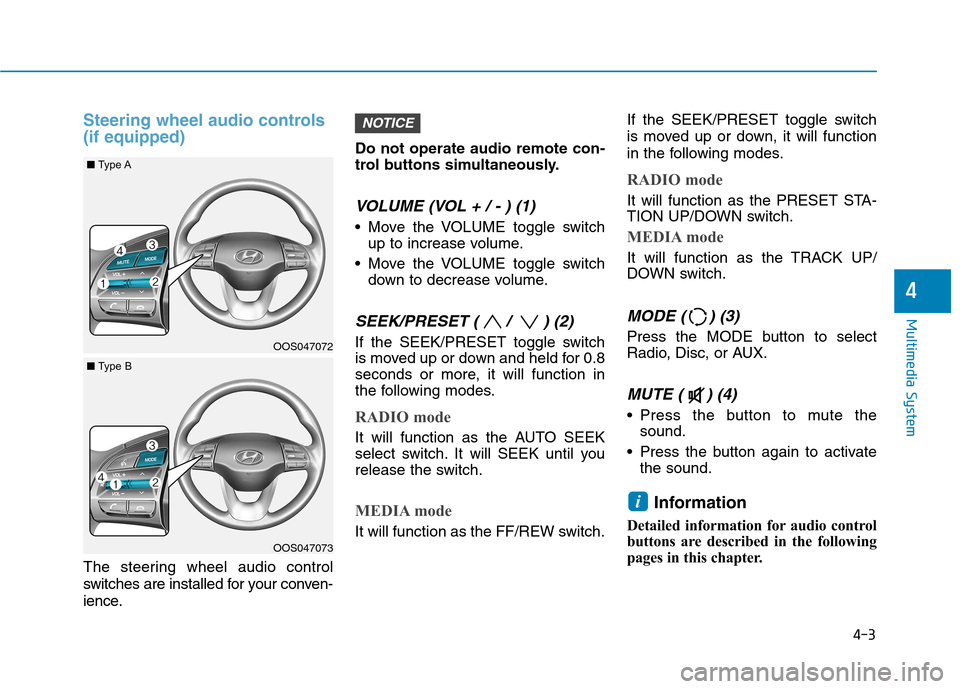
The steering wheel audio control
switches are installed for your conven-
ience.Do not operate audio remote con-
trol buttons simultaneously.
VOLUME (VOL + / - ) (1)
Move the VOLUME toggle switch
up to increase volume.
Move the VOLUME toggle switch down to decrease volume.
SEEK/PRESET ( / ) (2)
If the SEEK/PRESET toggle switch
is moved up or down and held for 0.8
seconds or more, it will function in
the following modes.
RADIO mode
It will function as the AUTO SEEK
select switch. It will SEEK until you
release the switch.
MEDIA mode
It will function as the FF/REW switch. If the SEEK/PRESET toggle switch
is moved up or down, it will function
in the following modes.
RADIO mode
It will function as the PRESET STA-
TION UP/DOWN switch.
MEDIA mode
It will function as the TRACK UP/
DOWN switch.
MODE ( ) (3)
Press the MODE button to select
Radio, Disc, or AUX.
MUTE ( ) (4)
Press the button to mute the
sound.
Press the button again to activate the sound.
Information
Detailed information for audio control
buttons are described in the following
pages in this chapter.
i
NOTICE
OOS047072
OOS047073
■ Type A
■Type B
Page 231 of 523
4-10
Multimedia System
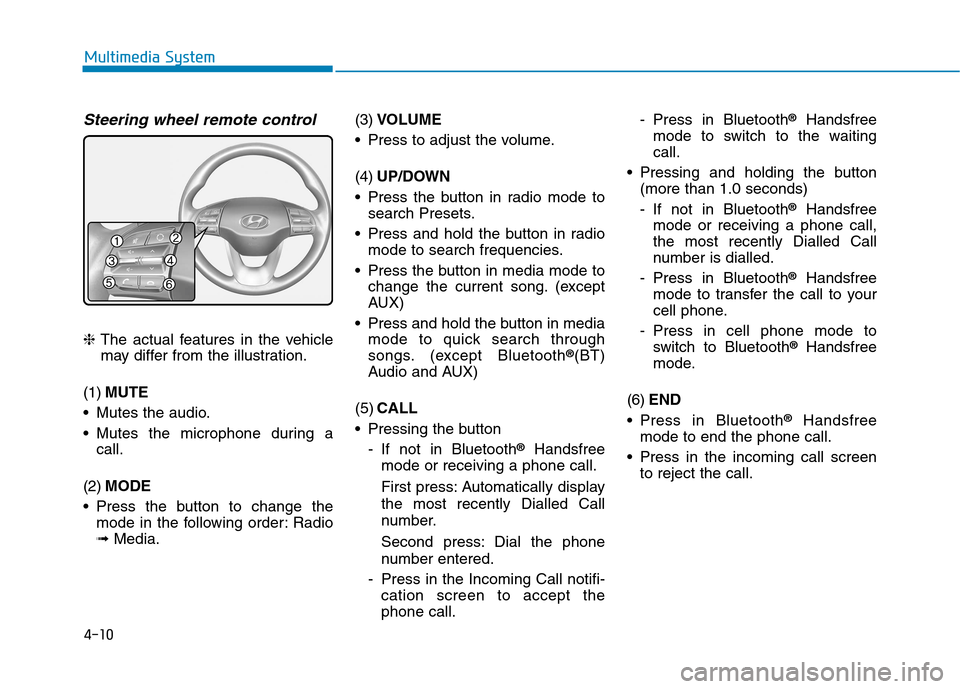
Steering wheel remote control
❈The actual features in the vehicle
may differ from the illustration.
(1) MUTE
Mutes the audio.
Mutes the microphone during a call.
(2) MODE
Press the button to change the mode in the following order: Radio ➟ Media. (3)
VOLUME
Press to adjust the volume. (4) UP/DOWN
Press the button in radio mode to search Presets.
Press and hold the button in radio mode to search frequencies.
Press the button in media mode to change the current song. (except
AUX)
Press and hold the button in media mode to quick search through
songs. (except Bluetooth ®
(BT)
Audio and AUX)
(5) CALL
Pressing the button
- If not in Bluetooth ®
Handsfree
mode or receiving a phone call.
First press: Automatically display
the most recently Dialled Call
number.
Second press: Dial the phone
number entered.
- Press in the Incoming Call notifi- cation screen to accept the phone call. - Press in Bluetooth
®
Handsfree
mode to switch to the waitingcall.
Pressing and holding the button (more than 1.0 seconds)
- If not in Bluetooth ®
Handsfree
mode or receiving a phone call,
the most recently Dialled Call
number is dialled.
- Press in Bluetooth ®
Handsfree
mode to transfer the call to your
cell phone.
- Press in cell phone mode to switch to Bluetooth ®
Handsfree
mode.
(6) END
Press in Bluetooth ®
Handsfree
mode to end the phone call.
Press in the incoming call screen to reject the call.
Page 246 of 523
4-25
Multimedia System
4
Pairing a Bluetooth®device
Information on pairing Bluetooth®
devices
Pairing refers to the process of pairing Bluetooth ®
cell phones or
devices with the system prior to
connection. This is a necessary
procedure for Bluetooth ®
connec-
tion and usage.
Up to five devices can be paired.
Pairing Bluetooth ®
device is not
allowed while vehicle is moving.
Pairing the first Bluetooth ®
device
Press the [PHONE]button on the
audio system or the [CALL]button
on the steering wheel remote control ➟ Search for the vehicle from the
Bluetooth ®
device, and pair ➟Enter
the passkey on the Bluetooth ®
device or approve passkey ➟
Bluetooth ®
pairing completed.
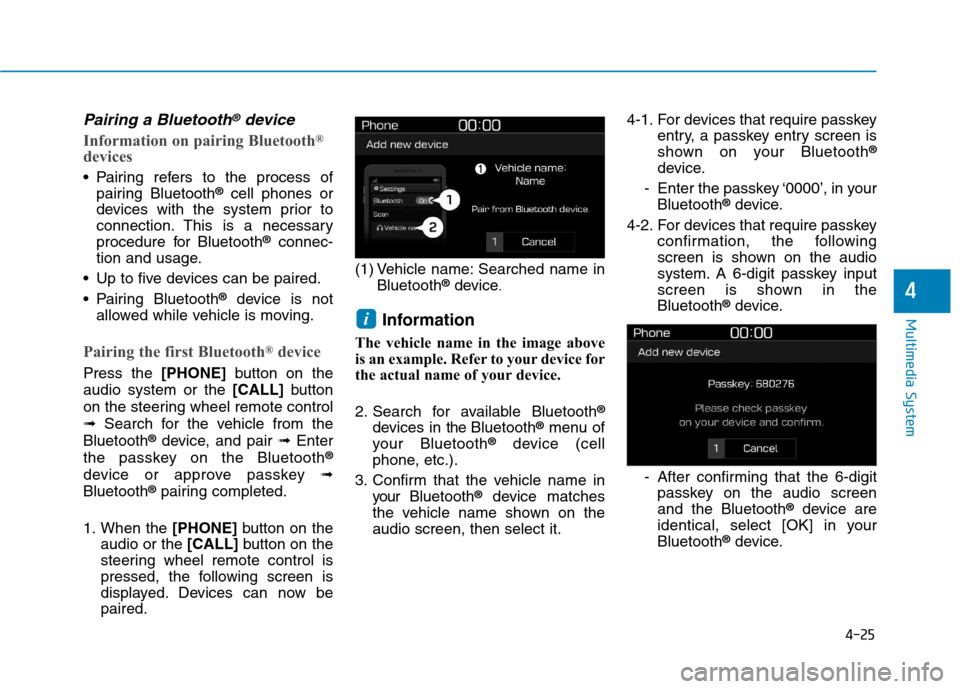
1. When the [PHONE]button on the
audio or the [CALL]button on the
steering wheel remote control is
pressed, the following screen is
displayed. Devices can now bepaired. (1) Vehicle name: Searched name in
Bluetooth ®
device .
Information
The vehicle name in the image above
is an example. Refer to your device for
the actual name of your device.
2. Search for available Bluetooth ®
devices in the Bluetooth ®
menu of
your Bluetooth ®
device (cell
phone, etc.).
3. Confirm that the vehicle name in your Bluetooth ®
device matches
the vehicle name shown on the audio screen, then select it. 4-1. For devices that require passkey
entry, a passkey entry screen is
shown on your Bluetooth ®
device.
- Enter the passkey ‘0000’, in your Bluetooth ®
device.
4-2. For devices that require passkey confirmation, the following
screen is shown on the audio
system. A 6-digit passkey input
screen is shown in theBluetooth ®
device.
- After confirming that the 6-digit passkey on the audio screenand the Bluetooth ®
device are
identical, select [OK] in yourBluetooth ®
device.
i
Page 247 of 523
![Hyundai Kona 2018 Owners Manual 4-26
Multimedia System
Information
The 6-digit passkey in the image
above is an example. Refer to your
vehicle for the actual passkey.
Pairing a second Bluetooth ®
device
Press the [SETUP/CLOCK] bu Hyundai Kona 2018 Owners Manual 4-26
Multimedia System
Information
The 6-digit passkey in the image
above is an example. Refer to your
vehicle for the actual passkey.
Pairing a second Bluetooth ®
device
Press the [SETUP/CLOCK] bu](/manual-img/35/16231/w960_16231-246.png)
4-26
Multimedia System
Information
The 6-digit passkey in the image
above is an example. Refer to your
vehicle for the actual passkey.
Pairing a second Bluetooth ®
device
Press the [SETUP/CLOCK] button
on the audio system ➟Select
[Bluetooth] ➟Select [Connections]
➟ Select [Add new device].
- The pairing procedure from this point is identical to [Pairing the first
Bluetooth device]. Information
Bluetooth ®
standby mode lasts for
three minutes. If a device is not
paired within three minutes, pairing
is canceled. Start over from the
beginning.
For most Bluetooth ®
devices, a con-
nection is established automatically
after pairing. Some devices, howev-
er, require separate confirmation
when connecting after pairing. Be
sure to check your Bluetooth ®
device after pairing to confirm that
it has connected.
Connecting Bluetooth®devices
If there are no connected devices
Press the [PHONE]button on the
audio system or the [CALL]button in
the steering wheel remote control ➟
List of paired Bluetooth ®
devices ➟
Select the desired Bluetooth ®
device
from the list ➟Connect Bluetooth ®
.
ii