2018 Hyundai Kona key battery
[x] Cancel search: key batteryPage 173 of 523

3-90
Convenient features of your vehicle
Battery saver function
The purpose of this feature is to pre-
vent the battery from being dis-
charged. The system automatically
turns off the position lamp when the
driver turns the engine off and opens
the driver-side door.
With this feature, the position lamps
will turn off automatically if the driver
parks on the side of road at night.
If necessary, to keep the lamps on
when the engine is turned off, perform
the following:
1) Open the driver-side door.
2) Turn the position lamps OFF andON again using the light switch on
the steering column.
Headlamp delay function
(if equipped)
If you place the ignition switch to the
ACC or OFF position with the head-lamps ON, the headlamps (and/or
position lamps) remain on for about 5
minutes. However, with the engine off if
the driver’s door is opened and closed,the headlamps (and/or position lamps)
are turned off after 15 seconds. The headlamps (and/or position
lamps) can be turned off by pressing
the lock button on the remote key or
smart key twice or turning the light
switch to the OFF or AUTO position.
However, if you turn the light switch
to the AUTO position when it is dark
outside, the headlamps will not be
turned off.
You can activate or deactivate the
Headlamp Delay function from theUser Settings mode on the LCD dis-
play. For more details, refer to
"LCD Display" in this chapter. If the driver gets out of the vehicle
through other doors (except dri-
ver's door), the battery saver func-tion does not operate and the
headlamp delay function does not
turn off automatically. Therefore, It
causes the battery to be dis-
charged. In this case, make sure to
turn off the lamp before getting out
of the vehicle.
NOTICE
Page 176 of 523

3-93
Convenient features of your vehicle
Interior lights
Do not use the interior lights for
extended periods when the engine
is turned off otherwise the battery
will discharge.
Interior lamp AUTO cut
The interior lamps will automatically
go off approximately 20 minutes after
the engine is turned off and the
doors are closed. If a door is opened,
the lamp will go off 40 minutes after
the engine is turned off. If the doors
are locked and the vehicle enters the
armed stage of the theft alarm sys-
tem, the lamps will go off five sec-
onds later.
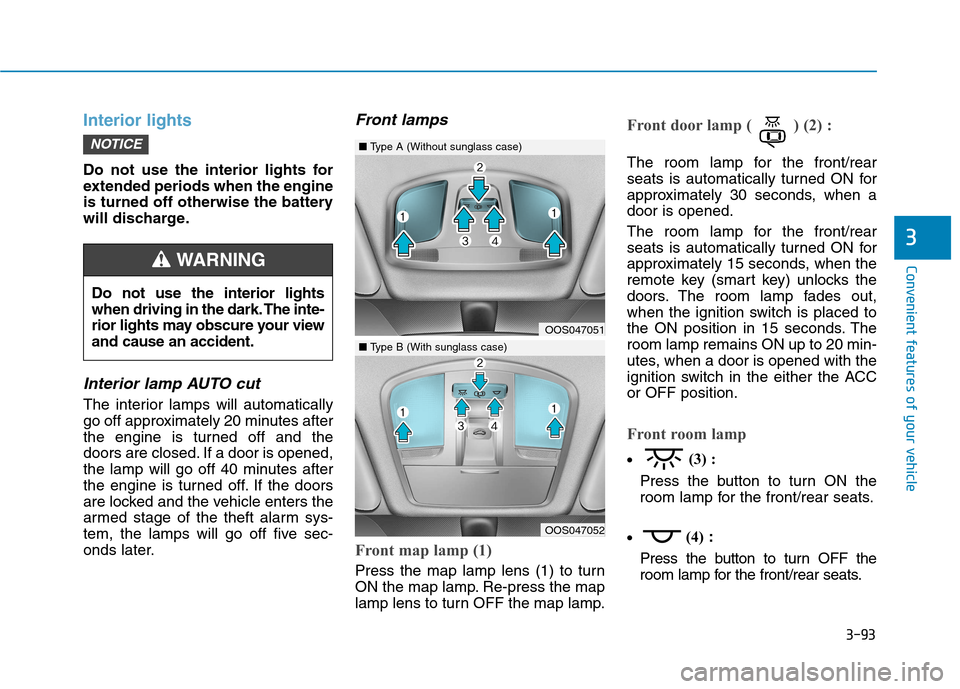
Front lamps
Front map lamp (1)
Press the map lamp lens (1) to turn
ON the map lamp. Re-press the map
lamp lens to turn OFF the map lamp.
Front door lamp ( ) (2) :
The room lamp for the front/rear
seats is automatically turned ON for
approximately 30 seconds, when adoor is opened.
The room lamp for the front/rear
seats is automatically turned ON for
approximately 15 seconds, when the
remote key (smart key) unlocks the
doors. The room lamp fades out,
when the ignition switch is placed to
the ON position in 15 seconds. Theroom lamp remains ON up to 20 min-
utes, when a door is opened with the
ignition switch in the either the ACCor OFF position.
Front room lamp
(3) :
Press the button to turn ON the
room lamp for the front/rear seats.
(4)
:
Press the button to turn OFF the
room lamp for the front/rear seats.
NOTICE
3
Do not use the interior lights
when driving in the dark. The inte-
rior lights may obscure your viewand cause an accident.
WARNING
OOS047051
OOS047052
■ Type A (Without sunglass case)
■Type B (With sunglass case)
Page 216 of 523

3-133
Convenient features of your vehicle
3
Some electronic devices cancause electronic interference
when plugged into a vehicle’s
power outlet. These devices may
cause excessive audio staticand malfunctions in other elec-
tronic systems or devices used
in your vehicle.
Push the plug in as far as it will go. If good contact is not made,
the plug may overheat and the
fuse may open.
Plug in battery equipped electrical/ electronic devices with reverse
current protection. The current
from the battery may flow into the
vehicle's electrical/electronic sys-tem and cause system malfunc-tion.Wireless cellular phone charg- ing system (if equipped)
There is a wireless cellular phone
charger inside the front console.
The system is available when all doors are closed, and when the igni-
tion switch is in the ACC/ON position.
To charge a cellular phone
The wireless cellular phone charging
system charges only the Qi-enabled
cellular phones ( ). Read the label
on the cellular phone accessory
cover or visit your cellular phone
manufacturer’s website to check
whether your cellular phone supports
the Qi technology. The wireless charging process starts
when you put a Qi-enabled cellularphone on the wireless charging unit.
1. Remove other items, including the
smart key, from the wireless charg-
ing unit. If not, the wireless charg-
ing process may be interrupted.Place the cellular phone on thecenter of charging pad.
2. The indicator light is orange when the cellular phone is charging. The
indicator light turns green when
phone charging is complete.
3. You can turn ON or OFF the wire- less charging function in the User
Settings mode on the instrument
cluster. For further information, refer
to the “LCD Display Modes” in this
chapter.
If your cellular phone is not charging:
- Slightly change the position of the cellular phone on the charging pad.
- Make sure the indicator light is orange.
OOS047064
Page 255 of 523

Driving your vehicle
Before driving.........................................................5-4Before entering the vehicle ...........................................5-4
Before starting...................................................................5-4
Ignition switch ........................................................5-6 Key ignition switch ............................................................5-6
Engine Start/Stop button ................................................5-9
Manual transmission............................................5-16 Manual transmission operation ...................................5-16
Good driving practices ...................................................5-18
Dual clutch transmission .....................................5-19 Dual clutch transmission operation ............................5-19
Parking ...............................................................................5-26
Good driving practices ...................................................5-26
Braking system.....................................................5-28 Power brakes ...................................................................5-28
Disc brakes wear indicator ...........................................5-29
Parking brake ...................................................................5-29
Anti-lock Brake System (ABS) ....................................5-31
Electronic Stability Control (ESC)................................5-33
Vehicle Stability Management......................................5-36
Hill-Start Assist Control (HAC) ....................................5-37
Emergency Stop Signal (ESS) ......................................5-37
Downhill Brake Control (DBC) ......................................5-38
Good braking practices..................................................5-40 Four wheel drive (4WD) ......................................5-41
4WD operation .................................................................5-42
Emergency precautions .................................................5-45
ISG (Idle Stop and Go) system ...........................5-47 To activate the ISG system ...........................................5-47
To deactivate the ISG system ......................................5-51
ISG system malfunction .................................................5-51
The battery sensor deactivation .................................5-52
Drive mode integrated control system .............5-53
Blind-spot collision warning (BCW) system ....5-55 BCW ....................................................................................5-56
RCCW (Rear Cross-Traffic Collision Warning) .........5-58
Detecting sensor .............................................................5-60
Limitations of the system .............................................5-61
Forward Collision-avoidance Assist (FCA)system-sensor fusion type
(Front radar + Front camera) ............................5-63 System setting and activation......................................5-63
FCA warning message and system control ..............5-65
FCA sensor........................................................................5-67
System malfunction ........................................................5-69
Limitations of the system .............................................5-70
5
Page 261 of 523

5-7
Driving your vehicle
5
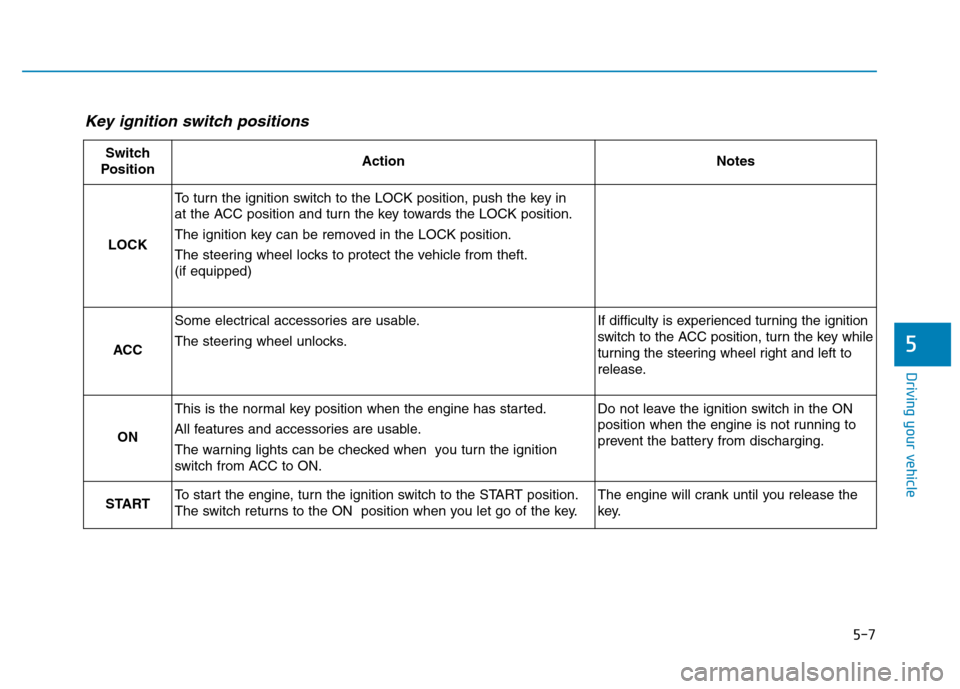
Key ignition switch positions
Switch
PositionActionNotes
LOCK
To turn the ignition switch to the LOCK position, push the key in
at the ACC position and turn the key towards the LOCK position.
The ignition key can be removed in the LOCK position.
The steering wheel locks to protect the vehicle from theft. (if equipped)
ACC
Some electrical accessories are usable.
The steering wheel unlocks.If difficulty is experienced turning the ignition
switch to the ACC position, turn the key while
turning the steering wheel right and left to
release.
ON
This is the normal key position when the engine has started.
All features and accessories are usable.
The warning lights can be checked when you turn the ignition
switch from ACC to ON.Do not leave the ignition switch in the ON
position when the engine is not running to
prevent the battery from discharging.
STARTTo start the engine, turn the ignition switch to the START position.
The switch returns to the ON position when you let go of the key.The engine will crank until you release the
key.
Page 269 of 523

5-15
Driving your vehicle
5
Information
Do not wait for the engine to warm up while the vehicle remains station-
ary.
Start driving at moderate engine
speeds. Steep accelerating and decel-
erating should be avoided.
Always start the vehicle with your foot on the brake pedal. Do not
depress the accelerator while start-
ing the vehicle. Do not race the
engine while warming it up.
To prevent damage to the vehicle:
If the engine stalls while you are in motion, do not attempt to
move the shift lever to the P
(Park) position.
If traffic and road conditions
permit, you may put the shift
lever in the N (Neutral) position
while the vehicle is still moving
and press the Engine Start/Stop
button in an attempt to restart
the engine.
Do not push or tow your vehicle to start the engine. To prevent damage to the vehicle:
Do not press the Engine Start/
Stop button for more than 10 sec-
onds except when the stop lamp
fuse is blown.
When the stop lamp fuse is blown,
you can't start the engine normal-
ly. Replace the fuse with a new
one. If you are not able to replace
the fuse, you can start the engine
by pressing and holding the
Engine Start/Stop button for 10
seconds with the Engine Start/
Stop button in the ACC position.
For your safety always depress the
brake and/or clutch pedal before
starting the engine.
Information
If the smart key battery is weak or the
smart key does not work correctly,
you can start the engine by pressing
the Engine Start/Stop button with the
smart key in the direction of the pic-
ture above.
i
NOTICE
NOTICE
i
OOS057003
Page 356 of 523

5-102
Driving your vehicle
When using tire chains:
Wrong size chains or improperlyinstalled chains can damage
your vehicle's brake lines, sus-
pension, body and wheels.
Use SAE “S” class or wire chains.
If you hear noise caused by chains contacting the body,
retighten the chain to prevent
contact with the vehicle body.
To prevent body damage, retight- en the chains after driving 0.5~1.0km (0.3~0.6 miles).
Do not use tire chains on vehi- cles equipped with aluminum
wheels. If unavoidable, use a
wire type chain.
Use wire chains less than 12 mm (0.47 in) wide to prevent damage
to the chain’s connection.
Winter Precautions
Use high quality ethylene glycol coolant
Your vehicle is delivered with high
quality ethylene glycol coolant in the
cooling system. It is the only type ofcoolant that should be used because
it helps prevent corrosion in the cool-
ing system, lubricates the water
pump and prevents freezing. Be sure
to replace or replenish your coolantin accordance with the maintenance
schedule in chapter 7. Before winter,
have your coolant tested to assure
that its freezing point is sufficient for
the temperatures anticipated during
the winter.
Check battery and cables
Winter temperatures affect battery
performance. Inspect the battery
and cables, as specified in the
chapter 7. The battery charging level
can be checked by an authorized
HYUNDAI dealer or in a service sta-tion. Change to "winter weight" oil if
necessary
In some regions during winter, it is recommended to use the "winter
weight" oil with lower viscosity. For
further information, refer to the chap-
ter 8. When you are not sure about a
type of winter weight oil, consult an
authorized HYUNDAI dealer.
Check spark plugs and ignition system
Inspect the spark plugs, as speci-
fied in the chapter 7.
If necessary,
replace them. Also check all ignition
wirings and components for any
cracks, wear-out, and damage.
To prevent locks from freezing
To prevent the locks from being
frozen, spray approved de-icing fluid
or glycerin into key holes. When a
lock opening is already covered with
ice, spray approved de-icing fluid
over the ice to remove it. When an
internal part of a lock freezes, try to
thaw it with a heated key. Carefully
use the heated key to avoid an injury.
NOTICE
Page 520 of 523

I-9
Normal maintenance schedule (for Europe) .................7-8
Normal maintenance schedule (except Europe) ...........7-13
Odometer ......................................................................3-40
Oil (Engine) ..................................................................7-21
Outside rearview mirror ...............................................3-20
Outside temperature gauge ...........................................3-40
Owner maintenance ........................................................7-5
Parking brake ................................................................5-29
Parking Distance Warning (Reverse) system .............3-100
Parking Distance Warning (Reverse/Forward) system3-104
Passenger's front air bag ON/OFF switch ....................2-49
Passenger's front air bag ...............................................2-48
Position lamp position ..................................................3-84
Power brakes.................................................................5-28
Power outlet ................................................................3-132
Power steering ..............................................................3-17
Power window lock switch...........................................3-26
Pre-tensioner seat belt...................................................2-28
Rear center seat belt .....................................................2-27
Rear fog lamp ...............................................................3-89
Rear seat adjustment .....................................................2-12
Folding the rear seat.................................................2-12
Armrest.....................................................................2-14
Rear seat headrests .......................................................2-18 Adjusting the height up and down ...........................2-19
Rear view monitor ........................................................3-99
Rear window wiper and washer switch........................3-98
Recommended cold tire inflation pressures .................7-37
Recommended lubricants and capacities........................8-7
Refrigerant label ...........................................................8-12
Remote key .....................................................................3-3 Locking ......................................................................3-3
Unlocking ...................................................................3-3
Tailgate unlocking ......................................................3-3
Mechanical key ..........................................................3-4
Battery replacement ...................................................3-5
Removable towing hook ...............................................6-42
Replacement light bulb .................................................7-64
Returning used vehicles ................................................F-9
Rocking the vehicle ......................................................5-96
Rotation (Tire) ..............................................................7-38
I
Index
N
O
P
R