Page 101 of 523

3-18
Convenient features of your vehicle
Information
After adjustment, sometimes the lock-
release lever may not lock the steering
wheel.
It is not a malfunction. This occurs
when two gears are not engaged cor-
rectly. In this case, adjust the steering
wheel again and then lock the steering
wheel.
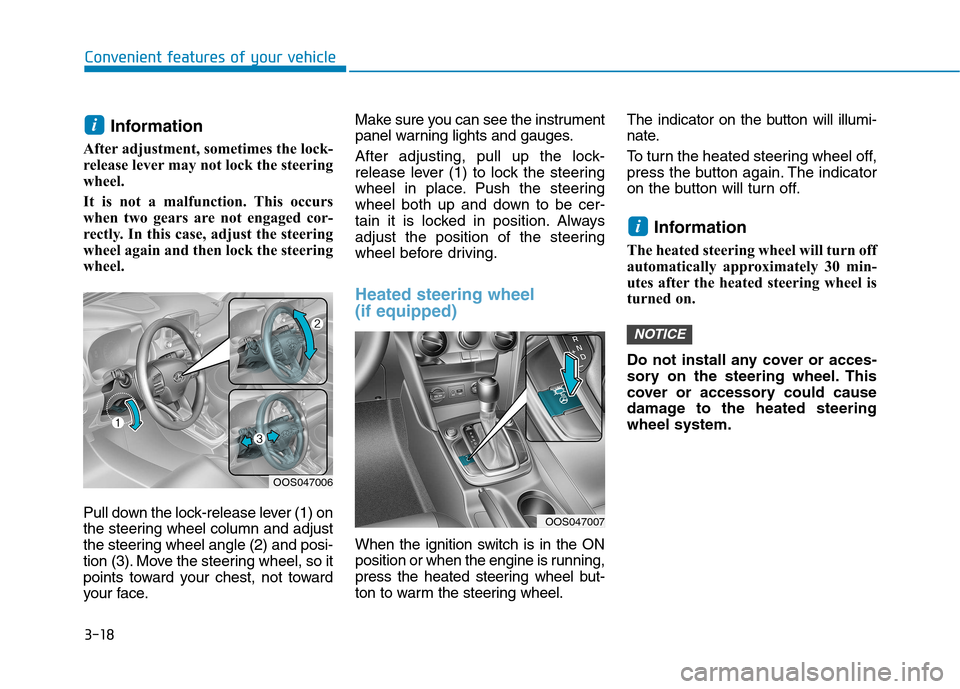
Pull down the lock-release lever (1) on
the steering wheel column and adjust
the steering wheel angle (2) and posi-
tion (3). Move the steering wheel, so it
points toward your chest, not toward
your face. Make sure you can see the instrument
panel warning lights and gauges.
After adjusting, pull up the lock-
release lever (1) to lock the steering
wheel in place. Push the steering
wheel both up and down to be cer-
tain it is locked in position. Always
adjust the position of the steering
wheel before driving.
Heated steering wheel (if equipped)
When the ignition switch is in the ON
position or when the engine is running,
press the heated steering wheel but-
ton to warm the steering wheel.
The indicator on the button will illumi-
nate.
To turn the heated steering wheel off,
press the button again. The indicator
on the button will turn off.
Information
The heated steering wheel will turn off
automatically approximately 30 min-
utes after the heated steering wheel is
turned on.
Do not install any cover or acces-
sory on the steering wheel. This
cover or accessory could cause
damage to the heated steeringwheel system.
NOTICE
i
i
OOS047006
OOS047007
Page 121 of 523
3-38
Convenient features of your vehicle
Instrument cluster control
Instrument panel illumination
When the vehicle's position lights or headlamps are on, press the illumi-
nation control button to adjust the
brightness of the instrument panelillumination. When pressing the illumination con-
trol button, the interior switch illumi-nation intensity is also adjusted. The brightness of the instrument
panel illumination is displayed.
If the brightness reaches the maxi- mum or minimum level, an alarmwill sound.
Gauges and meters
Speedometer
The speedometer indicates the
speed of the vehicle and is calibratedin kilometers per hour (km/h) and/ormiles per hour (MPH).
OOS047120 Never adjust the instrument
cluster while driving. This could
result in loss of control and lead
to an accident that may cause
death, serious injury, or vehicle
damage.
WARNING
■
Type B, C
■
Type A
OGC044138/OPDE046110
OOS047103L/OOS047126
■ MPH, km/h
■
km/h
Page 166 of 523

3-83
Convenient features of your vehicle
3
Exterior lights
Lighting control
To operate the lights, turn the knob at
the end of the control lever to one of
the following positions: (1) O position
(2) AUTO light position (if equipped)
(3) Position lamp position(4) Headlamp position
AUTO light position (if equipped)
When the light switch is in the AUTO position, the position lamp and head-
lamp will be turned ON or OFF auto-matically depending on the amount
of light outside the vehicle.
Even with the AUTO light feature in
operation, it is recommended to
manually turn ON the lamps when
driving at night or in a fog, or when
you enter dark areas, such as tun-
nels and parking facilities.• Do not cover or spill anything on
the sensor (1) located on theinstrument panel.
Do not clean the sensor using a window cleaner, the cleanser
may leave a light film which
could interfere with sensor oper-ation.
If your vehicle has window tint or other types of metallic coat-
ing on the front windshield, the
AUTO light system may not work
properly.
NOTICE
LLIIGG HH TTIINN GG
OOS047050L
OPDE046065
Page 167 of 523
3-84
Convenient features of your vehicle
Position lamp position ( )
The position lamp, license plate lamp
and instrument panel lamp are turnedON.
Headlamp position ( )
The headlamp, position lamp, license
plate lamp and instrument panel lamp
are turned ON.Information
The ignition switch must be in the ON
position to turn on the headlamp.
High beam operation
To turn on the high beam headlamp,
push the lever away from you. The
lever will return to its original position. The high beam indicator will light when the headlamp high beams are
switched on.
To turn off the high beam headlamp,
pull the lever towards you. The low
beams will turn on.
i
OAE046469LOAE046467L
OAE046453L
Do not use high beam when there
are other vehicles approaching
you. Using high beam couldobstruct the other driver's vision.
WARNING
Page 190 of 523

3-107
Convenient features of your vehicle
3
DDEEFFRR OO SSTT EERR
To prevent damage to the conduc-
tors bonded to the inside surface
of the rear window, never use
sharp instruments or window
cleaners containing abrasives to
clean the window.
Information
If you want to defrost and defog the
front windshield, refer to “Windshield
Defrosting and Defogging” in this
chapter.
Rear window defroster
The defroster heats the window to
remove frost, fog and thin ice from
the interior and exterior of the rear
window, while the engine is running.
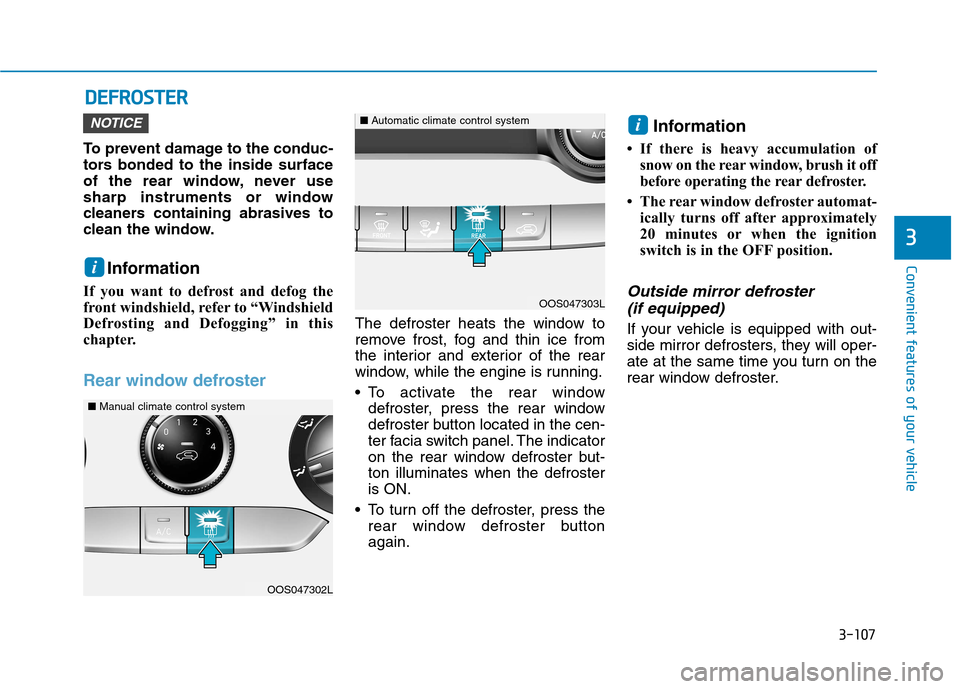
To activate the rear window defroster, press the rear window
defroster button located in the cen-
ter facia switch panel. The indicator
on the rear window defroster but-ton illuminates when the defrosteris ON.
To turn off the defroster, press the rear window defroster buttonagain. Information
If there is heavy accumulation of snow on the rear window, brush it off
before operating the rear defroster.
The rear window defroster automat- ically turns off after approximately
20 minutes or when the ignition
switch is in the OFF position.
Outside mirror defroster
(if equipped)
If your vehicle is equipped with out-
side mirror defrosters, they will oper-
ate at the same time you turn on the
rear window defroster.
iNOTICE
i
OOS047302L
OOS047303L
■ Manual climate control system
■Automatic climate control system
Page 193 of 523

3-110
Convenient features of your vehicle
Face-Level (B, D)
Air flow is directed toward the upper
body and face. Additionally, eachoutlet can be controlled to direct theair discharged from the outlet.
Bi-Level (B, C, D, E)
Air flow is directed towards the face
and the floor.
Floor-Level (A, C, D, E)
Most of the air flow is directed to the
floor, with a small amount of the airbeing directed to the windshield and
side window defrosters.
Floor/Defrost-Level
(A, C, D, E)
Most of the air flow is directed to the floor and the windshield with a small
amount directed to the side window
defrosters.
Defrost-Level (A, D)
Most of the air flow is directed to the windshield with a small amount of air
directed to the side window defrosters.
A/C MAX-Level (B, D)
(if equipped)
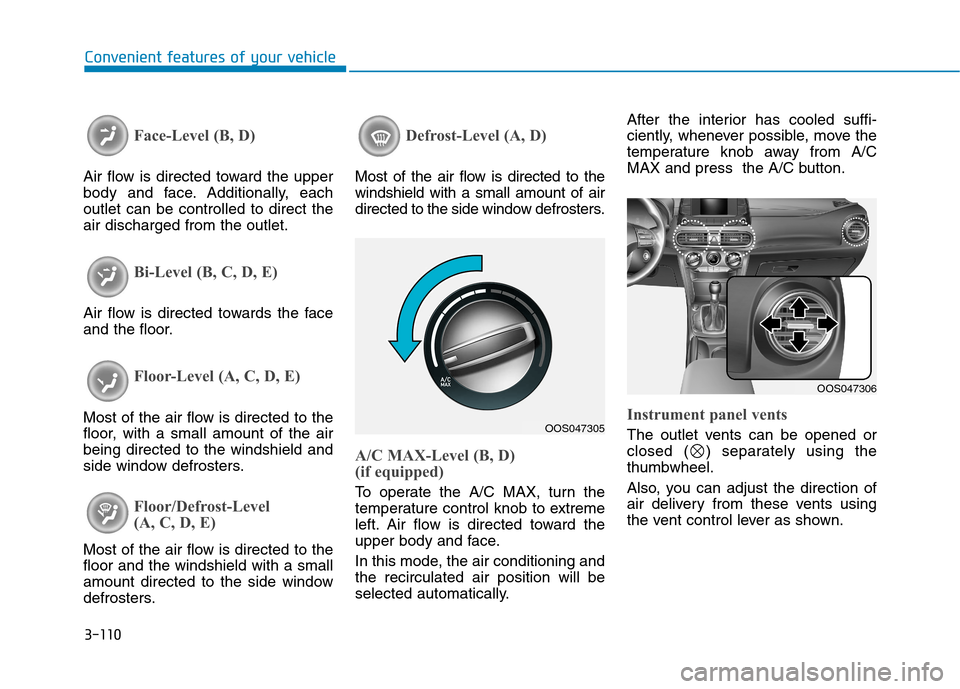
To operate the A/C MAX, turn the
temperature control knob to extreme
left. Air flow is directed toward the
upper body and face.
In this mode, the air conditioning and the recirculated air position will be
selected automatically.After the interior has cooled suffi-
ciently, whenever possible, move the
temperature knob away from A/C
MAX and press the A/C button.
Instrument panel vents
The outlet vents can be opened or
closed ( ) separately using thethumbwheel.
Also, you can adjust the direction of
air delivery from these vents using
the vent control lever as shown.OOS047305
OOS047306
Page 202 of 523

3-119
Convenient features of your vehicle
3
Instrument panel vents
The outlet vents can be opened or
closed ( ) separately using thethumbwheel.
Also, you can adjust the direction of
air delivery from these vents using
the vent control lever as shown.
Temperature control (1)
The temperature will increase by
turning the knob to the right. The
temperature will decrease by turningthe knob to the left.
Air intake control (9)
This is used to select the outside (fresh) air position or recirculated airposition.
To change the air intake control posi-
tion, push the control button.
Recirculated air position
With the recirculated airposition selected, air from the passenger com-
partment will be drawnthrough the heating sys-tem and heated or
cooled according to thefunction selected.
Outside (fresh) air position
With the outside (fresh) air position selected, air
enters the vehicle fromoutside and is heated or
cooled according to thefunction selected. Information
Using the system in the fresh air posi-
tion is recommended.
Prolonged operation of the heater in
the recirculated air position (without
air conditioning selected) can cause
fogging of the windshield and side win-
dows and the air within the passenger
compartment will become stale.
In addition, prolonged use of the air
conditioning with the recirculated air
position selected will result in exces-
sively dry air in the passenger com-
partment.
i
OOS047306
Page 257 of 523

5-3
Driving your vehicle
5
Carbon monoxide (CO) gas is toxic. Breathing CO can cause unconsciousness and death.
Engine exhaust contains carbon monoxide which cannot be seen or smelled.
Do not inhale engine exhaust.
If at any time you smell engine exhaust inside the vehicle, open the windows immediately. Exposure to CO can cause
unconsciousness and death by asphyxiation.
Be sure the exhaust system does not leak.
The exhaust system should be checked whenever the vehicle is raised to change the oil or for any other purpose. If
you hear a change in the sound of the exhaust or if you drive over something that strikes the underneath side of the
vehicle, we recommend that the exhaust system be checked as soon as possible by an authorized HYUNDAI dealer.
Do not run the engine in an enclosed area.
Letting the engine idle in your garage, even with the garage door open, is a hazardous practice. Run the engine only
long enough to start the engine and to move the vehicle out of the garage.
Avoid idling the engine for prolonged periods with people inside the vehicle.
If it is necessary to idle the engine for a prolonged period with people inside the vehicle, be sure to do so only in an
open area with the air intake set at "Fresh" and fan control set to high so fresh air is drawn into the interior.
Keep the air intakes clear.
To assure proper operation of the ventilation system, keep the ventilation air intakes located in front of the windshield
clear of snow, ice, leaves, or other obstructions.
If you must drive with the tailgate open:
Close all windows.
Open instrument panel air vents.
Set the air intake control at "Fresh", the air flow control at "Floor" or "Face", and the fan control set to high.
WARNING