2018 Hyundai Kona display
[x] Cancel search: displayPage 365 of 523
5-111
Driving your vehicle
5
When the clutch is overheated,
the safe protection mode
engages. If the safe protection
mode engages, the gear posi-
tion indicator on the cluster
blinks with a chime sound.
At this time, a warning message
will appear on the LCD display
and driving may not be smooth.
If you ignore this warning, the
driving condition may become
worse.
To return to normal driving con-
ditions, stop the vehicle on a flat
road and apply the foot brake for
a few minutes before driving off.Parking on hills
Generally, if you have a trailer
attached to your vehicle, you should
not park your vehicle on a hill.
However, if you ever have to park your
trailer on a hill, here's how to do it:
1. Pull the vehicle into the parkingspace.
Turn the steering wheel in the direction of the curb (right if head-
ed down hill, left if headed up hill).
2. Shift the vehicle to P (Park, for dual clutch transmission vehicle)
or neutral (for manual transmis-
sion vehicle).
3. Set the parking brake and shut off the vehicle.
4. Place wheel chocks under the trailer wheels on the down hill side
of the wheels.
5. Start the vehicle, hold the brakes, shift to neutral, release the park-
ing brake and slowly release the
brakes until the trailer chocksabsorb the load. 6. Reapply the brakes and parking
brakes.
7. Move the shift lever to P (Park, for dual clutch transmission vehicle)
or 1st gear (for manual transmis-
sion vehicle) when the vehicle is
parked on a uphill grade and in R
(Reverse) on a downhill.
8. Shut off the vehicle and release the vehicle brakes but leave the
parking brake set.
To prevent serious or fatal
injury:
Do not get out of the vehicle without the parking brake
firmly set. If you have left the
engine running, the vehicle
can move suddenly. You and
others could be seriously or
fatally injured.
Do not apply the accelerator
pedal to hold the vehicle onan uphill.
WARNING
Page 377 of 523

6-10
What to do in an emergency
Your vehicle has also been equipped
with a TPMS malfunction indicator toindicate when the system is not
operating properly. The TPMS mal-function indicator is combined with
the low tire pressure telltale. Whenthe system detects a malfunction,
the telltale will flash for approximate-
ly one minute and then remain con-
tinuously illuminated.
This sequence will continue upon
subsequent vehicle start-ups as long
as the malfunction exists. When themalfunction indicator is illuminated,
the system may not be able to detect
or signal low tire pressure as intend-
ed. TPMS malfunctions may occur
for a variety of reasons, including theinstallation of replacement or alter-
nate tires or wheels on the vehicle
that prevent the TPMS from function-
ing properly. Always check theTPMS malfunction telltale afterreplacing one or more tires or wheels
on your vehicle to ensure that the
replacement or alternate tires and
wheels allow the TPMS to continue
to function properly.If the TPMS indicator does not illu-
minate for 3 seconds when the
ignition switch is turned to the ON
position or engine is running, or if
it comes on after blinking for
approximately one minute, we rec-
ommend that you contact an
authorized HYUNDAI dealer.Low tire pressure telltale
When the tire pressure
monitoring system warn-ing indicator is illuminated
and warning message
displayed on the cluster LCD display,
one or more of your tires is signifi-cantly under-inflated.
If the telltale illuminates, immediately
reduce your speed, avoid hard cor-
nering and anticipate increased stop-
ping distances. You should stop and
check your tires as soon as possible.Inflate the tires to the proper pres-
sure as indicated on the vehicle'splacard or tire inflation pressure label
located on the driver's side center
pillar outer panel. If you cannot reach
a service station or if the tire cannot
hold the newly added air, replace the
low pressure tire with the spare tire.
Then the Low Tire Pressure telltale
may flash for approximately one
minute and then remain continuously
illuminated after restarting and about
10 minutes of continuous driving
before you have the low pressure tire
repaired and replaced on the vehicle.
NOTICE
Page 381 of 523
6-14
What to do in an emergency
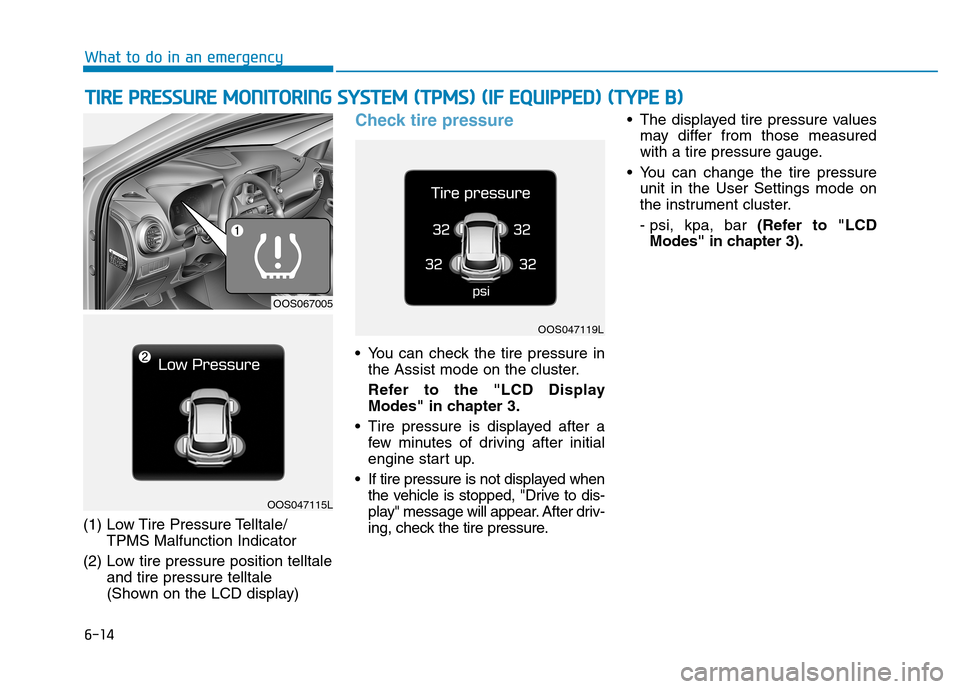
(1) Low Tire Pressure Telltale/TPMS Malfunction Indicator
(2) Low tire pressure position telltale and tire pressure telltale
(Shown on the LCD display)
Check tire pressure
You can check the tire pressure inthe Assist mode on the cluster.
Refer to the "LCD Display
Modes" in chapter 3.
Tire pressure is displayed after a few minutes of driving after initial
engine start up.
If tire pressure is not displayed when the vehicle is stopped, "Drive to dis-
play" message will appear. After driv-
ing, check the tire pressure. The displayed tire pressure values
may differ from those measured
with a tire pressure gauge.
You can change the tire pressure unit in the User Settings mode on
the instrument cluster.
- psi, kpa, bar (Refer to "LCD
Modes" in chapter 3).
TT IIRR EE PP RR EESSSSUU RREE MM OONNIITT OO RRIINN GG SS YY SSTT EEMM (( TT PP MM SS)) (( IIFF EE QQ UUIIPP PPEEDD )) (( TT YY PPEE BB ))
OOS067005
OOS047115L
OOS047119L
Page 383 of 523

6-16
What to do in an emergency
If any of the below happens, we rec- ommend that the system be
checked by an authorized HYUNDAI
dealer.
1. The low tire pressure telltale/TPMS malfunction indicator
does not illuminate for 3 sec-
onds when the ignition switchis turned to the ON position orthe engine is running.
2. The TPMS malfunction indicator remains illuminated after blink-
ing for approximately 1 minute.
3. The Low tire pressure position telltale remains illuminated.
Low tire pressure telltale
Low tire pressure position telltaleand tire pressuretelltale
When the tire pressure monitoring
system warning indicators are illumi-
nated and a warning message dis-
played on the cluster LCD display,
one or more of your tires is signifi-
cantly under-inflated. The low tirepressure position telltale light willindicate which tire is significantly
under-inflated by illuminating the cor-responding position light. If either telltale illuminates, immedi-
ately reduce your speed, avoid hard
cornering and anticipate increased
stopping distances. You should stop
and check your tires as soon as pos-
sible. Inflate the tires to the proper
pressure as indicated on the vehi-
cle’s placard or tire inflation pressure
label located on the driver's side cen-
ter pillar outer panel. If you cannot
reach a service station or if the tire
cannot hold the newly added air,
replace the low pressure tire with a
spare tire.
If you drive the vehicle for about 10
minutes at speeds above 25 km/h
after replacing the low pressure tire
with the spare tire, the below willhappen:
The TPMS malfunction indicator
may blink for approximately 1 minute
and then remain continuously illumi-
nated because the TPMS sensor isnot mounted on the spare wheel.
NOTICE
OOS047115L
Page 384 of 523
6-17
What to do in an emergency
6
The spare tire is not equipped with
a tire pressure sensor.
TPMS (Tire Pressure Monitoring System)malfunction indicator
The TPMS malfunction indicator will
illuminate after it blinks for approxi-
mately one minute when there is a
problem with the Tire Pressure
Monitoring System.
We recommend that the system be
checked by an authorized HYUNDAI
dealer. If there is a malfunction with the
TPMS, the low tire pressure posi-
tion telltale will not be displayed
even though the vehicle has an
under-inflated tire.
NOTICE
NOTICE
In winter or cold weather, the
low tire pressure telltale mayilluminate if the tire pressurewas adjusted to the recom-mended tire inflation pressure
in warm weather. It does not
mean your TPMS is malfunc-tioning because the decreased
temperature leads to a lowering
of tire pressure.
When you drive your vehicle
from a warm area to a cold area
or from a cold area to a warm
area, or the outside temperature
is higher or lower, you should
check the tire inflation pressureand adjust the tires to the rec-ommended tire inflation pres-
sure.
CAUTION
Low pressure damage
Significantly low tire pressure
makes the vehicle unstable and
can contribute to loss of vehicle
control and increased brakingdistances.
Continued driving on low pres- sure tires can cause the tires to
overheat and fail.
WARNING
Page 397 of 523

6-30
What to do in an emergency
0. Speed- restriction label
1. Sealant bottle and label withspeed restriction
2. Filling hose from sealant bottle to wheel
3. Connectors and cable for the power outlet direct connection 4. Holder for the sealant bottle
5. Compressor
6. ON/OFF switch
7. Pressure gauge for displaying the
tire inflation pressure
8. Button for reducing tire inflation pressure 9. Hose to connect compressor and
sealant bottle or compressor and wheel
Connectors, cable and connectionhose are stored in the compressorhousing.
Strictly follow the specified sequence,
otherwise the sealant may escape
under high pressure.
Components of the Tire Mobility Kit
OEL069020 Expired sealant
Do not use the Tire sealant after
the sealant has expired (i.e.
pasted the expiration date on
the sealant container). This can
increase the risk of tire failure.
WARNING
Sealant
Keep out of reach of children.
Avoid contact with eyes.
Do not swallow.
WARNING
Page 404 of 523
6-37
What to do in an emergency
6
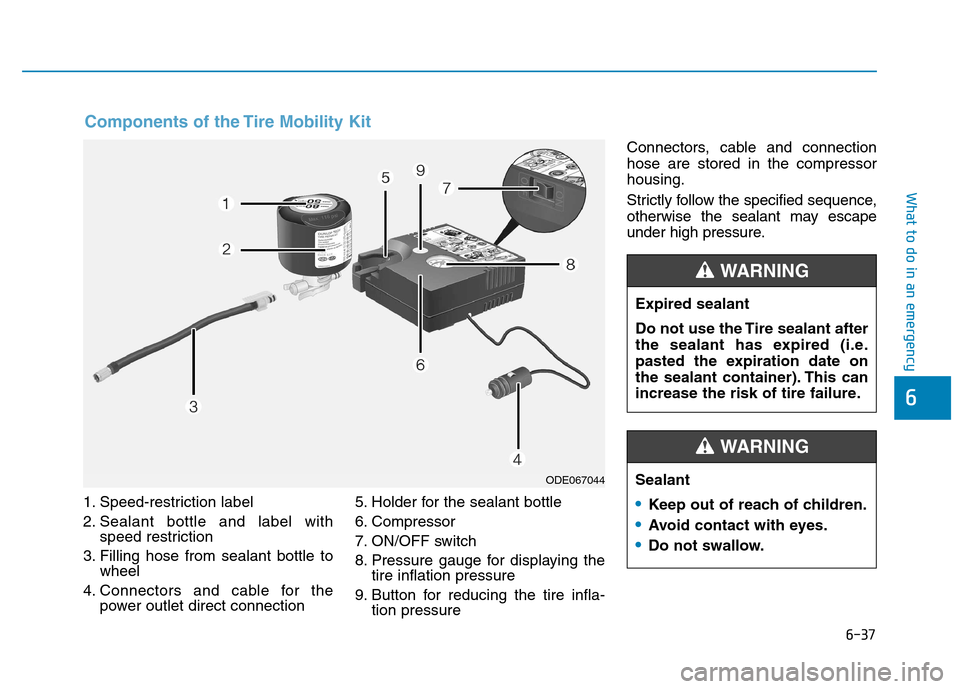
1. Speed-restriction label
2. Sealant bottle and label withspeed restriction
3. Filling hose from sealant bottle to wheel
4. Connectors and cable for the power outlet direct connection 5. Holder for the sealant bottle
6. Compressor
7. ON/OFF switch
8. Pressure gauge for displaying the
tire inflation pressure
9. Button for reducing the tire infla- tion pressure Connectors, cable and connection hose are stored in the compressorhousing.
Strictly follow the specified sequence,
otherwise the sealant may escape
under high pressure.
Components of the Tire Mobility Kit
ODE067044
Expired sealant
Do not use the Tire sealant after
the sealant has expired (i.e.
pasted the expiration date on
the sealant container). This can
increase the risk of tire failure.
WARNING
Sealant
Keep out of reach of children.
Avoid contact with eyes.
Do not swallow.
WARNING
Page 455 of 523
7-43
7
Maintenance
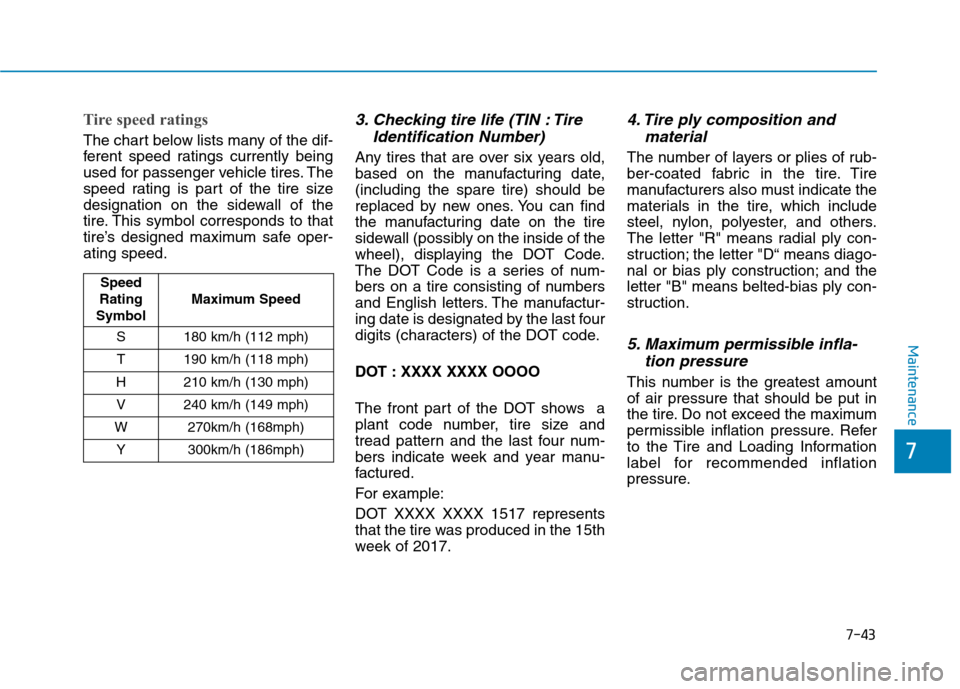
Tire speed ratings
The chart below lists many of the dif-
ferent speed ratings currently being
used for passenger vehicle tires. The
speed rating is part of the tire size
designation on the sidewall of the
tire. This symbol corresponds to that
tire’s designed maximum safe oper-ating speed.
3. Checking tire life (TIN : TireIdentification Number)
Any tires that are over six years old,
based on the manufacturing date,(including the spare tire) should be
replaced by new ones. You can find
the manufacturing date on the tire
sidewall (possibly on the inside of the
wheel), displaying the DOT Code.
The DOT Code is a series of num-
bers on a tire consisting of numbers
and English letters. The manufactur-
ing date is designated by the last four
digits (characters) of the DOT code.
DOT : XXXX XXXX OOOO
The front part of the DOT shows a
plant code number, tire size and
tread pattern and the last four num-
bers indicate week and year manu-
factured.
For example:
DOT XXXX XXXX 1517 represents
that the tire was produced in the 15th
week of 2017.
4. Tire ply composition andmaterial
The number of layers or plies of rub-
ber-coated fabric in the tire. Tire
manufacturers also must indicate the
materials in the tire, which include
steel, nylon, polyester, and others.
The letter "R" means radial ply con-
struction; the letter "D“ means diago-
nal or bias ply construction; and theletter "B" means belted-bias ply con-
struction.
5. Maximum permissible infla-tion pressure
This number is the greatest amountof air pressure that should be put in
the tire. Do not exceed the maximum
permissible inflation pressure. Refer
to the Tire and Loading Information
label for recommended inflation
pressure.
Speed
Rating
Symbol Maximum Speed
S 180 km/h (112 mph) T 190 km/h (118 mph)
H 210 km/h (130 mph) V 240 km/h (149 mph)
W 270km/h (168mph) Y 300km/h (186mph)