2018 Hyundai Kona Replace a tyre
[x] Cancel search: Replace a tyrePage 403 of 497
![Hyundai Kona 2018 Owners Manual - RHD (UK, Australia) 6-41
What to do in an emergency
6
Information
When reinstalling the repaired or
replaced tyre and wheel on the vehi-
cle, tighten the wheel lug nut to 11~13
kgf·m (79~94 lbf·ft).
Towing service
[A] Hyundai Kona 2018 Owners Manual - RHD (UK, Australia) 6-41
What to do in an emergency
6
Information
When reinstalling the repaired or
replaced tyre and wheel on the vehi-
cle, tighten the wheel lug nut to 11~13
kgf·m (79~94 lbf·ft).
Towing service
[A]](/manual-img/35/16232/w960_16232-402.png)
6-41
What to do in an emergency
6
Information
When reinstalling the repaired or
replaced tyre and wheel on the vehi-
cle, tighten the wheel lug nut to 11~13
kgf·m (79~94 lbf·ft).
Towing service
[A] : Dollies
If emergency towing is necessary,
we recommend having it done by a
HYUNDAI authorised repairer or a
commercial tow-truck service.
Proper lifting and towing procedures
are necessary to prevent damage to
the vehicle. The use of wheel dollies
or flatbed is recommended.On 2WD vehicles, it is acceptable to
tow the vehicle with the rear wheels
on the ground (without dollies) and
the front wheels off the ground.
If any of the loaded wheels or sus-
pension components are damaged
or the vehicle is being towed with the
front wheels on the ground, use a
towing dolly under the front wheels.
When being towed by a commercial
tow truck and wheel dollies are not
used, the front of the vehicle should
always be lifted, not the rear.
i
Tyre pressure sensor
(if equipped with TPMS)
The sealant on the tyre pres-
sure sensor and wheel should
be removed when you replace
the tyre with a new one and
inspect the tyre pressure sen-
sors at an authorised repairer.
CAUTION
The tyre inflation pressure must
be at least 220 kPa (32 psi). If it
is not, do not continue driving.
Call for road side service or
towing.
WARNING
TOWING
OOS067007L
The 4WD vehicle should never
be towed with the wheels on the
ground. This can cause serious
damage to the transaxle or the
4WD system.
CAUTION
Page 408 of 497
7
Maintenance
7
Maintenance
Engine compartment .............................................7-3
Maintenance services ...........................................7-4
Owner's responsibility ......................................................7-4
Owner maintenance precautions ................................7-4
Owner maintenance ...............................................7-5
Owner maintenance schedule ........................................7-5
Scheduled maintenance services.........................7-7
Explanation of scheduled maintenance items ...7-8
Engine oil ..............................................................7-11
Checking the engine oil level .......................................7-11
Checking the engine oil and filter ..............................7-12
Engine coolant......................................................7-13
Checking the engine coolant level..............................7-13
Changing the engine coolant .......................................7-15
Brake/clutch fluid ...............................................7-16
Checking the brake/clutch fluid level ........................7-16
Washer fluid .........................................................7-17
Checking the washer fluid level ...............................7-17
Parking brake .......................................................7-17
Checking the parking brake .........................................7-17
Air cleaner ............................................................7-18
Filter replacement ...........................................................7-18
Climate control air filter .....................................7-19
Filter inspection ...............................................................7-19
Filter replacement ...........................................................7-19
Wiper blades .........................................................7-21
Blade inspection ..............................................................7-21
Blade replacement ..........................................................7-21
Battery...................................................................7-23
For best battery service................................................7-24
Battery capacity label ...................................................7-25
Battery recharging .........................................................7-25
Reset items .......................................................................7\
-26
Tyres and wheels .................................................7-27
Tyre care ........................................................................\
...7-27
Recommended cold tyre inflation pressures ..........7-28
Check tyre inflation pressure ......................................7-29
Tyre rotation ....................................................................7-29\
Wheel alignment and tyre balance.............................7-30
Tyre replacement ...........................................................7-31
Wheel replacement .........................................................7-32
Tyre traction ...................................................................7-32
Tyre maintenance ...........................................................7-32
Tyre sidewall labelling ....................................................7-32
Low aspect ratio tyres...................................................7-36
7
Page 434 of 497
7-27
7
Maintenance
TYRES AND WHEELS
Tyre care
For proper maintenance, safety, and
maximum fuel economy, you must
always maintain recommended tyre
inflation pressures and stay within the
load limits and weight distribution rec-
ommended for your vehicle.
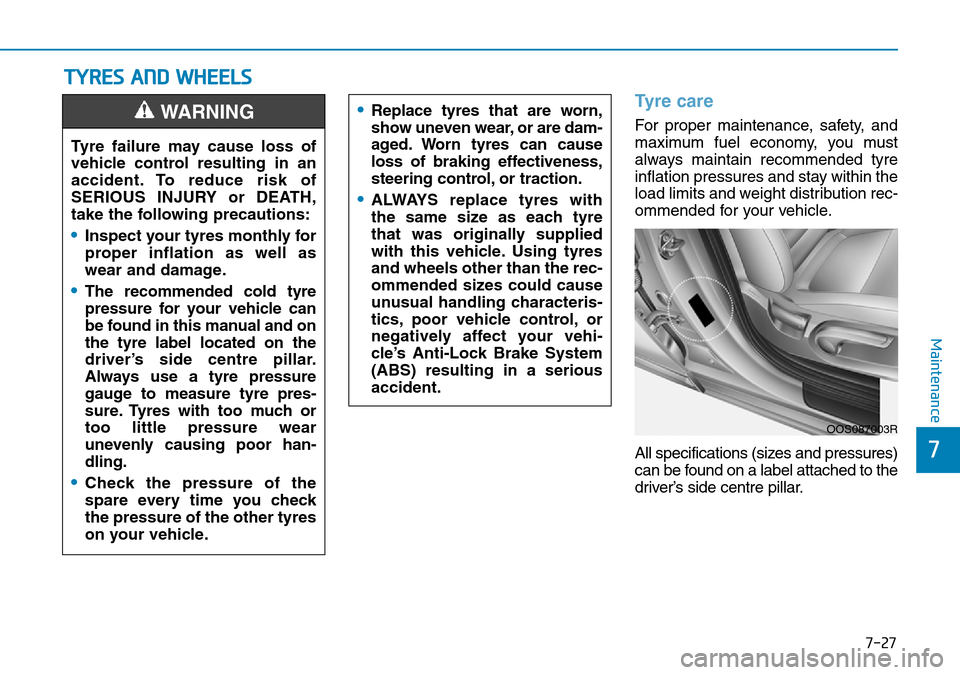
All specifications (sizes and pressures)
can be found on a label attached to the
driver’s side centre pillar.•Replace tyres that are worn,
show uneven wear, or are dam-
aged. Worn tyres can cause
loss of braking effectiveness,
steering control, or traction.
•ALWAYS replace tyres with
the same size as each tyre
that was originally supplied
with this vehicle. Using tyres
and wheels other than the rec-
ommended sizes could cause
unusual handling characteris-
tics, poor vehicle control, or
negatively affect your vehi-
cle’s Anti-Lock Brake System
(ABS) resulting in a serious
accident.
Tyre failure may cause loss of
vehicle control resulting in an
accident. To reduce risk of
SERIOUS INJURY or DEATH,
take the following precautions:
•Inspect your tyres monthly for
proper inflation as well as
wear and damage.
•The recommended cold tyre
pressure for your vehicle can
be found in this manual and on
the tyre label located on the
driver’s side centre pillar.
Always use a tyre pressure
gauge to measure tyre pres-
sure. Tyres with too much or
too little pressure wear
unevenly causing poor han-
dling.
•Check the pressure of the
spare every time you check
the pressure of the other tyres
on your vehicle.
WARNING
OOS087003R
Page 436 of 497
7-29
7
Maintenance
Check tyre inflation pressure
Check your tyres, including the spare
tyre, once a month or more.
How to check
Use a good quality tyre pressure
gauge to check tyre pressure. You
can not tell if your tyres are properly
inflated simply by looking at them.
Radial tyres may look properly inflat-
ed when they are under-inflated.
Remove the valve cap from the tyre
valve stem. Press the tyre gauge
firmly onto the valve to get a pres-
sure measurement. If the cold tyre
inflation pressure matches the rec-
ommended pressure on the tyre and
loading information label, no further
adjustment is necessary. If the pres-
sure is low, add air until you reach
the recommended pressure. Make
sure to put the valve caps back on
the valve stems. Without the valve
cap, dirt or moisture could get into
the valve core and cause air leakage.
If a valve cap is missing, install a new
one as soon as possible.If you overfill the tyre, release air by
pushing on the metal stem in the
centre of the tyre valve. Recheck the
tyre pressure with the tyre gauge. Be
sure to put the valve caps back on
the valve stems. Without the valve
cap, dirt or moisture could get into
the valve core and cause air leakage.
If a valve cap is missing, install a new
one as soon as possible.
Tyre rotation
To equalise tread wear, HYUNDAI
recommends that the tyres be rotat-
ed every 7,500 miles (12,000 km) or
sooner if irregular wear develops.
During rotation, check the tyres for
correct balance.
When rotating tyres, check for
uneven wear and damage. Abnormal
wear is usually caused by incorrect
tyre pressure, improper wheel align-
ment, out-of-balance wheels, severe
braking or severe cornering. Look for
bumps or bulges in the tread or side
of the tyre. Replace the tyre if you
find any of these conditions. Replace
the tyre if fabric or cord is visible.
After rotation, be sure to bring the
front and rear tyre pressures to spec-
ification and check lug nut tightness
(proper torque is 11~13 kgf·m
[79~94 lbf·ft]).
Page 438 of 497
7-31
7
Maintenance
Tyre replacement
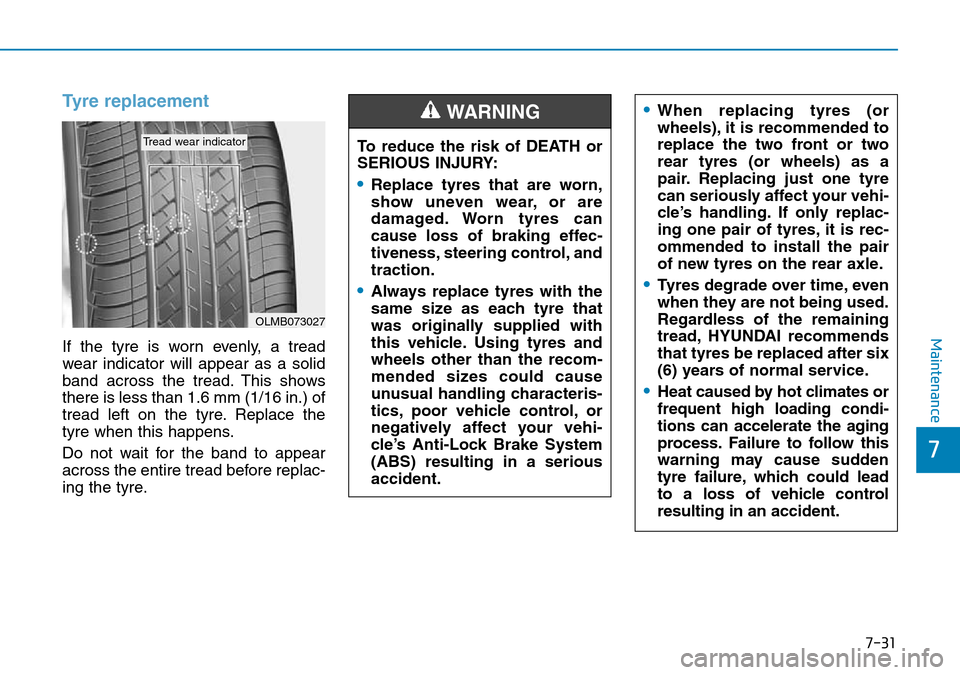
If the tyre is worn evenly, a tread
wear indicator will appear as a solid
band across the tread. This shows
there is less than 1.6 mm (1/16 in.) of
tread left on the tyre. Replace the
tyre when this happens.
Do not wait for the band to appear
across the entire tread before replac-
ing the tyre.
OLMB073027
Tread wear indicatorTo reduce the risk of DEATH or
SERIOUS INJURY:
•Replace tyres that are worn,
show uneven wear, or are
damaged. Worn tyres can
cause loss of braking effec-
tiveness, steering control, and
traction.
•Always replace tyres with the
same size as each tyre that
was originally supplied with
this vehicle. Using tyres and
wheels other than the recom-
mended sizes could cause
unusual handling characteris-
tics, poor vehicle control, or
negatively affect your vehi-
cle’s Anti-Lock Brake System
(ABS) resulting in a serious
accident.
WARNING •When replacing tyres (or
wheels), it is recommended to
replace the two front or two
rear tyres (or wheels) as a
pair. Replacing just one tyre
can seriously affect your vehi-
cle’s handling. If only replac-
ing one pair of tyres, it is rec-
ommended to install the pair
of new tyres on the rear axle.
•Tyres degrade over time, even
when they are not being used.
Regardless of the remaining
tread, HYUNDAI recommends
that tyres be replaced after six
(6) years of normal service.
•Heat caused by hot climates or
frequent high loading condi-
tions can accelerate the aging
process. Failure to follow this
warning may cause sudden
tyre failure, which could lead
to a loss of vehicle control
resulting in an accident.
Page 439 of 497
7-32
Maintenance
Compact spare tyre replace-ment (if equipped)
A compact spare tyre has a shorter
tread life than a regular size tyre.
Replace it when you can see the
tread wear indicator bars on the tyre.
The replacement compact spare tyre
should be the same size and design
tyre as the one provided with your
new vehicle and should be mounted
on the same compact spare tyre
wheel. The compact spare tyre is not
designed to be mounted on a regular
size wheel, and the compact spare
tyre wheel is not designed for mount-
ing a regular size tyre.
Wheel replacement
When replacing the metal wheels for
any reason, make sure the new
wheels are equivalent to the original
factory units in diameter, rim width
and offset.
Tyre traction
Tyre traction can be reduced if you
drive on worn tyres, tyres that are
improperly inflated or on slippery
road surfaces. Tyres should be
replaced when tread wear indicators
appear. To reduce the possibility of
losing control, slow down whenever
there is rain, snow or ice on the road.
Tyre maintenance
In addition to proper inflation, correct
wheel alignment helps to decrease
tyre wear. If you find a tyre is worn
unevenly, have a authorised repairer
check the wheel alignment.
When you have new tyres installed,
make sure they are balanced. This
will increase vehicle ride comfort and
tyre life. Additionally, a tyre should
always be rebalanced if it is removed
from the wheel.
Tyre sidewall labelling
This information identifies and
describes the fundamental charac-
teristics of the tyre and also provides
the tyre identification number (TIN)
for safety standard certification. The
TIN can be used to identify the tyre in
case of a recall.
The original tyre should be
repaired or replaced as soon as
possible to avoid failure of the
spare and loss of vehicle control
resulting in an accident. The com-
pact spare tyre is for emergency
use only. Do not operate your
vehicle over 50 mph (80 km/h)
when using the compact spare
tyre.
WARNING
Page 440 of 497
7-33
7
Maintenance
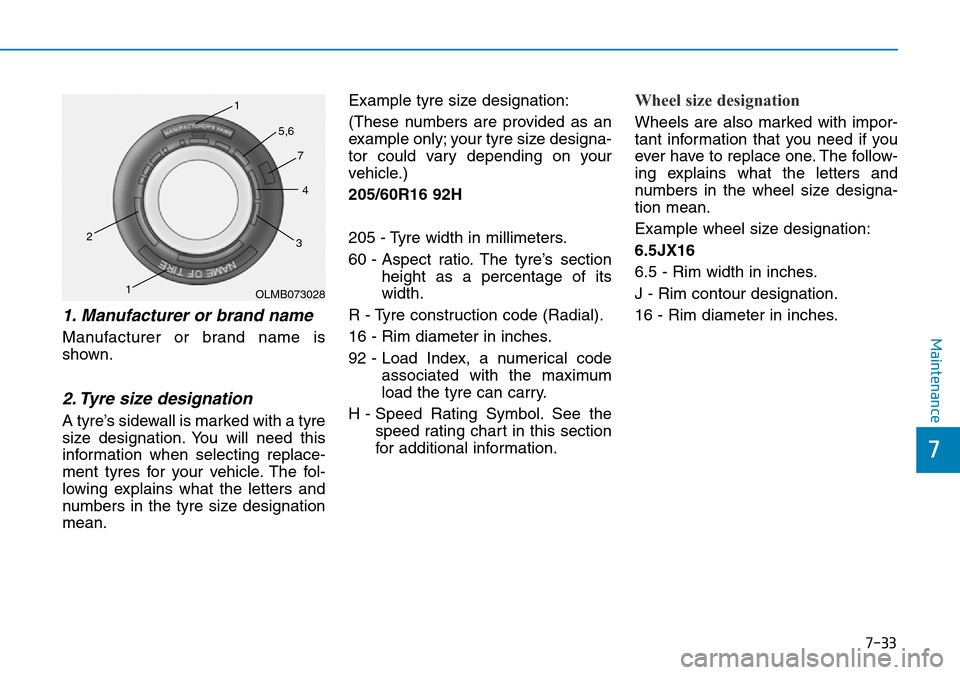
1. Manufacturer or brand name
Manufacturer or brand name is
shown.
2. Tyre size designation
A tyre’s sidewall is marked with a tyre
size designation. You will need this
information when selecting replace-
ment tyres for your vehicle. The fol-
lowing explains what the letters and
numbers in the tyre size designation
mean.Example tyre size designation:
(These numbers are provided as an
example only; your tyre size designa-
tor could vary depending on your
vehicle.)
205/60R16 92H
205 - Tyre width in millimeters.
60 - Aspect ratio. The tyre’s section
height as a percentage of its
width.
R - Tyre construction code (Radial).
16 - Rim diameter in inches.
92 - Load Index, a numerical code associated with the maximum
load the tyre can carry.
H - Speed Rating Symbol. See the speed rating chart in this section
for additional information.
Wheel size designation
Wheels are also marked with impor-
tant information that you need if you
ever have to replace one. The follow-
ing explains what the letters and
numbers in the wheel size designa-
tion mean.
Example wheel size designation:
6.5JX16
6.5 - Rim width in inches.
J - Rim contour designation.
16 - Rim diameter in inches.
OLMB073028
1
1
2
34
5,6
7
Page 441 of 497
7-34
Maintenance
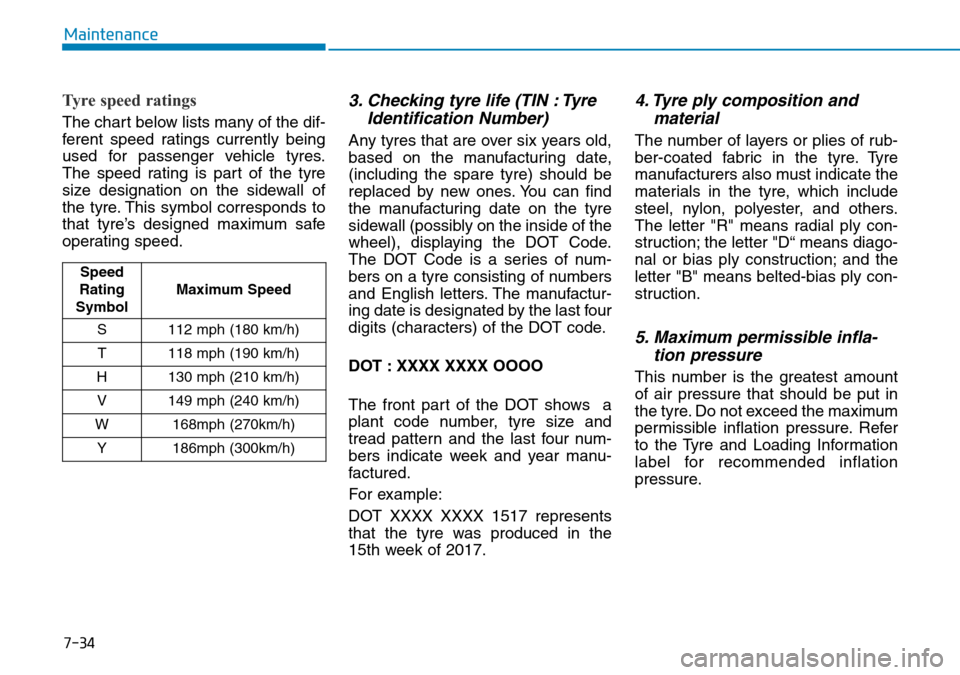
Tyre speed ratings
The chart below lists many of the dif-
ferent speed ratings currently being
used for passenger vehicle tyres.
The speed rating is part of the tyre
size designation on the sidewall of
the tyre. This symbol corresponds to
that tyre’s designed maximum safe
operating speed.
3. Checking tyre life (TIN : TyreIdentification Number)
Any tyres that are over six years old,
based on the manufacturing date,
(including the spare tyre) should be
replaced by new ones. You can find
the manufacturing date on the tyre
sidewall (possibly on the inside of the
wheel), displaying the DOT Code.
The DOT Code is a series of num-
bers on a tyre consisting of numbers
and English letters. The manufactur-
ing date is designated by the last four
digits (characters) of the DOT code.
DOT : XXXX XXXX OOOO
The front part of the DOT shows a
plant code number, tyre size and
tread pattern and the last four num-
bers indicate week and year manu-
factured.
For example:
DOT XXXX XXXX 1517 represents
that the tyre was produced in the
15th week of 2017.
4. Tyre ply composition andmaterial
The number of layers or plies of rub-
ber-coated fabric in the tyre. Tyre
manufacturers also must indicate the
materials in the tyre, which include
steel, nylon, polyester, and others.
The letter "R" means radial ply con-
struction; the letter "D“ means diago-
nal or bias ply construction; and the
letter "B" means belted-bias ply con-
struction.
5. Maximum permissible infla-tion pressure
This number is the greatest amount
of air pressure that should be put in
the tyre. Do not exceed the maximum
permissible inflation pressure. Refer
to the Tyre and Loading Information
label for recommended inflation
pressure.
Speed
Rating
Symbol Maximum Speed
S 112 mph (180 km/h) T 118 mph (190 km/h)
H 130 mph (210 km/h) V 149 mph (240 km/h)
W 168mph (270km/h) Y 186mph (300km/h)