Page 300 of 642

3-150
Convenient features of your vehicle
Wireless cellular phone charg-
ing system (if equipped)
There is a wireless cellular phone
charger inside the front console.
The system is available when all
doors are closed, and when the igni-
tion switch is in the ACC/ON position.
To charge a cellular phone
The wireless cellular phone charging
system charges only the Qi-enabled
cellular phones ( ). Read the label
on the cellular phone accessory
cover or visit your cellular phone
manufacturer’s website to check
whether your cellular phone supports
the Qi technology.The wireless charging process starts
when you put a Qi-enabled cellular
phone on the wireless charging unit.
1. Remove other items, including the
smart key, from the wireless charg-
ing unit. If not, the wireless charg-
ing process may be interrupted.
2. The indicator illuminates in orange
during the charging process. The
indicator color changes to green,
when the charging process is
completed.
3. You can turn ON or OFF the wire-
less charging function in the user
settings mode on the instrument
cluster. For further information,
refer to the “LCD Modes” in this
chapter.
OAE046444
Page 308 of 642

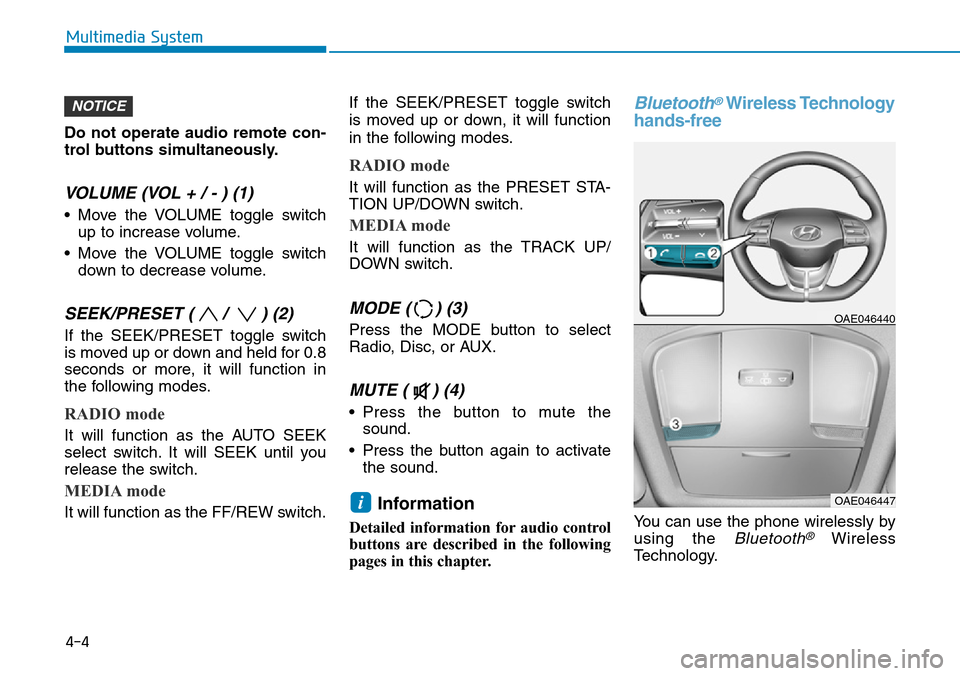
Do not operate audio remote con-
trol buttons simultaneously.
VOLUME (VOL + / - ) (1)
• Move the VOLUME toggle switch
up to increase volume.
• Move the VOLUME toggle switch
down to decrease volume.
SEEK/PRESET ( / ) (2)
If the SEEK/PRESET toggle switch
is moved up or down and held for 0.8
seconds or more, it will function in
the following modes.
RADIO mode
It will function as the AUTO SEEK
select switch. It will SEEK until you
release the switch.
MEDIA mode
It will function as the FF/REW switch.If the SEEK/PRESET toggle switch
is moved up or down, it will function
in the following modes.
RADIO mode
It will function as the PRESET STA-
TION UP/DOWN switch.
MEDIA mode
It will function as the TRACK UP/
DOWN switch.
MODE ( ) (3)
Press the MODE button to select
Radio, Disc, or AUX.
MUTE ( ) (4)
• Press the button to mute the
sound.
• Press the button again to activate
the sound.
Information
Detailed information for audio control
buttons are described in the following
pages in this chapter.
Bluetooth®Wireless Technology
hands-free
You can use the phone wirelessly by
using the
Bluetooth®Wireless
Technology.
OAE046440
OAE046447i
NOTICE
4-4
Multimedia System
Page 309 of 642

(1) Call / Answer button
(2) Call end button
(3) Microphone
• Audio : For detailed information,
refer to “AUDIO” in this chapter.
• AVN : Detailed information for the
Bluetooth® Wireless Technology
hands-free is described in the man-
ual supplied separately.
Audio / Video / Navigation sys-
tem (AVN)(if equipped)
Detailed information for the AVN sys-
tem is described in a separately sup-
plied manual.
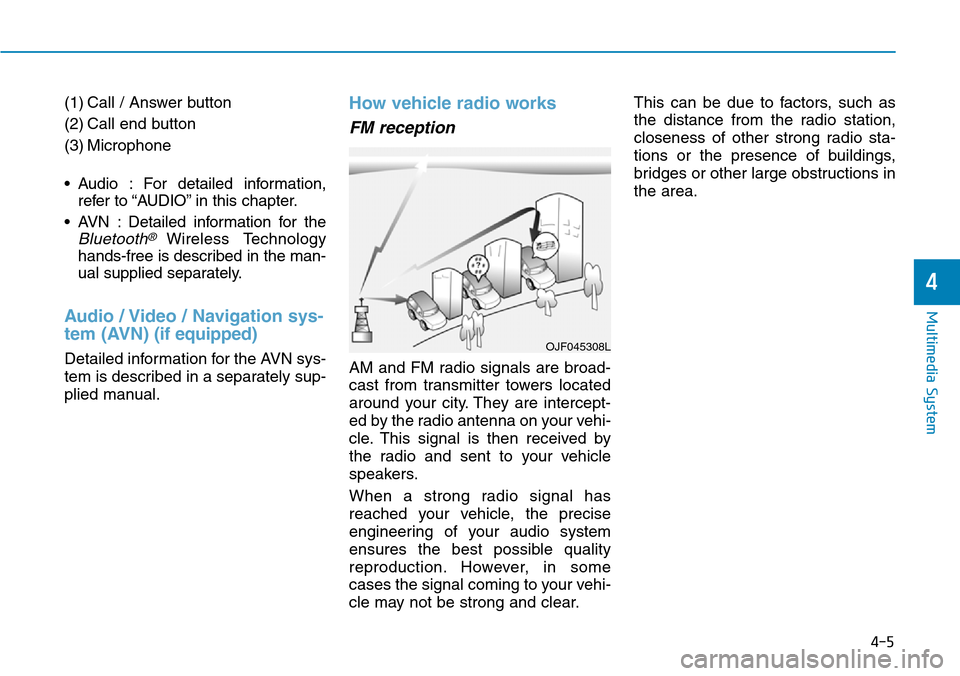
How vehicle radio works
FM reception
AM and FM radio signals are broad-
cast from transmitter towers located
around your city. They are intercept-
ed by the radio antenna on your vehi-
cle. This signal is then received by
the radio and sent to your vehicle
speakers.
When a strong radio signal has
reached your vehicle, the precise
engineering of your audio system
ensures the best possible quality
reproduction. However, in some
cases the signal coming to your vehi-
cle may not be strong and clear.This can be due to factors, such as
the distance from the radio station,
closeness of other strong radio sta-
tions or the presence of buildings,
bridges or other large obstructions in
the area.
OJF045308L
4-5
Multimedia System
4
Page 351 of 642

5-4
Driving your vehicle
Before entering the vehicle
• Be sure all windows, outside mir-
ror(s), and outside lights are clean
and unobstructed.
• Remove frost, snow, or ice.
• Visually check the tires for uneven
wear and damage.
• Check under the vehicle for any
sign of leaks.
• Be sure there are no obstacles
behind you if you intend to back up.
Before starting
• Make sure the hood, the tailgate,
and the doors are securely closed
and locked.
• Adjust the position of the seat and
steering wheel.
• Adjust the inside and outside
rearview mirrors.
• Verify all the lights work.
• Fasten your seat belt. Check that
all passengers have fastened their
seat belts.
• Check the gauges and indicators in
the instrument panel and the mes-
sages on the instrument display
when the ignition switch is in the
ON position.
• Check that any items you are car-
rying are stored properly or fas-
tened down securely.
BEFORE DRIVING
To reduce the risk of SERIOUS
INJURY or DEATH, take the fol-
lowing precautions:
•ALWAYS wear your seat belt.
All passengers must be prop-
erly belted whenever the vehi-
cle is moving. For more infor-
mation, refer to "Seat Belts" in
chapter 2.
•Always drive defensively.
Assume other drivers or pedes-
trians may be careless and
make mistakes.
•Stay focused on the task of
driving. Driver distraction can
cause accidents.
•Leave plenty of space between
you and the vehicle in front of
you.
WARNING
Page 366 of 642

5-19
Driving your vehicle
5
Transmission overheated
• If the vehicle continues to be driv-
en and the clutch temperatures
reach the maximum temperature
limit, the "Trans Hot! Park with
engine on" warning will be dis-
played. When this occurs the clutch
is disabled until the clutch cools to
normal temperatures.
• The warning will display a time to
wait for the transmission to cool.
• If this occurs, pull over to a safe
location, stop the vehicle with the
engine running, apply the brakes
and shift the vehicle to P (Park),
and allow the transmission to cool.• When the message "Trans cooled.
Resume driving." appears you can
continue to drive your vehicle.
• When possible, drive the vehicle
smoothly.
If any of the warning messages in the
LCD display continue to blink, for
your safety, we recommend that you
contact an authorized HYUNDAI
dealer and have the system checked.
Shift lever position
The indicator in the instrument clus-
ter displays the shift lever position
when the ignition switch is in the ON
position.
P (Park)
Always come to a complete stop
before shifting into P (Park).
To shift from P (Park), you must
depress firmly on the brake pedal
and make sure your foot is off the
accelerator pedal.
If you have done all of the above
and still cannot shift the lever out of
P (Park), see "Shift-Lock Release"
in this chapter.
The shift lever must be in P (Park)
before turning the vehicle off.
OTLA055141/OTLA055142
Page 381 of 642

5-34
Driving your vehicle
When operating
When the ESC is in opera-
tion, the ESC indicator light
blinks:
• When you apply your brakes under
conditions which may lock the
wheels, you may hear sounds from
the brakes, or feel a corresponding
sensation in the brake pedal. This is
normal and it means your ESC is
active.
• When the ESC activates, the vehi-
cle may not respond to the acceler-
ator as it does under routine condi-
tions.
• If the Cruise Control was in use
when the ESC activates, the Cruise
Control automatically disengages.
The Cruise Control can be reen-
gaged when the road conditions
allow.See "Cruise Control System"
later in this chapter.(if equipped)
• When moving out of the mud or
driving on a slippery road, the
engine rpm (revolutions per minute)
may not increase even if you press
the accelerator pedal deeply. This is
to maintain the stability and traction
of the vehicle and does not indicate
a problem.
ESC OFF condition
To cancel ESC operation :
• State 1
Press the ESC OFF button briefly.
The ESC OFF indicator light and
message "Traction Control disabled"
will illuminate. In this state, the trac-
tion control function of ESC (engine
management) is disabled, but the
brake control function of ESC (brak-
ing management) still operates.• State 2
Press and hold the ESC OFF button
continuously for more than 3 sec-
onds. The ESC OFF indicator light
and message "Traction & Stability
Control disabled" illuminates and a
warning chime sounds. In this state,
both the traction control function of
ESC (engine management) and the
brake control function of ESC (brak-
ing management) are disabled.
If the ignition switch is placed in the
LOCK/OFF position when ESC is off,
ESC remains off. Upon restarting the
vehicle, the ESC will automatically
turn on again.
■Type A■Type B
OLF054101N/OAE056018L
■Type A■Type B
OTLE055140/OAE056020L
Page 390 of 642

5-43
Driving your vehicle
5
• The second stage alarm may be
deactivated.
- To deactivate the warning chime:
Cluster type A
Go to the 'User Settings →Driving
Assist →Rear Collision Warning
and deselect Blind Spot Detection
Sound' on the LCD display.
Cluster type B
Go to the 'User Settings →Driving
Assist and deselect Blind Spot
Detection Sound' on the LCD dis-
play.
Information
The warning chime function helps
alert the driver. Deactivate this func-
tion only when it is necessary. For
more information, refer to "LCD
Display Modes" in chapter 3. - To activate the warning chime:
Cluster type A
Go to the 'User Settings →Driving
Assist →Rear Collision Warning
and select Blind Spot Detection
Sound' on the LCD display.
Cluster type B
Go to the 'User Settings →Driving
Assist and select Blind Spot
Detection Sound' on the LCD dis-
play.
RCTA (Rear Cross Traffic
Alert) (if equipped)
The Rear Cross Traffic Alert function
monitors approaching cross traffic
from the left and right side of the
vehicle when your vehicle is in
reverse.i
OAE056106
Page 391 of 642

5-44
Driving your vehicle
Operating conditions
To operate:
Cluster type A
Go to the 'User Settings →Driving
Assist →Rear Collision Warning and
select Rear Cross Traffic Alert' on the
LCD display.
Cluster type B
Go to the 'User Settings →Driving
Assist and select Rear Cross Traffic
Alert' on the LCD display.
The system will turn on and standby
to activate. The system will activate
when vehicle speed is below 10 km/h
(6.2 mph) and with the shift lever in R
(Reverse).
If the function is deselected from the
instrument cluster, the function will
deactivate.
For more information, refer to
"LCD Display Modes" in chapter 3.Information
• The last selected setting (ON or
OFF) of the RCTA is remained in
the system.
• The system will activate when vehi-
cle speed is below 10 km/h (6.2 mph)
and with the shift lever in R
(Reverse).
• The Rear Cross Traffic Alert
(RCTA) detecting range is approxi-
mately 0.5 m ~ 20 m (1 ft ~ 65 ft) in
the direction of both lateral sides of
the vehicle.
An approaching vehicle will be
detected if their vehicle speed is
within 4 km/h ~36 km/h (2.5 ~ 22.5
mph).
Note that the detecting range may
vary under certain conditions. As
always, use caution and pay close
attention to your surroundings
when backing up your vehicle.
Warning type
If the vehicle detected by the sensors
approaches your vehicle, the warn-
ing chime will sound, the warning
light on the outside rearview mirror
will blink and a message will appear
on the LCD display.
i
• Type A■ Left
■ Right
• Type B
• Type A• Type B
OAE056150L/OAE056046L
OAE056151L/OAE056047L