Page 169 of 642

3-19
Convenient features of your vehicle
3
Recalling memory positions
1. Move the shift lever into P while the
ignition switch or the Engine
Start/Stop button is in the ON posi-
tion.
2. Press the desired memory button
(1 or 2). The system will beep
once, then the driver’s seat posi-
tion, outside rearview mirror and
instrument panel illumination will
automatically adjust to the stored
position (if equipped).
3. "Driver 1(or 2) settings is applied"
will appear on the LCD display.
Information
• While recalling the "1" memory
position, pressing the SET or 1 but-
ton temporarily stops the adjust-
ment of the recalled memory posi-
tion. Pressing the 2 button recalls
the "2" memory position.
• While recalling the "2" memory
position, pressing the SET or 2 but-
ton temporarily stops the adjust-
ment of the recalled memory posi-
tion. Pressing the 1 button recalls
the "1" memory position.
• While recalling the stored positions,
pressing one of the control buttons
for the driver's seat, outside
rearview mirror, or instrument
panel illumination will cause the
movement of that component to stop
and move in the direction that the
control button is pressed.
Easy access function
(if equipped)
The system will move the driver's
seat automatically as follows:
The shift lever is in P
• Without smart key system
- It will move the driver’s seat rear-
ward when the ignition key is
removed and the driver’s door is
opened.
- It will move the driver’s seat forward
when the ignition key is inserted.
• With smart key system
- It will move the driver’s seat rear-
ward when the Engine Start/Stop
button is in the OFF position and
the driver’s door is opened.
- It will move the driver’s seat for-
ward when the vehicle is turned
ON or the driver’s door is closed
with the smart key with you.
You can activate or deactivate the
Easy Access Function from the User
Settings Mode on the LCD display.
For more information, refer to
"LCD Display" in this chapter.
i
Page 171 of 642

3-21
Convenient features of your vehicle
3
Tilt steering /
Telescopic steering
Information
After adjustment, sometimes the lock-
release lever may not lock the steering
wheel.
It is not a malfunction. This occurs
when two gears are not engaged cor-
rectly. In this case, adjust the steering
wheel again and then lock the steering
wheel.Pull down the lock-release lever (1) on
the steering wheel column and adjust
the steering wheel angle (2) and posi-
tion (3, if equipped). Move the steer-
ing wheel, so it points toward your
chest, not toward your face.
Make sure you can see the instrument
panel warning lights and gauges.
After adjusting, pull up the lock-
release lever (1) to lock the steering
wheel in place. Push the steering
wheel both up and down to be cer-
tain it is locked in position. Always
adjust the position of the steering
wheel before driving.
Heated steering wheel
(if equipped)
When the ignition switch is in the ON
position or when the engine is running,
press the heated steering wheel but-
ton to warm the steering wheel. The
indicator on the button will illuminate.
To turn the heated steering wheel off,
press the button again. The indicator
on the button will turn off.
i
Never adjust the steering wheel
while driving. You may lose
steering control and cause
severe personal injury, death or
accidents.
WARNING
OAE046007
OAE046008
Page 197 of 642
3-47
Convenient features of your vehicle
3
Instrument cluster control
Instrument panel illumination
When the vehicle's position lights or
headlamps are on, press the illumi-
nation control button to adjust the
brightness of the instrument panel
illumination.
When pressing the illumination con-
trol button, the interior switch illumi-
nation intensity is also adjusted.• The brightness of the instrument
panel illumination is displayed.
• If the brightness reaches to the
maximum or minimum level, a
chime will sound.
Gauges and meters
Speedometer
Never adjust the instrument clus-
ter while driving. This could result
in loss of control and lead to an
accident that may cause death,
serious injury, or vehicle damage.
WARNING
OAE046167L/OAE046113L
■Type B ■Type A
OAEPH047412L
■Type A
■Type B
OAE046102
OAE046103
■Type A
■Type B
• ECO mode selected
Page 257 of 642

3-107
Convenient features of your vehicle
3
Exterior lights
Lighting control
To operate the lights, turn the knob at
the end of the control lever to one of
the following positions:
(1) OFF (O) position
(2) AUTO light position
(3) Position lamp position
(4) Headlamp position
AUTO light position
When the light switch is in the AUTO
position, the position lamp and head-
lamp will be turned ON or OFF auto-
matically depending on the amount
of light outside the vehicle.Even with the AUTO light feature in
operation, it is recommended to
manually turn ON the lamps when
driving at night or in fog, or when you
enter dark areas, such as tunnels
and parking facilities.
• Do not cover or spill anything on
the sensor (1) located on the
instrument panel.
• Do not clean the sensor using a
window cleaner, the cleanser
may leave a light film which
could interfere with sensor oper-
ation.
• If your vehicle has window tint
or other types of metallic coat-
ing on the front windshield, the
AUTO light system may not work
properly.
NOTICE
LIGHT
OAE046448L
OAE046449L
■Type A
■Type B
OAE046450L
OAE046451L ■Type A
■Type B
Page 258 of 642
3-108
Convenient features of your vehicle
Position lamp position ( )
The position lamp, license plate lamp
and instrument panel lamp are turned
ON.
Headlamp position ( )
The headlamp, position lamp, license
plate lamp and instrument panel
lamp are turned ON.
Information
The ignition switch must be in the ON
position to turn on the headlamp.
High beam operation
To turn on the high beam headlamp,
push the lever away from you. The
lever will return to its original position.
The high beam indicator will light
when the headlamp high beams are
switched on.
i
OAE046468L
OAE046469L
■Type A
■Type BOAE046466L
OAE046467L
■Type A
■Type BOAE046452L
OAE046453L
■Type A
■Type B
Page 282 of 642
3-132
Convenient features of your vehicle
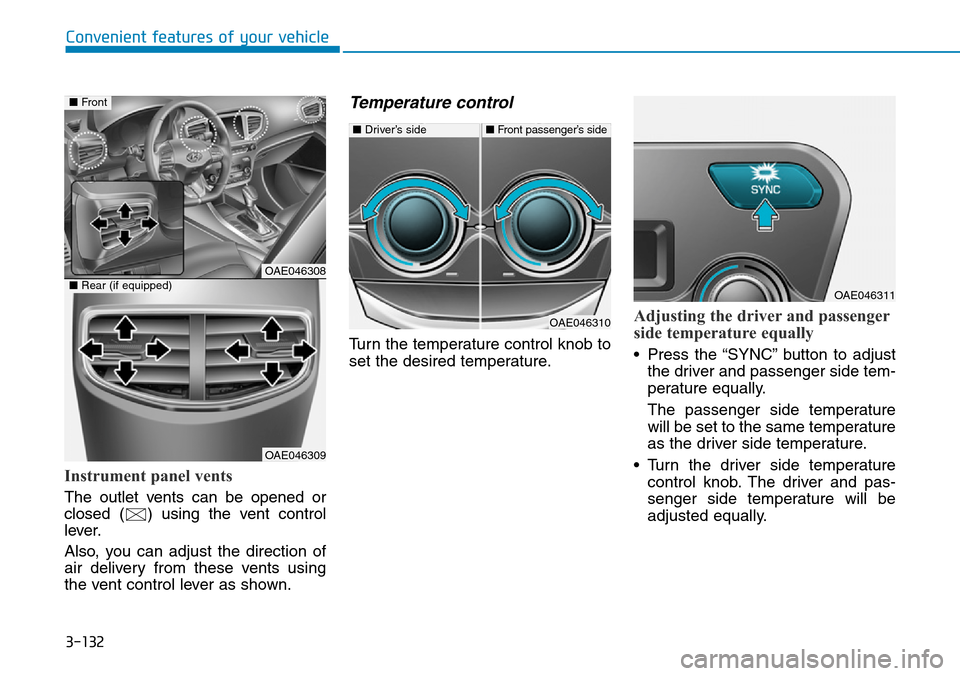
Instrument panel vents
The outlet vents can be opened or
closed ( ) using the vent control
lever.
Also, you can adjust the direction of
air delivery from these vents using
the vent control lever as shown.
Temperature control
Turn the temperature control knob to
set the desired temperature.
Adjusting the driver and passenger
side temperature equally
• Press the “SYNC” button to adjust
the driver and passenger side tem-
perature equally.
The passenger side temperature
will be set to the same temperature
as the driver side temperature.
• Turn the driver side temperature
control knob. The driver and pas-
senger side temperature will be
adjusted equally.
OAE046308
OAE046309
■Front
■Rear (if equipped)
OAE046310
OAE046311
■Driver’s side■Front passenger’s side
Page 350 of 642

5-3
Driving your vehicle
5
Carbon monoxide (CO) gas is toxic. Breathing CO can cause unconsciousness and death.
Engine exhaust contains carbon monoxide which cannot be seen or smelled.
Do not inhale engine exhaust.
If at any time you smell engine exhaust inside the vehicle, open the windows immediately. Exposure to CO can cause
unconsciousness and death by asphyxiation.
Be sure the exhaust system does not leak.
The exhaust system should be checked whenever the vehicle is raised to change the oil or for any other purpose. If
you hear a change in the sound of the exhaust or if you drive over something that strikes the underneath side of the
vehicle, we recommend that the exhaust system be checked as soon as possible by an authorized HYUNDAI dealer.
Do not run the engine in an enclosed area.
Letting the engine idle in your garage, even with the garage door open, is a hazardous practice. Run the engine only
long enough to start the engine and to move the vehicle out of the garage.
Avoid idling the engine for prolonged periods with people inside the vehicle.
If it is necessary to idle the engine for a prolonged period with people inside the vehicle, be sure to do so only in an
open area with the air intake set at "Fresh" and fan control set to high so fresh air is drawn into the interior.
Keep the air intakes clear.
To assure proper operation of the ventilation system, keep the ventilation air intakes located in front of the windshield
clear of snow, ice, leaves, or other obstructions.
If you must drive with the tailgate open:
Close all windows.
Open instrument panel air vents.
Set the air intake control at "Fresh", the air flow control at "Floor" or "Face", and the fan control set to high.
WARNING
Page 351 of 642

5-4
Driving your vehicle
Before entering the vehicle
• Be sure all windows, outside mir-
ror(s), and outside lights are clean
and unobstructed.
• Remove frost, snow, or ice.
• Visually check the tires for uneven
wear and damage.
• Check under the vehicle for any
sign of leaks.
• Be sure there are no obstacles
behind you if you intend to back up.
Before starting
• Make sure the hood, the tailgate,
and the doors are securely closed
and locked.
• Adjust the position of the seat and
steering wheel.
• Adjust the inside and outside
rearview mirrors.
• Verify all the lights work.
• Fasten your seat belt. Check that
all passengers have fastened their
seat belts.
• Check the gauges and indicators in
the instrument panel and the mes-
sages on the instrument display
when the ignition switch is in the
ON position.
• Check that any items you are car-
rying are stored properly or fas-
tened down securely.
BEFORE DRIVING
To reduce the risk of SERIOUS
INJURY or DEATH, take the fol-
lowing precautions:
•ALWAYS wear your seat belt.
All passengers must be prop-
erly belted whenever the vehi-
cle is moving. For more infor-
mation, refer to "Seat Belts" in
chapter 2.
•Always drive defensively.
Assume other drivers or pedes-
trians may be careless and
make mistakes.
•Stay focused on the task of
driving. Driver distraction can
cause accidents.
•Leave plenty of space between
you and the vehicle in front of
you.
WARNING