2018 HYUNDAI I10 brake light
[x] Cancel search: brake lightPage 229 of 343

Driving your vehicle
36 5
• Be sure your tires have enough tread.
If your tires do not have enough tread,
making a quick stop on wet pavement
can cause a skid and possibly lead to
an accident. See “Tire Tread” in chap-
ter 7.
• Turn on your headlights to make it eas-
ier for others to see you.
• Driving too fast through large puddles
can affect your brakes. If you must go
through puddles, try to drive through
them slowly.
• If you believe your brakes may be wet,
apply them lightly while driving until
normal braking operation returns.Hydroplaning
If the road is wet enough and you are
going fast enough, your vehicle may have
little or no contact with the road surface
and actually ride on the water. The best
advice is SLOW DOWN when the road is
wet. The risk of hydroplaning increases
as the depth of tire tread decreases, refer
to “Tire Tread” in chapter 7.
Driving in flooded areas
Avoid driving through flooded areas
unless you are sure the water is no high-
er than the bottom of the wheel hub.
Drive through any water slowly. Allow
adequate stopping distance because
brake performance may be reduced.
After driving through water, dry the
brakes by gently applying them several
times while the vehicle is moving slowly.
Page 230 of 343

537
Driving your vehicle
Snow or icy conditions
You need to keep sufficient distance
between your vehicle and the vehicle
in front of you.
Apply the brakes gently. Speeding,
rapid acceleration, sudden brake
applications, and sharp turns are
potentially very hazardous practices.
During deceleration, use engine
braking to the fullest extent. Sudden
brake applications on snowy or icy
roads may cause skids to occur.
To drive your vehicle in deep snow, it may
be necessary to use snow tires or to
install tire chains on your tires.
Always carry emergency equipment.
Some of the items you may want to carry
include tire chains, tow straps or chains,
a flashlight, emergency flares, sand, a
shovel, jumper cables, a window scraper,
gloves, ground cloth, coveralls, a blanket,
etc.Snow tires
If you mount snow tires on your vehicle,
make sure to use radial tires of the same
size and load range as the original tires.
Mount snow tires on all four wheels to
balance your vehicle’s handling in all
weather conditions. The traction provided
by snow tires on dry roads may not be as
high as your vehicle's original equipment
tires. Check with the tire dealer for maxi-
mum speed recommendations.
✽NOTICE
Do not install studded tires without first
checking local and municipal regula-
tions for possible restrictions against
their use.
WINTER DRIVING
OLMB053045
WARNING
Snow tires should be equivalent in
size and type to the vehicle's stan-
dard tires. Otherwise, the safety
and handling of your vehicle may
be adversely affected.
Page 235 of 343

What to do in an emergency
2 6
ROAD WARNING
Hazard warning flasher
The hazard warning flasher serves as a
warning to other drivers to exercise
extreme caution when approaching,
overtaking, or passing your vehicle.It should be used whenever emergency
repairs are being made or when the vehi-
cle is stopped near the edge of a road-
way.
To turn the hazard warning flasher on or
off, press the hazard warning flasher but-
ton with the ignition switch in any posi-
tion. The button is located in the center
console switch panel. All turn signal
lights will flash simultaneously.
• The hazard warning flasher operates
whether your vehicle is running or not.
• The turn signals do not work when the
hazard flasher is on.
If the engine stalls at a crossroad
or crossing
• If the engine stalls at a crossroad or
crossing, set the shift lever in the N
(Neutral) position and then push the
vehicle to a safe place.
• If your vehicle has a manual transaxle
not equipped with a ignition lock
switch, the vehicle can move forward
by shifting to the 2(second) or 3(third)
gear and then turning the starter with-
out depressing the clutch pedal.
If you have a flat tire while driving
If a tire goes flat while you are driving:
1. Take your foot off the accelerator pedal
and let the vehicle slow down while
driving straight ahead. Do not apply the
brakes immediately or attempt to pull
off the road as this may cause a loss of
control. When the vehicle has slowed
to such a speed that it is safe to do so,
brake carefully and pull off the road.
Drive off the road as far as possible
and park on a firm level ground. If you
are on a divided highway, do not park
in the median area between the two
traffic lanes.
IN CASE OF AN EMERGENCY
WHILE DRIVING
OBA043027L
Page 236 of 343

63
What to do in an emergency
2. When the vehicle is stopped, turn on
your hazard warning flasher, set the
parking brake and put the transaxle in
P (automatic transaxle) or reverse
(manual transaxle).
3. Have all passengers get out of the
vehicle. Be sure they all get out on the
side of the vehicle that is away from
traffic.
4. When changing a flat tire, follow the
instruction provided later in this chap-
ter.
If the engine stalls while driving
1. Reduce your speed gradually, keeping
a straight line. Move cautiously off the
road to a safe place.
2. Turn on your hazard warning flasher.
3. Try to start the engine again. Try to
start the engine again. If your vehicle
will not start, we recommend that you
consult an authorized HYUNDAI deal-
er.
If the engine doesn't turn over or
turns over slowly
1. If your vehicle has an automatic
transaxle, be sure the shift lever is in N
(Neutral) or P (Park) and the emer-
gency brake is set.
2. Check the battery connections to be
sure they are clean and tight.
3. Turn on the interior light. If the light
dims or goes out when you operate the
starter, the battery is discharged.
4. Check the starter connections to be
sure they are securely tightened.
5. Do not push or pull the vehicle to start
it. See instructions for "Jump starting".
If the engine turns over normally
but does not start
1. Check the fuel level.
2. With the ignition switch in the LOCK/
OFF position, check all connectors at
the ignition coils and spark plugs.
Reconnect any that may be discon-
nected or loose.
3. Check the fuel line in the engine com-
partment.
4. If the engine still does not start, we rec-
ommend that you call an authorized
HYUNDAI dealer.
IF THE ENGINE DOES NOT START
WARNING
If the engine will not start, do not
push or pull the vehicle to start it.
This could result in a collision or
cause other damage. In addition,
push or pull starting may cause the
catalytic converter to overload and
create a fire.
Page 238 of 343

65
What to do in an emergency
✽ NOTICE
An inappropriately disposed
battery can be harmful to the
environment and human health.
Dispose the battery according
to your local law(s) or regula-
tion.
Jump starting procedure
1. Position the vehicles close enough that
the jumper cables will reach, but do not
allow the vehicles to touch.
2. Avoid fans or any moving parts in the
engine compartment at all times, even
when the vehicles are turned off.
3. Turn off all electrical devices such as
radios, lights, air conditioning, etc. Put
the vehicles in P (Park, for automatic
transaxle vehicle) or neutral (for manu-
al transaxle vehicle), and set the park-
ing brakes. Turn both vehicles OFF.
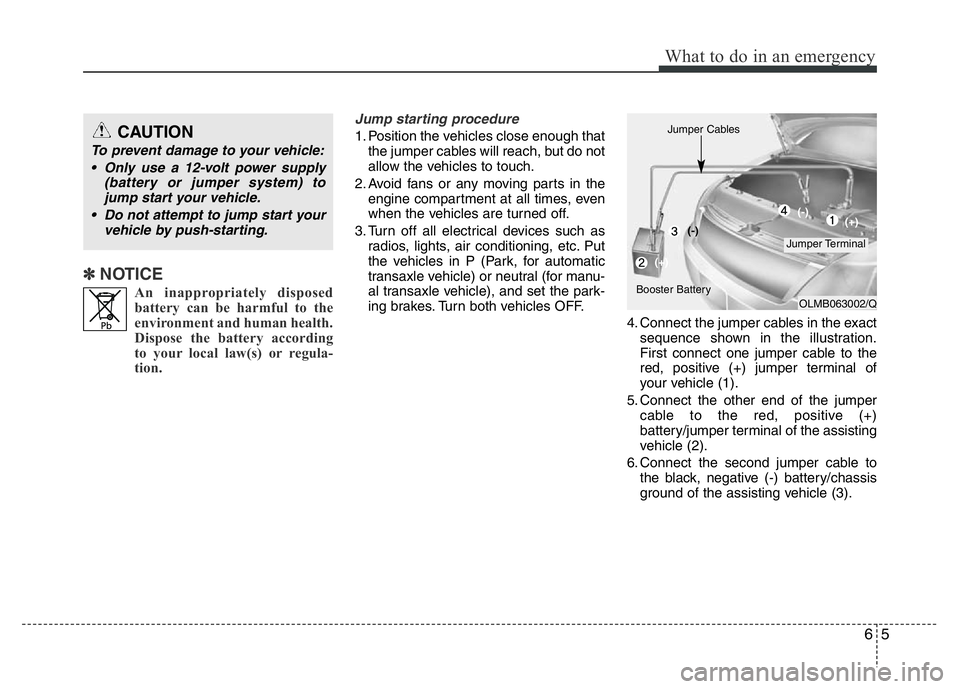
4. Connect the jumper cables in the exact
sequence shown in the illustration.
First connect one jumper cable to the
red, positive (+) jumper terminal of
your vehicle (1).
5. Connect the other end of the jumper
cable to the red, positive (+)
battery/jumper terminal of the assisting
vehicle (2).
6. Connect the second jumper cable to
the black, negative (-) battery/chassis
ground of the assisting vehicle (3).CAUTION
To prevent damage to your vehicle:
• Only use a 12-volt power supply
(battery or jumper system) to
jump start your vehicle.
• Do not attempt to jump start your
vehicle by push-starting.
OLMB063002/Q
Jumper Terminal Jumper Cables
Booster Battery(-)
(+)(+) (-)
Page 258 of 343

Maintenance
6 7
OWNER MAINTENANCE
The following lists are vehicle checks and
inspections that should be performed at
the frequencies indicated to help ensure
safe, dependable operation of your vehi-
cle.
Any adverse conditions should be
brought to the attention of your dealer as
soon as possible.
These Owner Maintenance Checks are
generally not covered by warranties and
you may be charged for labor, parts and
lubricants used.Owner maintenance schedule
When you stop for fuel:
• Check the engine oil level.
• Check the coolant level in the coolant
reservoir.
• Check the windshield washer fluid
level.
• Look for low or under-inflated tires.
While operating your vehicle:
• Note any changes in the sound of the
exhaust or any smell of exhaust fumes
in the vehicle.
• Check for vibrations in the steering
wheel. Notice any increased steering
effort or looseness in the steering
wheel, or change in its straight-ahead
position.
• Notice if your vehicle constantly turns
slightly or “pulls” to one side when trav-
eling on smooth, level road.
• When stopping, listen and check for
unusual sounds, pulling to one side,
increased brake pedal travel or “hard-
to-push” brake pedal.
• If any slipping or changes in the oper-
ation of your transaxle occurs, check
the transaxle fluid level.
• Check automatic transaxle P (Park)
function.
• Check the parking brake.
• Check for fluid leaks under your vehicle
(water dripping from the air condition-
ing system during or after use is nor-
mal).
WARNING
Be careful when checking your
engine coolant level when the
engine is hot. Scalding hot coolant
and steam may blow out under
pressure. This could cause burns
or other serious injury.
Page 259 of 343

77
Maintenance
At least monthly:
• Check the coolant level in the engine
coolant reservoir.
• Check the operation of all exterior
lights, including the stoplights, turn sig-
nals and hazard warning flashers.
• Check the inflation pressures of all
tires including the spare.
At least twice a year
(i.e., every Spring and Fall):
• Check the radiator, heater and air con-
ditioning hoses for leaks or damage.
• Check the windshield washer spray
and wiper operation. Clean the wiper
blades with clean cloth dampened with
washer fluid.
• Check the headlight alignment.
• Check the muffler, exhaust pipes,
shields and clamps.
• Check the lap/shoulder belts for wear
and function.
• Check for worn tires and loose wheel
lug nuts.
At least once a year:
• Clean the body and door drain holes.
• Lubricate the door hinges and checks,
and hood hinges.
• Lubricate the door and hood locks and
latches.
• Lubricate the door rubber weather-
strips.
• Check the air conditioning system.
• Inspect and lubricate the automatic
transaxle linkage and controls.
• Clean the battery and terminals.
• Check the brake (and clutch) fluid
level.
Page 280 of 343

Maintenance
28 7
✽NOTICE
“C” (COLD) range is for reference only
and should NOT be used to determine
the transaxle fluid level.
✽NOTICE
A new automatic transaxle fluid should
be red. The red dye is added so the
assembly plant can identify it as auto-
matic transaxle fluid and distinguish it
from engine oil or antifreeze. The red
dye, which is not an indicator of fluid
quality, is not permanent. As the vehicle
is driven, the automatic transaxle fluid
will begin to look darker. The color may
eventually appear light brown.
Therefore, we recommend that the sys-
tem be replaced by an authorized
HYUNDAI dealer according to the
Scheduled Maintenance at the begin-
ning of this chapter.
Use only the specified automatic
transaxle fluid. (Refer to “Recommended
lubricants and capacities” in chapter 8.)
Changing the automatic transaxle
fluid
We recommend that the system be
replaced by an authorized HYUNDAI
dealer.
WARNING- Parking brake
To avoid sudden movement of the
vehicle, apply the parking brake
and depress the brake pedal before
moving the shift lever.
CAUTION
• Low fluid level causes transaxle
shift slippage. Overfilling can
cause foaming, loss of fluid and
transaxle malfunction.
• The use of a non-specified fluid
could result in transaxle malfunc-
tion and failure.