Page 275 of 343

723
Maintenance
ENGINE COOLANT
Changing the engine oil and filter
We recommend that the engine oil and
filter be replaced by an authorized
HYUNDAI dealer.The high-pressure cooling system has a
reservoir filled with year round antifreeze
coolant. The reservoir is filled at the fac-
tory.
Check the antifreeze protection and
coolant level at least once a year, at the
beginning of the winter season, and
before traveling to a colder climate.
Checking the coolant level
WARNING
Used engine oil may cause skin irri-
tation or cancer if left in contact
with the skin for prolonged periods
of time. Used engine oil contains
chemicals that have caused cancer
in laboratory animals. Always pro-
tect your skin by washing your
hands thoroughly with soap and
warm water as soon as possible
after handling used oil.
WARNING
Removing radiator
cap
• Never attempt to remove the radi-
ator cap while the engine is oper-
ating or hot. Doing so might lead
to cooling system and engine
damage and could result in seri-
ous personal injury from escap-
ing hot coolant or steam.
• Turn the engine off and wait until
it cools down. Use extreme care
when removing the radiator cap.
Wrap a thick towel around it, and
turn it counterclockwise slowly to
the first stop. Step back while the
pressure is released from the
cooling system. When you are
sure all the pressure has been
released, press down on the cap,
using a thick towel, and continue
turning counterclockwise to
remove it.
(Continued)
Page 278 of 343

Maintenance
26 7
BRAKES/CLUTCH(IF EQUIPPED) FLUID
Checking the brake/clutch fluid
level
Check the fluid level in the reservoir peri-
odically. The fluid level should be
between MAX and MIN marks on the
side of the reservoir.Before removing the reservoir cap and
adding brake/clutch fluid, clean the area
around the reservoir cap thoroughly to
prevent brake/clutch fluid contamination.
If the level is low, add fluid to the MAX
level. The level will fall with accumulated
mileage. This is a normal condition asso-
ciated with the wear of the brake linings.
If the fluid level is excessively low, we
recommend that the system be checked
by an authorized HYUNDAI dealer.
Use only the specified brake/clutch fluid.
(Refer to “Recommended lubricants and
capacities” in chapter 8.)
Never mix different types of fluid.
WARNING - Brake/clutch
fluid
When changing and adding
brake/clutch fluid, handle it careful-
ly. Do not let it come in contact with
your eyes. If brake/clutch fluid
come in contact with your eyes,
immediately flush them with a large
quantity of fresh tap water. Have
your eyes examined by a doctor as
soon as possible.
WARNING - Loss of brake
fluid
In the event the brake system
requires frequent additions of fluid,
we recommend that the system be
inspected by an authorized
HYUNDAI dealer.
CAUTION
Do not allow brake/clutch fluid to
contact the vehicle's body paint, as
paint damage will result.
Brake/clutch fluid, which has been
exposed to open air for an extended
time should never be used as its
quality cannot be guaranteed. It
should be properly disposed. Don't
put in the wrong kind of fluid. A few
drops of mineral-based oil, such as
engine oil, in your brake/clutch sys-
tem can damage the system parts.
OBA073006
OBA073006R
■Left-hand drive
■Right-hand drive
Page 280 of 343

Maintenance
28 7
✽NOTICE
“C” (COLD) range is for reference only
and should NOT be used to determine
the transaxle fluid level.
✽NOTICE
A new automatic transaxle fluid should
be red. The red dye is added so the
assembly plant can identify it as auto-
matic transaxle fluid and distinguish it
from engine oil or antifreeze. The red
dye, which is not an indicator of fluid
quality, is not permanent. As the vehicle
is driven, the automatic transaxle fluid
will begin to look darker. The color may
eventually appear light brown.
Therefore, we recommend that the sys-
tem be replaced by an authorized
HYUNDAI dealer according to the
Scheduled Maintenance at the begin-
ning of this chapter.
Use only the specified automatic
transaxle fluid. (Refer to “Recommended
lubricants and capacities” in chapter 8.)
Changing the automatic transaxle
fluid
We recommend that the system be
replaced by an authorized HYUNDAI
dealer.
WARNING- Parking brake
To avoid sudden movement of the
vehicle, apply the parking brake
and depress the brake pedal before
moving the shift lever.
CAUTION
• Low fluid level causes transaxle
shift slippage. Overfilling can
cause foaming, loss of fluid and
transaxle malfunction.
• The use of a non-specified fluid
could result in transaxle malfunc-
tion and failure.
Page 292 of 343

Maintenance
40 7
Reset items
Items should be reset after the battery
has been discharged or the battery has
been disconnected.
• Auto up/down window (See chapter 4)
• Climate control system
(See chapter 4)
• Audio (See chapter 4)(Continued)
• Before performing maintenance
or recharging the battery, turn off
all accessories and stop the
engine.
• The negative battery cable must
be removed first and installed
last when the battery is discon-
nected.WARNING- Recharging
battery
When recharging the battery,
observe the following precautions:
• The battery must be removed
from the vehicle and placed in an
area with good ventilation.
• Do not allow cigarettes, sparks,
or flame near the battery.
• Watch the battery during charging,
and stop or reduce the charging
rate if the battery cells begin
gassing (boiling) violently or if the
temperature of the electrolyte of
any cell exceeds 49°C (120°F).
• Wear eye protection when check-
ing the battery during charging.
• Disconnect the battery charger in
the following order.
1. Turn off the battery charger main
switch.
2. Unhook the negative clamp from
the negative battery terminal.
3. Unhook the positive clamp from
the positive battery terminal.
(Continued)
Page 304 of 343

Maintenance
52 7
FUSES
A vehicle’s electrical system is protected
from electrical overload damage by
fuses.
This vehicle has 2 fuse panels, one locat-
ed in the driver’s side panel bolster, the
other in the engine compartment near
the battery.
If any of your vehicle’s lights, acces-
sories, or controls do not work, check the
appropriate circuit fuse. If a fuse has
blown, the element inside the fuse will
melt.
If the electrical system does not work,
first check the driver’s side fuse panel.
Always replace a blown fuse with one of
the same rating.
If the replacement fuse blows, this indi-
cates an electrical problem. Avoid using
the system involved and we recommend
that you consult an authorized HYUNDAI
dealer.
✽NOTICE
Three kinds of fuses are used: blade
type for lower amperage rating, car-
tridge type, and fusible link for higher
amperage ratings.OJC070046D Normal Normal ■Blade type
■Cartridge type
■Multi fuseBlown
Blown
Normal Blown
WARNING - Fuse replace-
ment
• Never replace a fuse with any-
thing but another fuse of the
same rating.
• A higher capacity fuse could
cause damage and possibly a
fire.
• Never install a wire or aluminum
foil instead of the proper fuse -
even as a temporary repair. It may
cause extensive wiring damage
and a possible fire.
CAUTION
Do not use a screwdriver or any
other metal object to remove fuses
because it may cause a short circuit
and damage the system.
Page 319 of 343
767
Maintenance
Fuse Name Symbol Fuse rating Circuit Protected
FUSE
F/PUMP15A F/Pump 1 Relay
HORN10A Horn Relay, B/Alarm Horn Relay
A/CON10A A/CON Relay
VACUUM
PUMPVACUUM
PUMP20A Vacuum Pump Relay
HEADLAMP
DIPPED
BEAM15A Headlamp High Beam
HEADLAMP
HIGH BEAM20A Headlamp Low Beam
C/FAN40A C/FAN LO Relay, C/FAN HI Relay
IG240AStart Relay, Ignition Switch (W/O Button Start), PDM Relay Box (IG2 Relay) (With
Button Start)
ECU3E310A PCM
ECU2E210A B3LA : PCM, Shut Off Valve #1/#2
SENSORS110AC/FAN LO Relay, C/FAN HI Relay, A/CON Relay, Start Relay (G3LA, With ISG),
PCM, Oil Control Valve #1/#2 (IN/EX), Purge Control Solenoid Valve, Camshaft
Position Sensor #1/#2 (IN/EX)
SENSOR2S210A G3LA/G4LA : PCM
Page 320 of 343
Maintenance
68 7
Fuse Name Symbol Fuse rating Circuit Protected
FUSE
HEADLAMP
DIPPED
BEAMS10A Head Lamp LH
HEADLAMP
DIPPED
BEAMS10A Head Lamp RH
ECU4E420A Not Used
INJECTOR10APCM, Immobilizer Module, F/Pump 1 Relay
G3LA : Injector #1/#2/#3, G4LA : Injector #1/#2/#3/#4
B3LA : Injector #1/#2/#3 (GSL), Injector #1/#2/#3 (LPI), Crash Pad Switch
IGN COIL15AG3LA/B3LA : Ignition Coil #1/#2/#3, Condenser
G4LA : Ignition Coil
B/UP LAMP7.5AA/T : PCM, Transaxle Range Switch, BCM, Instrument Cluster, Rear Combination
Lamp LH/RH
M/T : Back-Up Lamp Switch, Smart Junction Box (Fuse : F15)
HEADLAMP
HI INDICATOR7.5A Instrument Cluster, PCB Fuse & Relay Box (Head Lamp (H) Relay)
Page 322 of 343

Maintenance
70 7
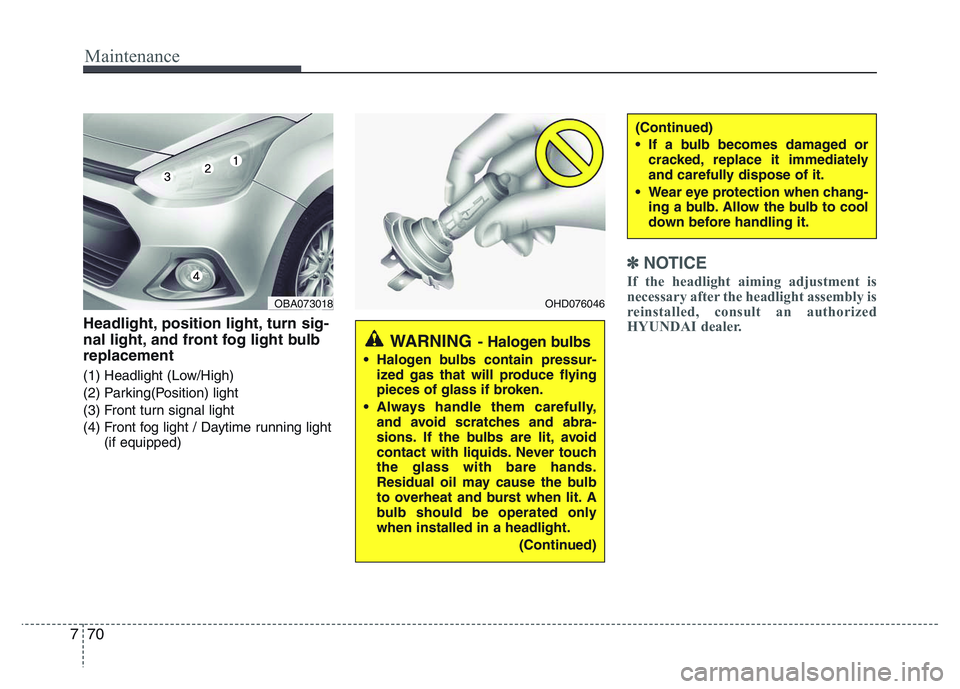
Headlight, position light, turn sig-
nal light, and front fog light bulb
replacement
(1) Headlight (Low/High)
(2) Parking(Position) light
(3) Front turn signal light
(4) Front fog light / Daytime running light
(if equipped)
✽NOTICE
If the headlight aiming adjustment is
necessary after the headlight assembly is
reinstalled, consult an authorized
HYUNDAI dealer.
OBA073018OHD076046
WARNING- Halogen bulbs
• Halogen bulbs contain pressur-
ized gas that will produce flying
pieces of glass if broken.
• Always handle them carefully,
and avoid scratches and abra-
sions. If the bulbs are lit, avoid
contact with liquids. Never touch
the glass with bare hands.
Residual oil may cause the bulb
to overheat and burst when lit. A
bulb should be operated only
when installed in a headlight.
(Continued)
(Continued)
• If a bulb becomes damaged or
cracked, replace it immediately
and carefully dispose of it.
• Wear eye protection when chang-
ing a bulb. Allow the bulb to cool
down before handling it.