Page 236 of 343

63
What to do in an emergency
2. When the vehicle is stopped, turn on
your hazard warning flasher, set the
parking brake and put the transaxle in
P (automatic transaxle) or reverse
(manual transaxle).
3. Have all passengers get out of the
vehicle. Be sure they all get out on the
side of the vehicle that is away from
traffic.
4. When changing a flat tire, follow the
instruction provided later in this chap-
ter.
If the engine stalls while driving
1. Reduce your speed gradually, keeping
a straight line. Move cautiously off the
road to a safe place.
2. Turn on your hazard warning flasher.
3. Try to start the engine again. Try to
start the engine again. If your vehicle
will not start, we recommend that you
consult an authorized HYUNDAI deal-
er.
If the engine doesn't turn over or
turns over slowly
1. If your vehicle has an automatic
transaxle, be sure the shift lever is in N
(Neutral) or P (Park) and the emer-
gency brake is set.
2. Check the battery connections to be
sure they are clean and tight.
3. Turn on the interior light. If the light
dims or goes out when you operate the
starter, the battery is discharged.
4. Check the starter connections to be
sure they are securely tightened.
5. Do not push or pull the vehicle to start
it. See instructions for "Jump starting".
If the engine turns over normally
but does not start
1. Check the fuel level.
2. With the ignition switch in the LOCK/
OFF position, check all connectors at
the ignition coils and spark plugs.
Reconnect any that may be discon-
nected or loose.
3. Check the fuel line in the engine com-
partment.
4. If the engine still does not start, we rec-
ommend that you call an authorized
HYUNDAI dealer.
IF THE ENGINE DOES NOT START
WARNING
If the engine will not start, do not
push or pull the vehicle to start it.
This could result in a collision or
cause other damage. In addition,
push or pull starting may cause the
catalytic converter to overload and
create a fire.
Page 238 of 343

65
What to do in an emergency
✽ NOTICE
An inappropriately disposed
battery can be harmful to the
environment and human health.
Dispose the battery according
to your local law(s) or regula-
tion.
Jump starting procedure
1. Position the vehicles close enough that
the jumper cables will reach, but do not
allow the vehicles to touch.
2. Avoid fans or any moving parts in the
engine compartment at all times, even
when the vehicles are turned off.
3. Turn off all electrical devices such as
radios, lights, air conditioning, etc. Put
the vehicles in P (Park, for automatic
transaxle vehicle) or neutral (for manu-
al transaxle vehicle), and set the park-
ing brakes. Turn both vehicles OFF.
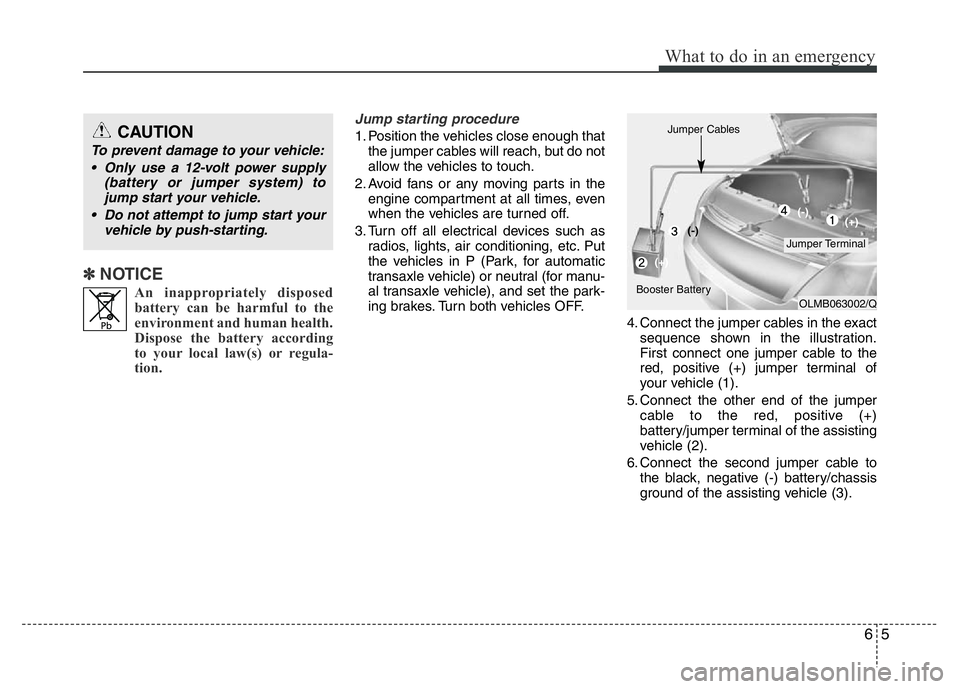
4. Connect the jumper cables in the exact
sequence shown in the illustration.
First connect one jumper cable to the
red, positive (+) jumper terminal of
your vehicle (1).
5. Connect the other end of the jumper
cable to the red, positive (+)
battery/jumper terminal of the assisting
vehicle (2).
6. Connect the second jumper cable to
the black, negative (-) battery/chassis
ground of the assisting vehicle (3).CAUTION
To prevent damage to your vehicle:
• Only use a 12-volt power supply
(battery or jumper system) to
jump start your vehicle.
• Do not attempt to jump start your
vehicle by push-starting.
OLMB063002/Q
Jumper Terminal Jumper Cables
Booster Battery(-)
(+)(+) (-)
Page 245 of 343

What to do in an emergency
12 6
9.Loosen the wheel lug nuts and
remove them with your fingers.
Slide the wheel off the studs and
lay it flat so it cannot roll away. To
put the wheel on the hub, pick up
the spare tire, line up the holes
with the studs and slide the wheel
onto them. If this is difficult, tip the
wheel slightly and get the top hole
in the wheel lined up with the top
stud. Then jiggle the wheel back
and forth until the wheel can be slid
over the other studs.10. To install the wheel, hold it on the
studs, put the wheel nuts on the
studs and tighten them finger
tight. Jiggle the tire to be sure it is
completely seated, then tighten
the nuts as much as possible
with your fingers again.
11. Lower the vehicle to the ground
by turning the wheel nut wrench
counterclockwise.
WARNING
• Wheels and wheel covers may
have sharp edges. Handle
them carefully to avoid possi-
ble severe injury.
• Before putting the wheel into
place, be sure that there is
nothing on the hub or wheel
(such as mud, tar, gravel, etc.)
that interferes with the wheel
from fitting solidly against the
hub. If there is, remove it. If
the contact of the mounting
surface between the wheel
and hub is not good, the
wheel nuts could come loose
and cause the loss of a wheel.
Loss of a wheel may result in
loss of control of the vehicle.
This may cause serious injury
or death.
Page 254 of 343

• Tire sidewall labeling . . . . . . . . . . . . . . . . . . . . . . . . . 7-47
• Low aspect ratio tire . . . . . . . . . . . . . . . . . . . . . . . . . . 7-51
FUSES . . . . . . . . . . . . . . . . . . . . . . . . . . . . . . . . . . . 7-52
• Instrument panel fuse replacement . . . . . . . . . . . . . . 7-53
• Engine compartment panel fuse replacement . . . . . 7-55
• Main fuse (multi fuse) . . . . . . . . . . . . . . . . . . . . . . . . . 7-56
• Fuse/relay panel description. . . . . . . . . . . . . . . . . . . . 7-57
LIGHT BULBS. . . . . . . . . . . . . . . . . . . . . . . . . . . . 7-69
• Headlight, position light, turn signal light, and
front fog light bulb replacement . . . . . . . . . . . . . . . 7-70
• Side repeater light bulb replacement . . . . . . . . . . . . 7-72
• Rear combination light bulb replacement . . . . . . . . 7-72
• Rear fog light bulb replacement . . . . . . . . . . . . . . . . 7-74
• High mounted stop light . . . . . . . . . . . . . . . . . . . . . . . 7-74
• License plate light bulb replacement . . . . . . . . . . . . 7-74
• Interior light bulb replacement . . . . . . . . . . . . . . . . . 7-75
APPEARANCE CARE . . . . . . . . . . . . . . . . . . . . . 7-76
• Exterior care . . . . . . . . . . . . . . . . . . . . . . . . . . . . . . . . 7-76
• Interior care . . . . . . . . . . . . . . . . . . . . . . . . . . . . . . . . . 7-81
EMISSION CONTROL SYSTEM . . . . . . . . . . . . 7-82
• Crankcase emission control system . . . . . . . . . . . . . . 7-82
• Evaporative emission control system. . . . . . . . . . . . . 7-82
• Exhaust emission control system . . . . . . . . . . . . . . . . 7-83
7
Page 258 of 343

Maintenance
6 7
OWNER MAINTENANCE
The following lists are vehicle checks and
inspections that should be performed at
the frequencies indicated to help ensure
safe, dependable operation of your vehi-
cle.
Any adverse conditions should be
brought to the attention of your dealer as
soon as possible.
These Owner Maintenance Checks are
generally not covered by warranties and
you may be charged for labor, parts and
lubricants used.Owner maintenance schedule
When you stop for fuel:
• Check the engine oil level.
• Check the coolant level in the coolant
reservoir.
• Check the windshield washer fluid
level.
• Look for low or under-inflated tires.
While operating your vehicle:
• Note any changes in the sound of the
exhaust or any smell of exhaust fumes
in the vehicle.
• Check for vibrations in the steering
wheel. Notice any increased steering
effort or looseness in the steering
wheel, or change in its straight-ahead
position.
• Notice if your vehicle constantly turns
slightly or “pulls” to one side when trav-
eling on smooth, level road.
• When stopping, listen and check for
unusual sounds, pulling to one side,
increased brake pedal travel or “hard-
to-push” brake pedal.
• If any slipping or changes in the oper-
ation of your transaxle occurs, check
the transaxle fluid level.
• Check automatic transaxle P (Park)
function.
• Check the parking brake.
• Check for fluid leaks under your vehicle
(water dripping from the air condition-
ing system during or after use is nor-
mal).
WARNING
Be careful when checking your
engine coolant level when the
engine is hot. Scalding hot coolant
and steam may blow out under
pressure. This could cause burns
or other serious injury.
Page 259 of 343

77
Maintenance
At least monthly:
• Check the coolant level in the engine
coolant reservoir.
• Check the operation of all exterior
lights, including the stoplights, turn sig-
nals and hazard warning flashers.
• Check the inflation pressures of all
tires including the spare.
At least twice a year
(i.e., every Spring and Fall):
• Check the radiator, heater and air con-
ditioning hoses for leaks or damage.
• Check the windshield washer spray
and wiper operation. Clean the wiper
blades with clean cloth dampened with
washer fluid.
• Check the headlight alignment.
• Check the muffler, exhaust pipes,
shields and clamps.
• Check the lap/shoulder belts for wear
and function.
• Check for worn tires and loose wheel
lug nuts.
At least once a year:
• Clean the body and door drain holes.
• Lubricate the door hinges and checks,
and hood hinges.
• Lubricate the door and hood locks and
latches.
• Lubricate the door rubber weather-
strips.
• Check the air conditioning system.
• Inspect and lubricate the automatic
transaxle linkage and controls.
• Clean the battery and terminals.
• Check the brake (and clutch) fluid
level.
Page 280 of 343

Maintenance
28 7
✽NOTICE
“C” (COLD) range is for reference only
and should NOT be used to determine
the transaxle fluid level.
✽NOTICE
A new automatic transaxle fluid should
be red. The red dye is added so the
assembly plant can identify it as auto-
matic transaxle fluid and distinguish it
from engine oil or antifreeze. The red
dye, which is not an indicator of fluid
quality, is not permanent. As the vehicle
is driven, the automatic transaxle fluid
will begin to look darker. The color may
eventually appear light brown.
Therefore, we recommend that the sys-
tem be replaced by an authorized
HYUNDAI dealer according to the
Scheduled Maintenance at the begin-
ning of this chapter.
Use only the specified automatic
transaxle fluid. (Refer to “Recommended
lubricants and capacities” in chapter 8.)
Changing the automatic transaxle
fluid
We recommend that the system be
replaced by an authorized HYUNDAI
dealer.
WARNING- Parking brake
To avoid sudden movement of the
vehicle, apply the parking brake
and depress the brake pedal before
moving the shift lever.
CAUTION
• Low fluid level causes transaxle
shift slippage. Overfilling can
cause foaming, loss of fluid and
transaxle malfunction.
• The use of a non-specified fluid
could result in transaxle malfunc-
tion and failure.
Page 288 of 343
Maintenance
36 7
2. Lift up the wiper blade clip (1). Then
pull down the blade assembly (2) and
remove it.3. Install a new blade assembly in the
reverse order of removal.
4. Return the wiper arm on the wind-
shield.Rear window wiper blade
(if equipped)
1. Raise the wiper arm and pull out the
wiper blade assembly.
2. Slightly rotate the wiper blade assem-
bly (1) and pull it out.
OHM078060OHM078061OPA077017