2018 HYUNDAI ELANTRA SPORT ESP
[x] Cancel search: ESPPage 54 of 534
2-36
Safety system of your vehicle
Booster seats
A booster seat is a restraint designed
to improve the fit of the vehicle’s seat
belt system. A booster seat positions
the seat belt so that it fits properly
over the lap of your child.
Keep your child in a booster seat
until they are big enough to sit in the
seat without a booster and still have
the seat belt fit properly. For a seat
belt to fit properly, the lap belt must
lie snugly across the upper thighs,
not the stomach. The shoulder belt
should lie snug across the shoulder
and chest and not across the neck or
face. Children under age 13 must
always ride in the rear seats and
must always be properly restrained
to minimize the risk of injury.
Installing a Child Restraint System (CRS)After selecting a proper child seat for
your child, check to make sure it fits
properly in your vehicle. Follow the
instructions provided by the manu-
facturer when installing the child
seat. Note these general steps when
installing the seat to your vehicle:
Properly secure the child restraint
to the vehicle.
All child restraints
must be secured to the vehicle with
the lap part of a lap/shoulder belt or
with the LATCH system.
Make sure the child restraint is
firmly secured. After installing a
child restraint to the vehicle, push
and pull the seat forward-and-back
and side-to-side to verify that it is
securely attached to the seat. A
child restraint secured with a seat
belt should be installed as firmly as
possible. However, some side-to-
side movement can be expected.
Secure the child in the childrestraint. Make sure the child is
properly strapped in the child
restraint according to the manufac-
turer instructions.
Before installing your child
restraint system always:Read and follow the instruc-
tions provided by the manu-
facturer of the child restraint.
Read and follow the instruc-
tions regarding child restraint
systems in this manual.
Failure to follow all warningsand instructions could increase
the risk of the SERIOUS INJURY
or DEATH if an accident occurs.
WARNING
If the vehicle head restraint pre-
vents proper installation of a
child seat (as described in the
child seat system manual, thehead restraint of the respectiveseating position shall be read-
justed or entirely removed.
WARNING
Page 67 of 534
2-49
Safety system of your vehicle
2
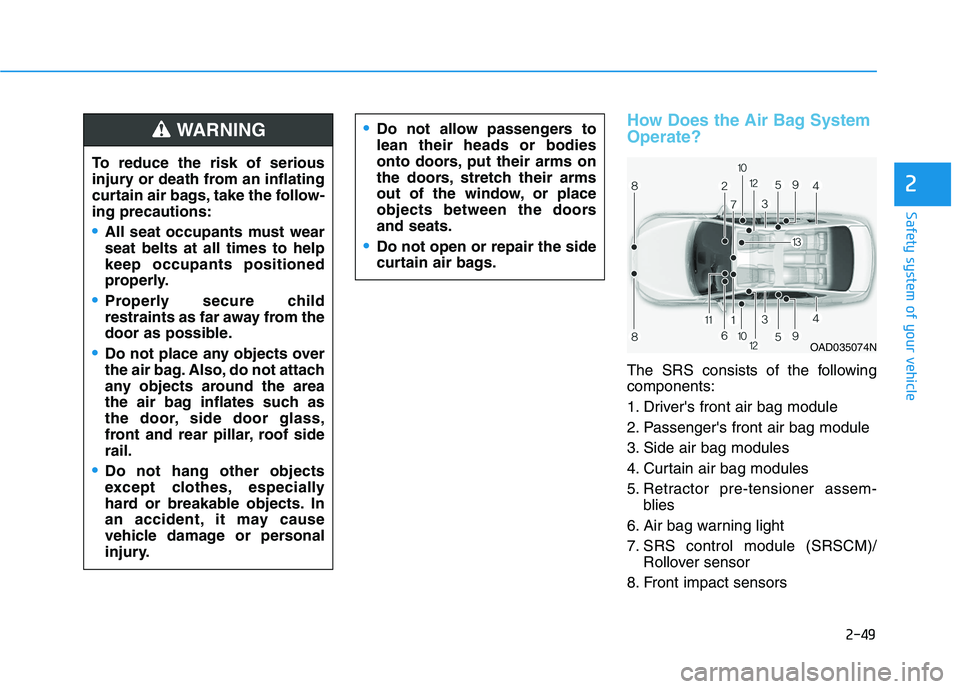
How Does the Air Bag System Operate?
The SRS consists of the following components:
1. Driver's front air bag module
2. Passenger's front air bag module
3. Side air bag modules
4. Curtain air bag modules
5. Retractor pre-tensioner assem-blies
6. Air bag warning light
7. SRS control module (SRSCM)/ Rollover sensor
8. Front impact sensors
To reduce the risk of serious
injury or death from an inflating
curtain air bags, take the follow-ing precautions:
All seat occupants must wear seat belts at all times to helpkeep occupants positioned
properly.
Properly secure child
restraints as far away from the
door as possible.
Do not place any objects over
the air bag. Also, do not attach
any objects around the area
the air bag inflates such as
the door, side door glass,
front and rear pillar, roof siderail.
Do not hang other objects
except clothes, especially
hard or breakable objects. In
an accident, it may cause
vehicle damage or personal
injury.
Do not allow passengers to lean their heads or bodies
onto doors, put their arms on
the doors, stretch their arms
out of the window, or place
objects between the doorsand seats.
Do not open or repair the side
curtain air bags.
WARNING
OAD035074N
Page 69 of 534
2-51
Safety system of your vehicle
2
During a frontal collision, sensors will
detect the vehicle's deceleration. If
the rate of deceleration is highenough, the control unit will inflate
the front air bags. The front air bags help protect the
driver and front passenger byresponding to frontal impacts inwhich seat belts alone cannot pro-
vide adequate restraint. When need-
ed, the side air bags help provide
protection in the event of a side
impact or rollover.
Air bags are activated (able toinflate if necessary) only when the
ignition switch is in the ON posi-tion.
Air bags inflate in the event of cer- tain frontal or side collisions to help
protect the occupants from serious
physical injury.
Generally, air bags are designed to inflate based upon the severity of a
collision, its direction, etc. These
two factors determine whether thesensors produce an electronic
deployment/ inflation signal. The front air bags will completely
inflate and deflate in an instant. It is
virtually impossible for you to see
the air bags inflate during an acci-
dent. It is much more likely that youwill simply see the deflated air
bags hanging out of their storage
compartments after the collision.
In addition to inflating in certain side collisions, vehicles equipped
with a rollover sensor, side and
curtain air bags will inflate if the
sensing system detects a rollover.
When a rollover is detected, side
and curtain air bags will remain
inflated longer to help provide pro-tection from ejection, especiallywhen used in conjunction with the
seat belts. To help provide protection, the air
bags must inflate rapidly. Thespeed of air bag inflation is a con-
sequence of extremely short timein which to inflate the air bag
between the occupant and the
vehicle structures before the occu-
pant impacts those structures. This
speed of inflation reduces the risk
of serious or life-threatening
injuries and is thus a necessary
part of air bag design.
However, the rapid air bag inflation
can also cause injuries which can
include facial abrasions, bruises
and broken bones because theinflation speed also causes the air
bags to expand with a great deal of
force.
There are even circumstances under which contact with the air
bag can cause fatal injuries, espe-cially if the occupant is positioned
excessively close to the air bag.
Page 90 of 534
3-5
Convenient features of your vehicle
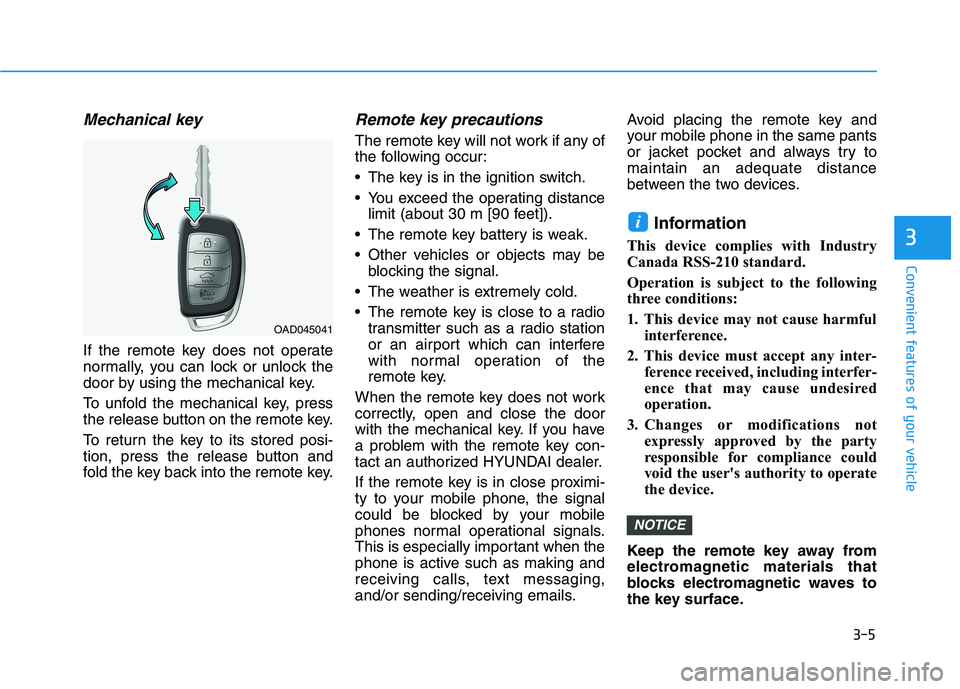
Mechanical key
If the remote key does not operate
normally, you can lock or unlock the
door by using the mechanical key.
To unfold the mechanical key, press
the release button on the remote key.
To return the key to its stored posi-
tion, press the release button and
fold the key back into the remote key.
Remote key precautions
The remote key will not work if any of
the following occur:
The key is in the ignition switch.
You exceed the operating distancelimit (about 30 m [90 feet]).
The remote key battery is weak.
Other vehicles or objects may be blocking the signal.
The weather is extremely cold.
The remote key is close to a radio transmitter such as a radio station
or an airport which can interfere
with normal operation of the
remote key.
When the remote key does not work
correctly, open and close the door
with the mechanical key. If you have
a problem with the remote key con-
tact an authorized HYUNDAI dealer.
If the remote key is in close proximi-
ty to your mobile phone, the signal
could be blocked by your mobile
phones normal operational signals.
This is especially important when the
phone is active such as making and
receiving calls, text messaging,
and/or sending/receiving emails. Avoid placing the remote key and
your mobile phone in the same pants
or jacket pocket and always try tomaintain an adequate distance
between the two devices.
Information
This device complies with Industry
Canada RSS-210 standard.
Operation is subject to the following
three conditions:
1. This device may not cause harmful interference.
2. This device must accept any inter- ference received, including interfer-
ence that may cause undesired
operation.
3. Changes or modifications not expressly approved by the party
responsible for compliance could
void the user's authority to operate
the device.
Keep the remote key away from
electromagnetic materials that
blocks electromagnetic waves to
the key surface.
NOTICE
i
3
OAD045041
Page 95 of 534
3-10
Convenient features of your vehicle
If the smart key is in close proximity
to your mobile phone, the signal
could be blocked by your mobile
phones normal operational signals.
This is especially important when the
phone is active such as making and
receiving calls, text messaging,
and/or sending/receiving emails.
Avoid placing the smart key and your mobile phone in the same pants or
jacket pocket and always try to main-
tain an adequate distance between
the two devices.Information
This device complies with Industry
Canada RSS-210 standard.
Operation is subject to the following
three conditions:
1. This device may not cause harmful interference.
2. This device must accept any inter- ference received, including interfer-
ence that may cause undesired
operation.
3. Changes or modifications not expressly approved by the party
responsible for compliance could
void the user's authority to operate
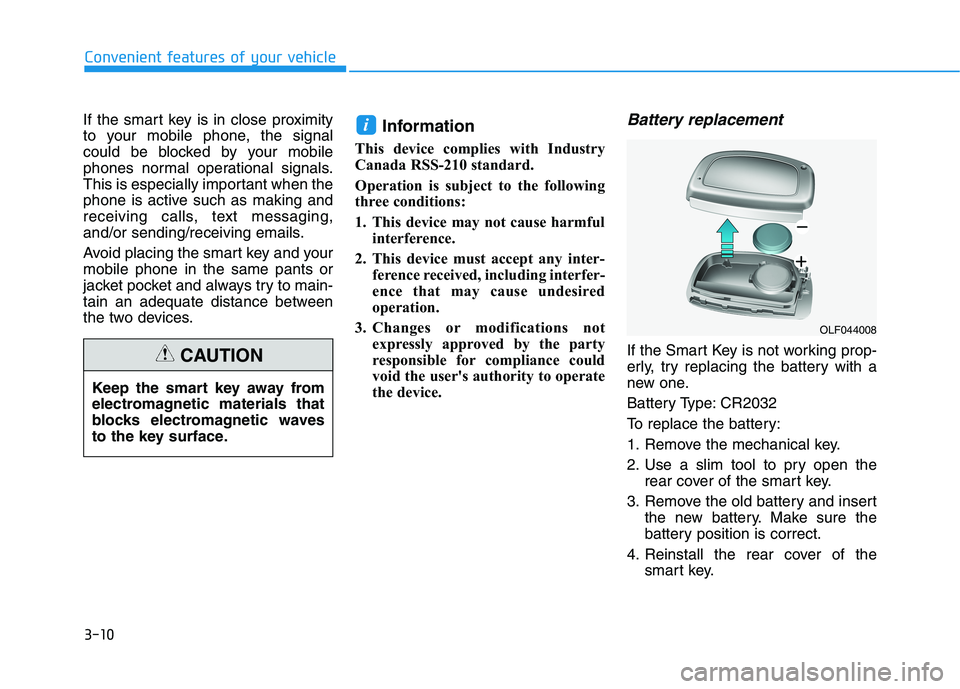
the device.Battery replacement
If the Smart Key is not working prop-
erly, try replacing the battery with a
new one.
Battery Type: CR2032
To replace the battery:
1. Remove the mechanical key.
2. Use a slim tool to pry open the rear cover of the smart key.
3. Remove the old battery and insert the new battery. Make sure the
battery position is correct.
4. Reinstall the rear cover of the smart key.
i
OLF044008
Keep the smart key away from
electromagnetic materials that
blocks electromagnetic waves
to the key surface.
CAUTION
Page 97 of 534
3-12Information
This device complies with Industry
Canada RSS-210 standard.
Operation is subject to the following
three conditions:
1. This device may not cause harmful interference.
2. This device must accept any inter- ference received, including interfer-
ence that may cause undesired
operation.
3. Changes or modifications not expressly approved by the party
responsible for compliance could
void the user's authority to operate
the device.
"Limp Home" Mode and Related
Procedures
If the immobilizer warning indicator
blinks for five seconds when the igni-
tion key is turned to the "ON" posi-
tion, this indicates the immobilizer
system requires service. The engine
cannot be started without using the
procedure below.
The following procedure describes
how to start the engine using thelimp home function (0, 1, 2, 3 as a
sample password).
You can get a limp home pass-
word when the vehicle is first
delivered to you. If you do not
have a password, consult your
authorized HYUNDAI dealer. 1. To activate the password, turn the
ignition key "ON" and "OFF"
according to the digit numbers.
The immobilizer indicator will blink
along with the operation of the
ignition key. For example, turn the
ignition key once for digit number
"1", and twice for "2", and so on.
For the digit number "0", you must
cycle the ignition key 10 times.
2. Wait for 3~10 seconds.
3. You may set the remaining num- ber of digits by following steps 1 and 2.
4. If all of the four password digits have been successfully entered,
turn the ignition key "ON" and
check that the immobilizer indica-
tor illuminates. From this time, you
have to start your engine within 30
seconds. If you try to start your
engine after 30 seconds, your
engine will not start.
NOTICE
i
Convenient features of your vehicle
Page 116 of 534
3-31
Convenient features of your vehicle
3
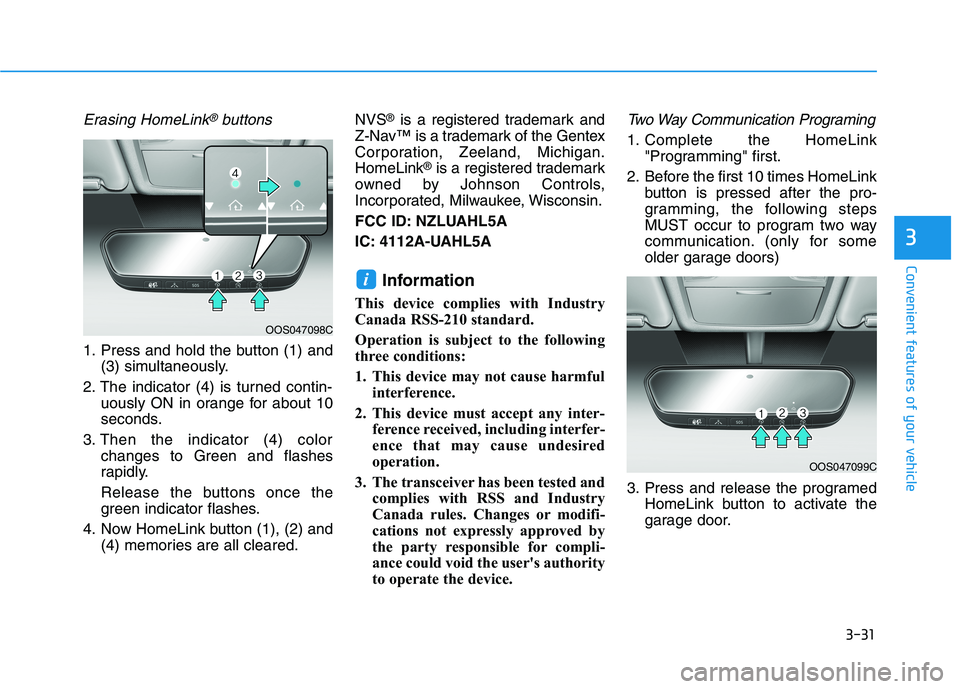
Erasing HomeLink®buttons
1. Press and hold the button (1) and(3) simultaneously.
2. The indicator (4) is turned contin- uously ON in orange for about 10
seconds.
3. Then the indicator (4) color changes to Green and flashes
rapidly.
Release the buttons once the
green indicator flashes.
4. Now HomeLink button (1), (2) and (4) memories are all cleared. NVS
®
is a registered trademark and
Z-Nav™ is a trademark of the Gentex
Corporation, Zeeland, Michigan.HomeLink ®
is a registered trademark
owned by Johnson Controls,
Incorporated, Milwaukee, Wisconsin.
FCC ID: NZLUAHL5A
IC: 4112A-UAHL5A
Information
This device complies with Industry
Canada RSS-210 standard.
Operation is subject to the following
three conditions:
1. This device may not cause harmful interference.
2. This device must accept any inter- ference received, including interfer-
ence that may cause undesired
operation.
3. The transceiver has been tested and complies with RSS and Industry
Canada rules. Changes or modifi-
cations not expressly approved by
the party responsible for compli-
ance could void the user's authority
to operate the device.
Two Way Communication Programing
1. Complete the HomeLink "Programming" first.
2. Before the first 10 times HomeLink button is pressed after the pro-
gramming, the following steps
MUST occur to program two way
communication. (only for some
older garage doors)
3. Press and release the programed HomeLink button to activate the
garage door.
i
OOS047099C
OOS047098C
Page 139 of 534
3-54
Convenient features of your vehicle
Information
Make sure to refuel your vehicle
according to the "Fuel Requirements"
suggested in the Introduction chapter.
Do not spill fuel on the exterior surfaces of the vehicle. Any type of fuel spilled on painted sur-
faces may damage the paint.
If the fuel filler cap requires replacement, use only a genuine
HYUNDAI cap or the equivalent
specified for your vehicle. Anincorrect fuel filler cap canresult in a serious malfunctionof the fuel system or emission
control system.
NOTICE
iIf pressurized fuel sprays out,
it can cover your clothes or
skin and thus subject you to
the risk of fire and burns.
Always remove the fuel cap
carefully and slowly. If the cap
is venting fuel or if you hear a
hissing sound, wait until the
condition stops before com-
pletely removing the cap.
Always check that the fuel cap
is installed securely to pre-
vent fuel spillage in the eventof an accident.
Use only approved portable
plastic fuel containers designed
to carry and store gasoline.
When refueling, always move
the shift lever to the P (Park)
position, set the parking
brake, and place the ignition
switch to the LOCK/OFF posi-
tion. Sparks produced byelectrical components relatedto the engine can ignite fuel
vapors causing a fire.
Do not use matches or a lighter and do not smoke or
leave a lit cigarette in your
vehicle while at a gas station,
especially during refueling.
Do not over-fill or top-off your
vehicle tank, which can cause
gasoline spillage.
If a fire breaks out during refu-
eling, leave the vicinity of the
vehicle, and immediately con-
tact the manager of the gasstation and then contact the
local fire department. Follow
any safety instructions they
provide.