2018 Hyundai Elantra information panel
[x] Cancel search: information panelPage 93 of 526

3-16
Convenient features of your vehicle
Once the security system is set, opening
any door, the trunk, or the hood without
using the remote key or smart key will
cause the alarm to activate.
The Theft Alarm System will not set if the
hood, the trunk, or any door is not fully
closed. If the system will not set, check
the hood, the trunk, or the doors are fully
closed.
Do not attempt to alter this system or add
other devices to it.
Information
• Do not lock the doors until all passen-gers have left the vehicle. If the remain-
ing passenger leaves the vehicle when
the system is armed, the alarm will be
activated.
• If the vehicle is not disarmed with the remote key or smart key, open the doors
by using the mechanical key and place
the ignition switch in the ON position
(for remote key) or start the engine (for
smart key) by directly pressing the igni-
tion switch with the smart key.
• When the system is disarmed but a door or trunk is not opened within 30 sec-
onds, the system will be rearmed. The Driver Position Memory System is
provided to store and recall the following
memory settings with a simple button
operation.
- Driver's seat position
- Side view mirror position
- Instrument panel illumination intensity
If the battery is disconnected, the posi-
tion memory will be lost and the driving
positions must be stored in the system
again.
If the Driver Position Memory System
does not operate normally, have the sys-
tem checked by an authorized HYUNDAI
dealer.
i
D D
R
RI
IV
V E
ER
R
P
P O
O S
SI
IT
T I
IO
O N
N
M
M E
EM
M O
OR
RY
Y
S
S Y
Y S
ST
T E
EM
M
(
( I
IF
F
E
E Q
Q U
UI
IP
P P
PE
ED
D )
)
OAD045043L
Never attempt to operate the driver
position memory system while the
vehicle is moving.
This could result in loss of control,
and an accident causing death,
serious injury, or property damage.
WARNING
Page 176 of 526

3-99
Convenient features of your vehicle
3
AUTO light position (if equipped)
The parking lamp and headlamp will be
turned ON or OFF automatically depend-
ing on the amount of light outside the
vehicle.
Even with the AUTO light feature in oper-
ation, it is recommended to manually turn
ON the lamps when driving at night or in
a fog, driving in the rain, or when you
enter dark areas, such as tunnels and
parking facilities.• Do not cover or spill anything on the
sensor (1) located in front of the
instrument panel.
Do not clean the sensor using a win- dow cleaner, the cleanser may leave
a light film which could interfere
with sensor operation.
If your vehicle has window tint or other types of metallic coating on
the front windshield, the AUTO light
system may not work properly.
Parking lamp position ( )
The parking lamp, license plate lamp and
instrument panel lamp are turned ON.
Headlamp position ( )
The headlamp, parking lamp, license
plate lamp and instrument panel lamp
are turned ON.
Information
The ignition switch must be in the ON
position to turn on the headlamp.
i
NOTICE
OAD045436N
OLF044086N
OLF044087N
Page 187 of 526
3-110
Convenient features of your vehicle
D
DE
EF
FR
R O
O S
ST
T E
ER
R
To prevent damage to the conductors
bonded to the inside surface of the
rear window, never use sharp instru-
ments or window cleaners containing
abrasives to clean the window.
If you want to defrost and defog the
front windshield, refer to the
"Windshield Defrosting and
Defogging" section in this chapter.
Rear Window Defroster
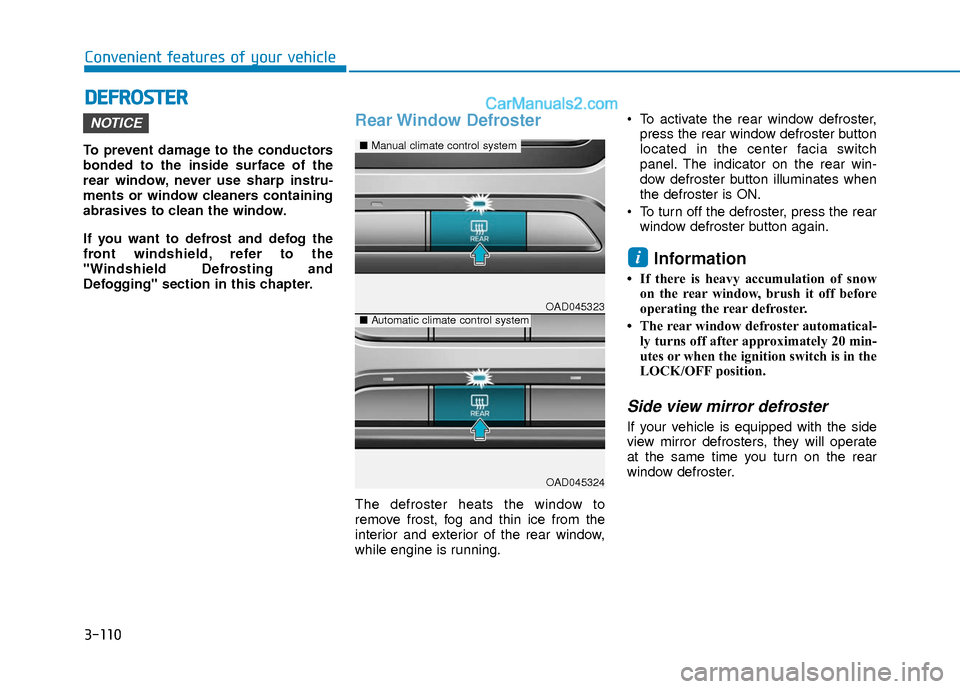
The defroster heats the window to
remove frost, fog and thin ice from the
interior and exterior of the rear window,
while engine is running. To activate the rear window defroster,
press the rear window defroster button
located in the center facia switch
panel. The indicator on the rear win-
dow defroster button illuminates when
the defroster is ON.
To turn off the defroster, press the rear window defroster button again.
Information
• If there is heavy accumulation of snowon the rear window, brush it off before
operating the rear defroster.
• The rear window defroster automatical- ly turns off after approximately 20 min-
utes or when the ignition switch is in the
LOCK/OFF position.
Side view mirror defroster
If your vehicle is equipped with the side
view mirror defrosters, they will operate
at the same time you turn on the rear
window defroster.
i
NOTICE
OAD045323
OAD045324
■ Manual climate control system
■Automatic climate control system
Page 244 of 526
4-25
Multimedia System
4
Information
Turn on the car ignition before using this
device. Do not operate the audio system
for long periods of time with the ignition
turned off as such operations may lead to
battery discharge.
Do not subject the device to severeshock or impact. Direct pressure
onto the front side of the monitor
may cause damage to the LCD or
touch screen.
When cleaning the device, make sure to turn off the device and use a
dry and smooth cloth. Never use
rough materials, chemical cloths, or
solvents (alcohol, benzene, thin-
ners, etc.) as such materials may
damage the device panel or cause
color/quality deterioration.
Do not place beverages close to the audio system. Spilling beverages
may lead to system malfunction.
Placing the audio system within an electromagnetic environment may
result in noise interference.
Information
In case of product malfunction, please
contact your dealer or vehicle service cen-
ter.
i
NOTICE
i(Continued)
Do not touch the antenna during
thunder or lightening as such
acts may lead to lightning
induced electric shock.
Do not stop or park in parking-
restricted areas to operate the
product. Such acts could lead to
traffic accidents.
Distracted Driving
Driving while distracted can result
in a loss of vehicle control that may
lead to an accident, severe person-
al injury, and death. The driver’s pri-
mary responsibility is in the safe
and legal operation of a vehicle,
and use of any handheld devices,
other equipment, or vehicle sys-
tems which take the driver’s eyes,
attention and focus away from the
safe operation of a vehicle or which
are not permissible by law should
never be used during operation of
the vehicle.
WARNING
Page 466 of 526

7-48
Maintenance
F
FU
U S
SE
E S
S
A vehicle’s electrical system is protected
from electrical overload damage by
fuses.
This vehicle has 2 (or 3) fuse panels, one
located in the driver's side panel bolster,
the other in the engine compartment
near the battery.
If any of your vehicle’s lights, acces-
sories, or controls do not work, check the
appropriate circuit fuse. If a fuse has
blown, the element inside the fuse will be
melted or broken.
If the electrical system does not work,
first check the driver's side fuse panel.
Before replacing a blown fuse, turn the
engine and all switches off, and then dis-
connect the negative battery cable.
Always replace a blown fuse with one of
the same rating.
If the replacement fuse blows, this indi-
cates an electrical problem. Avoid using
the system involved and immediately
consult an authorized HYUNDAI dealer.
Information
Four kinds of fuses are used : blade type
for lower amperage rating, cartridge type/
Multi fuse/Battery fuse terminal for high-
er amperage ratings. Do not use a screwdriver or any other
metal object to remove fuses because
it may cause a short circuit and dam-
age the system.
NOTICE
i
NEVER replace a fuse with any-
thing but another fuse of the same
rating.
A higher capacity fuse could
cause damage and possibly
cause a fire.
Do not install a wire or aluminum
foil instead of the proper fuse -
even as a temporary repair. It may
cause extensive wiring damage
and possibly a fire.
WARNING ■
Blade type
Normal
■ Cartridge type Blown
Normal
Blown
■ Multi fuse
Normal Blown
■
Battery fuse terminal
Normal Blown
OLF074075
Page 468 of 526
7-50
Maintenance
Fuse switch
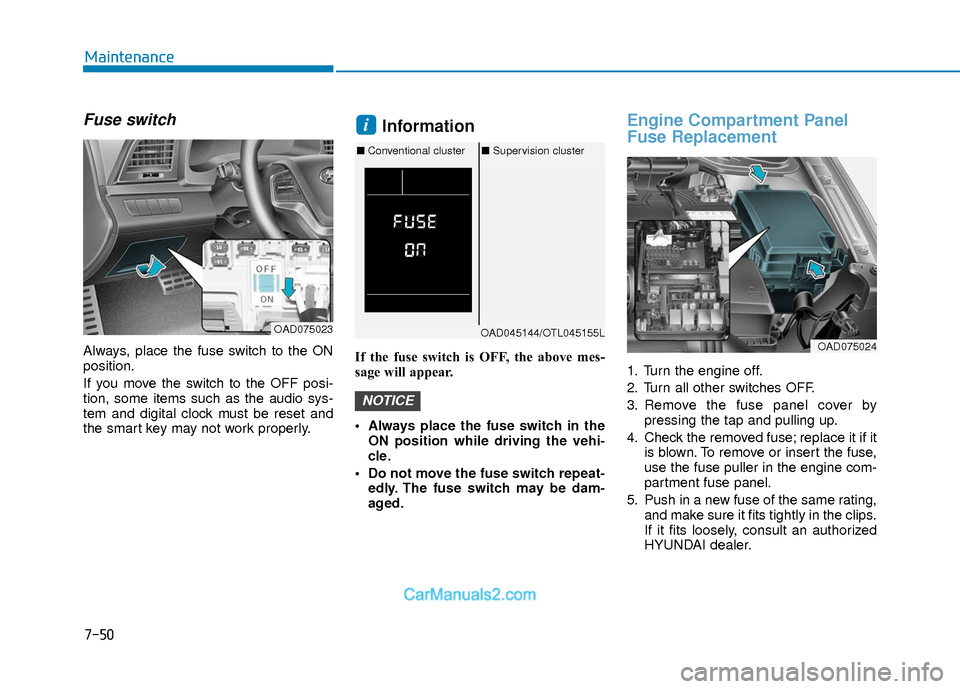
Always, place the fuse switch to the ON
position.
If you move the switch to the OFF posi-
tion, some items such as the audio sys-
tem and digital clock must be reset and
the smart key may not work properly.
Information
If the fuse switch is OFF, the above mes-
sage will appear.
Always place the fuse switch in theON position while driving the vehi-
cle.
Do not move the fuse switch repeat- edly. The fuse switch may be dam-
aged.
Engine Compartment Panel
Fuse Replacement
1. Turn the engine off.
2. Turn all other switches OFF.
3. Remove the fuse panel cover by pressing the tap and pulling up.
4. Check the removed fuse; replace it if it is blown. To remove or insert the fuse,
use the fuse puller in the engine com-
partment fuse panel.
5. Push in a new fuse of the same rating, and make sure it fits tightly in the clips.
If it fits loosely, consult an authorized
HYUNDAI dealer.
NOTICE
i
OAD075023OAD045144/OTL045155L
■Conventional cluster ■Supervision cluster
OAD075024
Page 469 of 526
7-51
7
Maintenance
Main fuse
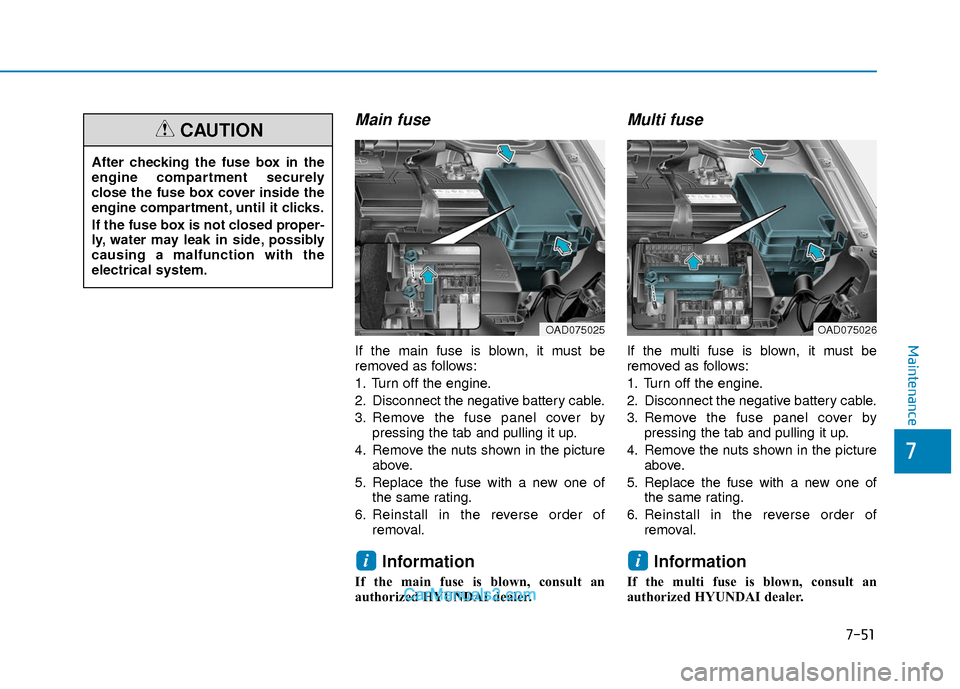
If the main fuse is blown, it must be
removed as follows:
1. Turn off the engine.
2. Disconnect the negative battery cable.
3. Remove the fuse panel cover bypressing the tab and pulling it up.
4. Remove the nuts shown in the picture above.
5. Replace the fuse with a new one of the same rating.
6. Reinstall in the reverse order of removal.
Information
If the main fuse is blown, consult an
authorized HYUNDAI dealer.
Multi fuse
If the multi fuse is blown, it must be
removed as follows:
1. Turn off the engine.
2. Disconnect the negative battery cable.
3. Remove the fuse panel cover bypressing the tab and pulling it up.
4. Remove the nuts shown in the picture above.
5. Replace the fuse with a new one of the same rating.
6. Reinstall in the reverse order of removal.
Information
If the multi fuse is blown, consult an
authorized HYUNDAI dealer.
ii
After checking the fuse box in the
engine compartment securely
close the fuse box cover inside the
engine compartment, until it clicks.
If the fuse box is not closed proper-
ly, water may leak in side, possibly
causing a malfunction with the
electrical system.
CAUTION
OAD075025OAD075026
Page 471 of 526

7-53
7
Maintenance
Fuse/Relay Panel Description
Instrument panel fuse panel
Inside the fuse/relay box cover, you can
find the fuse/relay label describing
fuse/relay name and capacity.
Information
Not all fuse panel descriptions in this man-
ual may be applicable to your vehicle; the
information is accurate at the time of
printing. When you inspect the fuse box on
your vehicle, refer to the fuse box label.
i
OAD075029
OAD075104N