Page 60 of 472
2. Fasten the lap/shoulder belt latch
into the buckle. Listen for the dis-
tinct “click” sound.
Information
Position the release button so that it is
easy to access in case of an emergency.3. Remove as much slack from the
belt as possible by pushing down
on the Child Restraint System
while feeding the shoulder belt
back into the retractor.
4. Push and pull on the Child
Restraint System to confirm that
the seat belt is holding it firmly in
place.
If your CRS manufacturer instructs or
recommends you use a ISOFIX top-
tether anchorage with the lap/shoul-
der belt, see page 2-45.To remove the Child Restraint System,
press the release button on the buckle
and then pull the lap/shoulder belt out
of the restraint and allow the seat belt
to retract fully.
i
2-40
Safety system of your vehicle
OLMB033045OLMB033046
Page 87 of 472

Light .......................................................................3-78
Exterior lights ..................................................................3-78
Interior lights ....................................................................3-85
Wipers and washers ............................................3-88
Windshield wipers ...........................................................3-89
Windshield washers ........................................................3-89
Rear window wiper and washer switch.....................3-90
Driver assist system ............................................3-91
Rear view camera ...........................................................3-91
Rear parking assist system ..........................................3-92
Climate control system........................................3-95
Defroster ...........................................................................3-95
Manual climate control system ...................................3-96
Automatic climate control system ............................3-105
Windshield defrosting and defogging .....................3-116
Storage compartment ........................................3-120
Center console storage ...............................................3-120
Glove box ........................................................................3-121
Sunglass holder .............................................................3-121
Interior features.................................................3-122
Digital clock ....................................................................3-122
Cigarette lighter ............................................................3-122
Ashtray ............................................................................3-123
Cup holder.......................................................................3-124
Sunvisor ...........................................................................3-125
Power outlet/USB charger .........................................3-125
Clothes hanger ..............................................................3-127
Floor mat anchor(s)......................................................3-127
Luggage net holder ......................................................3-128
Cargo area cover ..........................................................3-129
3
Page 212 of 472
3-127
Convenient features of your vehicle
3
Clothes hanger (if equipped)
These hangers are not designed to
hold large or heavy items.
To hang items, pull down the upper
portion of the hanger.
Floor mat anchor(s)
(if equipped)
ALWAYS use the Floor Mat Anchors
to attach the front floor mats to the
vehicle. The anchors on the front
floor carpet keep the floor mats from
sliding forward. Do not hang other objects such
as hangers or hard objects
except clothes. Also, do not put
heavy, sharp or breakable
objects in the clothe pockets. In
an accident or when the curtain
air bag is inflated, it may cause
vehicle damage or personal
injury.
WARNING
OFS040126
OAEE046434
■Rear
Page 213 of 472

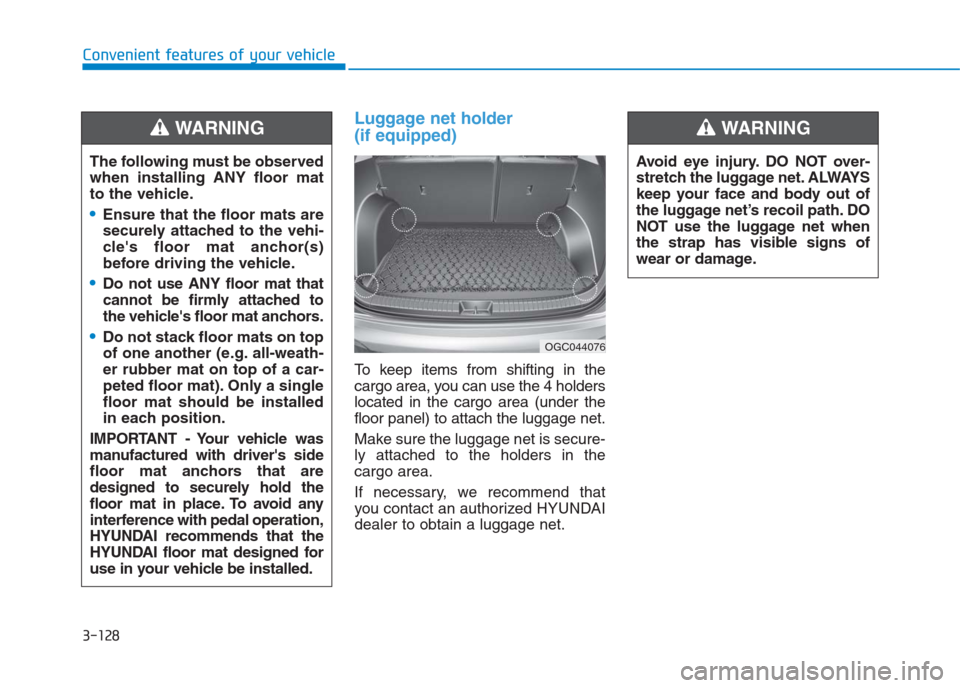
Luggage net holder
(if equipped)
To keep items from shifting in the
cargo area, you can use the 4 holders
located in the cargo area (under the
floor panel) to attach the luggage net.
Make sure the luggage net is secure-
ly attached to the holders in the
cargo area.
If necessary, we recommend that
you contact an authorized HYUNDAI
dealer to obtain a luggage net. The following must be observed
when installing ANY floor mat
to the vehicle.
Ensure that the floor mats are
securely attached to the vehi-
cle's floor mat anchor(s)
before driving the vehicle.
Do not use ANY floor mat that
cannot be firmly attached to
the vehicle's floor mat anchors.
Do not stack floor mats on top
of one another (e.g. all-weath-
er rubber mat on top of a car-
peted floor mat). Only a single
floor mat should be installed
in each position.
IMPORTANT - Your vehicle was
manufactured with driver's side
floor mat anchors that are
designed to securely hold the
floor mat in place. To avoid any
interference with pedal operation,
HYUNDAI recommends that the
HYUNDAI floor mat designed for
use in your vehicle be installed.
WARNING
OGC044076
Avoid eye injury. DO NOT over-
stretch the luggage net. ALWAYS
keep your face and body out of
the luggage net’s recoil path. DO
NOT use the luggage net when
the strap has visible signs of
wear or damage.
WARNING
Convenient features of your vehicle
3-128
Page 469 of 472

I-5
If the engine overheats ...................................................6-8
If the engine will not start ..............................................6-4
If the engine doesn't turn over or turns over ..............6-4
If the engine turns over normally but doesn't start ......6-4
If you have a flat tire ....................................................6-16
Changing tires ...........................................................6-17
Jack and tools ...........................................................6-16
Jack label ...................................................................6-21
Removing and storing the spare tire ..........................6-16
Ignition switch ................................................................5-5
Engine Start/Stop button ..............................................5-9
Key ignition switch......................................................5-5
In case of an emergency while driving ..........................6-3
If the engine stalls at a crossroad or crossing..............6-3
If the engine stalls while driving .................................6-3
If you have a flat tire while driving.............................6-3
Instrument cluster .........................................................3-43
Gauges .......................................................................3-45
Instrument Cluster Control ........................................3-44
LCD display ...............................................................3-67
Transaxle shift indicator ............................................3-48
Trip computer ............................................................3-74
Warning and indicator lights......................................3-50
Warning Messages (for Type B) ................................3-61Instrument panel overview (I) ........................................1-6
Instrument panel overview (II) .......................................1-7
Interior features...........................................................3-122
Ashtray .....................................................................3-123
Cargo area cover ......................................................3-129
Cigarette lighter .......................................................3-122
Clothes hanger .........................................................3-127
Cup holder ...............................................................3-124
Digital clock.............................................................3-122
Floor mat anchor(s) .................................................3-127
Luggage net holder ..................................................3-128
Power outlet/USB charger .......................................3-125
Sunvisor ...................................................................3-125
Interior overview (I) .......................................................1-4
Interior overview (II) ......................................................1-5
Jump starting...................................................................6-5
I
Index
I
J