Page 376 of 472
7-19
7
Maintenance
I : Inspect and if necessary, adjust, correct, clean or replace.
R : Replace or change.
*8: Manual transaxle fluid should be changed anytime they have been submerged in water.
Normal maintenance schedule (Except Mexico) - Diesel engine (Cont.)
Number of months or driving distance, whichever comes first
Months1224364860728496
Miles×1,00012.52537.55062.57587.5100
Km×1,00020406080100120140160
Steering gear rack, linkage and bootsIIIIIIII
Drive shaft and bootsIIIIIIII
Tire (pressure & tread wear) IIIIIIII
Front suspension ball jointsIIIIIIII
Bolt and nuts on chassis and bodyIIIIIIII
Air conditioner refrigerant IIIIIIII
Air conditioner compressorIIIIIIII
Climate control air filterReplace every 10,000 km (6,000 miles) or 12 months
Manual transaxle fluid *8Inspect every 60,000 km (40,000 miles) or 48 months
Automatic transaxle fluid (if equipped)No check, No service required
MAINTENANCE
ITEM
MAINTENANCE
INTERVALS
Page 379 of 472

7-22
Maintenance
I : Inspect and if necessary, adjust, correct, clean or replace.
R : Replace or change.
*
1: The drive belt should be replaced when cracks occur or tension is reduced excessively.
*2: Check the engine oil level and leak every 500 km (350 miles) or before starting a long trip.
*3: If good quality gasolines meet Europe Fuel standards (EN228) or equivalents including fuel additives is not available, one bot-
tle of additive is recommended. Additives are available from your authorized HYUNDAI dealer along with information on how to
use them. Do not mix other additives.
*
4: For your convenience, it can be replaced prior to it's interval when you do maintenance of other items.
*5: Inspect for excessive valve noise and/or engine vibration and adjust if necessary. We recommend that the system be checked
by an authorized HYUNDAI dealer.
Normal Maintenance Schedule (For Mexico)
Number of months or driving distance, whichever comes first
Months6121824303642485460
Miles×1,0006.51319.52632.53945.55258.565
Km×1,000102030405060708090100
Drive belts *1At first, inspect every 80,000 km (50,000 miles) or 48 months
After that, inspect every 20,000 km (12,500 miles) or 12 months
Engine oil and engine oil filter *2RRRRRRRRRR
Air cleaner filterIIRIIRIIRI
Fuel additives *3Add every 5,000 km (3,000 miles) or 6 months
Spark plugs *4R
Valve clearance*5I
MAINTENANCE
INTERVALS
MAINTENANCE
ITEM
Page 382 of 472
7-25
7
Maintenance
Normal Maintenance Schedule (For Mexico) (Cont.)
Number of months or driving distance, whichever comes first
Months6121824303642485460
Miles×1,0006.51319.52632.53945.55258.565
Km×1,000102030405060708090100
Steering gear rack, linkage and bootsIIIIIIIIII
Driveshaft and bootsIIIII
Tire (pressure & tread wear) IIIIIIIIII
Front suspension ball jointsIIIIIIIIII
Bolt and nuts on chassis and bodyIIIIIIIIII
Air conditioner refrigerant IIIIIIIIII
Air conditioner compressor IIIIIIIIII
Climate control air filter RRRRRRRRRR
Manual transaxle fluid *8II
Automatic transaxle fluidNo check, No service required
Exhaust systemIIIII
MAINTENANCE
INTERVALS
MAINTENANCE
ITEM
Page 385 of 472

7-28
Maintenance
E EX
XP
PL
LA
AN
NA
AT
TI
IO
ON
N
O
OF
F
S
SC
CH
HE
ED
DU
UL
LE
ED
D
M
MA
AI
IN
NT
TE
EN
NA
AN
NC
CE
E
I
IT
TE
EM
MS
S
Engine oil and filter
The engine oil and filter should be
changed at the intervals specified in
the maintenance schedule. If the car
is being driven in severe conditions,
more frequent oil and filter changes
are required.
Drive belts
Inspect all drive belts for evidence of
cuts, cracks, excessive wear or oil
saturation and replace if necessary.
Drive belts should be checked peri-
odically for proper tension and
adjusted as necessary.
When you are inspecting the belt,
place the ignition switch in the
LOCK/OFF or ACC position.
Fuel filter
A clogged filter can limit the speed at
which the vehicle may be driven,
damage the emission system and
cause multiple issues such as hard
starting. If an excessive amount of
foreign matter accumulates in the
fuel tank, the filter may require
replacement more frequently.
After installing a new filter, run the
engine for several minutes, and
check for leaks at the connections.
We recommend that the fuel filter be
replaced by an authoized HYUNDAI
dealer.
Fuel lines, fuel hoses and con-
nections
Check the fuel lines, fuel hoses and
connections for leakage and dam-
age. We recommend that the fuel
lines, fuel hoses and connections be
replaced by an authoized HYUNDAI
dealer.
NOTICE
Diesel Engine
Never work on injection system
with engine running or within 30
seconds after shutting off
engine. High pressure pump,
rail, injectors and high pressure
pipes are subject to high pres-
sure even after the engine
stopped. The fuel jet produced
by fuel leaks may cause serious
injury, if it touch the body.
People using pacemakers
should not move than 30cm
closer to the ECU or wiring har-
ness within the engine room
while engine is running, since
the high currents in the
Common Rail system produce
considerable magnetic fields.
WARNING
Page 387 of 472

7-30
Maintenance
Valve clearance
(For gasoline engine)
Inspect excessive valve noise and/or
engine vibration and adjust if neces-
sary.
We recommend that the system be
serviced by an authorized HYUNDAI
dealer.
Cooling system
Check cooling system components,
such as radiator, coolant reservoir,
hoses and connections for leakage
and damage. Replace any damaged
parts.
Engine coolant
The coolant should be changed at
the intervals specified in the mainte-
nance schedule.
Manual transaxle fluid
(if equipped)
Inspect the manual transaxle fluid
according to the maintenance sched-
ule.
Automatic transaxle fluid
(if equipped)
Automatic transaxle fluid should not
be checked under normal usage
conditions.
We recommend that the automatic
transaxle fluid changed by an author-
ized HYUNDAI dealer according to
the maintenance schedule.
Information
Automatic transaxle fluid color is
basically red.
As the vehicle is driven, the automatic
transaxle fluid will begin to look darker.
It is normal condition and you should
not judge the need to replace the fluid
based upon the changed color.The use of a non-specified fluid
could result in transaxle malfunc-
tion and failure.
Use only specified automatic
transaxle fluid. (Refer to
"Recommended lubricants and
capacities" in chapter 8.)
NOTICE
i
Page 388 of 472

7-31
7
Maintenance
Brake hoses and lines
Visually check for proper installation,
chafing, cracks, deterioration and
any leakage. Replace any deteriorat-
ed or damaged parts immediately.
Brake fluid
Check brake fluid level in the brake
fluid reservoir. The level should be
between "MIN" (Minimum) and
"MAX" (Maximum) marks on the side
of the reservoir. Use only hydraulic
brake fluid conforming to DOT 3 or
DOT 4 specification.
Parking brake
Inspect the parking brake system
including the parking brake pedal
and cables.
Brake discs, pads, calipers
and rotors
Check the pads for excessive wear,
discs for run out and wear, and
calipers for fluid leakage.
Suspension mounting bolts
Check the suspension connections
for looseness or damage. Retighten
to the specified torque.
Steering gear box, linkage &
boots/lower arm ball joint
With the vehicle stopped and engine
off, check for excessive free-play in
the steering wheel.
Check the linkage for bends or dam-
age. Check the dust boots and ball
joints for deterioration, cracks, or
damage. Replace any damaged
parts.
Steering gear box, linkage &
boots/lower arm ball joint
With the vehicle stopped and engine
off, check for excessive free-play in
the steering wheel.
Check the linkage for bends or dam-
age. Check the dust boots and ball
joints for deterioration, cracks, or
damage. Replace any damaged
parts.
Drive shafts and boots
Check the drive shafts, boots and
clamps for cracks, deterioration, or
damage. Replace any damaged
parts and, if necessary, repack the
grease.
Air conditioning refrigerant
(if equipped)
Check the air conditioning lines and
connections for leakage and dam-
age.
Page 389 of 472

7-32
Maintenance
E EN
NG
GI
IN
NE
E
O
OI
IL
L
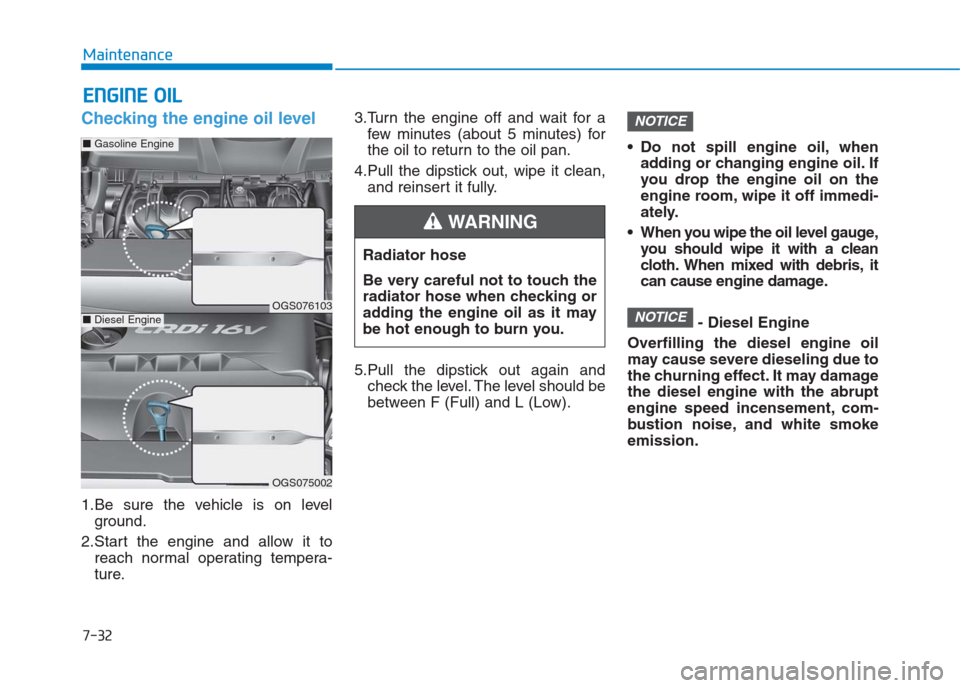
Checking the engine oil level
1.Be sure the vehicle is on level
ground.
2.Start the engine and allow it to
reach normal operating tempera-
ture.3.Turn the engine off and wait for a
few minutes (about 5 minutes) for
the oil to return to the oil pan.
4.Pull the dipstick out, wipe it clean,
and reinsert it fully.
5.Pull the dipstick out again and
check the level. The level should be
between F (Full) and L (Low). Do not spill engine oil, when
adding or changing engine oil. If
you drop the engine oil on the
engine room, wipe it off immedi-
ately.
When you wipe the oil level gauge,
you should wipe it with a clean
cloth. When mixed with debris, it
can cause engine damage.
- Diesel Engine
Overfilling the diesel engine oil
may cause severe dieseling due to
the churning effect. It may damage
the diesel engine with the abrupt
engine speed incensement, com-
bustion noise, and white smoke
emission.
NOTICE
NOTICE
Radiator hose
Be very careful not to touch the
radiator hose when checking or
adding the engine oil as it may
be hot enough to burn you.
WARNING
OGS076103
OGS075002
■Gasoline Engine
■Diesel Engine
Page 391 of 472

7-34
Maintenance
E EN
NG
GI
IN
NE
E
C
CO
OO
OL
LA
AN
NT
T
The high-pressure cooling system
has a reservoir filled with year-round
antifreeze coolant. The reservoir is
filled at the factory.
Check the antifreeze protection and
coolant level at least once a year, at
the beginning of the winter season,
and before traveling to a colder cli-
mate.
Do not drive with no engine
coolant. It may cause water
pump failure and engine seizure,
etc.
When the engine overheats from
low engine coolant, suddenly
adding engine coolant may
cause cracks in the engine. To
prevent damage, add engine
coolant slowly in small quanti-
ties.Checking the coolant level
NOTICE
Removing radiator
cap
Never attempt to remove the
radiator cap while the engine
is operating or hot. Doing so
might lead to cooling system
and engine damage and could
result in serious personal
injury from escaping hot
coolant or steam.
(Continued)
WARNING
(Continued)
Turn the engine off and wait
until it cools down. Use
extreme care when removing
the radiator cap. Wrap a thick
towel around it, and turn it
counterclockwise slowly to
the first stop. Step back while
the pressure is released from
the cooling system. When you
are sure all the pressure has
been released, press down on
the cap, using a thick towel,
and continue turning counter-
clockwise to remove it.
Even if the engine is not oper-
ating, do not remove the radi-
ator cap or the drain plug
while the engine and radiator
are hot. Hot coolant and
steam may still blow out
under pressure, causing seri-
ous injury.
OGS076105