2018 HONDA RIDGELINE display
[x] Cancel search: displayPage 160 of 623

158
uuOperating the Switches Around the Steering Wheel uDriving Position Memory System*
Controls
Driving Position Memory System*
You can store two driver’s seat (except for power lumbar) and door mirror positions
with the driving position memory system.
When you unlock and open the driver’s do or with a remote transmitter or smart
entry system, the seat and door mirrors adju st automatically to one of the two preset
positions.
When you enter the vehicle, the multi-in formation display briefly shows you which
remote transmitter you used to unlock the vehicle.
• DRIVER 1 transmitter is linked to memory button 1.
• DRIVER 2 transmitter is linked to memory button 2.
The driver’s seat moves rearward depending
on the set seating position once you
•Stop the vehicle.
• Put the transmission in
(P.
• Turn the engine off.
• Then open the driver’s door.
Once the power mode is in the ACCESSORY
position, the driver’s seat moves to the
DRIVER 1 or 2 preset position.
1Driving Position Memory System*
Using the audio/informati on screen, you can disable
the automatic seat and d oor mirrors adjustment
function. 2 Customized Features P. 317
The driver’s seat easy feature can be turned ON/OFF. 2 Customized Features P. 317
System Operation
The system will not operate if:
•The vehicle speed is above 3 mph (5 km/h).
•Either memory position button is pressed while the
seat is in motion.
•The seat position is adju sted while in operation.
•The memory 1 or 2 position is set fully to the rear.
To turn the memory positi on link settings back on,
repeat this procedure. The LED will blink once.
DRIVER 1 DRIVER 2
* Not available on all models
Page 173 of 623

171Continued
Controls
Interior Lights/Convenience Items
Interior Lights
■ON
The interior lights come on regardless of
whether the doors are open or closed.
■Door activated
The interior lights come on in the following
situations:
• When any doors are opened.
• You unlock the driver’s door.
• When the power mode is set to VEHICLE
OFF (LOCK).
■OFF
The interior lights remain off regardless of
whether the doors are open or closed.
■Interior Light Switches1 Interior Light Switches
In the door activated position, the interior lights fade
out and go off about 30 se conds after the doors are
closed.
The lights go off after 30 seconds in the following
situations:
•When you unlock the driver’s door but do not open
it.
•When you set the power mode to VEHICLE OFF
(LOCK) but do not open a door.
You can change the interi or lights dimming time.
2 Customized Features P. 317
The interior lights go off i mmediately in the following
situations:
•When you lock the driver’s door.•When you close the driver’s door in ACCESSORY
mode.
•When you set the power mode to ON.
If you leave any of the doors open in VEHICLE OFF
(LOCK) mode, the interior lights go off after about 15
minutes.
Models with Display Audio
Door Activated Position
Off
On
Models without Moonroof
Door Activated Position
Models with Moonroof
OffOn
Page 190 of 623

188
Controls
Climate Control System*
Using Automatic Climate Control
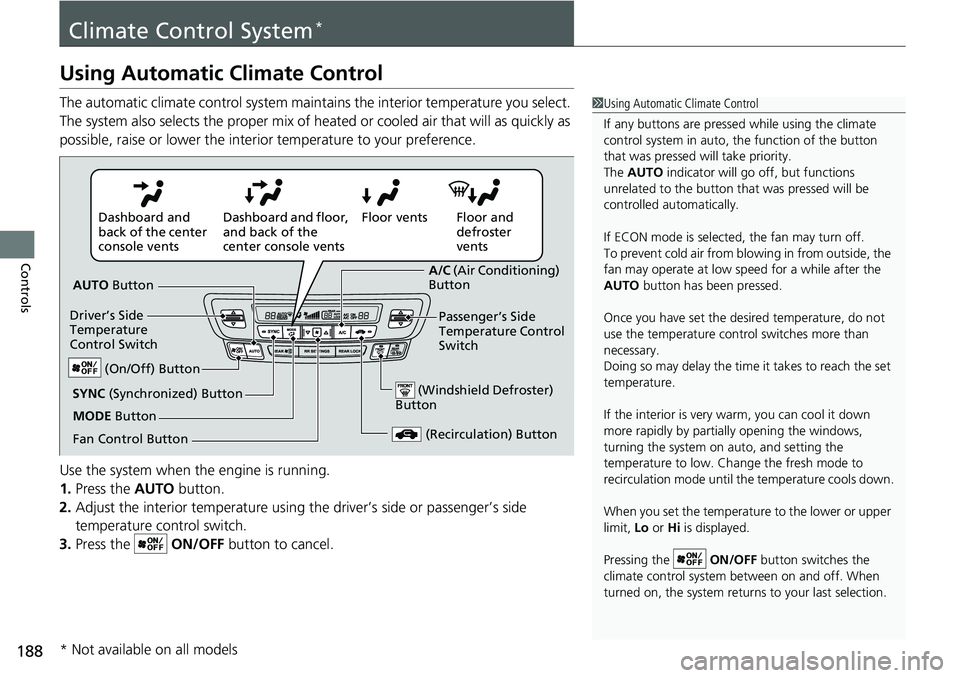
The automatic climate control system maintains the interior temperature you select.
The system also selects the proper mix of heated or cooled air that will as quickly as
possible, raise or lower the interior temperature to your preference.
Use the system when the engine is running.
1. Press the AUTO button.
2. Adjust the interior temperature using the driver’s side or passenger’s side
temperature control switch.
3. Press the ON/OFF button to cancel.1Using Automatic Climate Control
If any buttons are presse d while using the climate
control system in auto, the function of the button
that was pressed will take priority.
The AUTO indicator will go off, but functions
unrelated to the button th at was pressed will be
controlled automatically.
If ECON mode is selected, the fan may turn off.
To prevent cold air from bl owing in from outside, the
fan may operate at low speed for a while after the
AUTO button has been pressed.
Once you have set the de sired temperature, do not
use the temperature control switches more than
necessary.
Doing so may delay the time it takes to reach the set
temperature.
If the interior is very warm, you can cool it down
more rapidly by partial ly opening the windows,
turning the system on auto, and setting the
temperature to low. Change the fresh mode to
recirculation mode until the temperature cools down.
When you set the temperature to the lower or upper
limit, Lo or Hi is displayed.
Pressing the ON/OFF button switches the
climate control system be tween on and off. When
turned on, the system returns to your last selection.
Floor and
defroster
vents
Floor vents
Dashboard and floor,
and back of the
center console vents
Dashboard and
back of the center
console vents
AUTO Button
Driver’s Side
Temperature
Control Switch
(Recirculation) Button
Fan Control Button A/C
(Air Conditioning)
Button
Passenger’s Side
Temperature Control
Switch
(Windshield Defroster)
ButtonSYNC (Synchronized) Button
(On/Off) Button
MODE Button
* Not available on all models
Page 194 of 623

192
uuClimate Control System*uRear Climate Control System
Controls
Rear Climate Control System
Use the system when the engine is running and the climate control system is
operating.
1. Press the REAR (Rear On/Off) button.
2. Press the RR SETTINGS button.
u The system adjusts the rear climate control system.
3. To turn off the rear climate control system, press the REAR (Rear On/Off)
button.
■Using the Rear Climate Control System From the Front Panel1 Rear Climate Control System
LOCK appears on the rear control panel while the
rear lock is on.
If the rear lock is on while in SYNC mode, the rear
control panel is disabled. LOCK SYNC appears on the
rear control panel.
Models with REAR LOCK button
1 Using the Rear Climate Control System From the Front Panel
Press the REAR LOCK button to turn the rear lock
mode on and off.
While the rear lock mode is on, the rear control panel
is disabled.
u REAR LOCK appears on the display.
Models with REAR LOCK button
REAR LOCK
Button
(Rear On/Off) Button RR SETTINGS Button
Page 201 of 623

199
Features
This chapter describes how to operate technology features.
Audio SystemAbout Your Audio System ................ 200
USB Port(s) ....................................... 201
Auxiliary Input Jack .......................... 202
Audio System Theft Protection ......... 203
Audio Remote Controls .................... 204
Audio System Basic Operation ........ 206
Audio/Information Screen ................ 207
Adjusting the Sound ........................ 211
Display Setup ................................... 212
Playing AM/FM Radio ....................... 213
Playing an iPod ................................ 215
Playing a USB Flash Drive ................. 218
Playing Bluetooth ® Audio ................. 221
Models with color audio system
Audio System Basic Operation ........ 224
Audio/Information Screen ................ 225
Adjusting the Sound ........................ 242
Display Setup ................................... 243
Voice Control Operation .................. 245
Playing AM/FM Radio ....................... 249
Playing SiriusXM ® Radio
*................. 253
Playing a CD .................................... 261
Playing an iPod ................................ 264
Song By Voice
TM (SBV) ...................... 267
Playing Pandora ®............................. 271
Models with Display Audio
Canadian models
Models with navigation system
U.S. models
Playing a USB Flash Drive ................. 273
Playing Bluetooth ® Audio ................ 276
HondaLink ®..................................... 278
Wi-Fi Connection ............................. 283
Siri Eyes Free .................................... 285
Apple CarPlay .................................. 286
Android Auto .................................. 289
Truck Bed Audio System
*................ 293
Audio Error Messages ...................... 294
General Information on the Audio
System ............................................. 298
Customized Features ........................ 317
HomeLink ® Universal Transceiver
*... 348
Bluetooth ® HandsFreeLink® ..... 351, 376
* Not available on all models
Page 202 of 623

200
Features
Audio System
About Your Audio System
The audio system features AM/FM radio and SiriusXM® Radio* service. It can also
play audio CDs*, WMA/MP3/AAC files*, USB flash drives, and iPod, iPhone and
Bluetooth ® devices.
You can operate the audi o system from the buttons
* and knobs* on the panel, the
remote controls on the steering wheel, or the icons on the touchscreen interface*.
1 About Your Audio System
Video CDs, DVDs, and 3-inch (8-cm) mini CDs are not
supported.
iPod, iPhone and iTunes are trademarks of Apple Inc.
State or local laws may pr ohibit the operation of
handheld electronic devi ces while operating a
vehicle.
SiriusXM ® Radio
* is available on a subscription basis
only. For more information on SiriusXM ® Radio*,
contact a dealer. 2 General Information on the Audio System
P. 298
SiriusXM ® Radio
* is available in the United States and
Canada, except Ha waii, Alaska, and Puerto Rico.
SiriusXM ®
* is a registered trademark of SiriusXM
Radio*, Inc.
Models with Display Audio
Remote Controls iPod
USB Flash
Drive
Models with Display Audio
Remote Controls iPod
USB Flash
Drive
Models with color audio system
* Not available on all models
Page 203 of 623

201
uuAudio System uUSB Port(s)
Features
USB Port(s)
Install the iPod USB connector or the USB flash drive to the USB port.
■On the front console compartment*
The USB port (1.5A) is for charging devices,
playing audio files and connecting compatible
phones with Apple CarPlay or Android Auto.
■In the consol e compartment
The USB port (1.0A) is for playing audio files
on a USB flash drive, connecting a mobile
phone, and charging devices.
■On the back of the console
compartment*
The USB ports (2.5A) are only for charging
devices.
1 USB Port(s)
•Do not leave the iPod or USB flash drive in the
vehicle. Direct sunlight and high temperatures may
damage it.
•We recommend using an extension cable with the
USB port.
•Do not connect the iPod or USB flash drive using a
hub.
•Do not use a device such as a card reader or hard disk
drive, as the device or your files may be damaged.
•We recommend keeping y our data backed up
before using the device in your vehicle.
•Displayed messages may vary depending on the
device model and software version.
If the audio system does not recognize the iPod, try
reconnecting it a few times or reboot the device. To
reboot, follow the manufac turer’s instructions
provided with the iPod or visit www.apple.com/ipod.
The USB port can supply up to 1.0A/1.5A/2.5A of
power. It does not output 1.0A/1.5A/2.5A unless the
device requests.
For amperage details, read the operating manual of
the device that ne eds to be charged.
Set the power mode to ACCESSORY or ON first.
This port is for battery charge only. You cannot play
music even if you have conne cted a music player to it.
Under certain condi tions, a device connected to the
port may generate noise in the radio you are listening
to.
USB charge
On the front console
compartment
In the console compartment
On the back of the console
compartment
* Not available on all models
Page 204 of 623

202
uuAudio System uAuxiliary Input Jack
Features
Auxiliary Input Jack
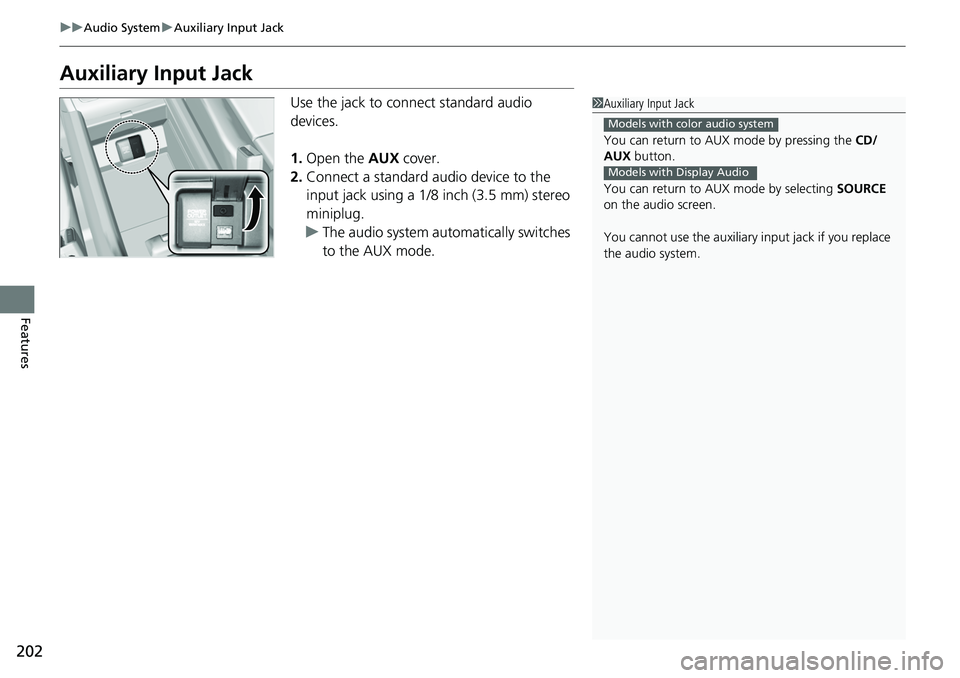
Use the jack to connect standard audio
devices.
1. Open the AUX cover.
2. Connect a standard audio device to the
input jack using a 1/8 inch (3.5 mm) stereo
miniplug.
u The audio system automatically switches
to the AUX mode.1Auxiliary Input Jack
You can return to AUX mode by pressing the CD/
AUX button.
You can return to AUX mode by selecting SOURCE
on the audio screen.
You cannot use the auxiliary input jack if you replace
the audio system.
Models with color audio system
Models with Display Audio