Page 668 of 763
666
uuReplacing Light Bulbs uBrake, Rear Turn Signal Light Bulbs, and Rear Side Marker/Taillights
Maintenance
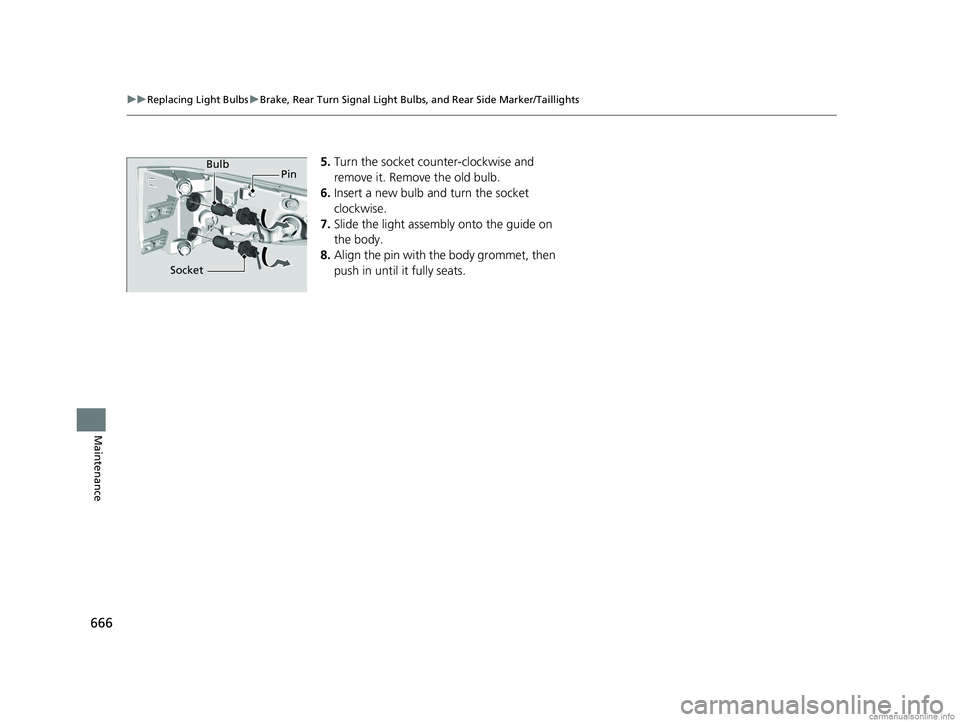
5. Turn the socket counter-clockwise and
remove it. Remove the old bulb.
6. Insert a new bulb and turn the socket
clockwise.
7. Slide the light assembly onto the guide on
the body.
8. Align the pin with the body grommet, then
push in until it fully seats.Bulb
Socket Pin
18 US ODYSSEY-31THR6010.book 666 ページ 2018年12月6日 木曜日 午後4時18分
Page 669 of 763
667
uuReplacing Light Bulbs uBack-Up Light Bulbs/Taillights
Maintenance
Back-Up Light Bulbs/Taillights
When replacing, use the following bulbs.
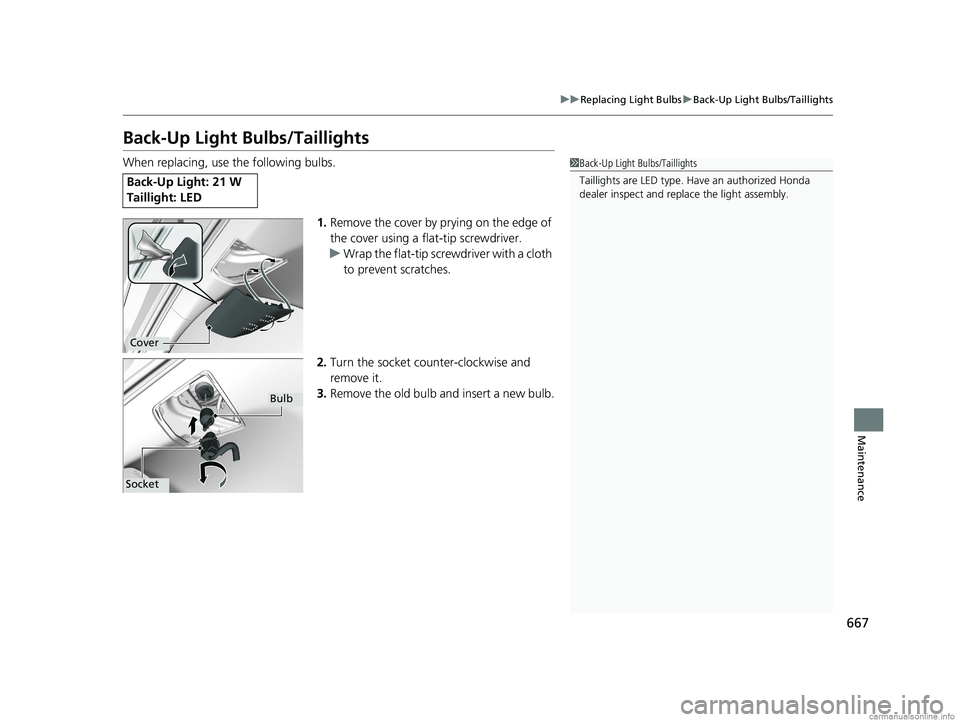
1.Remove the cover by prying on the edge of
the cover using a flat-tip screwdriver.
u Wrap the flat-tip scre wdriver with a cloth
to prevent scratches.
2. Turn the socket counter-clockwise and
remove it.
3. Remove the old bulb and insert a new bulb.
Back-Up Light: 21 W
Taillight: LED
1Back-Up Light Bulbs/Taillights
Taillights are LED type. Ha ve an authorized Honda
dealer inspect and replace the light assembly.
Cover
Bulb
Socket
18 US ODYSSEY-31THR6010.book 667 ページ 2018年12月6日 木曜日 午後4時18分
Page 670 of 763
668
uuReplacing Light Bulbs uRear License Plate Light
Maintenance
Rear License Plate Light
Rear license plate light is LED type. Have an authorized Honda dealer inspect and
replace the light assembly.
High-Mount Brake Light
High-mount brake light is LED type. Have an authorized Honda dealer inspect and
replace the light assembly.
18 US ODYSSEY-31THR6010.book 668 ページ 2018年12月6日 木曜日 午後4時18分
Page 671 of 763
669Continued
Maintenance
Checking and Maintaining Wiper Blades
Checking Wiper Blades
If the wiper blade rubber has deteriorated, it will leave streaks and the hard surfaces
of the blade may scratch the window glass.
Changing the Front Wiper Blade Rubber
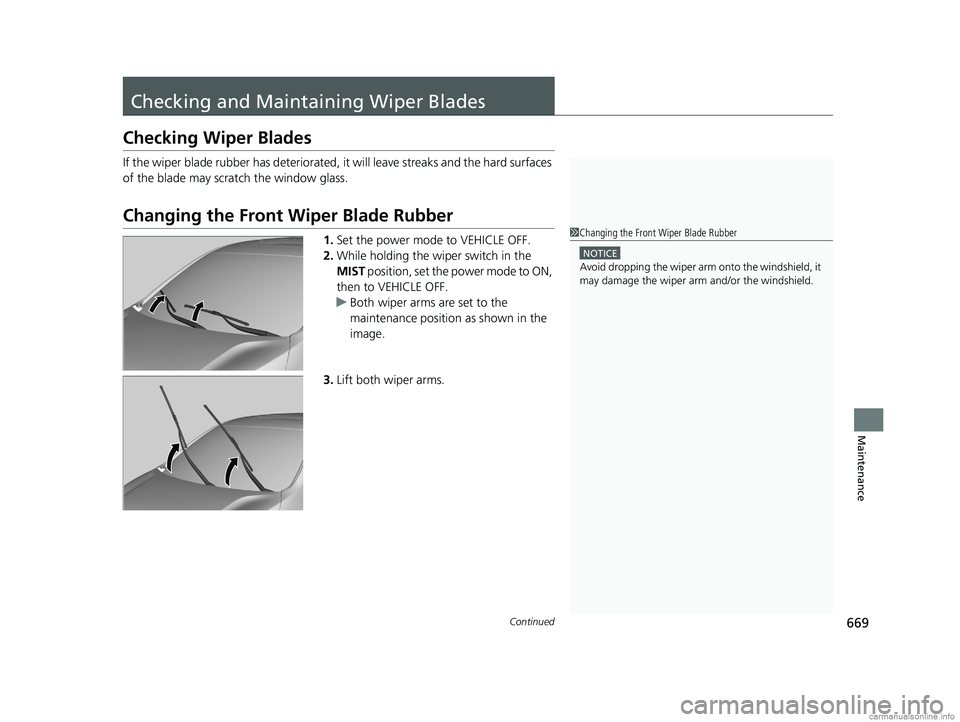
1.Set the power mode to VEHICLE OFF.
2. While holding the wiper switch in the
MIST position, set the power mode to ON,
then to VEHICLE OFF.
u Both wiper arms are set to the
maintenance position as shown in the
image.
3. Lift both wiper arms.1Changing the Front Wiper Blade Rubber
NOTICE
Avoid dropping the wiper arm onto the windshield, it
may damage the wiper arm and/or the windshield.
18 US ODYSSEY-31THR6010.book 669 ページ 2018年12月6日 木曜日 午後4時18分
Page 672 of 763
670
uuChecking and Maintaining Wiper Blades uChanging the Front Wiper Blade Rubber
Maintenance
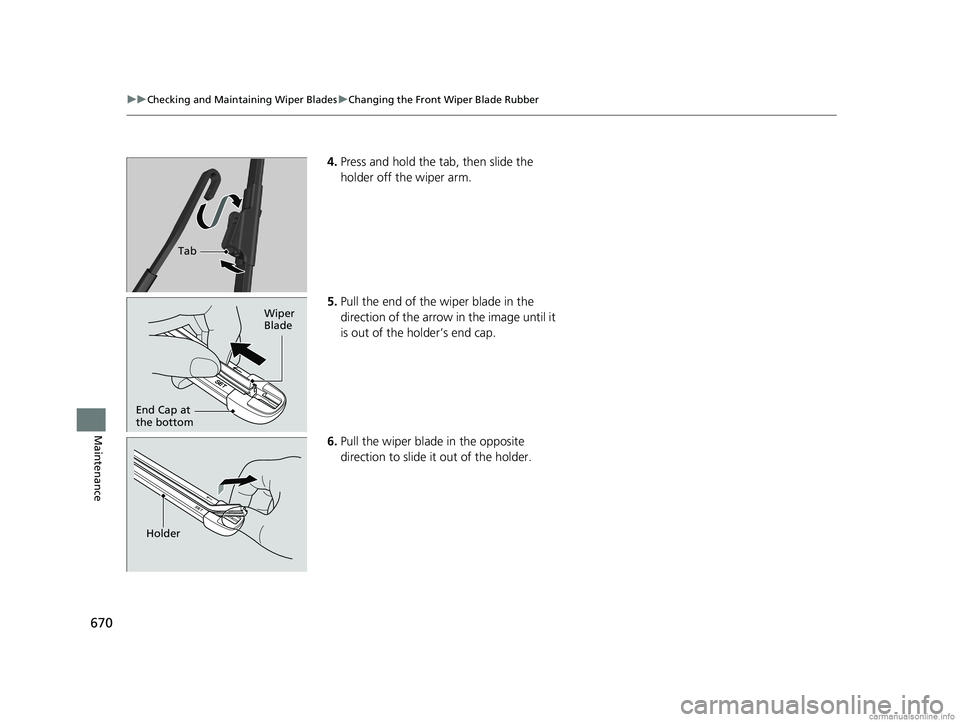
4. Press and hold the tab, then slide the
holder off the wiper arm.
5. Pull the end of the wiper blade in the
direction of the arrow in the image until it
is out of the holder’s end cap.
6. Pull the wiper blade in the opposite
direction to slide it out of the holder.
Tab
Wiper
Blade
End Cap at
the bottom
Holder
18 US ODYSSEY-31THR6010.book 670 ページ 2018年12月6日 木曜日 午後4時18分
Page 673 of 763
Continued671
uuChecking and Maintaining Wiper Blades uChanging the Rear Wiper Blade Rubber
Maintenance
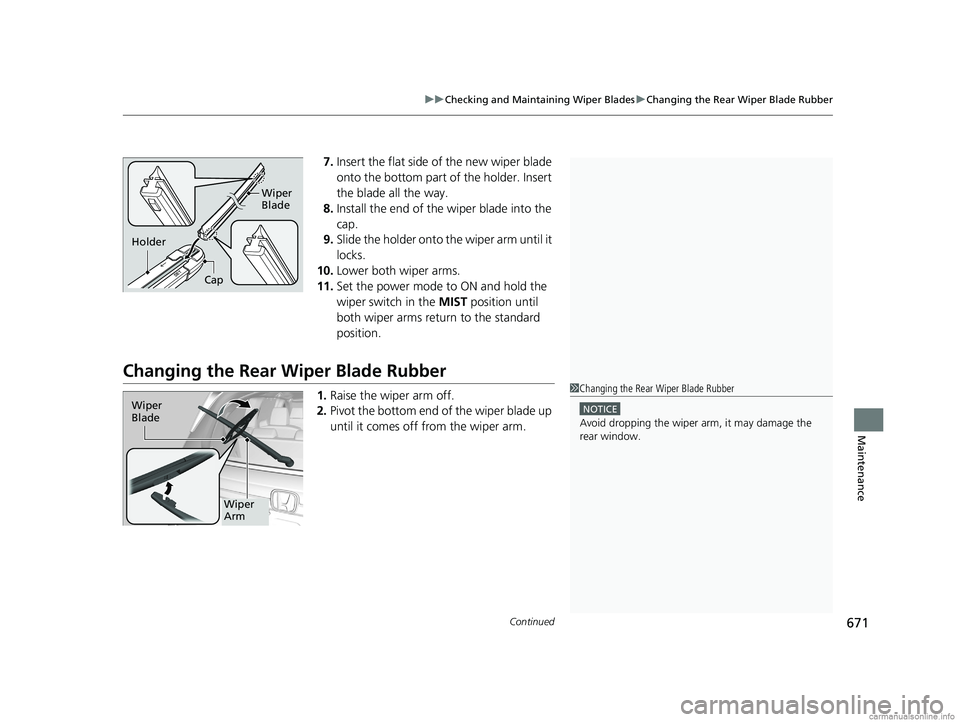
7. Insert the flat side of the new wiper blade
onto the bottom part of the holder. Insert
the blade all the way.
8. Install the end of the wiper blade into the
cap.
9. Slide the holder onto the wiper arm until it
locks.
10. Lower both wiper arms.
11. Set the power mode to ON and hold the
wiper switch in the MIST position until
both wiper arms return to the standard
position.
Changing the Rear Wiper Blade Rubber
1.Raise the wiper arm off.
2. Pivot the bottom end of the wiper blade up
until it comes off from the wiper arm.
Cap Wiper
Blade
Holder
1
Changing the Rear Wiper Blade Rubber
NOTICE
Avoid dropping the wiper ar m, it may damage the
rear window.
Wiper
Blade
Wiper
Arm
18 US ODYSSEY-31THR6010.book 671 ページ 2018年12月6日 木曜日 午後4時18分
Page 674 of 763
672
uuChecking and Maintaining Wiper Blades uChanging the Rear Wiper Blade Rubber
Maintenance
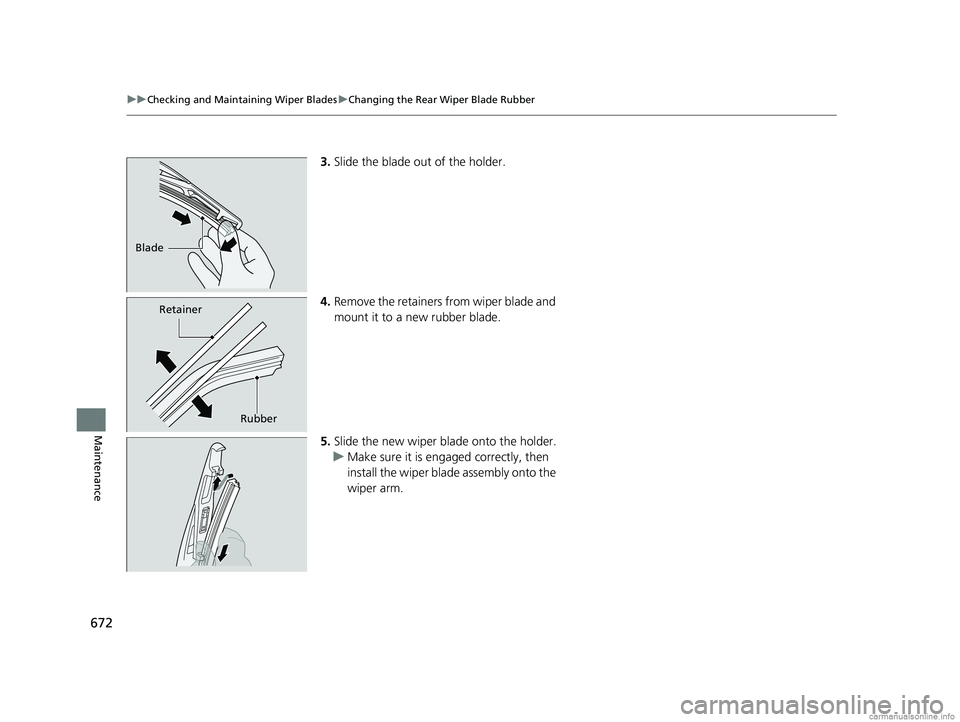
3. Slide the blade out of the holder.
4. Remove the retainers from wiper blade and
mount it to a new rubber blade.
5. Slide the new wiper blade onto the holder.
u Make sure it is engaged correctly, then
install the wiper blade assembly onto the
wiper arm.
Blade
Retainer
Rubber
18 US ODYSSEY-31THR6010.book 672 ページ 2018年12月6日 木曜日 午後4時18分
Page 675 of 763
673
Maintenance
Checking and Maintaining Tires
Checking Tires
To safely operate your vehicle, your tires must be of the proper type and size, in
good condition with adequate tread, and properly inflated.
■Inflation guidelines
Properly inflated tires provide the best combination of handling, tread life, and
comfort. Refer to the driver’s doorjamb labe l or specifications page for the specified
pressure.
Underinflated tires wear unev enly, adversely affect handling and fuel economy, and
are more likely to fail from overheating.
Overinflated tires make your vehicle ride ha rshly, are more prone to road hazards,
and wear unevenly.
Every day before you drive, look at each of the tires. If one looks lower than the
others, check the pressure with a tire gauge.
At least once a month or before long trips , use a gauge to measure the pressure in
all tires, including the spare. Even tires in good condition can lose 1-2 psi (10-20 kPa,
0.1-0.2 kgf/cm
2) per month.
■Inspection guidelines
Every time you check inflation, also examine the tires and valve stems. Look for:
• Bumps or bulges on the side or in the tr ead. Replace the tire if you find any cuts,
splits, or cracks in the side of the tire . Replace it if you see fabric or cord.
• Remove any foreign objects and inspect for air leaks.
• Uneven tread wear. Have a deal er check the wheel alignment.
• Excessive tread wear.
2 Wear Indicators P. 678
•Cracks or other damage around valve stem.
1Checking Tires
Measure the air pressure when tires are cold. This
means the vehicle has been parked for at least three
hours, or driven less than 1 mile (1.6 km). If
necessary, add or releas e air until the specified
pressure is reached.
If checked when hot, tire pressure can be as much as
4–6 psi (30–40 kPa, 0.3–0.4 kgf/cm
2) higher than if
checked when cold.
Have a dealer check the tires if you feel a consistent
vibration while driving. Ne w tires and any that have
been removed and reinst alled should be properly
balanced.
Check the spare tire pressu re once a month or before
long trips.
3WARNING
Using tires that are excessively worn or
improperly inflated can cause a crash in
which you can be seriously hurt or killed.
Follow all instruction s in this owner’s
manual regarding tire inflation and
maintenance.
18 US ODYSSEY-31THR6010.book 673 ページ 2018年12月6日 木曜日 午後4時18分