Page 648 of 763
646
uuMaintenance Under the Hood uOpening the Hood
Maintenance
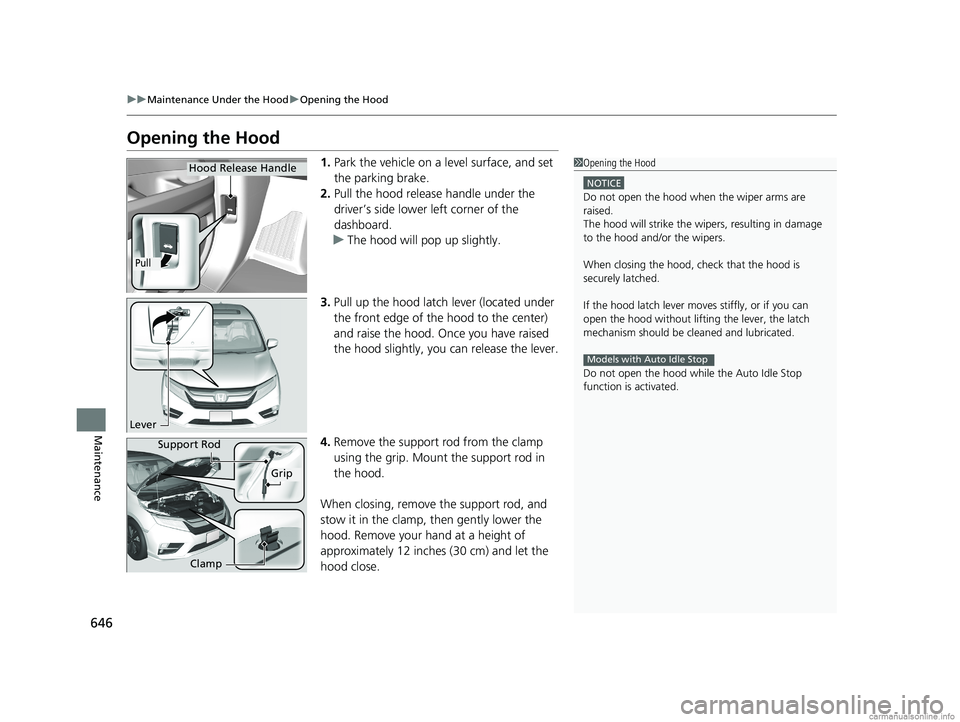
Opening the Hood
1. Park the vehicle on a level surface, and set
the parking brake.
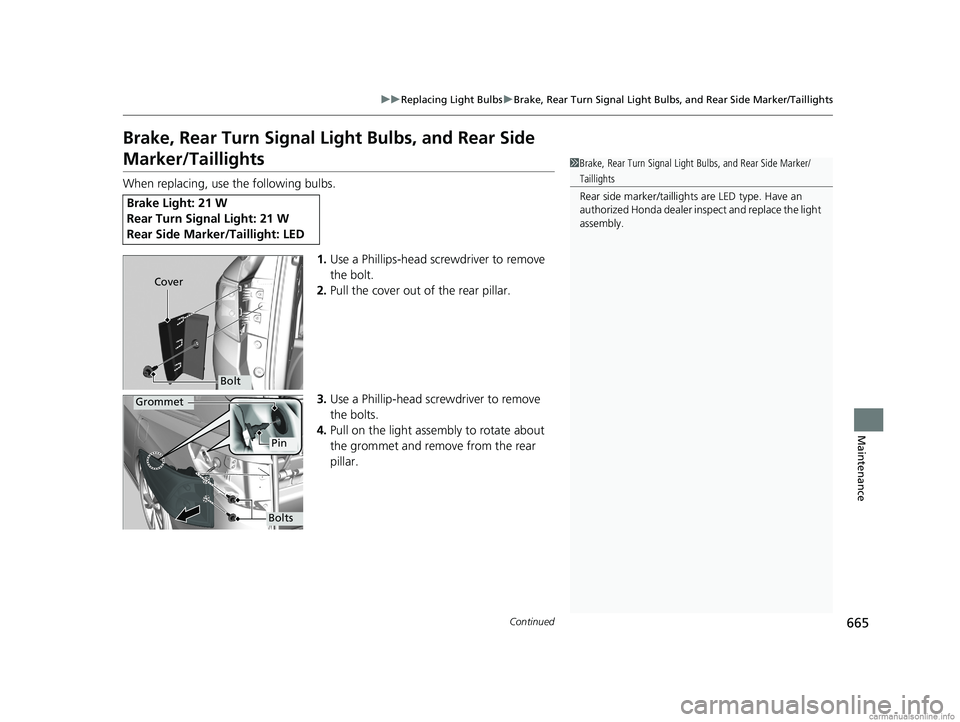
2. Pull the hood release handle under the
driver’s side lower left corner of the
dashboard.
u The hood will pop up slightly.
3. Pull up the hood latch lever (located under
the front edge of the hood to the center)
and raise the hood. On ce you have raised
the hood slightly, you can release the lever.
4. Remove the support rod from the clamp
using the grip. Mount the support rod in
the hood.
When closing, remove the support rod, and
stow it in the clamp, then gently lower the
hood. Remove your hand at a height of
approximately 12 inches (30 cm) and let the
hood close.1 Opening the Hood
NOTICE
Do not open the hood when the wiper arms are
raised.
The hood will strike the wipe rs, resulting in damage
to the hood and/or the wipers.
When closing the hood, check that the hood is
securely latched.
If the hood latch lever moves stiffly, or if you can
open the hood without lifti ng the lever, the latch
mechanism should be cl eaned and lubricated.
Do not open the hood while the Auto Idle Stop
function is activated.
Models with Auto Idle Stop
Hood Release Handle
Pull
Lever
Support Rod
Grip
Clamp
18 US ODYSSEY-31THR6010.book 646 ページ 2018年12月6日 木曜日 午後4時18分
Page 667 of 763
665
uuReplacing Light Bulbs uBrake, Rear Turn Signal Light Bulb s, and Rear Side Marker/Taillights
Continued
Maintenance
Brake, Rear Turn Signal Light Bulbs, and Rear Side
Marker/Taillights
When replacing, use the following bulbs.
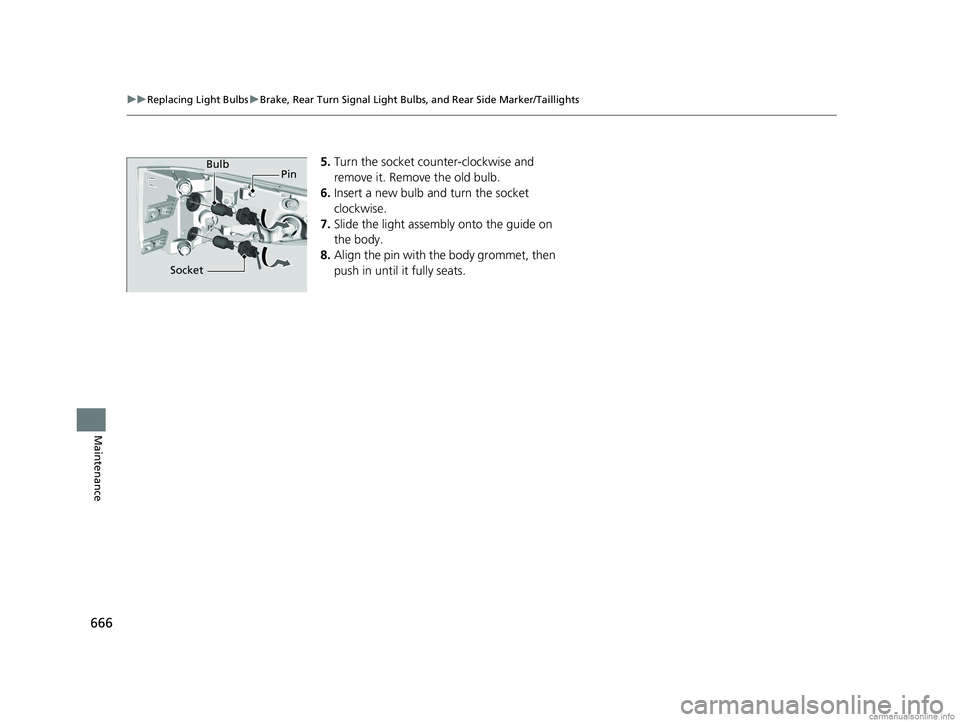
1.Use a Phillips-head sc rewdriver to remove
the bolt.
2. Pull the cover out of the rear pillar.
3. Use a Phillip-head screwdriver to remove
the bolts.
4. Pull on the light assembly to rotate about
the grommet and remove from the rear
pillar.
Brake Light: 21 W
Rear Turn Signal Light: 21 W
Rear Side Marker/Taillight: LED
1Brake, Rear Turn Signal Light Bulbs, and Rear Side Marker/
Taillights
Rear side marker /taillights are LED type. Have an
authorized Honda dealer in spect and replace the light
assembly.
Bolt
Cover
Grommet
Pin
Bolts
18 US ODYSSEY-31THR6010.book 665 ページ 2018年12月6日 木曜日 午後4時18分
Page 668 of 763
666
uuReplacing Light Bulbs uBrake, Rear Turn Signal Light Bulbs, and Rear Side Marker/Taillights
Maintenance
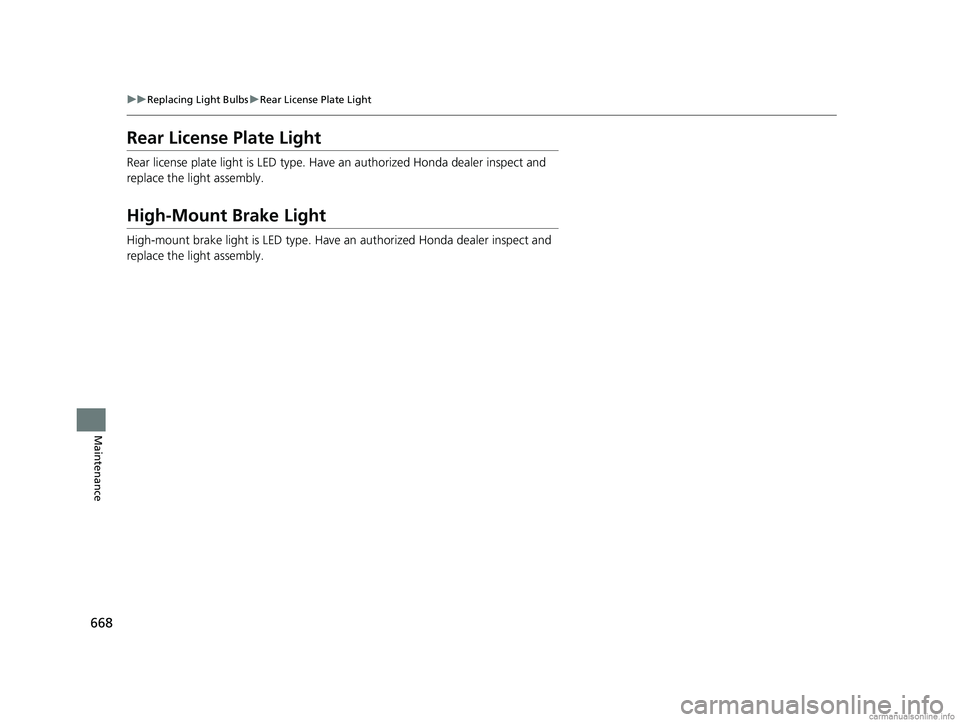
5. Turn the socket counter-clockwise and
remove it. Remove the old bulb.
6. Insert a new bulb and turn the socket
clockwise.
7. Slide the light assembly onto the guide on
the body.
8. Align the pin with the body grommet, then
push in until it fully seats.Bulb
Socket Pin
18 US ODYSSEY-31THR6010.book 666 ページ 2018年12月6日 木曜日 午後4時18分
Page 670 of 763
668
uuReplacing Light Bulbs uRear License Plate Light
Maintenance
Rear License Plate Light
Rear license plate light is LED type. Have an authorized Honda dealer inspect and
replace the light assembly.
High-Mount Brake Light
High-mount brake light is LED type. Have an authorized Honda dealer inspect and
replace the light assembly.
18 US ODYSSEY-31THR6010.book 668 ページ 2018年12月6日 木曜日 午後4時18分
Page 695 of 763
693
uuCleaning uExterior Care
Maintenance
The inside lenses of exterior lights (headlights, brake light s, etc.) may fog temporarily
if you have driven in the rain, or after the vehicle has been run through a car wash.
Dew condensation also may build up inside the lenses when there is a significant
enough difference between the ambient and inside lens temperatures (similar to
vehicle windows fogging up in rainy conditions). These conditions are natural
processes, not structural design problems in the exterior lights.
Lens design characteristics ma y result in moisture developing on the light lens frame
surfaces. This also is not a malfunction.
However, if you see large amounts of wa ter accumulation, or large water drops
building up inside the lenses, have your vehicle inspected by a dealer.
■Fogged Exterior Light Lenses
18 US ODYSSEY-31THR6010.book 693 ページ 2018年12月6日 木曜日 午後4時18分
Page 701 of 763

699Continued
Handling the Unexpected
If a Tire Goes Flat
Changing a Flat Tire
If a tire goes flat while driving, grasp the steering wheel firmly, and brake gradually
to reduce speed. Then, stop in a safe plac e. Replace the flat tire with a compact
spare tire. Go to a dealer as soon as possib le to have the full-size tire repaired or
replaced.
1. Park the vehicle on a firm, level, non-slippery surface and apply the parking brake.
2. Press the
(P button.
3. Turn on the hazard warning lights an d set the power mode to VEHICLE OFF.
1Changing a Flat Tire
Follow compact spare precautions:
Periodically check the tire pressure of the compact
spare. It should be set to the specified pressure.
Specified Pressure: 60 psi (420 kPa, 4.2 kgf/cm
2)
When driving with the compact spare tire, keep the
vehicle speed under 50 mph (80 km/h). Replace with
a full-size tire as soon as possible.
The compact spare tire and wheel in your vehicle are
specifically for this model. Do not use them with
another vehicle. Do not us e another type of compact
spare tire or wheel with your vehicle.
Do not mount tire chains on a compact spare tire.
If a chain-mounted front tire goes flat, remove one of
the full-size rear tires and replace it with the compact
spare tire. Remove the flat front tire and replace it
with the full-size tire that was removed from the rear.
Mount the tire chains on the front tire.
Do not use a puncture-repairi ng agent on a flat tire,
as it can damage the tire pressure sensor.
Do not use the jack if it doesn’t work properly. Call
your dealer or a prof essional towing service.
18 US ODYSSEY-31THR6010.book 699 ページ 2018年12月6日 木曜日 午後4時18分
Page 717 of 763
715
uuOverheating uHow to Handle Overheating
Handling the Unexpected
■The Stop Driving When Safe. Engi ne Temperature Too Hot Message
Appears On The Driver Information Interface.
The Stop Driving When Safe. En gine Temperature Too Hot message appears
on the driver information interface when the engine temperature is high.
2 Driver Information Interface Wa rning and Information Messages P. 102
1.Immediately park the vehicle in a safe place.
u Press the
(P button, and set the parking brake. Turn off all accessories and
turn on the hazard warning lights.
2. Keep the engine running, and wait until the message disappears.
u If the message does not disappear, have the vehicle inspected at a dealer.
1How to Handle Overheating
Continuing to drive with the Stop Driving When
Safe. Engine Temperature Too Hot message on
the driver information interface may damage the
engine.
18 US ODYSSEY-31THR6010.book 715 ページ 2018年12月6日 木曜日 午後4時18分
Page 720 of 763

718
uuIndicator, Coming On/Blinking uIf the Brake System Indicator (Red) Comes On or Blinks
Handling the Unexpected
If the Brake System Indicator (Red) Comes On or
Blinks
■Reasons for the indicator to come on
• The brake fluid is low.
• There is a malfunction in the brake system.
■What to do when the indicator comes on while driving
Depress the brake pedal lightly to check pedal pressure.
• If normal, check the brake fluid level the next time you stop.
• If abnormal, take immediate action . If necessary, downshift the
transmission to slow the vehicle using engine braking.
■Reason for the indicator to blink
• There is a problem with the electric parking brake system.
■What to do when the indicator blinks
• Avoid using the parking brake and ha ve your vehicle checked by a
dealer immediately.
1 If the Brake System Indicator (Red) Comes On or Blinks
Have your vehicle re paired immediately.
It is dangerous to drive with low brake fluid. If there
is no resistance from the brake pedal, stop
immediately in a safe plac e. If necessary downshift
the gears.
If the brake system indicator and ABS indicator come
on simultaneously, the elec tronic brake distribution
system is not working. Th is can result in vehicle
instability under sudden braking.
Have your vehicle inspecte d by a dealer immediately.
If the brake system indicator (red) blinks at the same
time when the brake system indicator (amber) comes
on, the parking br ake may not work.
Avoid using the parking brak e and have your vehicle
checked by a dealer immediately.
2 If the Brake System Indicator (Red) Comes
On or Blinks at the Same Time When the
Brake System Indicator (Amber) Comes On
P. 719
If you repeatedly operate th e electric parking brake in
a short period of time, the brake stops operating to
prevent heating of the system.
It returns to its original state in approximately one
minute.
U.S.
Canada
(Red)
18 US ODYSSEY-31THR6010.book 718 ページ 2018年12月6日 木曜日 午後4時18分