2018 HONDA ODYSSEY high beam
[x] Cancel search: high beamPage 196 of 763
194
uuOperating the Switches Around the Steering Wheel uAuto High-Beam*
Controls
Auto High-Beam*
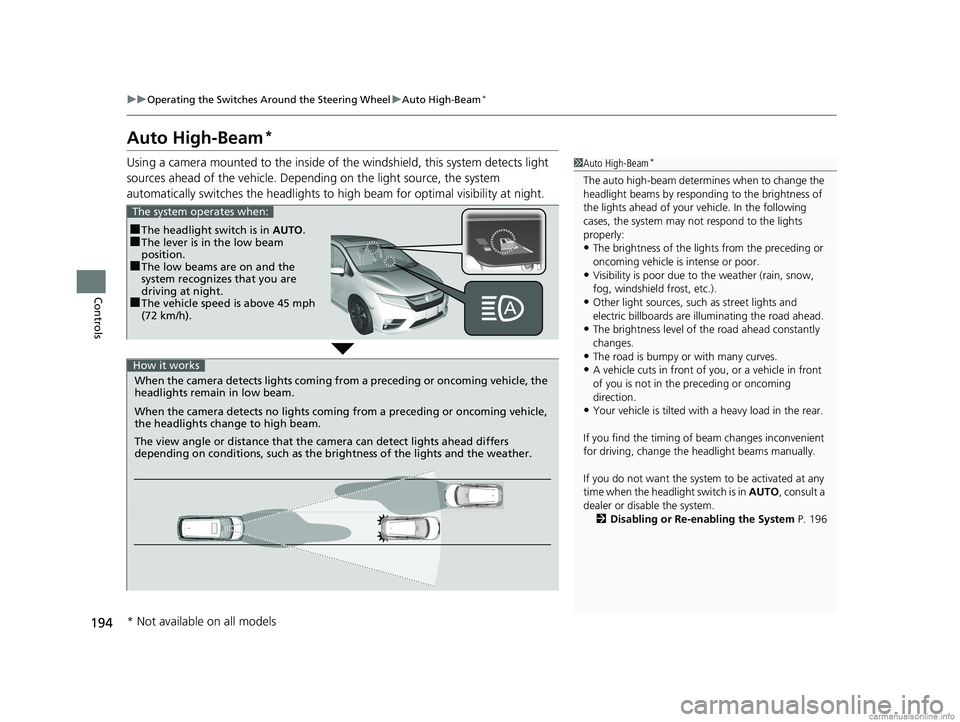
Using a camera mounted to the inside of the windshield, this system detects light
sources ahead of the vehicle. Depend ing on the light source, the system
automatically switches the headlights to hi gh beam for optimal visibility at night.1Auto High-Beam*
The auto high-beam determines when to change the
headlight beams by responding to the brightness of
the lights ahead of your vehicle. In the following
cases, the system may not respond to the lights
properly:
•The brightness of the lights from the preceding or
oncoming vehicle is intense or poor.
•Visibility is poor due to the weather (rain, snow,
fog, windshield frost, etc.).
•Other light sources, such as street lights and
electric billboards are illuminating the road ahead.
•The brightness level of th e road ahead constantly
changes.
•The road is bumpy or with many curves.
•A vehicle cuts in front of you, or a vehicle in front
of you is not in the preceding or oncoming
direction.
•Your vehicle is tilted with a heavy load in the rear.
If you find the timing of beam changes inconvenient
for driving, change the headlight beams manually.
If you do not want the system to be activated at any
time when the headlight switch is in AUTO, consult a
dealer or disable the system. 2 Disabling or Re-enabling the System P. 196
■The headlight switch is in AUTO.■The lever is in the low beam
position.
■The low beams are on and the
system recognizes that you are
driving at night.
■The vehicle speed is above 45 mph
(72 km/h).
The system operates when:
When the camera detects lig hts coming from a preceding or oncoming vehicle, the
headlights remain in low beam.
When the camera detects no lights coming from a preceding or oncoming vehicle,
the headlights change to high beam.
The view angle or distance that the camera can detect lights ahead differs
depending on conditions, such as the brightness of the lights and the weather.
How it works
* Not available on all models
18 US ODYSSEY-31THR6010.book 194 ページ 2018年12月6日 木曜日 午後4時18分
Page 197 of 763

Continued195
uuOperating the Switches Around the Steering Wheel uAuto High-Beam*
Controls
To activate the system , turn the headlight
switch to AUTO and then set the headlights
to low beam. The auto high-beam indicator
will come on.
2 Light Switches P. 189
The high beams remain on unless:
•You have been driving below 45 mph (72 km/h) for an extended amount of time.
• The speed of the vehicle drops below 30 mph (48 km/h).
• The windshield wipers have been runnin g at a high speed for more than a few
seconds.
• You enter a well lit location.
The high beams come back on once the condi tion that caused them to turn off no
longer exists.
If needed, you can temporarily turn the hi gh beams off manually. Turn on the high
beams by pushing the lever forward until you hear a click, or flash the high beams
once by pulling the lever toward you. To turn the high beams back on, repeat one
of the procedures.
■Operating the System1 Operating the System
For the auto high-beam to work properly:
•Do not place an object that reflects light on the
dashboard.
•Keep the windshield around the camera clean.
When cleaning the windshield, be careful not to
apply windshield cleanser to the camera lens.
•Do not attach an object, sticker or film to the area
around the camera.
•Do not touch the camera lens.
If the camera receives a st rong impact, or repairing of
the area near the camera is required, consult a dealer.
If the Some Driver Assist Systems Cannot
Operate: Camera Temperature Too High message
appears:
•Use the climate control system to cool down the
interior and, if necessary, also use defroster mode
with the airflow directed toward the camera.
•Start driving the vehicle to lower the windshield
temperature, which cool s down the area around
the camera.
If the Some Driver Assist Systems Cannot
Operate: Clean Front Windshield message
appears:
•Park your vehicle in a sa fe place, and clean the
windshield. If the message does not disappear after
you have cleaned the winds hield and driven for a
while, have your vehicle checked by a dealer.
Headlight Switch
18 US ODYSSEY-31THR6010.book 195 ページ 2018年12月6日 木曜日 午後4時18分
Page 198 of 763
uuOperating the Switches Around the Steering Wheel uAuto High-Beam*
196
Controls
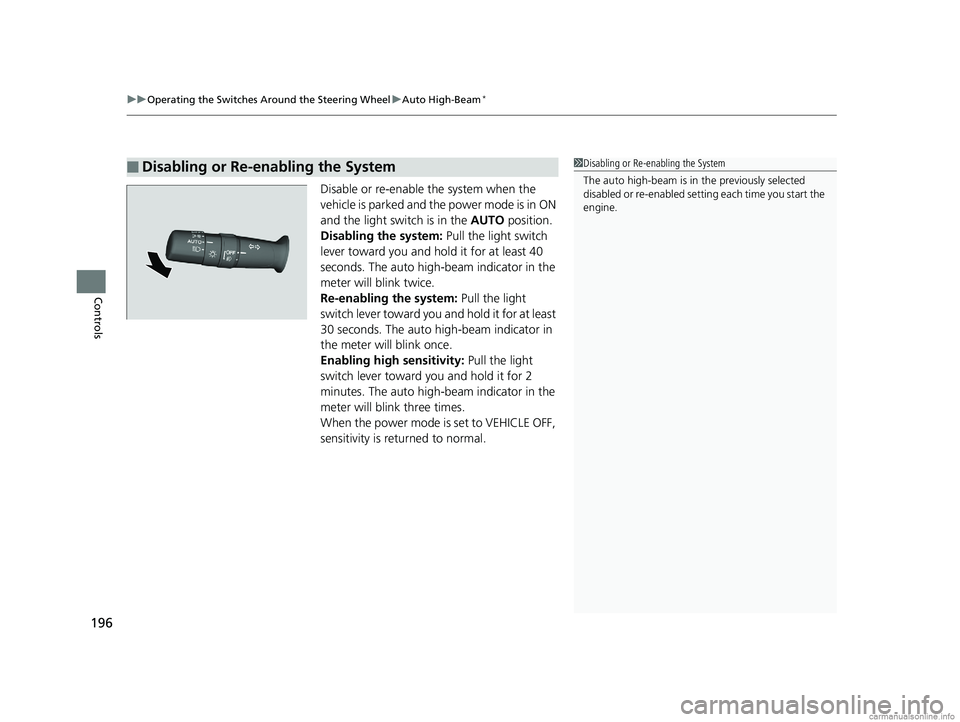
Disable or re-enable the system when the
vehicle is parked and the power mode is in ON
and the light switch is in the AUTO position.
Disabling the system: Pull the light switch
lever toward you and hold it for at least 40
seconds. The auto high-beam indicator in the
meter will blink twice.
Re-enabling the system: Pull the light
switch lever toward you and hold it for at least
30 seconds. The auto high-beam indicator in
the meter will blink once.
Enabling high sensitivity: Pull the light
switch lever toward you and hold it for 2
minutes. The auto high-beam indicator in the
meter will blink three times.
When the power mode is set to VEHICLE OFF,
sensitivity is returned to normal.
■Disabling or Re-enabling the System1 Disabling or Re-enabling the System
The auto high-beam is in the previously selected
disabled or re-enabled sett ing each time you start the
engine.
18 US ODYSSEY-31THR6010.book 196 ページ 2018年12月6日 木曜日 午後4時18分
Page 564 of 763

562
uuWhen Driving uFront Sensor Camera*
Driving
Front Sensor Camera*
The camera, used in systems such as LKAS, RDM, ACC, Auto High-Beam, and
CMBSTM, is designed to detect an object that triggers any of the systems to operate
its functions.
This camera is located behind the rearview
mirror.
To help reduce the likelihood that high interior
temperatures will cause the camera’s sensing
system to shut off, when parking, find a shady
area or face the front of the vehicle away from
the sun. If you use a re flective sun shade, do
not allow it to cove r the camera housing.
Covering the camera can concentrate heat on
it.
■Camera Location and Handling Tips
1 Front Sensor Camera*
Never apply a film or attach any objects to the
windshield, the hood, or the front grill that could
obstruct the camera’s fiel d of vision and cause the
system to operate abnormally.
Scratches, nicks, and othe r damage to the windshield
within the camera’s fiel d of vision can cause the
system to operate abnormall y. If this occurs, we
recommend that you replac e the windshield with a
genuine Honda replacem ent windshield. Making
even minor repairs within th e camera’s field of vision
or installing an aftermarket replacement windshield
may also cause the system to operate abnormally.
After replacing the winds hield, have a dealer
recalibrate the camera. Pr oper calibration of the
camera is necessary for the system to operate
properly.
Do not place an object on the top of the instrument
panel. It may reflect onto the windshield and prevent
the system from detecting lane lines properly.
Front Sensor
Camera
* Not available on all models
18 US ODYSSEY-31THR6010.book 562 ページ 2018年12月6日 木曜日 午後4時18分
Page 660 of 763
658
Maintenance
Replacing Light Bulbs
Headlight Bulbs
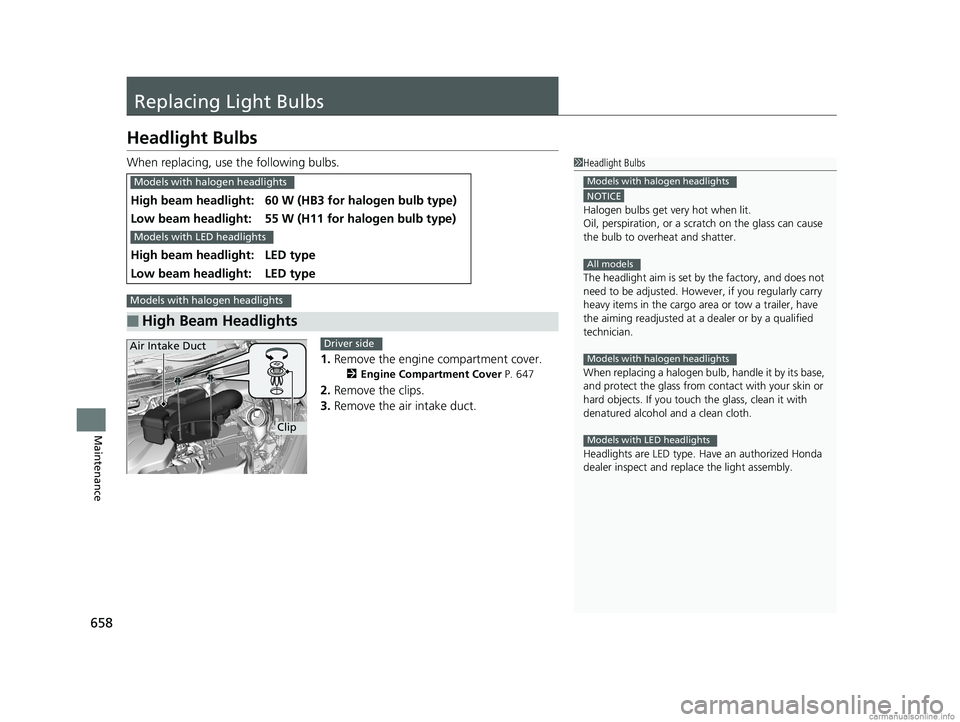
When replacing, use the following bulbs.1.Remove the engine compartment cover.
2 Engine Compartment Cover P. 647
2.Remove the clips.
3. Remove the air intake duct.
High beam headlight:60 W (HB3 for halogen bulb type)
Low beam headlight:55 W (H11 for halogen bulb type)
High beam headlight:LED type
Low beam headlight:LED type
■High Beam Headlights
1Headlight Bulbs
NOTICE
Halogen bulbs get very hot when lit.
Oil, perspiration, or a scratch on the glass can cause
the bulb to overhe at and shatter.
The headlight aim is set by the factory, and does not
need to be adjusted. Howeve r, if you regularly carry
heavy items in the cargo area or tow a trailer, have
the aiming readjusted at a dealer or by a qualified
technician.
When replacing a halogen bulb, handle it by its base,
and protect the glass from c ontact with your skin or
hard objects. If you touch the glass, clean it with
denatured alcohol and a clean cloth.
Headlights are LED type. Ha ve an authorized Honda
dealer inspect and replace the light assembly.
Models with halogen headlights
All models
Models with halogen headlights
Models with LED headlights
Models with halogen headlights
Models with LED headlights
Models with halogen headlights
Clip
Air Intake DuctDriver side
18 US ODYSSEY-31THR6010.book 658 ページ 2018年12月6日 木曜日 午後4時18分
Page 661 of 763
Continued659
uuReplacing Light Bulbs uHeadlight Bulbs
Maintenance
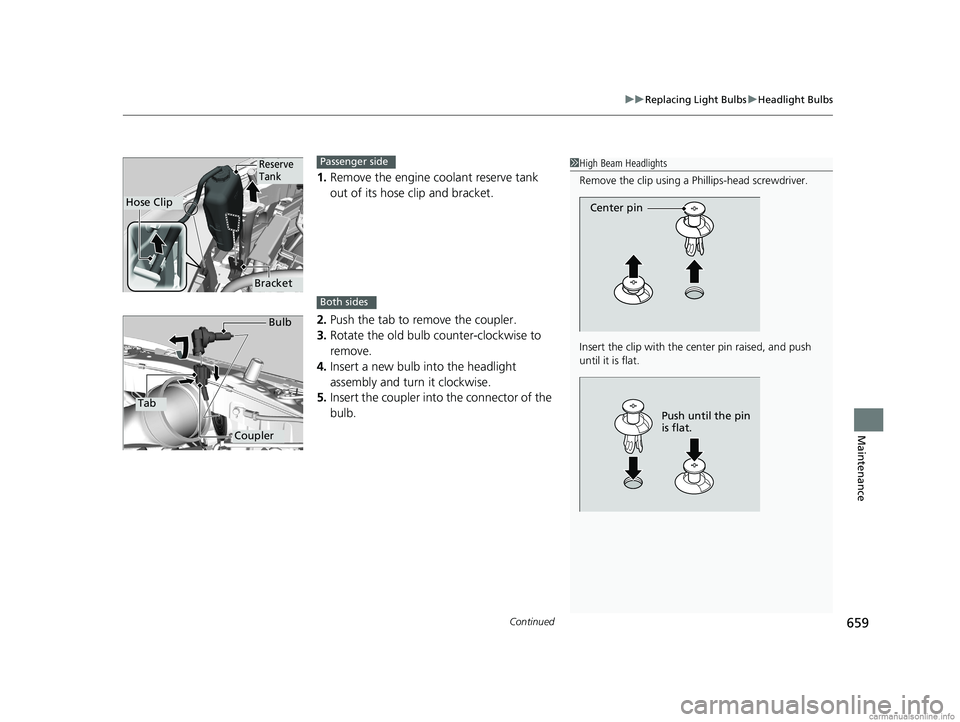
1. Remove the engine coolant reserve tank
out of its hose clip and bracket.
2. Push the tab to remove the coupler.
3. Rotate the old bulb counter-clockwise to
remove.
4. Insert a new bulb into the headlight
assembly and turn it clockwise.
5. Insert the coupler into the connector of the
bulb.
1 High Beam Headlights
Remove the clip using a Phillips-head screwdriver.
Insert the clip with the center pin raised, and push
until it is flat.
Center pin
Push until the pin
is flat.
Hose Clip
Reserve
Tank
Bracket
Passenger side
Both sides
Tab
Coupler Bulb
18 US ODYSSEY-31THR6010.book 659 ページ 2018年12月6日 木曜日 午後4時18分
Page 664 of 763
662
uuReplacing Light Bulbs uParking/Daytime Running Lights
Maintenance
Parking/Daytime Running Lights
Parking/daytime running lights are LED type . Have an authorized Honda dealer
inspect and replace the light assembly.
Daytime Running Lights
Daytime running light bulbs and high beam headlight bulbs are the same.
2 Headlight Bulbs P. 658
Models with fog lights
Models without fog lights
18 US ODYSSEY-31THR6010.book 662 ページ 2018年12月6日 木曜日 午後4時18分
Page 684 of 763

682
Maintenance
Battery
Checking the Battery
The condition of the battery is monitored by a
sensor located on the negative terminal of the
battery. If there is a problem with this sensor,
the driver information in terface will display a
warning message. If this happens, have your
vehicle inspected by a dealer.
Check the battery terminals for corrosion
monthly.
To access the battery terminals:
1. Remove the engine compartment cover.
2 Engine Compartment Cover P. 647
2.Remove the clips using a Phillips-head
screwdriver, then remove the air intake
duct.
2 High Beam Headlights P. 658
If your vehicle’s battery is disconnected or goes dead:
•The audio system is disabled.
2 Reactivating the audio system P. 263
•The clock resets.
2 Clock P. 142
•
The immobilizer system needs to be reset.
2 Immobilizer System Indicator P. 93
1Battery
WARNING: Battery post, terminals,
and related accessories contain lead
and lead compounds.
Wash your hands after handling.
When you find corrosion, cl ean the battery terminals
by applying a baking powder and water solution.
Clean terminals with a damp towel. Cloth/towel dry
the battery. Coat the terminals with grease to help
prevent future corrosion.
When replacing the battery, the replacement must be
of the same specifications.
Consult a dealer for more information.
3WARNING
The battery gives off explosive hydrogen
gas during normal operation.
A spark or flame can cause the battery to
explode with enough force to kill or
seriously hurt you.
When conducting any battery
maintenance, wear prot ective clothing and
a face shield, or have a skilled technician do
it.
Canadian models only
18 US ODYSSEY-31THR6010.book 682 ページ 2018年12月6日 木曜日 午後4時18分