Page 194 of 763
192
uuOperating the Switches Around the Steering Wheel uFog Lights*
Controls
Fog Lights*
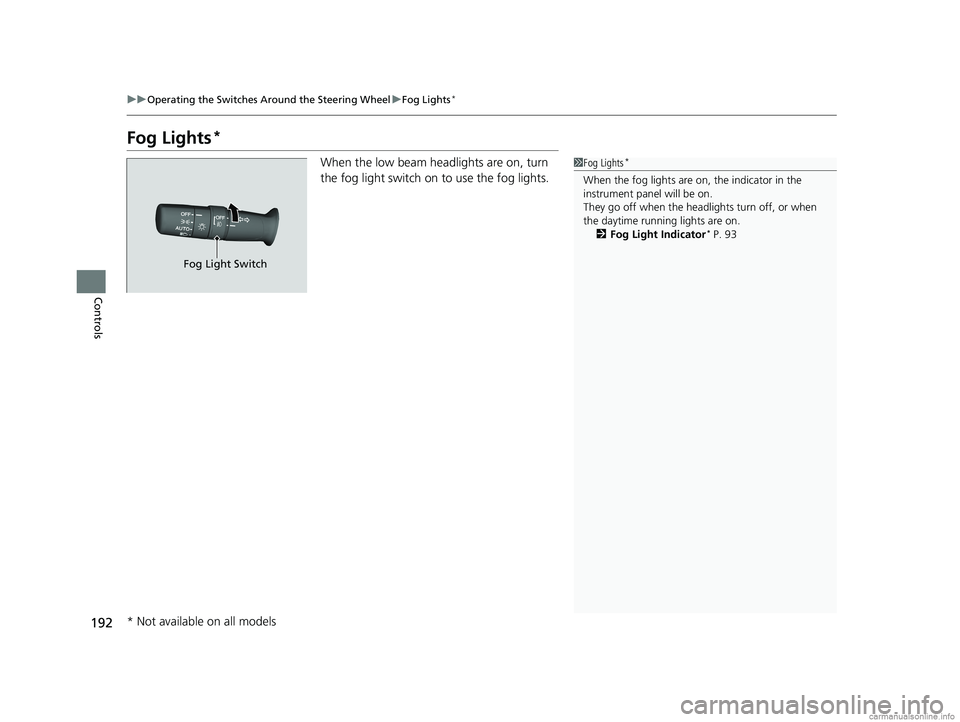
When the low beam headlights are on, turn
the fog light switch on to use the fog lights.1Fog Lights*
When the fog lights are on, the indicator in the
instrument pane l will be on.
They go off when the headlights turn off, or when
the daytime running lights are on. 2 Fog Light Indicator
* P. 93
Fog Light Switch
* Not available on all models
18 US ODYSSEY-31THR6010.book 192 ページ 2018年12月6日 木曜日 午後4時18分
Page 195 of 763
193
uuOperating the Switches Around the Steering Wheel uDaytime Running Lights
Controls
Daytime Running Lights
When the conditions listed below are me t, the daytime running lights come on:
• The power mode is in ON.
• The headlight switch is off.
• The parking brake is released.
The lights remain on even if you set th e parking brake. Setting the power mode to
VEHICLE OFF will turn off the daytime running lights.
The daytime running lights go off once the headlight switch is turned on, or when
the headlight switch is in AUTO
* and it is getting dark outside.
The high beam headlights return to the original brightness once the headlight
switch is turned on.
1 Daytime Running Lights
The parking lights serve as daytime running lights.
The high beam headlights come on slightly dimmer
than normal to serve as daytime running lights.
Models with fog lights
Models without fog lights
Models without fog lights
* Not available on all models
18 US ODYSSEY-31THR6010.book 193 ページ 2018年12月6日 木曜日 午後4時18分
Page 196 of 763
194
uuOperating the Switches Around the Steering Wheel uAuto High-Beam*
Controls
Auto High-Beam*
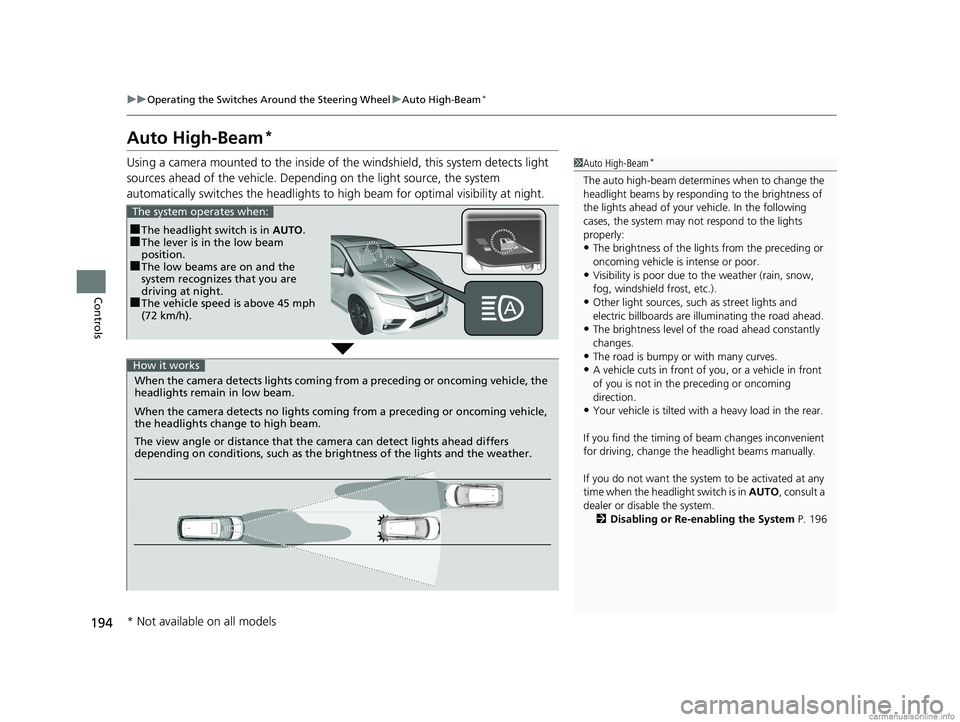
Using a camera mounted to the inside of the windshield, this system detects light
sources ahead of the vehicle. Depend ing on the light source, the system
automatically switches the headlights to hi gh beam for optimal visibility at night.1Auto High-Beam*
The auto high-beam determines when to change the
headlight beams by responding to the brightness of
the lights ahead of your vehicle. In the following
cases, the system may not respond to the lights
properly:
•The brightness of the lights from the preceding or
oncoming vehicle is intense or poor.
•Visibility is poor due to the weather (rain, snow,
fog, windshield frost, etc.).
•Other light sources, such as street lights and
electric billboards are illuminating the road ahead.
•The brightness level of th e road ahead constantly
changes.
•The road is bumpy or with many curves.
•A vehicle cuts in front of you, or a vehicle in front
of you is not in the preceding or oncoming
direction.
•Your vehicle is tilted with a heavy load in the rear.
If you find the timing of beam changes inconvenient
for driving, change the headlight beams manually.
If you do not want the system to be activated at any
time when the headlight switch is in AUTO, consult a
dealer or disable the system. 2 Disabling or Re-enabling the System P. 196
■The headlight switch is in AUTO.■The lever is in the low beam
position.
■The low beams are on and the
system recognizes that you are
driving at night.
■The vehicle speed is above 45 mph
(72 km/h).
The system operates when:
When the camera detects lig hts coming from a preceding or oncoming vehicle, the
headlights remain in low beam.
When the camera detects no lights coming from a preceding or oncoming vehicle,
the headlights change to high beam.
The view angle or distance that the camera can detect lights ahead differs
depending on conditions, such as the brightness of the lights and the weather.
How it works
* Not available on all models
18 US ODYSSEY-31THR6010.book 194 ページ 2018年12月6日 木曜日 午後4時18分
Page 197 of 763

Continued195
uuOperating the Switches Around the Steering Wheel uAuto High-Beam*
Controls
To activate the system , turn the headlight
switch to AUTO and then set the headlights
to low beam. The auto high-beam indicator
will come on.
2 Light Switches P. 189
The high beams remain on unless:
•You have been driving below 45 mph (72 km/h) for an extended amount of time.
• The speed of the vehicle drops below 30 mph (48 km/h).
• The windshield wipers have been runnin g at a high speed for more than a few
seconds.
• You enter a well lit location.
The high beams come back on once the condi tion that caused them to turn off no
longer exists.
If needed, you can temporarily turn the hi gh beams off manually. Turn on the high
beams by pushing the lever forward until you hear a click, or flash the high beams
once by pulling the lever toward you. To turn the high beams back on, repeat one
of the procedures.
■Operating the System1 Operating the System
For the auto high-beam to work properly:
•Do not place an object that reflects light on the
dashboard.
•Keep the windshield around the camera clean.
When cleaning the windshield, be careful not to
apply windshield cleanser to the camera lens.
•Do not attach an object, sticker or film to the area
around the camera.
•Do not touch the camera lens.
If the camera receives a st rong impact, or repairing of
the area near the camera is required, consult a dealer.
If the Some Driver Assist Systems Cannot
Operate: Camera Temperature Too High message
appears:
•Use the climate control system to cool down the
interior and, if necessary, also use defroster mode
with the airflow directed toward the camera.
•Start driving the vehicle to lower the windshield
temperature, which cool s down the area around
the camera.
If the Some Driver Assist Systems Cannot
Operate: Clean Front Windshield message
appears:
•Park your vehicle in a sa fe place, and clean the
windshield. If the message does not disappear after
you have cleaned the winds hield and driven for a
while, have your vehicle checked by a dealer.
Headlight Switch
18 US ODYSSEY-31THR6010.book 195 ページ 2018年12月6日 木曜日 午後4時18分
Page 208 of 763

206
Controls
Adjusting the Mirrors
Interior Rearview Mirror
Adjust the angle of the rearview mirror when you are sitting in the correct driving
position.
Flip the tab to switch the position.
The night position will help to reduce the glare
from headlights behind you when driving
after dark.
When you are driving after dark, the
automatic dimming rearview mirror reduces
the glare from headlights behind you. Press
the auto button to turn this function on and
off. When activated, the auto indicator comes
on.
■Rearview Mirror with Day and Night Positions*
1Adjusting the Mirrors
Keep the inside and out side mirrors clean and
adjusted for best visibility.
Adjust the mirrors befo re you start driving.
2 Front Seats P. 209
Tab
Daytime
Position Night PositionUp
Down
■Automatic Dimming Rearview Mirror*1Automatic Dimming Rearview Mirror*
The auto dimming function cancels when the
transmission is in
(R.Sensor
Auto Button
* Not available on all models
18 US ODYSSEY-31THR6010.book 206 ページ 2018年12月6日 木曜日 午後4時18分
Page 465 of 763
463
uuCustomized Features u
Continued
Features
*1:Default SettingSetup
Group Customizable Features
DescriptionSelectable Settings
Vehicle
Lighting
Setup
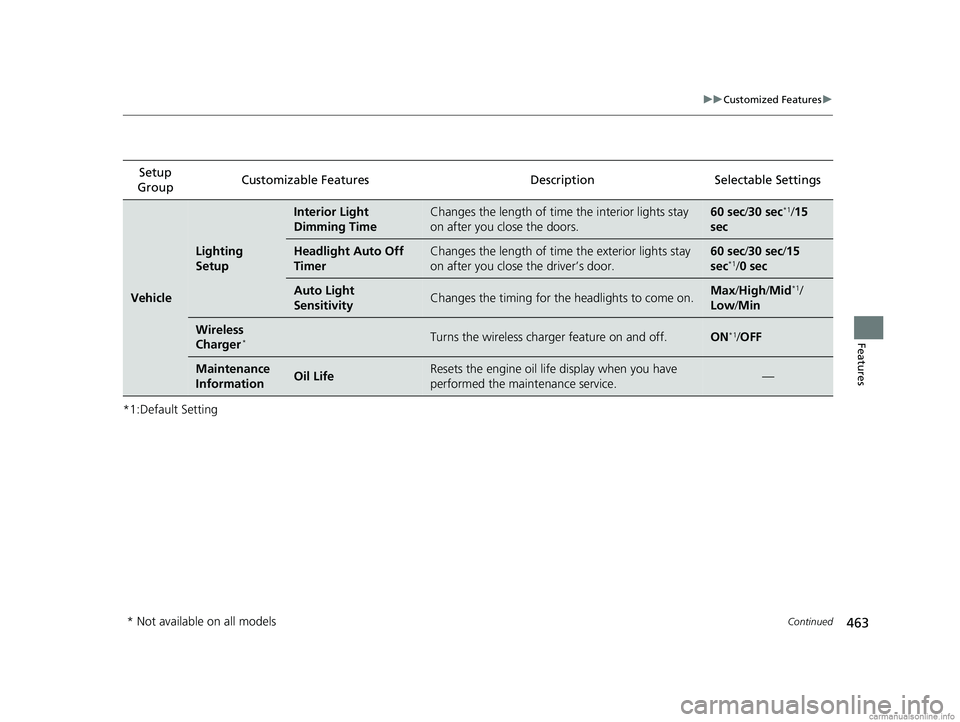
Interior Light
Dimming TimeChanges the length of time the interior lights stay
on after you close the doors.60 sec/30 sec*1/15
sec
Headlight Auto Off
TimerChanges the length of time the exterior lights stay
on after you close the driver’s door.60 sec /30 sec/ 15
sec*1/ 0 sec
Auto Light
SensitivityChanges the timing for the headlights to come on.Max /High /Mid*1/
Low /Min
Wireless
Charger*Turns the wireless charger feature on and off.ON*1/OFF
Maintenance
InformationOil LifeResets the engine oil life display when you have
performed the maintenance service.—
* Not available on all models
18 US ODYSSEY-31THR6010.book 463 ページ 2018年12月6日 木曜日 午後4時18分
Page 582 of 763
580
uuWhen Driving uRoad Departure Mitigation (RDM) System*
Driving
■Roadway conditions
• Driving on a snowy or wet roadway (obscured lane marking, vehicle tracks,
reflected lights, road spray, high contrast).
• Driving on a road with temporary lane markings.
• Faint, multiple, or varied lane markings are visible on the roadway due to road
repairs or old lane markings.
• The roadway has merging, split, or crossing lines (e.g., such as at an intersection
or crosswalk).
• The lane markings are extremely narrow, wide, or changing.
• The vehicle in front of you is driving near the lane lines.
• The road is hilly or the vehicle is approaching the crest of a hill.
• Driving on rough or unpaved roads, or over bumpy surfaces.
• When objects on the road (c urb, guard rail, pylons, etc.) are recognized as white
lines (or yellow lines).
• Driving on roads with double lines.
■Vehicle conditions
• Headlight lenses are dirty or the headlights are not properly adjusted.
• The outside of the windshield is streake d or blocked by dirt, mud, leaves, wet
snow, etc.
• The inside of the windshield is fogged.
• The camera temperature gets too high.
• An abnormal tire or wheel condition (wrong sized, varied size or construction,
improperly inflated, comp act spare tire, etc.).
• The vehicle is tilted due to a heav y load or suspension modifications.
• When tire chains are installed.
18 US ODYSSEY-31THR6010.book 580 ページ 2018年12月6日 木曜日 午後4時18分
Page 590 of 763
588
uuWhen Driving uLane Keeping Assist System (LKAS)*
Driving
■Roadway conditions
• Driving on a snowy or wet roadway (obscured lane marking, vehicle tracks,
reflected lights, road spray, high contrast).
• Driving on a road with temporary lane markings.
• Faint, multiple, or varied lane markings are visible on the roadway due to road
repairs or old lane markings.
• The roadway has merging, split, or crossing lines (e.g., such as at an intersection
or crosswalk).
• The lane markings are extremely narrow, wide, or changing.
• The vehicle in front of you is driving near the lane lines.
• The road is hilly or the vehicle is approaching the crest of a hill.
• Driving on rough or unpaved roads, or over bumpy surfaces.
• When objects on the road (c urb, guard rail, pylons, etc.) are recognized as white
lines (or yellow lines).
• Driving on roads with double lines.
■Vehicle conditions
• Headlight lenses are dirty or the headlights are not properly adjusted.
• The outside of the windshield is streake d or blocked by dirt, mud, leaves, wet
snow, etc.
• The inside of the windshield is fogged.
• The camera temperature gets too high.
• An abnormal tire or wheel condition (wrong sized, varied size or construction,
improperly inflated, comp act spare tire, etc.).
• The vehicle is tilted due to a heav y load or suspension modifications.
18 US ODYSSEY-31THR6010.book 588 ページ 2018年12月6日 木曜日 午後4時18分