2018 HONDA HR-V fuel
[x] Cancel search: fuelPage 395 of 503

393
uuBefore Performing Maintenance uSafety When Performing Maintenance
Maintenance
Safety When Performing Maintenance
Some of the most important safe ty precautions are given here.
However, we cannot warn you of every conceivable hazard that can arise in
performing maintenance. Only you can decide whether you should perform a given
task.
• To reduce the possibility of fire or explos ion, keep cigarettes, sparks, and flames
away from the battery and all fuel related parts.
• Never leave rags, towels, or other flammable objects under the hood.
u Heat from the engine and exhaust can ignite them, causing a fire.
• To clean parts, use a co mmercially available degreas er or parts cleaner, not
gasoline.
• Wear eye protection and protective clothi ng when working with the battery or
compressed air.
• Engine exhaust contains carbon monoxide, which is poisonous and can kill you.
u Only operate the engine if th ere is sufficient ventilation.
• The vehicle must be in a stationary condition.
u Make sure your vehicle is parked on le vel ground, the parking brake is set, and
the engine is off.
• Be aware that hot parts can burn you.
u Make sure to let the engine and exhaust system cool thoroughly before
touching vehicle parts.
• Be aware that moving parts can injure you.
u Do not start the engine unless instruct ed, and keep your hands and limbs away
from moving parts.
■Maintenance Safety
■Vehicle Safety
1 Safety When Performing Maintenance
3WARNING
Improperly maintaining this vehicle or
failing to correct a pr oblem before driving
can cause a crash in which you can be
seriously hurt or killed.
Always follow the inspection and
maintenance recommendations according
to the schedules in this owner’s manual.
3WARNING
Failure to properly follow maintenance
instructions and precautions can cause you
to be seriously hurt or killed.
Always follow the procedures and
precautions in this owner’s manual.
18 HR-V-31T7A6200.book 393 ページ 2017年6月30日 金曜日 午後1時23分
Page 399 of 503

397
uuMaintenance MinderTMuTo Use Maintenance MinderTM
Continued
Maintenance
■Maintenance Service Items1Maintenance Service Items
•Independent of the Maintenance Minder
information, replace the brake fluid every 3 years.
•Adjust the valves during services A, B, 1, 2, or 3 if
they are noisy.Maintenance Minder Message
Maintenance
Minder Indicator
Sub Items Main Item
*1: If a message SERVICE does not appear more than 12 months after the display is reset, change the
engine oil every year.
# : See information on maintenance and emissions warranty.
CODEMaintenance Main Items
A
●Replace engine oil*1
B●Replace engine oil*1 and oil filter●Inspect front and rear brakes●Inspect tie rod ends, steering gearbox, and boots●Inspect suspension components●Inspect driveshaft boots●Inspect brake hoses and li nes (Including ABS/VSA)●Inspect all fluid levels and condition of fluids●Inspect exhaust system#
●Inspect fuel lines and connections#
*2: If you drive in dusty conditions, replace the air cleaner element every 15,000 miles (24,000 km).
*3: If you drive primarily in urban areas that have high concentrations of soot in the air from industry and
from diesel-powered vehicles, replace the dust and pollen filter every 15,000 miles (24,000 km).
*4: Driving in mountainous areas at very low vehicle speeds results in higher transmission temperatures. This requires transmission fluid changes more frequently than recommended by the Maintenance
Minder. If you regularly drive your vehicle under these conditions, have the transmission fluid changed
every 25,000 miles (40,000 km).
CODEMaintenance Sub Items
1
●Rotate tires
2●Replace air cleaner element*2
●Replace dust and pollen filter*3
●Inspect drive belt
3
●Replace transmission fluid*4
4●Replace spark plugs●Inspect valve clearance
5
●Replace engine coolant
6●Replace rear differential fluid*
Continuously variable transmission models only
* Not available on all models
18 HR-V-31T7A6200.book 397 ページ 2017年6月30日 金曜日 午後1時23分
Page 404 of 503

402
uuMaintenance Under the Hood uOil Check
Maintenance
Oil Check
We recommend that you check the engi ne oil level every time you refuel.
Park the vehicle on level ground.
Wait approximately three minutes after turn ing the engine off before you check the
oil. 1.Remove the dipstick (orange).
2. Wipe the dipstick with a clean cloth or
paper towel.
3. Insert the dipstick back all the way into its
hole.
4. Remove the dipstick again, and check the
level. It should be between the upper and
lower marks. Add oil if necessary.1Oil Check
If the oil level is near or below the lower mark, slowly
add oil, being carefu l not to overfill.
Upper Mark
Lower Mark
18 HR-V-31T7A6200.book 402 ページ 2017年6月30日 金曜日 午後1時23分
Page 408 of 503
406
uuMaintenance Under the Hood uEngine Coolant
Maintenance
Engine Coolant
This coolant is premixed with 50% antifreeze and 50% water. Do not add any
straight antifreeze or water.
We recommend you check the engine coolant level every time you refuel. Check the
reserve tank first. If it is completely empty, also check the coolant level in the
radiator. Add the engine coolant accordingly.
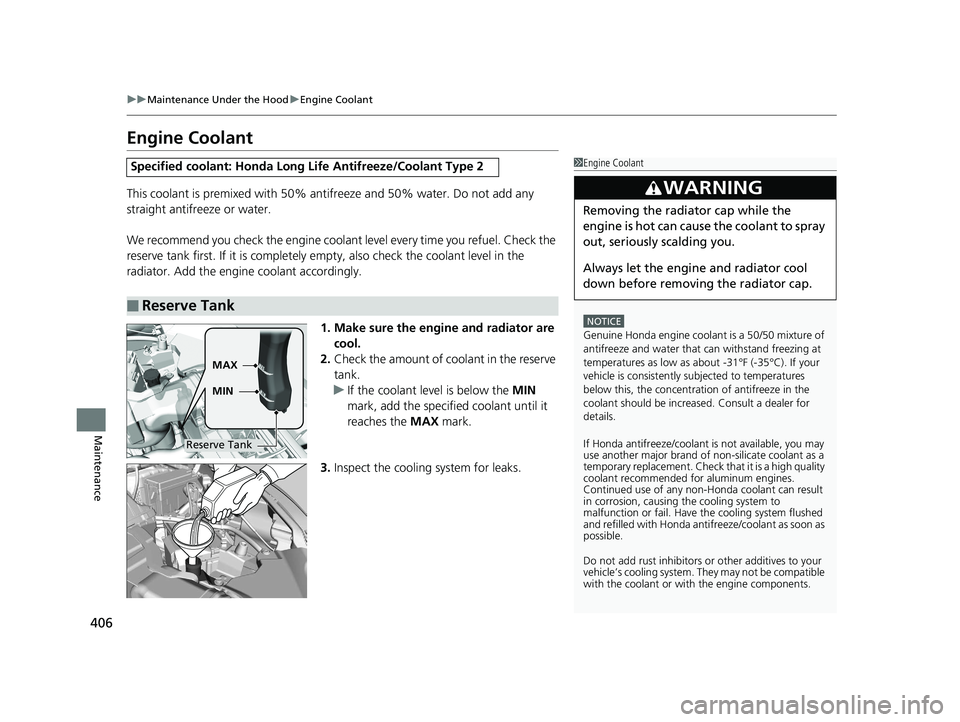
1. Make sure the engine and radiator are cool.
2. Check the amount of coolant in the reserve
tank.
u If the coolant level is below the MIN
mark, add the specified coolant until it
reaches the MAX mark.
3. Inspect the cooling system for leaks.
Specified coolant: Honda Long Life Antifreeze/Coolant Type 2
■Reserve Tank
1Engine Coolant
NOTICE
Genuine Honda engine coolant is a 50/50 mixture of
antifreeze and water that can withstand freezing at
temperatures as low as a bout -31°F (-35°C). If your
vehicle is consistently subjected to temperatures
below this, the concentration of antifreeze in the
coolant should be increased. Consult a dealer for
details.
If Honda antifreeze /coolant is not available, you may
use another major brand of non-silicate coolant as a
temporary replacement. Check that it is a high quality
coolant recommended for aluminum engines.
Continued use of any non-Honda coolant can result
in corrosion, causing the cooling system to
malfunction or fail. Have the cooling system flushed
and refilled wi th Honda antifreeze /coolant as soon as
possible.
Do not add rust inhibitors or other additives to your
vehicle’s cooling system. They may not be compatible
with the coolant or with the engine components.
3WARNING
Removing the radiator cap while the
engine is hot can cause the coolant to spray
out, seriously scalding you.
Always let the engine and radiator cool
down before removing the radiator cap.
Reserve TankMAX
MIN
18 HR-V-31T7A6200.book 406 ページ 2017年6月30日 金曜日 午後1時23分
Page 425 of 503

423Continued
Maintenance
Checking and Maintaining Tires
Checking Tires
To safely operate your vehicle, your tires must be of the proper type and size, in
good condition with adequate tread, and properly inflated.
■Inflation guidelines
Properly inflated tires provide the best combination of handling, tread life, and
comfort. Refer to the driver’s doorjamb labe l or specification’s page for the specified
pressure.
Underinflated tires wear unev enly, adversely affect handling and fuel economy, and
are more likely to fail from overheating.
Overinflated tires make your vehicle ride ha rshly, are more prone to road hazards,
and wear unevenly.
Every day before you drive, look at each of the tires. If one looks lower than the
others, check the pressure with a tire gauge.
At least once a month or before long trips , use a gauge to measure the pressure in
all tires, including the spare. Even tires in good condition can lose 1-2 psi (10-20 kPa,
0.1-0.2 kgf/cm
2) per month.
1 Checking Tires
Measure the air pressure when tires are cold. This
means the vehicle has been parked for at least three
hours, or driven less than 1 mile (1.6 km). If
necessary, add or releas e air until the specified
pressure is reached.
If checked when hot, tire pressure can be as much as
4–6 psi (30–40 kPa, 0.3–0.4 kgf/cm
2) higher than if
checked when cold.
Have a dealer check the tires if you feel a consistent
vibration while driving. Ne w tires and any that have
been removed and reinst alled should be properly
balanced.
3WARNING
Using tires that are excessively worn or
improperly inflated can cause a crash in
which you can be seriously hurt or killed.
Follow all instruction s in this owner’s
manual regarding ti re inflation and
maintenance.
18 HR-V-31T7A6200.book 423 ページ 2017年6月30日 金曜日 午後1時23分
Page 459 of 503

457
Handling the Unexpected
Engine Does Not Start
Checking the Engine
If the engine does not start, check the starter.
Starter conditionChecklist
Starter doesn’t turn or turns
over slowly.
The battery may be dead. Check
each of the items on the right and
respond accordingly.Check the brightness of the interior lights.
Turn on the interior lights and check the brightness.
●If the interior lights are dim or do not come on at all
2Battery P. 433●If the interior lights come on normally 2 Fuses P. 470
The starter turns over normally
but the engine doesn’t start.
There may be a problem with the
fuse. Check each of the items on
the right and respond accordingly.Review the engine start procedure.
Follow its instructions, and try to start the engine again.
2 Starting the Engine P. 339, 342
Check the immobilize r system indicator.
When the immobilizer system indicator is blinking, the engine cannot be started.
2 Immobilizer System P. 118
Check the fuel level.
There should be enough fuel in the tank.
2 Fuel Gauge P. 93
Check the fuse.
Check all fuses, or have your vehicle checked by a dealer.
2Inspecting and Changing Fuses P. 474
If the problem continues:
2Emergency Towing P. 475
1Checking the Engine
If you must start the vehi cle immediately, use an
assisting vehicle to jump start it.
2 Jump Starting P. 460
18 HR-V-31T7A6200.book 457 ページ 2017年6月30日 金曜日 午後1時23分
Page 468 of 503

466
uuIndicator, Coming On/Blinking uIf the Malfunction Indicato r Lamp Comes On or Blinks
Handling the Unexpected
If the Malfunction Indicator Lamp Comes On or
Blinks
■Reasons for the indicator la mp to come on or blink
• Comes on when there is a problem with the engine emissions control
system, or the fuel fill cap is missing, or loose.
• Blinks when engine misfiring is detected.
■What to do when the indicator lamp comes on
Avoid high speeds and immediately get your vehicle inspected at a
dealer.
■What to do when the indicator lamp blinks
Park the vehicle in a safe place with no flammable items and wait at least
10 minutes or more with the engine stopped until it cools.
■The message appears on when:
An evaporative system leak is detected. This may be caused by the fuel fill cap being
loose or not being installed.
■What to do when the message appears:
1. Stop the engine.
2. Check that the fuel fill cap is fully installed.
u If not, loosen the cap, and then reti ghten it until it clicks at least once.
3. Drive for several days of normal driving.
u The message should go off.
■When the malfunction indicator lamp comes on
The malfunction indicator lamp comes on if the system continues to detect a leak of
gasoline vapor. If this happens, check the fuel fill cap using the procedures described
above.
■Check Fuel Cap Message
1 If the Malfunction Indicato r Lamp Comes On or Blinks
NOTICE
If you drive with the malf unction indicator lamp on,
the emissions control system and the engine could be
damaged.
If the malfunction indicator lamp blinks again when
restarting the engine, drive to the nearest dealer at
31 mph (50 km/h) or less. Have your vehicle
inspected.
18 HR-V-31T7A6200.book 466 ページ 2017年6月30日 金曜日 午後1時23分
Page 474 of 503

472
uuFuses uFuse Locations
Handling the Unexpected
■Fuse box A
Located behind the instrument panel.
Fuse locations are shown on the label under
the steering column.
Locate the fuse in question by the fuse
number and label number.
■Interior Fuse Boxes
Fuse Label
■Circuit protected and fuse rating
Circuit ProtectedAmps
1Door Lock20 A
2––
3Smart*(10 A)
4Driver Side Door Unlock10 A
5Passenger Side Door Unlock10 A
6Driver Door Unlock10 A
7Driver Door Lock10 A
8Driver’s Power Window20 A
9Passenger’s Power Window20 A
10Rear Left Power Window20 A
11Rear Right Power Window20 A
12Driver Side Door Lock10 A
13Passenger Side Door Lock10 A
14––
15Right Headlight High Beam10 A
16STS*(7.5 A)
17Sunshade*(20 A)
18Moonroof*(20 A)
19Front Seat Heater*(20 A)
20––
Circuit ProtectedAmps
21MP Camera*(10 A)
22Washer15 A
23Rear Wiper*(10 A)
24A/C7.5 A
25Daytime Running Lights7.5 A
26Starter Cut*(7.5 A)
27ABS/VSA7.5 A
28SRS10 A
29Left Headlight High Beam10 A
30ACG10 A
31IG Relay10 A
32Fuel Pump15 A
33SRS(7.5 A)
34Meter7.5 A
35Mission SOL7.5 A
36Front ACC Socket20 A
37ACC(7.5 A)
38ACC*(7.5 A)
39Option10 A
40Rear Wiper10 A
41−−
42−−
* Not available on all models
18 HR-V-31T7A6200.book 472 ページ 2017年6月30日 金曜日 午後1時23分