2018 HONDA CLARITY PLUG-IN warning
[x] Cancel search: warningPage 437 of 591

Continued435
uuBraking uBrake System
Driving
Keeps the brake applied after releasing the brake pedal until the accelerator pedal is
pressed. You can use this system while th e vehicle is temporarily stopped, like at
traffic lights and in heavy traffic.
■Automatic Brake Hold1 Automatic Brake Hold
3WARNING
Activating the automatic brake hold system
on steep hills or slippery roads may still
allow the vehicle to move if you remove
your foot from the brake pedal.
If a vehicle unexpectedly moves, it may
cause a crash resulting in serious injury or
death.
Never activate the automatic brake hold
system or rely on it to keep a vehicle from
moving when stopped on a steep hill or
slippery roads.
3WARNING
Using the automatic brake hold system to
park the vehicle may result in the vehicle
unexpectedly moving.
If a vehicle moves unexpectedly, it may
cause a crash, resulting in serious injury or
death.
Never leave the vehicle when braking is
temporarily kept by automatic brake hold
and always park the vehicle by putting the
transmission in
( P and applying the parking
brake.
■Turning on the system
Fasten your seat belt
properly, then start the
power system. Press the
automatic brake hold
button.
●The automatic brake
hold system indicator
comes on. The system
is turned on.
■Activating the system
Depress the brake pedal
to come to a complete
stop. The transmission
must be in
( D or (N.●The automatic brake
hold indicator comes
on. Braking is kept for
up to 10 minutes.
●Release the brake
pedal after the
automatic brake hold
indicator comes on.
■Canceling the system
Depress the accelerator
pedal while the
transmission is in
( D.
The system is canceled
and the vehicle starts to
move.
●The automatic brake
hold indicator goes
off. The system
continues to be on.
Accelerator PedalBrake PedalAutomatic Brake
Hold Button
Goes
Off
Comes
OnOn On
Comes
On
Comes
On
U.S.
Canada
18 CLARITY PHEV CSS-31TRW6000.book 435 ページ 2017年12月25日 月曜日 午後2時22分
Page 443 of 591
441
uuBraking uCollision Mitigation Braking SystemTM (CMBSTM)
Continued
Driving
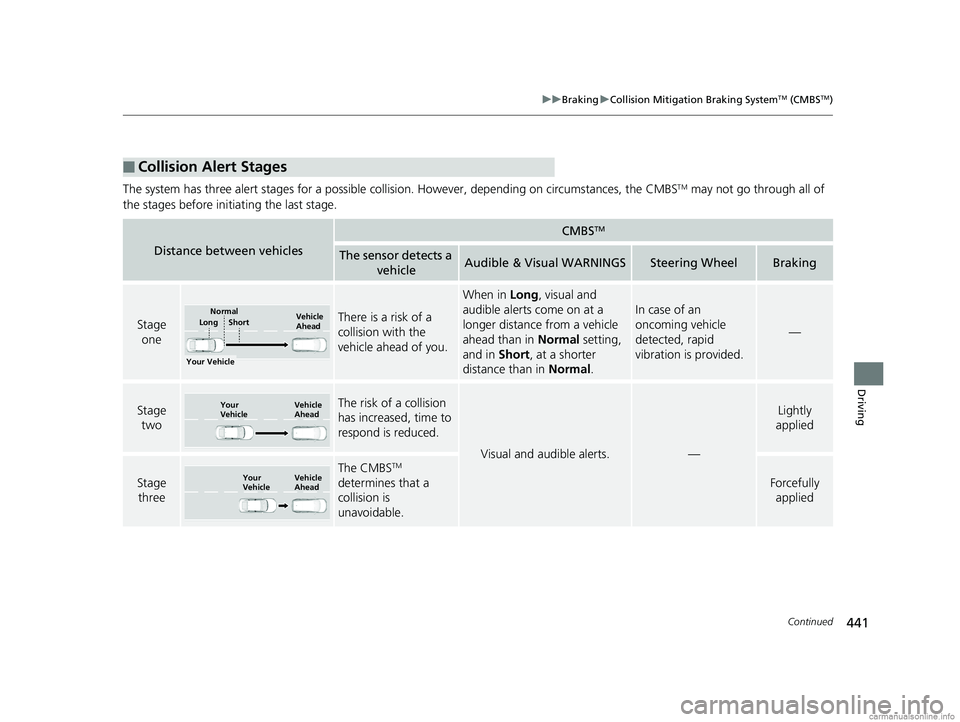
The system has three alert stages for a possible collis ion. However, depending on circumstances, the CMBSTM may not go through all of
the stages before initiating the last stage.
■Collision Alert Stages
Distance between vehicles
CMBSTM
The sensor detects a vehicleAudible & Visual WARNINGSSteering WheelBraking
Stage oneThere is a risk of a
collision with the
vehicle ahead of you.
When in Long, visual and
audible alerts come on at a
longer distance from a vehicle
ahead than in Normal setting,
and in Short, at a shorter
distance than in Normal.
In case of an
oncoming vehicle
detected, rapid
vibration is provided.
—
Stage
twoThe risk of a collision
has increased, time to
respond is reduced.
Visual and audible alerts.—
Lightly
applied
Stage three
The CMBSTM
determines that a
collision is
unavoidable.
Forcefully applied
Your Vehicle Vehicle
Ahead
Short
LongNormal
Your
Vehicle Vehicle
Ahead
Your
VehicleVehicle
Ahead
18 CLARITY PHEV CSS-31TRW6000.book 441 ページ 2017年12月25日 月曜日 午後2時22分
Page 448 of 591
uuBraking uCollision Mitigation Braking SystemTM (CMBSTM)
446
Driving
The CMBSTM may activate even when you are aw are of a vehicle ahead of you, or
when there is no vehicle ahead . Some examples of this are:
■When Passing
Your vehicle approaches another vehicle ah ead of you and you change lanes to pass.
■At an intersection
Your vehicle approaches or passes another vehicle that is making a left or right turn.
■On a curve
When driving through curves, your vehicle comes to a point where an oncoming
vehicle is right in front of you.
■Through a low bridge at high speed
You drive under a low or narrow bridge at high speed.
■Speed bumps, road work sites, tr ain tracks, roadside objects, etc.
You drive over speed bumps, steel road plates, etc., or yo ur vehicle approaches train
tracks or roadside objects [such as a traffi c sign and guard rail] on a curve or, when
parking, stationary vehicles and walls.
■With Little Chance of a Collision1 Collision Mitigation Braking SystemTM (CMBSTM)
For the CMBS
TM to work properly:
Always keep the radar sensor cover clean.
Never use chemical solvents or polishing powder for
cleaning the sensor cover. Clean it with water or a
mild detergent.
Do not apply any coverings or paint to the radar
sensor area. Do not put a sticker on the emblem or
replace the emblem.
These can impact CMBS
TM operation.
If you need the radar sensor to be repaired, or
removed, or the radar se nsor cover is strongly
impacted, turn off the system by pressing the
CMBS
TM off button and take your vehicle to an
authorized Honda Clarity Plug-In Hybrid dealer.
Have your vehicle checked by an authorized Honda
Clarity Plug-In Hybrid deal er if you find any unusual
behavior of the system (e.g., the warning message
appears too frequently).
If the front of the vehicle is impacted in any of the
following situations, the ra dar sensor may not work
properly. Have your vehicle checked by an authorized
Honda Clarity Plug-In Hybrid dealer:
•The vehicle mounted onto a bump, curb, chock,
embankment, etc.
•You drive the vehicle where the water is deep.
•Your vehicle has a frontal collision.
18 CLARITY PHEV CSS-31TRW6000.book 446 ページ 2017年12月25日 月曜日 午後2時22分
Page 449 of 591
447Continued
Driving
Parking Your Vehicle
When Stopped
1.Depress the brake pedal firmly.
2. With the brake pedal depressed, pull up th e electric parking brake switch slowly,
but fully.
3. Change the gear position to
(P.
4. Turn off the power system.
u The parking brake and brake system in dicator (red) goes off in about 15
seconds.
1 Parking Your Vehicle
Do not park your vehicle near flammable objects,
such as dry grass, oil, or timber.
Heat from the exhaust can cause a fire.
3WARNING
The vehicle can roll aw ay if left unattended
without confirming that Park is engaged.
A vehicle that rolls away could cause a crash
resulting in seriou s injury or death.
Always keep your foot on the brake pedal
until you have confirmed that
( P is shown
on the gear position indicator.
1 When Stopped
NOTICE
The following can damage the driveline:
•Depressing the accelera tor and brake pedals
simultaneously.
•Holding the vehicle in place when facing uphill by
depressing the accelerator pedal.
•Changing into ( P before the vehicle stops
completely.
18 CLARITY PHEV CSS-31TRW6000.book 447 ページ 2017年12月25日 月曜日 午後2時22分
Page 454 of 591
452
uuRefueling uHow to Refuel
Driving
How to Refuel
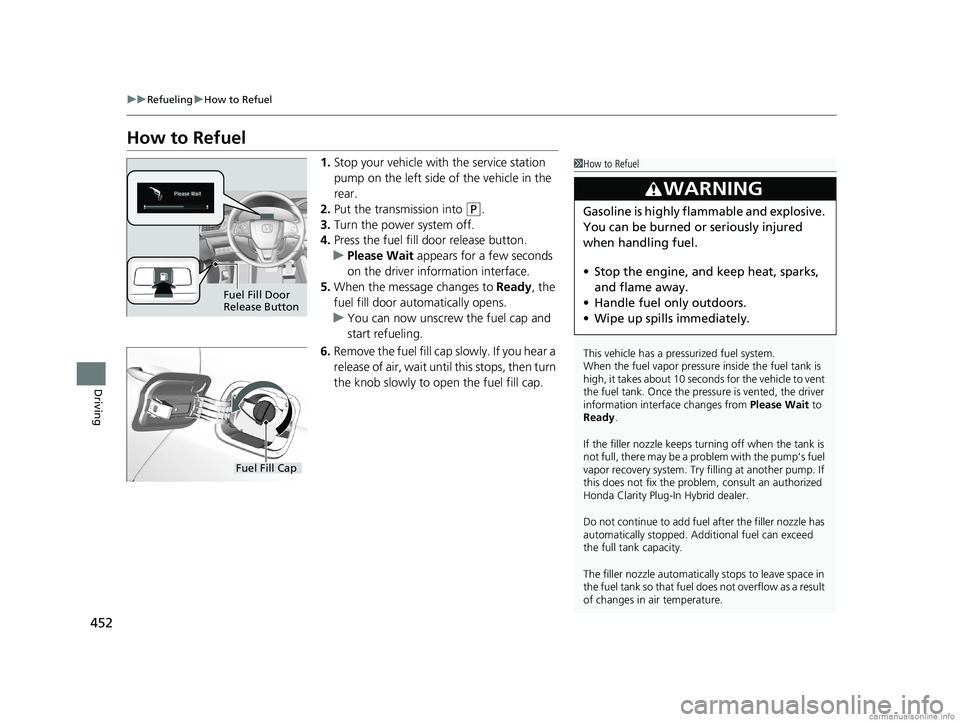
1. Stop your vehicle with the service station
pump on the left side of the vehicle in the
rear.
2. Put the transmission into
(P.
3. Turn the power system off.
4. Press the fuel fill door release button.
u Please Wait appears for a few seconds
on the driver information interface.
5. When the message changes to Ready, the
fuel fill door automatically opens.
u You can now unscrew the fuel cap and
start refueling.
6. Remove the fuel fill cap slowly. If you hear a
release of air, wait unt il this stops, then turn
the knob slowly to open the fuel fill cap.
1 How to Refuel
This vehicle has a pressurized fuel system.
When the fuel vapor pressure inside the fuel tank is
high, it takes about 10 seconds for the vehicle to vent
the fuel tank. Once the pressure is vented, the driver
information interface changes from Please Wait to
Ready.
If the filler nozzle keeps tu rning off when the tank is
not full, there may be a problem with the pump's fuel
vapor recovery system. Try fi lling at another pump. If
this does not fix the problem, consult an authorized
Honda Clarity Plug-In Hybrid dealer.
Do not continue to add fuel after the filler nozzle has
automatically stopped. Addi tional fuel can exceed
the full tank capacity.
The filler nozzle automatically stops to leave space in
the fuel tank so that fuel does not overflow as a result
of changes in air temperature.
3WARNING
Gasoline is highly flammable and explosive.
You can be burned or seriously injured
when handling fuel.
• Stop the engine, and keep heat, sparks,
and flame away.
• Handle fuel only outdoors.
• Wipe up spills immediately.
Fuel Fill Door
Release Button
Fuel Fill Cap
18 CLARITY PHEV CSS-31TRW6000.book 452 ページ 2017年12月25日 月曜日 午後2時22分
Page 456 of 591
454
Driving
Charging
Before Charging
Check the following items before you start charging your vehicle.
•Make sure to use a dedicated and properly grounded circuit, that is rated for at
least 15 amps.
u Have an electrician inspect the outlet you are using to see if it meets these
criteria.
• Make sure you plug the charging cable dire ctly into the wall outlet dedicated to
vehicle charging.
u Do not use extension cords, adaptors , or multi-outlet plugs between the
charging cable and the outlet.
• Make sure the charging cable is fully uncoiled before use.
• Make sure the control box, charging connec tor, and charging cable are free from
any damage, including cracks or frays.
u If you find any damage to the devices, contact an authorized Honda Clarity
Plug-In Hybrid dealer.
• Make sure the charging connector and inlet are clean.
u If you find any contamination or fore ign object in the connector or inlet,
contact an authorized Honda Clarity Plug-In Hybrid dealer.
• Make sure the charging cable is dry.
u Check that there is no water in the i mmediate area, and that your hands are
dry.
Note: Outlet needs to be in good shape. Worn or damaged outlet will not make
good contact with the plug. Ensure that the plug is fully inserted and does not come
out of the outlet after installation. A loose connection will cause excessive heat build
up within the plug and damage it.
■Safety Checklist
1 Charging
3WARNING
Using a 120 volt wall outlet that is rated less
than 15 amps or one that is powering other
devices can cause a fire, seriously injuring
you or others.
When using the 120 volt charger, use a
dedicated and properly grounded circuit
rated 15 amps or more. Consult an
electrician if yo u are not sure.
18 CLARITY PHEV CSS-31TRW6000.book 454 ページ 2017年12月25日 月曜日 午後2時22分
Page 457 of 591
455
uuCharging uCharge the High Voltage battery using a Level 1 or 2 charger
Continued
Driving
Charge the High Voltage battery using a Level 1 or 2
charger
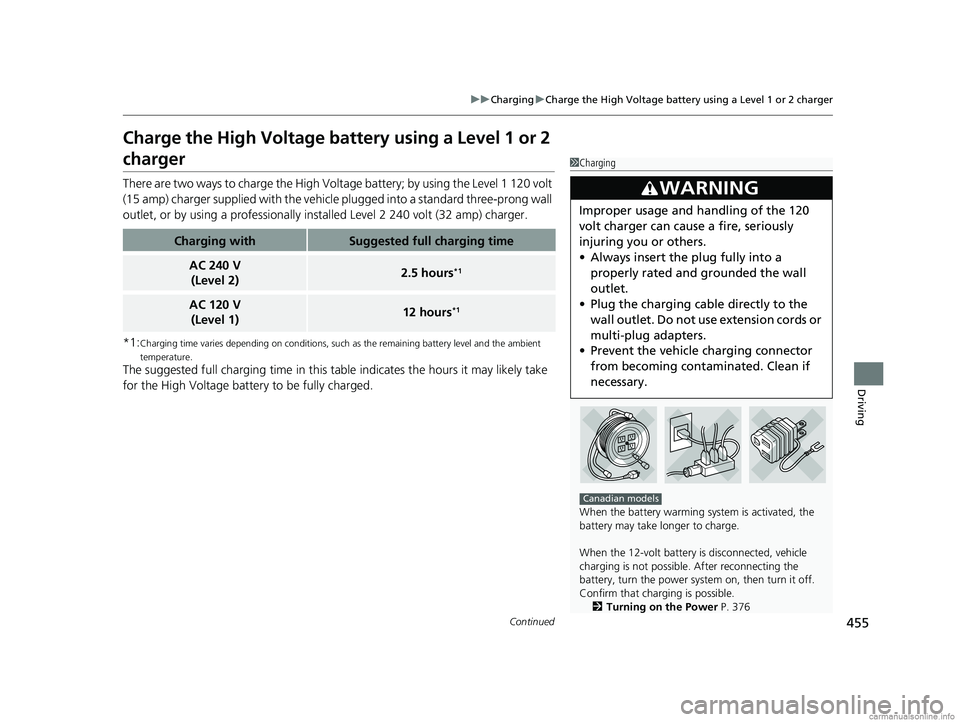
There are two ways to charge the High Volt age battery; by using the Level 1 120 volt
(15 amp) charger supplied with the vehicle plugged into a standard three-prong wall
outlet, or by using a professionally inst alled Level 2 240 volt (32 amp) charger.
*1:
Charging time varies depending on conditions, such as the remaining battery level and the ambient
temperature.
The suggested full charging time in this table indicates the hours it may likely take
for the High Voltage batte ry to be fully charged.
Charging withSuggested full charging time
AC 240 V
(Level 2)2.5 hours*1
AC 120 V(Level 1)12 hours*1
1 Charging
When the battery warming system is activated, the
battery may take longer to charge.
When the 12-volt battery is disconnected, vehicle
charging is not possible. After reconnecting the
battery, turn the power system on, then turn it off.
Confirm that charging is possible.
2 Turning on the Power P. 376
3WARNING
Improper usage and handling of the 120
volt charger can cause a fire, seriously
injuring you or others.
•Always insert the plug fully into a
properly rated and grounded the wall
outlet.
• Plug the charging cable directly to the
wall outlet. Do not use extension cords or
multi-plug adapters.
• Prevent the vehicle charging connector
from becoming contaminated. Clean if
necessary.
Canadian models
18 CLARITY PHEV CSS-31TRW6000.book 455 ページ 2017年12月25日 月曜日 午後2時22分
Page 458 of 591
uuCharging uCharge the High Voltage battery using a Level 1 or 2 charger
456
Driving
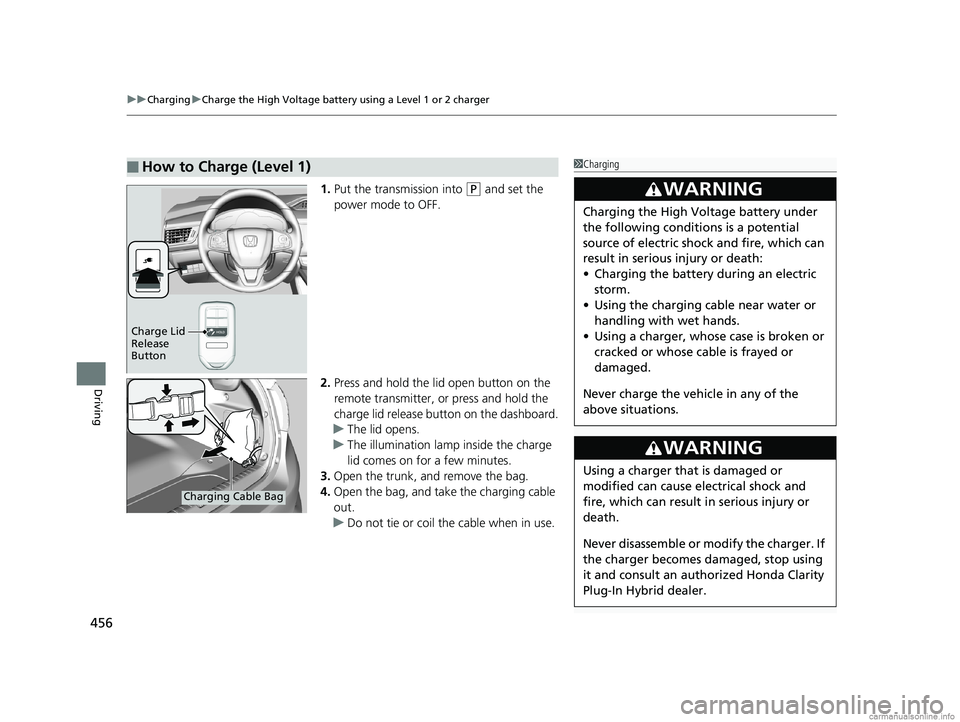
1. Put the transmission into (P and set the
power mode to OFF.
2. Press and hold the lid open button on the
remote transmitter, or press and hold the
charge lid release button on the dashboard.
u The lid opens.
u The illumination lamp inside the charge
lid comes on for a few minutes.
3. Open the trunk, and remove the bag.
4. Open the bag, and take the charging cable
out.
u Do not tie or coil the cable when in use.
■How to Charge (Level 1)1Charging
3WARNING
Charging the High Vo ltage battery under
the following conditions is a potential
source of electric shock and fire, which can
result in serious injury or death:
• Charging the battery during an electric
storm.
• Using the charging cable near water or
handling with wet hands.
• Using a charger, whose case is broken or
cracked or whose cable is frayed or
damaged.
Never charge the vehi cle in any of the
above situations.
3WARNING
Using a charger that is damaged or
modified can cause electrical shock and
fire, which can result in serious injury or
death.
Never disassemble or modify the charger. If
the charger becomes damaged, stop using
it and consult an authorized Honda Clarity
Plug-In Hybrid dealer.
Charge Lid
Release
Button
Charging Cable Bag
18 CLARITY PHEV CSS-31TRW6000.book 456 ページ 2017年12月25日 月曜日 午後2時22分