2018 HONDA CLARITY PLUG-IN seats
[x] Cancel search: seatsPage 182 of 591
180
uuAdjusting the Seats uMaintain a Proper Sitting Position
Controls
Maintain a Proper Sitting Position
After all occupants have adjusted their seats and head restraints, and put on their
seat belts, it is very important that they continue to sit upright, well back in their
seats, with their feet on the floor, until the vehicle is safely parked and the power
system is off.
Sitting improperly can increase the chance of injury during a crash. For example, if
an occupant slouches, lies down, turns si deways, sits forward, leans forward or
sideways, or puts one or both feet up, the chance of injury during a crash is greatly
increased.
In addition, an occupant who is out of position in the front seat can be seriously or
fatally injured in a crash by striking interior parts of the vehicle or being struck by an
inflating front airbag.1 Maintain a Proper Sitting Position
3WARNING
Sitting improperly or out of position can
result in serious injury or death in a crash.
Always sit upright, well back in the seat,
with your feet on the floor.
18 CLARITY PHEV CSS-31TRW6000.book 180 ページ 2017年12月25日 月曜日 午後2時22分
Page 183 of 591

181
uuAdjusting the Seats uRear Seats
Controls
Rear Seats
1. Remove the center shoulder belt from the
guide.
2. Pull the release lever in the trunk to release
the lock.
3. Fold the seat-back down.
■60/40 Split Folding Down the Rear Seats160/40 Split Folding Down the Rear Seats
The rear seat-back(s) can be folded down to
accommodate bulkier items in the trunk.
Never drive with a seat-back folded down and the
trunk lid open.
2 Exhaust Gas Hazard P. 82
To lock the seat-back upri ght, push it backwards until
it locks.
When returning a seat-back to its original position,
push it firmly back. Also, m ake sure all rear shoulder
belts are positioned in front of the seat-back, and the
center shoulder belt is re -positioned in the guide.
Make sure that the folded seat-back does not press
against the front passenger se at, as this can cause the
weight sensors in the front passenger seat to work
improperly. 2 Passenger Front Airbag Off Indicator P. 67
Also make sure all items in the trunk or items
extending through the opening into the rear
seats are properly secured. Loose items can fly
forward if you have to brake hard.
The front seat(s) must be far enough forward so they
do not interfere with the rear seats as they fold
down.
Center
Shoulder Belt
Guide
Release
Lever
18 CLARITY PHEV CSS-31TRW6000.book 181 ページ 2017年12月25日 月曜日 午後2時22分
Page 184 of 591
182
uuAdjusting the Seats uArmrest
Controls
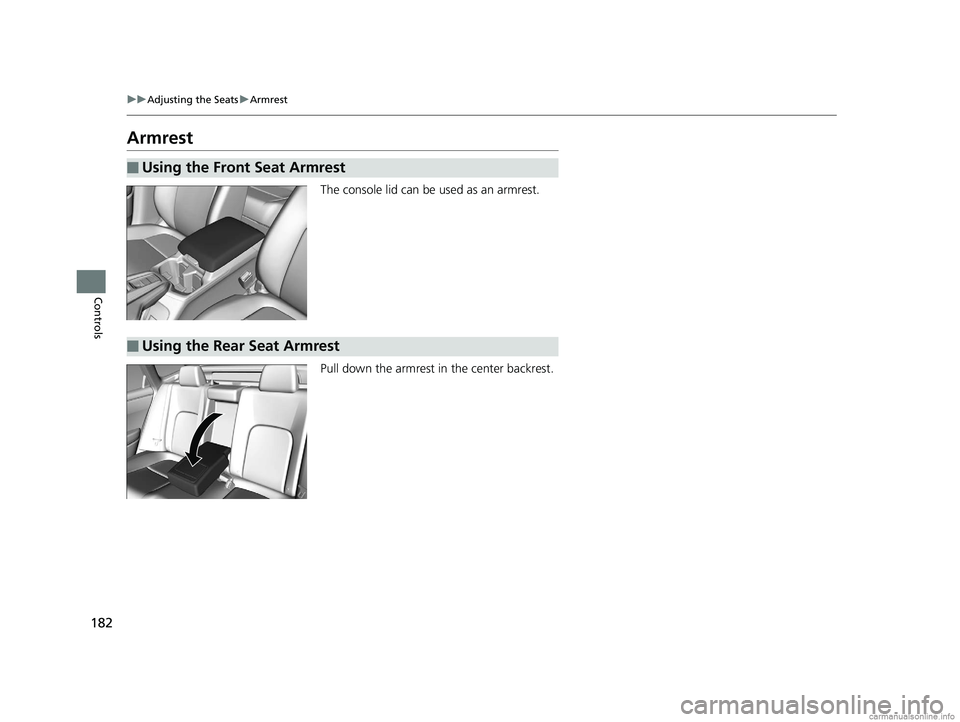
Armrest
The console lid can be used as an armrest.
Pull down the armrest in the center backrest.
■Using the Front Seat Armrest
■Using the Rear Seat Armrest
18 CLARITY PHEV CSS-31TRW6000.book 182 ページ 2017年12月25日 月曜日 午後2時22分
Page 373 of 591
Continued371
uuBefore Driving uDriving Preparation
Driving
• Store or secure all items on board properly.
u Carrying too much cargo, or improperly storing it, can affect your vehicle’s
handling, stability, sto pping distance, and tires, and make it unsafe.
2Maximum Load Limit P. 373
•Do not pile items higher than the seat height.
u They can block your view and may be thrown forward in the event of sudden
braking.
• Do not place anything in the front seat footwells. Make sure to secure the floor
mat.
u An object or unsecured floor mat can in terfere with your brake and accelerator
pedal operation while driving.
• If you have any animals on board, do not let them move around in the vehicle.
u They may interfere with driving and a crash could occur.
• Securely close and lock all doors and the trunk.
2 Locking/Unlocking the Doors from the Inside P. 146
•Adjust your seating position properly.
u Adjust the head restraint, too.
2Adjusting the Seats P. 175
2 Adjusting the Front Head Restraints Positions P. 178
•Adjust the mirrors and steering wh eel properly for your driving.
u Adjust them while sitting in the proper driving position.
2 Adjusting the Mirrors P. 173
2 Adjusting the Steering Wheel P. 172
■Interior Checks1Interior Checks
The headlight aim is set by the factory, and does not
need to be adjusted. Howeve r, if you regularly carry
heavy items in the trunk, have the aiming readjusted
at an authorized Honda Clar ity Plug-In Hybrid dealer
or by a qualif ied technician.
18 CLARITY PHEV CSS-31TRW6000.book 371 ページ 2017年12月25日 月曜日 午後2時22分
Page 374 of 591
372
uuBefore Driving uDriving Preparation
Driving
• Be sure items placed on the floor behind the front seats cannot roll under the
seats.
u They can interfere with the driver’s ability to operate the pedals, the operation
of the seats, or the operation of the sensors under the seats.
• Everyone in the vehicle must fasten their seat belt.
2Fastening a Seat Belt P. 50
•Make sure that the indicators in the ins trument panel come on when you start the
vehicle, and go off soon after.
u Always have an authorized Honda Clar ity Plug-In Hybrid dealer check the
vehicle if a problem is indicated.
2 Indicators P. 86
18 CLARITY PHEV CSS-31TRW6000.book 372 ページ 2017年12月25日 月曜日 午後2時22分
Page 516 of 591
uuCleaning uInterior Care
514
Maintenance
Wipe using a glass cleaner.
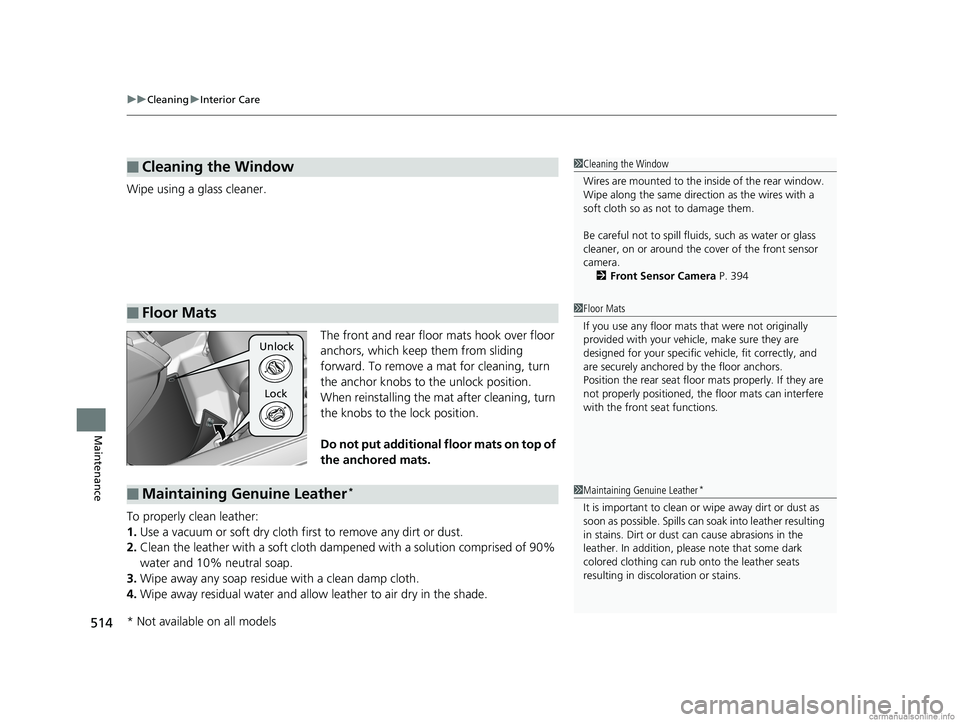
The front and rear floor mats hook over floor
anchors, which keep them from sliding
forward. To remove a mat for cleaning, turn
the anchor knobs to the unlock position.
When reinstalling the mat after cleaning, turn
the knobs to the lock position.
Do not put additional floor mats on top of
the anchored mats.
To properly clean leather:
1. Use a vacuum or soft dry cloth first to remove any dirt or dust.
2. Clean the leather with a soft cloth dampen ed with a solution comprised of 90%
water and 10% neutral soap.
3. Wipe away any soap residu e with a clean damp cloth.
4. Wipe away residual water and allow leather to air dry in the shade.
■Cleaning the Window
■Floor Mats
1Cleaning the Window
Wires are mounted to the in side of the rear window.
Wipe along the same direct ion as the wires with a
soft cloth so as not to damage them.
Be careful not to spill fluids, such as water or glass
cleaner, on or around the cover of the front sensor
camera. 2 Front Sensor Camera P. 394
1Floor Mats
If you use any floor mats that were not originally
provided with your vehicle, make sure they are
designed for your specific ve hicle, fit correctly, and
are securely anchored by the floor anchors.
Position the rear seat floor mats properly. If they are
not properly positioned, the floor mats can interfere
with the front seat functions.
Unlock
Lock
■Maintaining Genuine Leather*1 Maintaining Genuine Leather*
It is important to clean or wipe away dirt or dust as
soon as possible. Spills can soak into leather resulting
in stains. Dirt or dust ca n cause abrasions in the
leather. In addition, pl ease note that some dark
colored clothing can rub onto the leather seats
resulting in discol oration or stains.
* Not available on all models
18 CLARITY PHEV CSS-31TRW6000.book 514 ページ 2017年12月25日 月曜日 午後2時22分
Page 521 of 591
519
Maintenance
Accessories and Modifications
Accessories
When installing accessories, check the following:
• Do not install accessories on the windsh ield. They can obstruct your view and
delay your reaction to driving conditions.
• Do not install any accessories over areas marked SRS Airbag, on the sides or backs
of the front seats, on front or side pillars, or near the side windows. Accessories
installed in these areas may interfere with proper operation of the vehicle’s
airbags or may be propelled into you or another occupant if the airbags deploy.
• Be sure electronic accessories do not overload electrical circuits or interfere with
proper operation of your vehicle.
2 Fuses P. 553
•Before installing any electronic accessory, have the installer contact an authorized
Honda Clarity Plug-In Hybrid dealer for assi stance. If possible, have an authorized
Honda Clarity Plug-In Hybrid dealer inspect the final installation.
1 Accessories and Modifications
Honda Genuine accessor ies are recommended to
ensure proper operati on on your vehicle.
3WARNING
Improper accessories or modifications can
affect your vehicle’s handling, stability, and
performance, and cause a crash in which
you can be seriously hurt or killed.
Follow all instruction s in this owner’s
manual regarding accessories and
modifications.
3WARNING
Use of improperly designed, engineered or
manufactured high-voltage battery
assemblies could cause a fire in your
vehicle.
A vehicle fire could result in a crash or
injury.
Only use a genuine Honda high-voltage
battery assembly, or it s equivalent, in your
vehicle.
18 CLARITY PHEV CSS-31TRW6000.book 519 ページ 2017年12月25日 月曜日 午後2時22分
Page 581 of 591

Index
579
Index
Index
Numbers
120V AC (AC Level 1)............................... 456
12-Volt Battery Charging System Indicator ................................................... 90
240V AC (AC Level 2) ............................... 459
A
ABS (Anti-lock Brake System) .................. 437
Accessories and Modifications ................ 519
Accessory Power Sockets ......................... 189
Acoustic Vehicle Alerting System ............ 393
Adaptive Cruise Control (ACC) with Low
Speed Follow (LSF) ................................. 400
Indicator ................................................. 100
Additives
Coolant .................................................. 488
Engine Oil ............................................... 482
Washer ................................................... 493
Additives, Engine Oil ............................... 482
Adjusting
Armrest .................................................. 182
Front Seats.............................................. 175
Head Restraints ....................................... 178
Mirrors.................................................... 173
Steering Wheel ....................................... 172
Temperature ........................................... 126
Agile Handling Assist ............................... 424
Air Conditioning System (Climate Control System) .................................................... 193
Changing the Mode................................ 195 Defrosting the Windshield and
Windows ............................................... 197
Dust and Pollen Filter ............................... 512
Sensors .................................................... 201
Synchronized Mode ................................. 198
Using Automatic Climate Control ............ 193
Air Pressure ....................................... 500, 567
Airbags ........................................................ 54
Advanced Airbags ..................................... 60
Airbag Care ............................................... 68
Driver’s Knee Airbag .................................. 61
Event Data Recorder .................................... 0
Front Airbags (SRS) .................................... 57
Indicator .............................................. 66, 94
Passenger Front Airbag Off Indicator ......... 67
Sensors ...................................................... 54
Side Airbags .............................................. 63
Side Curtain Airbags .................................. 65
AM/FM Radio ............................................ 243
Android Auto ............................................ 280
Anti-lock Brake System (ABS) .................. 437
Indicator .................................................... 93
Apple CarPlay ........................................... 277
Armrest ..................................................... 182
Audio Remote Controls ............................ 207
Audio System .................................... 204, 210
Adjusting the Sound ................................ 236
Audio/Information Screen ........................ 211
Changing the Home Screen Icon Layout .. 219
Changing the Screen Interface ................. 233
Closing Apps ........................................... 235 Customizing the Meter............................ 219
Display Setup .......................................... 237
Error Messages ........................................ 284
General Information ................................ 288
Home Screen........................................... 225
Limitations for Manual Operation ............ 238
Menu Customize ..................................... 234
MP3/WMA/AAC ...................................... 264
Reactivating ............................................ 206
Recommended Devices............................ 290
Remote Controls ..................................... 207
Security Code .......................................... 206
Selecting an Audio Source ....................... 238
Status Area ............................................. 232
Theft Protection ...................................... 206
USB Flash Drives ...................................... 290
USB Port.................................................. 205
Voice Control Operation.......................... 239
Wallpaper Setup...................................... 223
Audio/Information Screen ....................... 211
Authorized Manuals ................................ 576
Auto Door Locking/Unlocking ................. 149
Automatic Brake Hold ............................. 435
Indicator............................................ 87, 435
Automatic Brake Hold System
Indicator............................................ 87, 435
Automatic Lighting .................................. 163
Average Fuel Economy ............................ 126
Average Fuel Economy Records .............. 129
Average Speed ......................................... 127
18 CLARITY PHEV CSS-31TRW6000.book 579 ページ 2017年12月25日 月曜日 午後2時22分