Page 6 of 559
Contents
This owner’s manual should be considered a permanent part of the
vehicle and should remain with the vehicle when it is sold.
This owner’s manual covers all models of your vehicle. You may find
descriptions of equipment and features that are not on your
particular model.
Images throughout this owner’s manual (including the front cover)
represent features and equipment that are available on some, but
not all, models. Your particular mo del may not have some of these
features.
The information and specifications in cluded in this publication were
in effect at the time of approval for printing. Honda Motor Co., Ltd.
reserves the right, however, to discontinue or change specifications
or design at any time without notice and without incurring any
obligation.2 Safe Driving P. 39
For Safe Driving P. 40 Seat Belts P. 44 Airbags P. 52
2Instrument Panel P. 81
Indicators P. 82 Gauges and Driver Information Interface P. 116
2Controls P. 129
Clock P. 130 Locking and Unlocking the Doors P. 131
Operating the Switches Around the Steering Wheel P. 152
Interior Lights/Interior Convenience Items P. 176
2 Features P. 195
Audio System P. 196 Audio System Basic Operation P. 202
Customized Features P. 296 HomeLink® Universal Transceiver P. 322
2 Driving P. 359
Before Driving P. 360 Towing a Trailer P. 365
Multi-View Rear Camera P. 438 Charging P. 440
2 Maintenance P. 457
Before Performing Maintenance P. 458 Maintenance MinderTM P. 461
Checking and Maintaining Wiper Blades P. 472
Climate Control System Main tenance P. 487 Cleaning P. 488
2Handling the Unexpected P. 497
If a Tire Goes Flat P. 498 Handling of the Jack P. 510
Indicator, Coming On/Blinking P. 518 Fuses P. 524
When You Cannot Disengage the Charging Connector P. 533
2Information P. 535
Specifications P. 536 Identification Numbers P. 538
Warranty Coverages P. 541 Authorized Manuals P. 543
18 CLARITY ELECTRIC CSS-31TRV6100.book 4 ページ 2018年2月5日 月曜日 午後12時0分
Page 10 of 559
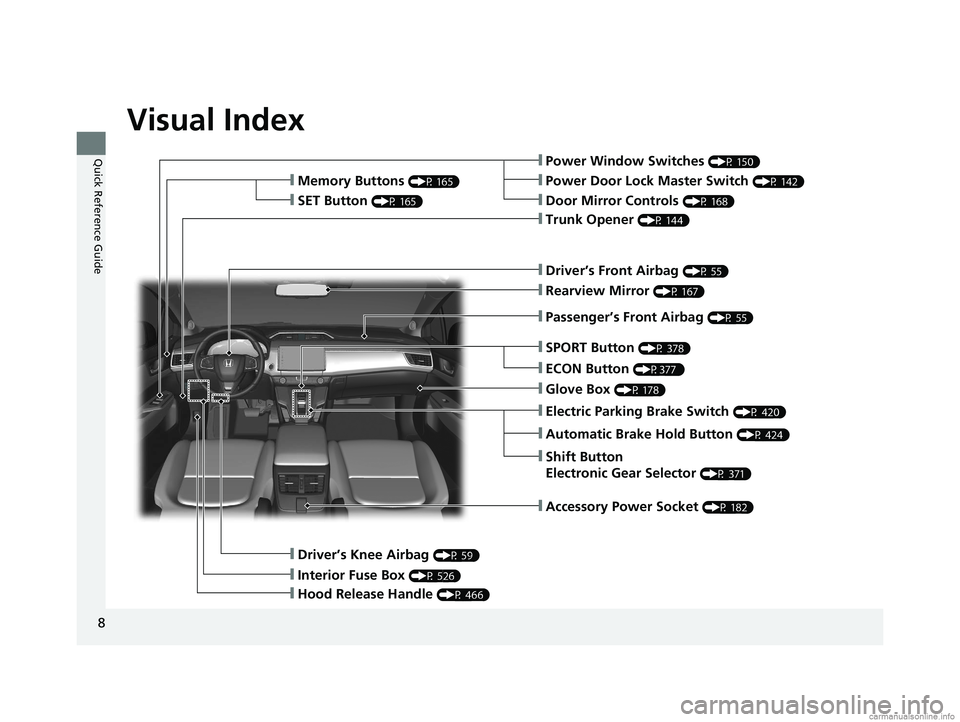
Visual Index
8
Quick Reference Guide❙Power Window Switches (P 150)
❙Trunk Opener (P 144)
❙Driver’s Knee Airbag (P 59)
❙Door Mirror Controls (P 168)
❙Power Door Lock Master Switch (P 142)❙Memory Buttons (P 165)
❙SET Button (P 165)
❙Interior Fuse Box (P 526)
❙Automatic Brake Hold Button (P 424)
❙Driver’s Front Airbag (P 55)
❙Passenger’s Front Airbag (P 55)
❙Rearview Mirror (P 167)
❙SPORT Button (P 378)
❙Glove Box (P 178)
❙Electric Parking Brake Switch (P 420)
❙Shift Button
Electronic Gear Selector
(P 371)
❙Accessory Power Socket (P 182)
❙Hood Release Handle (P 466)
❙ECON Button (P377 )
18 CLARITY ELECTRIC CSS-31TRV6100.book 8 ページ 2018年2月5日 月曜日 午後12時0分
Page 12 of 559
Visual Index
10
Quick Reference Guide
❙Maintenance Under the Hood (P 465)
❙Windshield Wipers (P 160, 472)
❙Tires (P 475, 498)
❙Door Lock/Unlock Control (P 133)
❙Power Door Mirrors (P 168)
❙Headlights (P 156, 470)
❙Front Turn Signal Lights (P 155, 470)
❙Parking/Daytime Running Lights (P 156, 159, 470)
❙Front Side Marker Lights (P 156, 470)
❙How to Charge (P442, 444)
18 CLARITY ELECTRIC CSS-31TRV6100.book 10 ページ 2018年2月5日 月曜日 午後12時0分
Page 23 of 559
21
Quick Reference Guide
Drive Cycle Score/Lifetime Points
●Appears when the power mode is in VEHICLE OFF (LOCK).
Eco Drive Display (P126)
The vehicle icon in the display moves forward and back.
● When you accelerate and decelerate, the icon moves forward and ba ck respectively. The greater the acceleration or deceleration,
the greater the icon moves.
● You can maintain better energy efficiency by keeping the icon in the center.
Aggressive Deceleration Energy-Effici ent Driving Aggressive Acceleration
Moderate
Deceleration Moderate
AccelerationLifetime Points
Drive Cycle Score
18 CLARITY ELECTRIC CSS-31TRV6100.book 21 ページ 2018年2月5日 月曜日 午後12時0分
Page 25 of 559
23
Quick Reference Guide
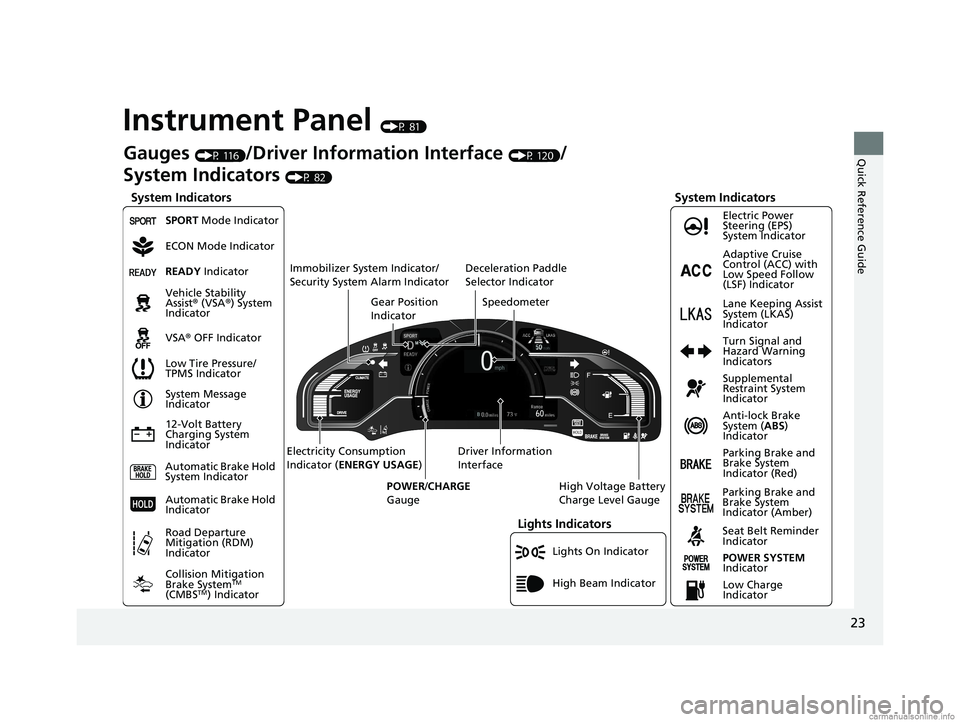
Instrument Panel (P 81)
Lights On Indicator
System Indicators
12-Volt Battery
Charging System
IndicatorAnti-lock Brake
System (
ABS)
Indicator
Vehicle Stability
Assist
® (VSA ®) System
Indicator
VSA ® OFF Indicator Electric Power
Steering (EPS)
System Indicator
Lights Indicators
High Beam Indicator
Seat Belt Reminder
Indicator
System Indicators
System Message
Indicator
Parking Brake and
Brake System
Indicator (Red) Supplemental
Restraint System
Indicator
Gauges (P 116)/Driver Information Interface (P 120)/
System Indicators
(P 82)
Low Tire Pressure/
TPMS Indicator Turn Signal and
Hazard Warning
Indicators
Speedometer
Automatic Brake Hold
System Indicator Parking Brake and
Brake System
Indicator (Amber)
SPORT Mode Indicator
Collision Mitigation
Brake System
TM
(CMBSTM) Indicator
Road Departure
Mitigation (RDM)
Indicator
Immobilizer System Indicator/
Security System Alarm Indicator
Automatic Brake Hold
IndicatorREADY Indicator
POWER SYSTEM
Indicator
Gear Position
Indicator
High Voltage Battery
Charge Level Gauge
Driver Information
Interface
Electricity Consumption
Indicator (
ENERGY USAGE )
POWER /CHARGE
Gauge
Low Charge
Indicator Adaptive Cruise
Control (ACC) with
Low Speed Follow
(LSF) Indicator
Lane Keeping Assist
System (LKAS)
Indicator
Deceleration Paddle
Selector Indicator
ECON Mode Indicator
18 CLARITY ELECTRIC CSS-31TRV6100.book 23 ページ 2018年2月5日 月曜日 午後12時0分
Page 26 of 559
24
Quick Reference Guide
Controls (P 129)
Clock (P 130)
The navigation system receives signals from
GPS satellites, updating the clock
automatically.
You can also adjust the time manually.
aSelect the (Home) icon, then select
Settings .
bSelect Clock, then Clock Adjustment .
cTouch the respective / icon to
adjust the hours or minutes up or
down.
dSelect OK.
43
POWER Button (P 152)
Press the button to change the vehicle’s
power mode.Turn Signals (P 155)
Lights (P 156)
Turn Signal Control Lever
Right
Left
Light Control Switches
Low Beam High Beam
Flashing
18 CLARITY ELECTRIC CSS-31TRV6100.book 24 ページ 2018年2月5日 月曜日 午後12時0分
Page 27 of 559
25
Quick Reference Guide
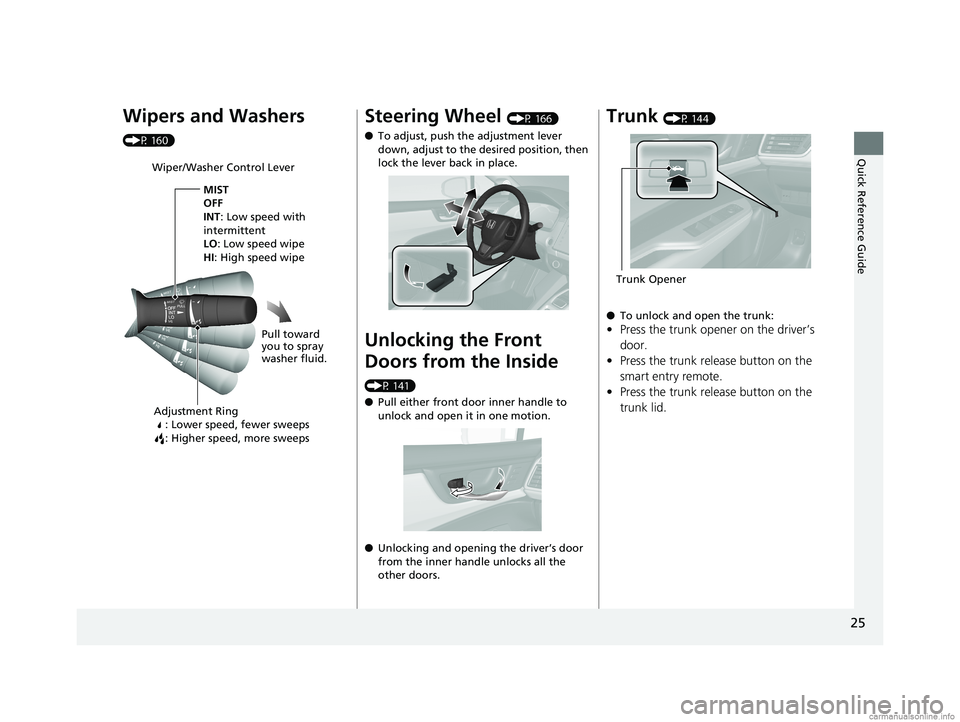
Wipers and Washers
(P 160)
Wiper/Washer Control LeverAdjustment Ring : Lower speed, fewer sweeps
: Higher speed, more sweeps
MIST
OFF
INT: Low speed with
intermittent
LO : Low speed wipe
HI: High speed wipe
Pull toward
you to spray
washer fluid.
Steering Wheel (P 166)
● To adjust, push the adjustment lever
down, adjust to the desired position, then
lock the lever back in place.
Unlocking the Front
Doors from the Inside
(P 141)
●Pull either front door inner handle to
unlock and open it in one motion.
● Unlocking and opening the driver’s door
from the inner handle unlocks all the
other doors.
Trunk (P 144)
● To unlock and open the trunk:
•Press the trunk opener on the driver’s
door.
• Press the trunk release button on the
smart entry remote.
• Press the trunk release button on the
trunk lid.
Trunk Opener
18 CLARITY ELECTRIC CSS-31TRV6100.book 25 ページ 2018年2月5日 月曜日 午後12時0分
Page 28 of 559
26
Quick Reference Guide
Power Door Mirrors
(P 168)
●With the power mode in ON, move the
selector switch to L or R .
● Push the appropriate edge of the
adjustment switch to adjust the mirror.
Selector Switch
Adjustment Switch
Power Windows (P 150)
● With the power mode in ON, open and
close the power windows.
● If the power window lock button is in the
off position, each passenger’s window
can be opened and closed with its own
switch.
● If the power window lock button is in the
on position (indicator on), each
passenger’s window switch is disabled.
Power Window Lock Button
Window SwitchIndicator
18 CLARITY ELECTRIC CSS-31TRV6100.book 26 ページ 2018年2月5日 月曜日 午後12時0分