2018 HONDA CLARITY ELECTRIC warning
[x] Cancel search: warningPage 481 of 559
479
uuChecking and Maintaining Tires uDOT Tire Quality Grading (U.S. Vehicles)
Maintenance
The traction grades, from highest to lowest, are AA, A, B, and C.
Those grades represent the tire’s ability to stop on wet pavement
as measured under controlled conditions on specified
government test surfaces of asph alt and concrete. A tire marked
C may have poor traction performance.
The temperature grades are A (the highest), B, and C,
representing the tire’s resistance to the generation of heat and its
ability to dissipate heat when te sted under controlled conditions
on a specified indoor laboratory test wheel. Sustained high
temperature can cause the material of the tire to degenerate and
reduce tire life, and ex cessive temperature can lead to sudden tire
failure. The grade C corresponds to a level of performance which
all passenger car tires must meet under the Federal Motor Vehicle
Safety Standard No. 109. Grades B and A represent higher levels
of performance on the laboratory test wheel than the minimum
required by law.
■Traction
■Temperature
1 Traction
Warning: The traction grade
assigned to this tire is based on
straight-ahead braking traction tests,
and does not include acceleration,
cornering, hydroplaning, or peak
traction characteristics.
1Temperature
Warning: The temperature grade for
this tire is establishe d for a tire that is
properly inflated and not
overloaded. Excessive speed,
underinflation, or excessive loading,
either separately or in combination,
can cause heat buildup and possible
tire failure.
18 CLARITY ELECTRIC CSS-31TRV6100.book 479 ページ 2018年2月5日 月曜日 午後12時0分
Page 483 of 559
481
uuChecking and Maintaining Tires uTire and Wheel Replacement
Maintenance
Tire and Wheel Replacement
Replace your tires with radials of the same size, load range, speed rating, and
maximum cold tire pressure rating (as shown on the tire’s sidewall). Using tires of a
different size or construction can cause ce rtain vehicle systems such as the ABS and
Vehicle Stability Assist ® (VSA ®) system to work incorrectly.
It is best to replace all four tires at the same time. If that isn’t possible, replace the
front or rear tires in pairs.
Make sure that the wheel’s specifications match those of the original wheels.1 Tire and Wheel Replacement
3WARNING
Installing improper tires on your vehicle can
affect handling and stability. This can cause
a crash in which you can be seriously hurt or
killed.
Always use the size and type of tires
recommended in this owner’s manual.
18 CLARITY ELECTRIC CSS-31TRV6100.book 481 ページ 2018年2月5日 月曜日 午後12時0分
Page 485 of 559
483
uuChecking and Maintaining Tires uWinter Tires
Maintenance
Winter Tires
If driving on snowy or frozen roads, mount all season marked M+S tires, snow tires,
or tire chains; reduce speed; and maintain sufficient distance between vehicles when
driving.
Be particularly careful wh en operating the steering wheel or brakes to prevent
skidding.
Use tire chains, snow tires, or all season tires when necessary or according to the law.
When mounting, refer to the following points.
For winter tires:
• Select the size and load ranges that are the same as the original tires.
• Mount the tires to all four wheels.
For tire chains:
• Install them on the front tires only.
• Because your vehicle has limited tire clea rance, we strongly recommend using the
chains listed below:
• Follow the chain manufactur er’s instruction when installing. Mount them as
tightly as you can.
• Check that the chains do not touc h the brake lines or suspension.
• Drive slowly.
Cable-type: SCC Radial Chain SC1040
1Winter Tires
NOTICE
Traction devices that are th e wrong size or improperly
installed can damage your vehicle’s brake lines,
suspension, body, and wheels. Stop driving if they are
hitting any part of the vehicle.
When tire chains are mounted, follow the chain
manufacturer’s instructi ons regarding vehicle
operational limits.
If your vehicle is equipp ed with summer tires, be
aware that these tires are not designed for winter
driving conditions. For more information, contact an
authorized Honda Clarity Electric dealer.
3WARNING
Using the wrong chains, or not properly
installing chains, can damage the brake
lines and cause a crash in which you can be
seriously injured or killed.
Follow all instruction s in this owner’s
manual regarding the selection and use of
tire chains.
18 CLARITY ELECTRIC CSS-31TRV6100.book 483 ページ 2018年2月5日 月曜日 午後12時0分
Page 486 of 559
484
Maintenance
12-Volt Battery
Checking the 12-Volt Battery
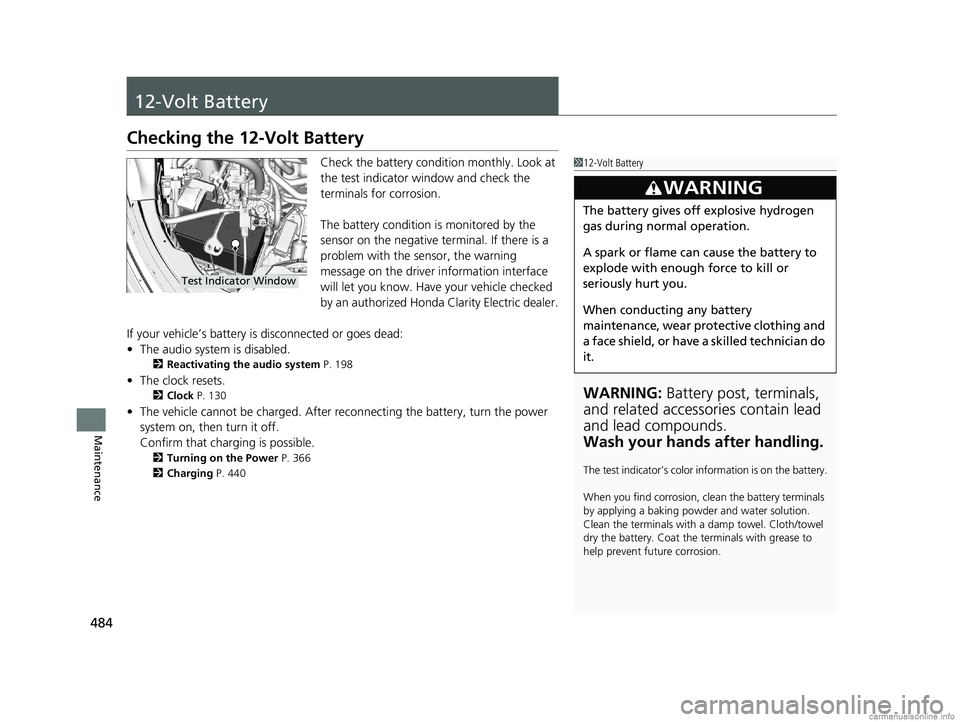
Check the battery condition monthly. Look at
the test indicator window and check the
terminals for corrosion.
The battery condition is monitored by the
sensor on the negative terminal. If there is a
problem with the sensor, the warning
message on the driver information interface
will let you know. Have your vehicle checked
by an authorized Honda Clarity Electric dealer.
If your vehicle’s battery is disconnected or goes dead:
• The audio system is disabled.
2 Reactivating the audio system P. 198
•The clock resets.
2 Clock P. 130
•The vehicle cannot be charged. After reconnecting the batte ry, turn the power
system on, then turn it off.
Confirm that charging is possible.
2 Turning on the Power P. 366
2 Charging P. 440
112-Volt Battery
WARNING: Battery post, terminals,
and related accessories contain lead
and lead compounds.
Wash your hands after handling.
The test indicator’s color in formation is on the battery.
When you find corrosion, cl ean the battery terminals
by applying a baking powder and water solution.
Clean the terminals with a damp towel. Cloth/towel
dry the battery. Coat the terminals with grease to
help prevent future corrosion.
3WARNING
The battery gives off explosive hydrogen
gas during normal operation.
A spark or flame can cause the battery to
explode with enough force to kill or
seriously hurt you.
When conducting any battery
maintenance, wear prot ective clothing and
a face shield, or have a skilled technician do
it.
Test Indicator Window
18 CLARITY ELECTRIC CSS-31TRV6100.book 484 ページ 2018年2月5日 月曜日 午後12時0分
Page 488 of 559
486
Maintenance
Remote Transmitter Care
Replacing the Button Battery
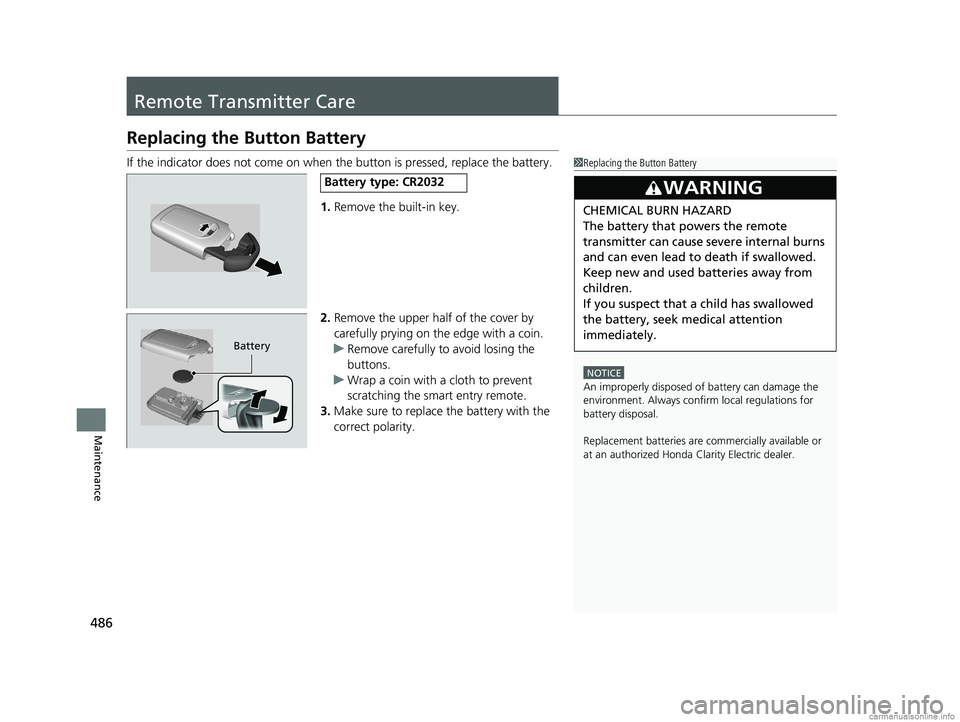
If the indicator does not come on when the button is pressed, replace the battery.
1.Remove the built-in key.
2. Remove the upper half of the cover by
carefully prying on the edge with a coin.
u Remove carefully to avoid losing the
buttons.
u Wrap a coin with a cloth to prevent
scratching the smart entry remote.
3. Make sure to replace the battery with the
correct polarity.1 Replacing the Button Battery
NOTICE
An improperly disposed of battery can damage the
environment. Always conf irm local regulations for
battery disposal.
Replacement batteries are commercially available or
at an authorized Honda Clarity Electric dealer.
3WARNING
CHEMICAL BURN HAZARD
The battery that powers the remote
transmitter can cause severe internal burns
and can even lead to death if swallowed.
Keep new and used batteries away from
children.
If you suspect that a child has swallowed
the battery, seek medical attention
immediately.
Battery type: CR2032
Battery
18 CLARITY ELECTRIC CSS-31TRV6100.book 486 ページ 2018年2月5日 月曜日 午後12時0分
Page 496 of 559
494
Maintenance
Accessories and Modifications
Accessories
When installing accessories, check the following:
• Do not install accessories on the windshield. They can obstruct your view and
delay your reaction to driving conditions. In addition, they may become projectiles
in a crash.
• Do not install any accessorie s over areas marked SRS Airbag, on the sides or backs
of the front seats, on front or side pillars, or near the side windows. Accessories
installed in these areas may interfere with proper operation of the vehicle’s
airbags or may be propelled into you or another occupant if the airbags deploy.
• Be sure electronic accessories do not over load electrical circuits or interfere with
proper operation of your vehicle.
2 Fuses P. 524
•Before installing any electronic accessory, have the installer contact an authorized
Honda Clarity Electric dealer for assistance . If possible, have an authorized Honda
Clarity Electric dealer inspect the final installation.
1 Accessories and Modifications
Honda Genuine accessor ies are recommended to
ensure proper operati on on your vehicle.
3WARNING
Improper accessories or modifications can
affect your vehicle’s handling, stability, and
performance, and cause a crash in which
you can be seriously hurt or killed.
Follow all instruction s in this owner’s
manual regarding accessories and
modifications.
3WARNING
Use of improperly designed, engineered or
manufactured high-voltage battery
assemblies could cause a fire in your
vehicle.
A vehicle fire could result in a crash or
injury.
Only use a genuine Honda high-voltage
battery assembly, or it s equivalent, in your
vehicle.
18 CLARITY ELECTRIC CSS-31TRV6100.book 494 ページ 2018年2月5日 月曜日 午後12時0分
Page 499 of 559
497
Handling the Unexpected
This chapter explains how to handle unexpected troubles.
If a Tire Goes FlatTemporarily Repairi ng a Flat Tire....... 498
Handling of the Jack ......................... 510
Power System Won’t Start Checking the Procedure ................... 511
If the Smart Entry Remote Battery is Weak .......................................... 512
Emergency Power System Off........... 513
Jump Starting .................................... 514
Overheating How to Handle Overheating ............. 517 Indicator, Coming On/Blinking
If the 12-Volt Battery Charging System Indicator Comes On ....................... 518
If the Brake System Indicator (Red) Comes On or Blinks ....................................... 519
If the Electric Power Steering (EPS) System
Indicator Comes On ........................... 520If the Brake System Indicator (Red) Comes On or Blinks at the Same Time
When the Brake System Indicator
(Amber) Comes On ...................... 521
If the Low Tire Pressure/TPMS Indicator
Comes On or Blinks........................ 522 If the Transmission System Indicator Blinks
along with the Warning Message .... 523
Fuses
Fuse Locations ................................. 524
Inspecting and Changing Fuses ........ 530
Emergency Towing ........................... 531
When You Cannot Open the Charge
Lid ................................................. 532
When You Cannot Disengage the Charging
Connector.................................................533When You Cannot Open the Trunk .. 534
18 CLARITY ELECTRIC CSS-31TRV6100.book 497 ページ 2018年2月5日 月曜日 午後12時0分
Page 500 of 559
498
Handling the Unexpected
If a Tire Goes Flat
Temporarily Repairing a Flat Tire
If the tire has a large cut or is otherwise severely damaged, you will need to have the
vehicle towed. If the tire only has a smal l puncture, from a nail for instance, you can
use the temporary tire repair kit so that you can drive to the nearest service station
for a more permanent repair.
If a tire goes flat while driving, grasp the steering wheel firmly, and brake gradually
to reduce speed. Then stop in a safe place.
1. Park the vehicle on a firm, level, and non-slippery surface and apply the parking
brake.
2. Change the gear position to
(P.
3. Turn on the hazard warning lights an d set the power mode to VEHICLE OFF
(LOCK).
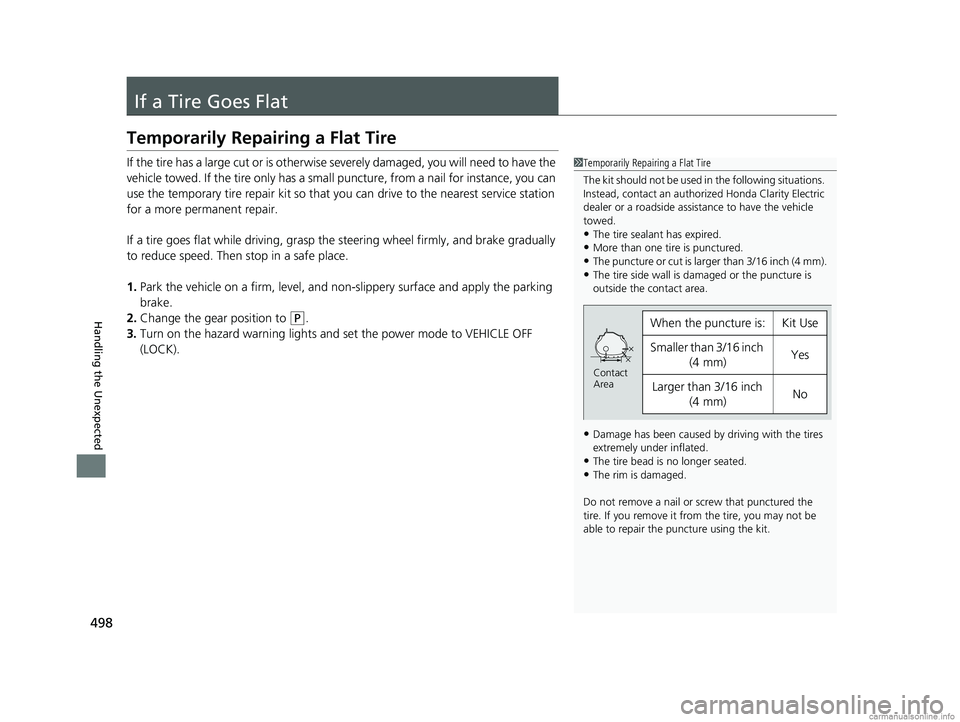
1 Temporarily Repairing a Flat Tire
The kit should not be used in the following situations.
Instead, contact an authorized Honda Clarity Electric
dealer or a roadside assistance to have the vehicle
towed.
•The tire sealant has expired.•More than one tire is punctured.
•The puncture or cut is larger than 3/16 inch (4 mm).
•The tire side wall is da maged or the puncture is
outside the contact area.
•Damage has been caused by driving with the tires
extremely under inflated.
•The tire bead is no longer seated.•The rim is damaged.
Do not remove a nail or screw that punctured the
tire. If you remove it from the tire, you may not be
able to repair the puncture using the kit.
When the puncture is:Kit Use
Smaller than 3/16 inch (4 mm)Yes
Larger than 3/16 inch
(4 mm)No
Contact
Area
18 CLARITY ELECTRIC CSS-31TRV6100.book 498 ページ 2018年2月5日 月曜日 午後12時0分