2018 HONDA CLARITY ELECTRIC turn signal
[x] Cancel search: turn signalPage 406 of 559
404
uuWhen Driving uLane Keeping Assist System (LKAS)
Driving
Lane Keeping Assist System (LKAS)
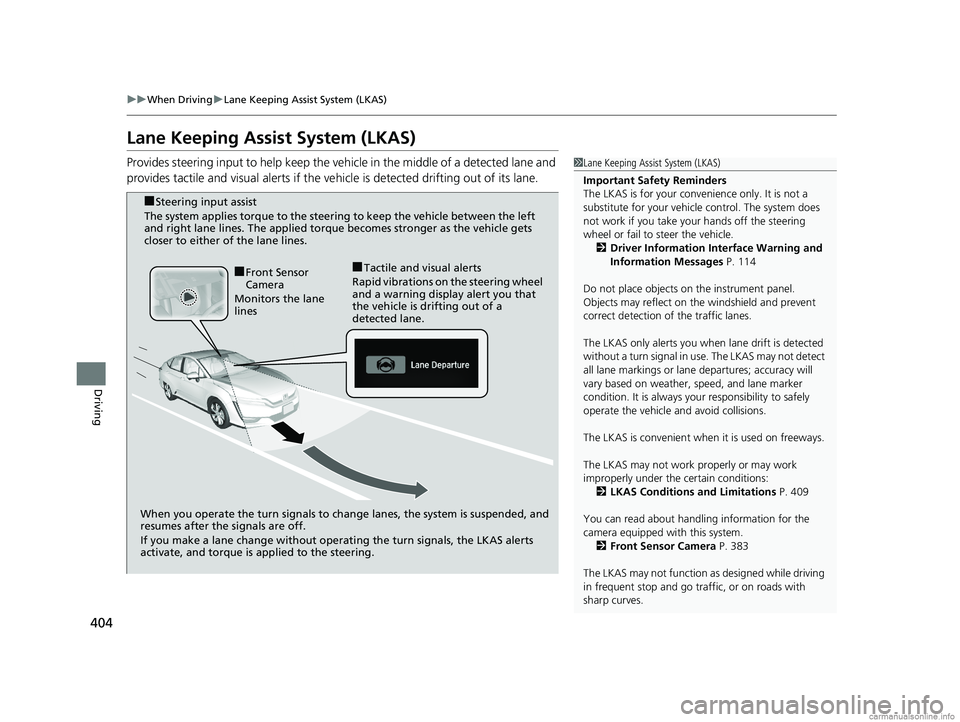
Provides steering input to help keep the vehicle in the middle of a detected lane and
provides tactile and visual alerts if the ve hicle is detected drifting out of its lane.1Lane Keeping Assist System (LKAS)
Important Safety Reminders
The LKAS is for your convenience only. It is not a
substitute for your vehicle control. The system does
not work if you take y our hands off the steering
wheel or fail to steer the vehicle. 2 Driver Information Interface Warning and
Information Messages P. 114
Do not place objects on the instrument panel.
Objects may reflect on th e windshield and prevent
correct detection of the traffic lanes.
The LKAS only alerts you when lane drift is detected
without a turn signal in use. The LKAS may not detect
all lane markings or lane departures; accuracy will
vary based on weather, speed, and lane marker
condition. It is always your responsibility to safely
operate the vehicle an d avoid collisions.
The LKAS is convenient when it is used on freeways.
The LKAS may not work properly or may work
improperly under the certain conditions: 2 LKAS Conditions and Limitations P. 409
You can read about handling information for the
camera equipped with this system. 2 Front Sensor Camera P. 383
The LKAS may not function as designed while driving
in frequent stop and go traf fic, or on roads with
sharp curves.
When you operate the turn signals to chan ge lanes, the system is suspended, and
resumes after the signals are off.
If you make a lane change without operat ing the turn signals, the LKAS alerts
activate, and torque is applied to the steering.
■Front Sensor
Camera
Monitors the lane
lines■Tactile and visual alerts
Rapid vibrations on the steering wheel
and a warning display alert you that
the vehicle is drifting out of a
detected lane.
■Steering input assist
The system applies torque to the steering to keep the vehicle between the left
and right lane lines. The applied torque becomes stronger as the vehicle gets
closer to either of the lane lines.
18 CLARITY ELECTRIC CSS-31TRV6100.book 404 ページ 2018年2月5日 月曜日 午後12時0分
Page 408 of 559
uuWhen Driving uLane Keeping Assist System (LKAS)
406
Driving
The system can be used when the following conditions are met.
• The lane in which you are driving has dete ctable lane markers on both sides, and
your vehicle is in the center of the lane.
• The vehicle speed is between 45 and 90 mph (72 and 145 km/h).
• You are driving on a straight or slightly curved road.
• The turn signals are off.
• The brake pedal is not depressed.
• The wipers are not in continuous operation.
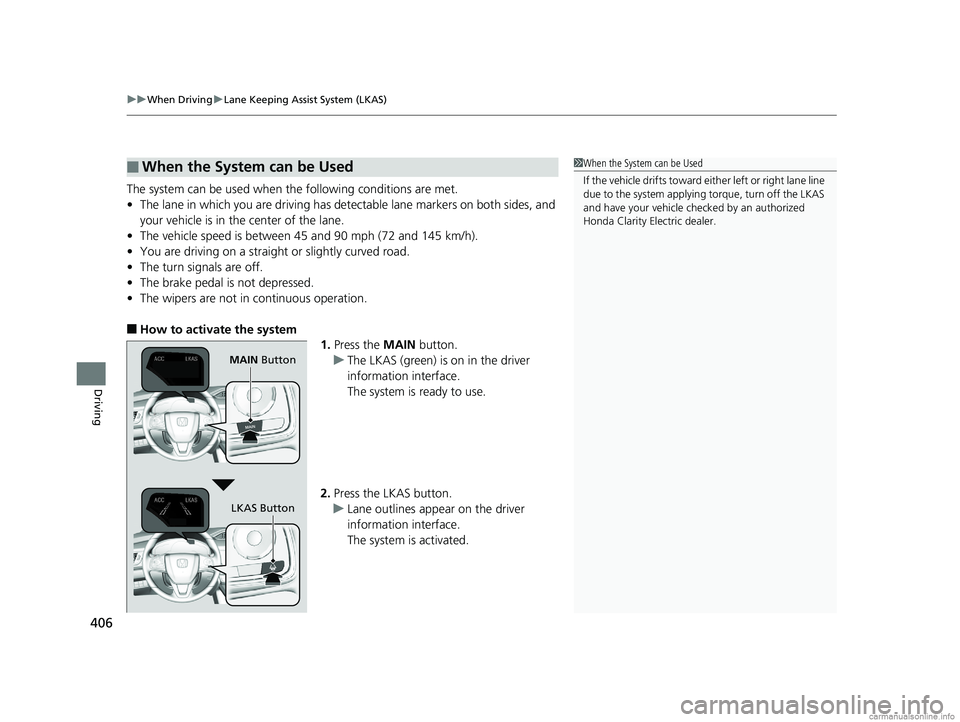
■How to activate the system
1.Press the MAIN button.
u The LKAS (green) is on in the driver
information interface.
The system is ready to use.
2. Press the LKAS button.
u Lane outlines appear on the driver
information interface.
The system is activated.
■When the System can be Used1When the System can be Used
If the vehicle drifts toward ei ther left or right lane line
due to the system applying torque, turn off the LKAS
and have your vehicle checked by an authorized
Honda Clarity Electric dealer.
MAIN Button
LKAS Button
18 CLARITY ELECTRIC CSS-31TRV6100.book 406 ページ 2018年2月5日 月曜日 午後12時0分
Page 420 of 559
418
uuWhen Driving uLaneWatchTM
Driving
LaneWatchTM
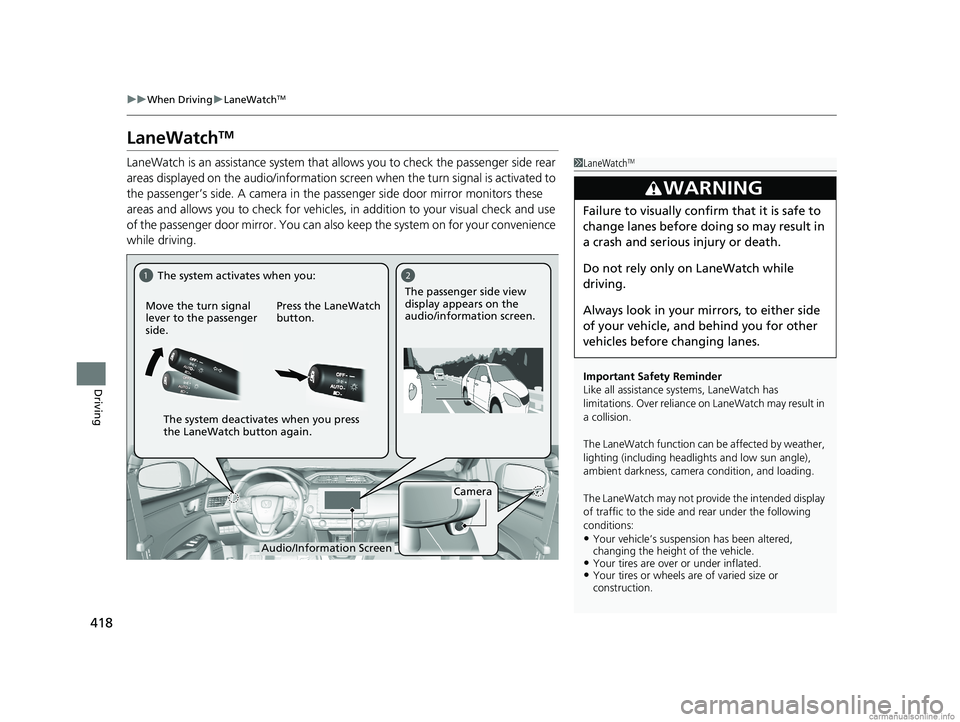
LaneWatch is an assistance system that allows you to check the passenger side rear
areas displayed on the audio/information screen when the turn signal is activated to
the passenger’s side. A camera in the pass enger side door mirror monitors these
areas and allows you to chec k for vehicles, in addition to your visual check and use
of the passenger door mirror. You can also keep the system on for your convenience
while driving.1 LaneWatchTM
Important Safety Reminder
Like all assistance systems, LaneWatch has
limitations. Over reliance on LaneWatch may result in
a collision.
The LaneWatch function can be affected by weather,
lighting (including headli ghts and low sun angle),
ambient darkness, camera condition, and loading.
The LaneWatch may not prov ide the intended display
of traffic to the side and rear under the following
conditions:
•Your vehicle’s suspensi on has been altered,
changing the height of the vehicle.
•Your tires are over or under inflated.•Your tires or wheels are of varied size or
construction.
3WARNING
Failure to visually confirm that it is safe to
change lanes before doing so may result in
a crash and serious injury or death.
Do not rely only on LaneWatch while
driving.
Always look in your mi rrors, to either side
of your vehicle, and behind you for other
vehicles before changing lanes.
12
Camera
Move the turn signal
lever to the passenger
side.
Press the LaneWatch
button.The passenger side view
display appears on the
audio/information screen.
The system activates when you:
The system deactivates when you press
the LaneWatch button again.
Audio/Information Screen
18 CLARITY ELECTRIC CSS-31TRV6100.book 418 ページ 2018年2月5日 月曜日 午後12時0分
Page 421 of 559
419
uuWhen Driving uLaneWatchTM
Driving
■Customizing the La neWatch settings
You can customize the following items using the audio/information screen.
• Show with Turn Signal : Selects whether LaneWatch monitor comes on when
you operate the turn signal light lever.
• Display Time after Turn Signal Off : Changes the length of time the LaneWatch
display stays on after you pull the turn signal lever back.
• Reference Line : Selects whether the reference lines appear on the LaneWatch
monitor.
• Display : Allows for display adjustments of items, such as brightness, contrast and
black level. This setting is part of the System setup group.
2Customized Features P. 296
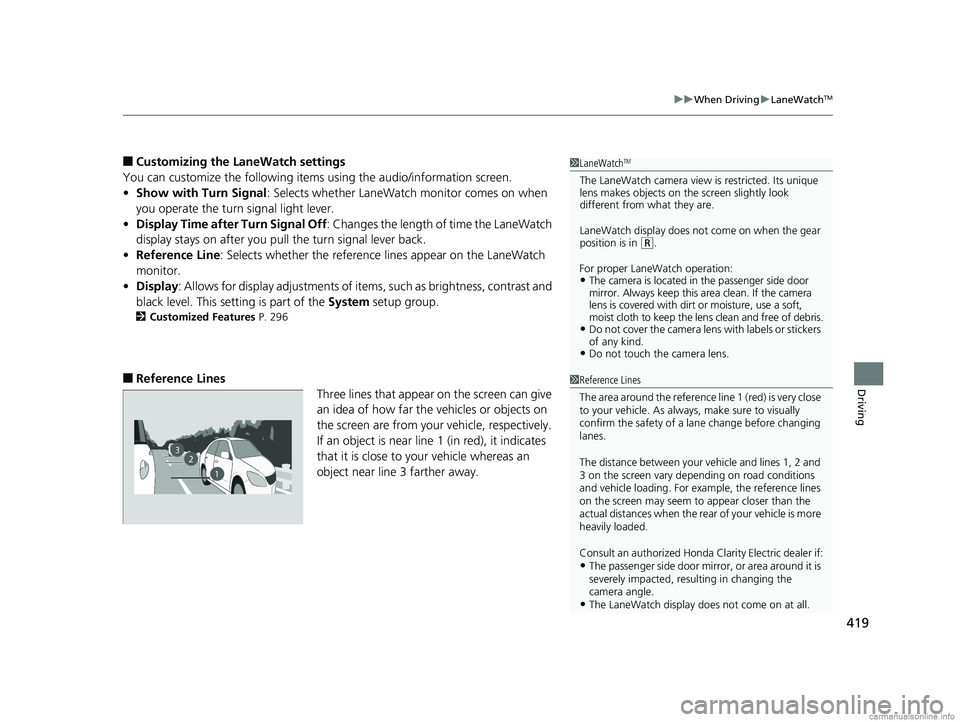
■Reference Lines
Three lines that appear on the screen can give
an idea of how far the vehicles or objects on
the screen are from your vehicle, respectively.
If an object is near line 1 (in red), it indicates
that it is close to your vehicle whereas an
object near line 3 farther away.
1LaneWatchTM
The LaneWatch camera view is restricted. Its unique
lens makes objects on the screen slightly look
different from what they are.
LaneWatch display does not come on when the gear
position is in
( R.
For proper LaneWatch operation:
•The camera is located in the passenger side door
mirror. Always keep this area clean. If the camera
lens is covered with dirt or moisture, use a soft,
moist cloth to keep the lens clean and free of debris.
•Do not cover the camera lens with labels or stickers
of any kind.
•Do not touch the camera lens.
23
1
1Reference Lines
The area around the reference li ne 1 (red) is very close
to your vehicle. As always, make sure to visually
confirm the safety of a la ne change before changing
lanes.
The distance betwee n your vehicle and lines 1, 2 and
3 on the screen vary depending on road conditions
and vehicle loading. For ex ample, the reference lines
on the screen may seem to appear closer than the
actual distances when the rear of your vehicle is more
heavily loaded.
Consult an authorized Honda Clarity Electric dealer if:
•The passenger side door mirr or, or area around it is
severely impacted, resulting in changing the
camera angle.
•The LaneWatch display doe s not come on at all.
18 CLARITY ELECTRIC CSS-31TRV6100.book 419 ページ 2018年2月5日 月曜日 午後12時0分
Page 472 of 559
470
Maintenance
Replacing Light Bulbs
Headlights
Headlights are LED type. Have an authorized Honda Clarity Electric dealer inspect
and replace the light assembly.
Front Turn Signal and Front Side Marker Lights
Front turn signal and front side marker lights are LED type. Have an authorized
Honda Clarity Electric dealer inspec t and replace the light assembly.
Parking/Daytime Running Lights
Parking/daytime running lights are LED type . Have an authorized Honda Clarity
Electric dealer inspect and replace the light assembly.
1Headlights
The headlight aim is set by the factory, and does not
need to be adjusted. Howeve r, if you regularly carry
heavy items in the trunk, have the aiming readjusted
at an authorized Honda Clar ity Electric dealer or by a
qualified technician.
18 CLARITY ELECTRIC CSS-31TRV6100.book 470 ページ 2018年2月5日 月曜日 午後12時0分
Page 473 of 559
471
uuReplacing Light Bulbs uTaillights/Rear Side Marker, Brake and Rear Turn Signal Lights
Maintenance
Taillights/Rear Side Marker , Brake and Rear Turn
Signal Lights
Taillights/rear side marker, brake and rear turn signal lights are LED type. Have an
authorized Honda Clarity Electric dealer inspect and replace the light assembly.
Taillights and Back-Up Lights
Taillights and back-up lights are LED type. Ha ve an authorized Honda Clarity Electric
dealer inspect and replace the light assembly.
Rear License Plate Light
Rear license plate light is LED type. Have an authorized Honda Clarity Electric dealer
inspect and replace the light assembly.
High-Mount Brake Light
High-mount brake light is LED type. Have an authorized Honda Clarity Electric dealer
inspect and replace the light assembly.
18 CLARITY ELECTRIC CSS-31TRV6100.book 471 ページ 2018年2月5日 月曜日 午後12時0分
Page 538 of 559
536
Information
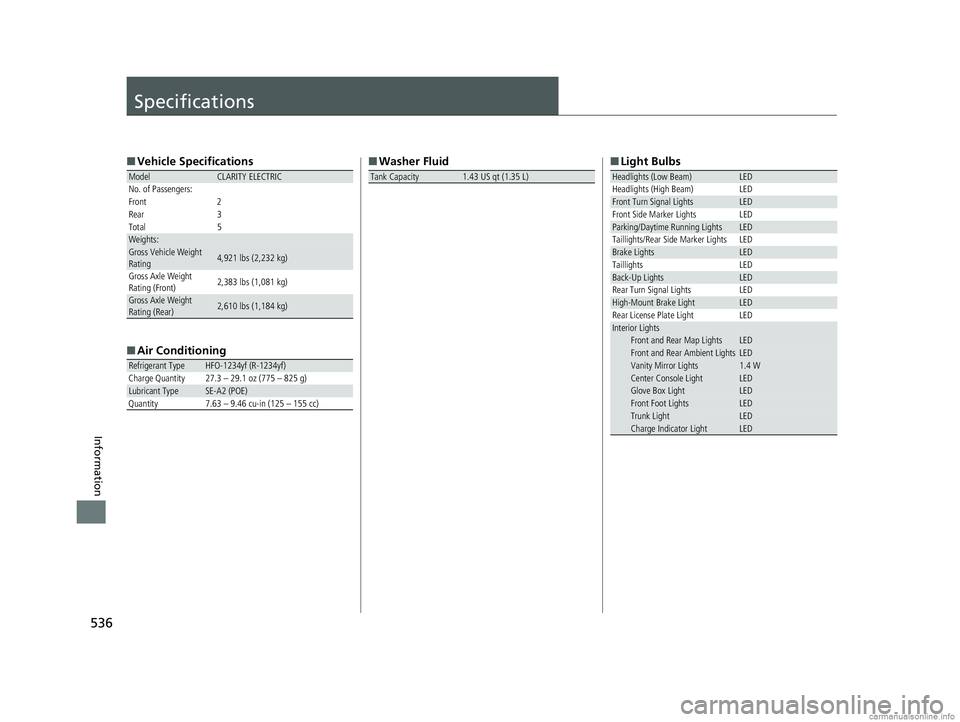
Specifications
■Vehicle Specifications
■ Air Conditioning
ModelCLARITY ELECTRIC
No. of Passengers:
Front 2
Rear 3
Total 5
Weights:Gross Vehicle Weight
Rating 4,921 lbs (2,232 kg)
Gross Axle Weight
Rating (Front)2,383 lbs (1,081 kg)
Gross Axle Weight
Rating (Rear)2,610 lbs (1,184 kg)
Refrigerant TypeHFO-1234yf (R-1234yf)
Charge Quantity 27.3 – 29.1 oz (775 – 825 g)
Lubricant TypeSE-A2 (POE)
Quantity 7.63 – 9.46 cu-in (125 – 155 cc)
■ Washer Fluid
Tank Capacity1.43 US qt (1.35 L)
■Light Bulbs
Headlights (Low Beam)LED
Headlights (High Beam) LED
Front Turn Signal LightsLED
Front Side Marker Lights LED
Parking/Daytime Running LightsLED
Taillights/Rear Side Marker Lights LED
Brake LightsLED
Taillights LED
Back-Up LightsLED
Rear Turn Signal Lights LED
High-Mount Brake LightLED
Rear License Plate Light LED
Interior LightsFront and Rear Map LightsLEDFront and Rear Ambient LightsLEDVanity Mirror Lights1.4 WCenter Console LightLEDGlove Box LightLEDFront Foot LightsLEDTrunk LightLEDCharge Indicator LightLED
18 CLARITY ELECTRIC CSS-31TRV6100.book 536 ページ 2018年2月5日 月曜日 午後12時0分
Page 549 of 559
547
Index
Charging ................................................ 440
Charging (12-Volt Battery) ...................... 485
Energy Economy ..................................... 456
High Voltage........................................... 453
Jump Starting ......................................... 514
Maintenance (Checking the 12-Volt Battery) ................................................. 484
Maintenance (Replacing) ......................... 486
Safety Checklist ...................................... 440
Belts (Seat) .................................................. 44
Beverage Holders ..................................... 180
Bluetooth ® Audio ..................................... 257
Bluetooth ® HandsFreeLink ®.................... 325
Booster Seats (For Children) ...................... 79
Brake System ............................................ 420
Anti-lock Brake System (ABS) .................. 426
Automatic Brake Hold ............................. 424
Brake Assist System................................. 427
Fluid ....................................................... 468
Foot Brake .............................................. 423
Indicator (Red) ........................................ 521
Parking Brake.......................................... 420
Brake System (Amber) Indicator ................................................... 84
Brake System (Red)
Indicator ..................................... 82, 83, 519
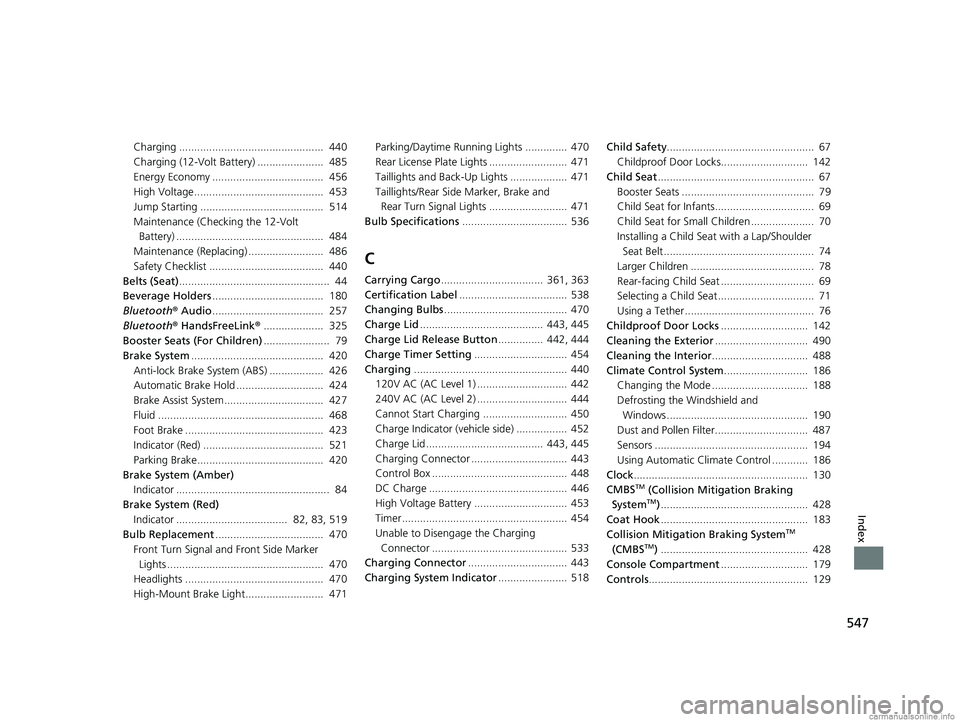
Bulb Replacement .................................... 470
Front Turn Signal and Front Side Marker
Lights .................................................... 470
Headlights .............................................. 470
High-Mount Brake Light.......................... 471 Parking/Daytime Running Lights .............. 470
Rear License Plate Lights .......................... 471
Taillights and Back-Up Lights ................... 471
Taillights/Rear Side
Marker, Brake and
Rear Turn Signal Lights .......................... 471
Bulb Specifications ................................... 536
C
Carrying Cargo.................................. 361, 363
Certification Label .................................... 538
Changing Bulbs ......................................... 470
Charge Lid ......................................... 443, 445
Charge Lid Release Button ............... 442, 444
Charge Timer Setting ............................... 454
Charging ................................................... 440
120V AC (AC Level 1) .............................. 442
240V AC (AC Level 2) .............................. 444
Cannot Start Charging ............................ 450
Charge Indicator (vehicle side) ................. 452
Charge Lid ....................................... 443, 445
Charging Connector ................................ 443
Control Box ............................................. 448
DC Charge .............................................. 446
High Voltage Battery ............................... 453
Timer ....................................................... 454
Unable to Disengage the Charging Connector ............................................. 533
Charging Connector ................................. 443
Charging System Indicator ....................... 518Child Safety
................................................. 67
Childproof Door Locks............................. 142
Child Seat .................................................... 67
Booster Seats ............................................ 79
Child Seat for Infants................................. 69
Child Seat for Small Children ..................... 70
Installing a Child Seat with a Lap/Shoulder
Seat Belt .................................................. 74
Larger Children ......................................... 78
Rear-facing Child Seat ............................... 69
Selecting a Child Seat ................................ 71
Using a Tether ........................................... 76
Childproof Door Locks ............................. 142
Cleaning the Exterior ............................... 490
Cleaning the Interior ................................ 488
Climate Control System ............................ 186
Changing the Mode ................................ 188
Defrosting the Windshield and Windows ............................................... 190
Dust and Pollen Filter............................... 487
Sensors ................................................... 194
Using Automatic Climate Control ............ 186
Clock .......................................................... 130
CMBS
TM (Collision Mitigation Braking
SystemTM) ................................................. 428
Coat Hook ................................................. 183
Collision Mitigation Braking System
TM
(CMBSTM) ................................................. 428
Console Compartment ............................. 179
Controls ..................................................... 129
18 CLARITY ELECTRIC CSS-31TRV6100.book 547 ページ 2018年2月5日 月曜日 午後12時0分