Page 117 of 559
115
uuIndicators uDriver Information Interface Wa rning and Information Messages
Instrument Panel
MessageConditionExplanation
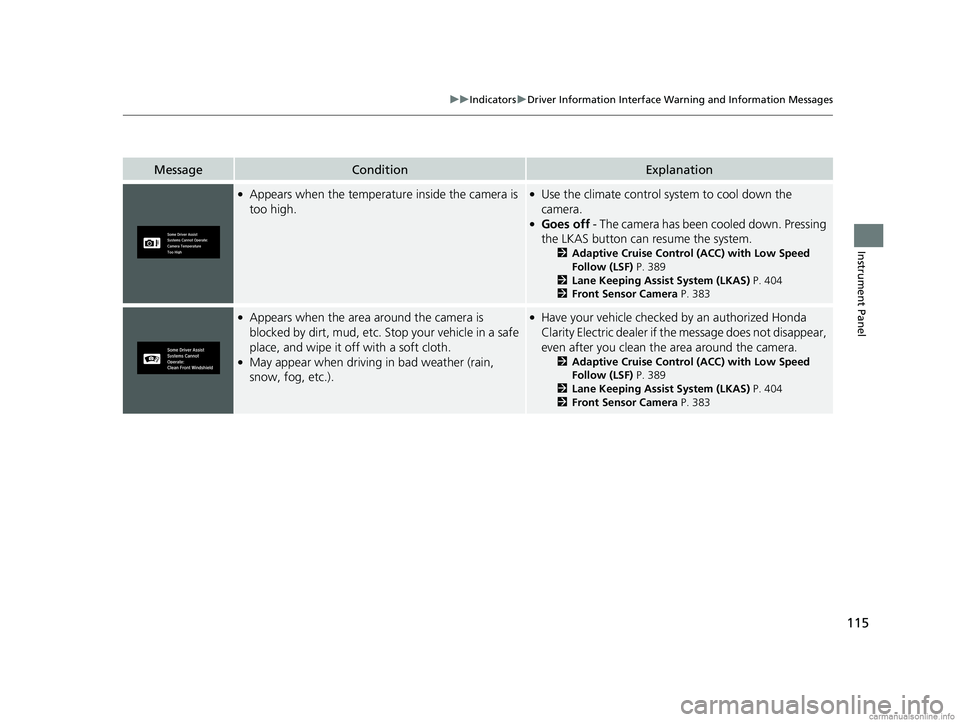
●Appears when the temperature inside the camera is
too high.●Use the climate control system to cool down the
camera.
●Goes off - The camera has been cooled down. Pressing
the LKAS button can resume the system.
2 Adaptive Cruise Control (ACC) with Low Speed
Follow (LSF) P. 389
2 Lane Keeping Assist System (LKAS) P. 404
2 Front Sensor Camera P. 383
●Appears when the area around the camera is
blocked by dirt, mud, etc. Stop your vehicle in a safe
place, and wipe it off with a soft cloth.
●May appear when driving in bad weather (rain,
snow, fog, etc.).
●Have your vehicle checked by an authorized Honda
Clarity Electric dealer if the message does not disappear,
even after you clean the area around the camera.
2Adaptive Cruise Control (ACC) with Low Speed
Follow (LSF) P. 389
2 Lane Keeping Assist System (LKAS) P. 404
2 Front Sensor Camera P. 383
18 CLARITY ELECTRIC CSS-31TRV6100.book 115 ページ 2018年2月5日 月曜日 午後12時0分
Page 124 of 559
uuGauges and Driver Information Interface uDriver Information Interface
122
Instrument Panel
Shows the total number of miles or kilome ters that your vehicle has accumulated.
Shows the total number of miles or kilomete rs driven since the last reset. Meters A
and B can be used to measure two separate trips.
■Resetting a trip meter
To reset a trip meter, display it, then press and hold the TRIP button. The trip meter
is reset to 0.0.
Shows the outside temperature in Fahrenheit.
■Adjusting the outside temperature display
Adjust the temperature reading up to ± 5°F if the temperature reading seems
incorrect.
Shows the estimated average energy consum ption of each trip meter in miles/kWh
or km/kWh. The display is updated at set in tervals. When a trip meter is reset, the
average energy consumption is also reset.
■Odometer
■Trip Meter
■Outside Temperature
■Average Energy Consumption
1 Trip Meter
Switch between trip meter A and trip meter B by
pressing the TRIP button.
1Outside Temperature
The temperature sensor is in the front bumper.
Road heat and exhaust from another vehicle can
affect the temperature reading when your vehicle
speed is less than 19 mph (30 km/h).
It may take several minutes for the display to be
updated after the temperature reading has stabilized.
Use the audio/information screen’s customized
features to correct the temperature.
2 Customized Features P. 296
1Average Energy Consumption
You can change when to reset the average energy
consumption.
2 Customized Features P. 296
18 CLARITY ELECTRIC CSS-31TRV6100.book 122 ページ 2018年2月5日 月曜日 午後12時0分
Page 131 of 559
129
Controls
This chapter explains how to operate the various controls necessary for driving.
Clock.................................................. 130
Locking and Unlocking the Doors Key Types and Functions .................. 131
Low Smart Entry Remote Signal Strength .. 132Locking/Unlocking the Doors from the Outside .......................................... 133
Locking/Unlocking the Doors from the Inside ............................................. 140
Childproof Door Locks ..................... 142
Auto Door Locking/Unlocking .......... 143
Opening and Closing the Trunk ....... 144
Security System ................................ 147
Immobilizer System .......................... 147 Security System Alarm...................... 147
Opening and Closing the Windows ... 150
Operating the Switches Around the
Steering Wheel POWER Button................................. 152
Turn Signals ..................................... 155
Light Switches.................................. 156
Daytime Running Lights ................... 159
Wipers and Washers ........................ 160
Brightness Control ........................... 162
Rear Defogger/Heated Door Mirror Button........................................ 163
Driving Position Memory System ...... 164 Adjusting the Steering Wheel .......... 166
Adjusting the Mirrors ....................... 167
Interior Rearview Mirror ................... 167
Power Door Mirrors ......................... 168
Adjusting the Seats .......................... 169
Front Seats ...................................... 169
Interior Lights/Interior Convenience Items ................................................ 176
Interior Lights .................................. 176
Interior Convenience Items .............. 178
Climate Control System ................... 186
Using Automatic Climate Control .... 186
Automatic Climate Control Sensors ... 194
18 CLARITY ELECTRIC CSS-31TRV6100.book 129 ページ 2018年2月5日 月曜日 午後12時0分
Page 138 of 559
uuLocking and Unlocking the Doors uLocking/Unlocking the Doors from the Outside
136
Controls
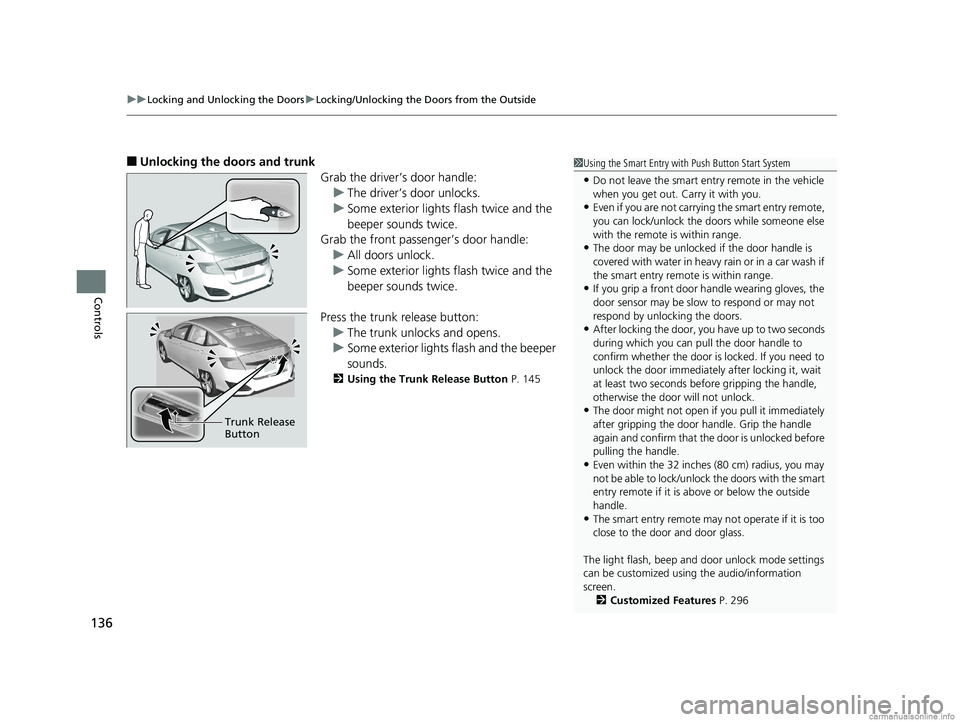
■Unlocking the doors and trunk
Grab the driver’s door handle:u The driver’s door unlocks.
u Some exterior lights flash twice and the
beeper sounds twice.
Grab the front passenger’s door handle:
u All doors unlock.
u Some exterior lights flash twice and the
beeper sounds twice.
Press the trunk release button: u The trunk unlocks and opens.
u Some exterior lights flash and the beeper
sounds.
2 Using the Trunk Release Button P. 145
Trunk Release
Button
1Using the Smart Entry with Push Button Start System
•Do not leave the smart entry remote in the vehicle
when you get out. Carry it with you.
•Even if you are not carrying the smart entry remote,
you can lock/unlock the doors while someone else
with the remote is within range.
•The door may be unlocked if the door handle is
covered with water in heavy rain or in a car wash if
the smart entry remote is within range.
•If you grip a front door handle wearing gloves, the
door sensor may be slow to respond or may not
respond by unlocking the doors.
•After locking the door, you have up to two seconds
during which you can pull the door handle to
confirm whether the door is locked. If you need to
unlock the door immediately after locking it, wait
at least two seconds befo re gripping the handle,
otherwise the door will not unlock.
•The door might not open if you pull it immediately
after gripping the door handle. Grip the handle
again and confirm that th e door is unlocked before
pulling the handle.
•Even within the 32 inches (80 cm) radius, you may
not be able to lock/unlock the doors with the smart
entry remote if it is a bove or below the outside
handle.
•The smart entry remote may not operate if it is too
close to the door and door glass.
The light flash, beep and door unlock mode settings
can be customized using the audio/information
screen.
2 Customized Features P. 296
18 CLARITY ELECTRIC CSS-31TRV6100.book 136 ページ 2018年2月5日 月曜日 午後12時0分
Page 159 of 559
Continued157
uuOperating the Switches Around the Steering Wheel uLight Switches
Controls
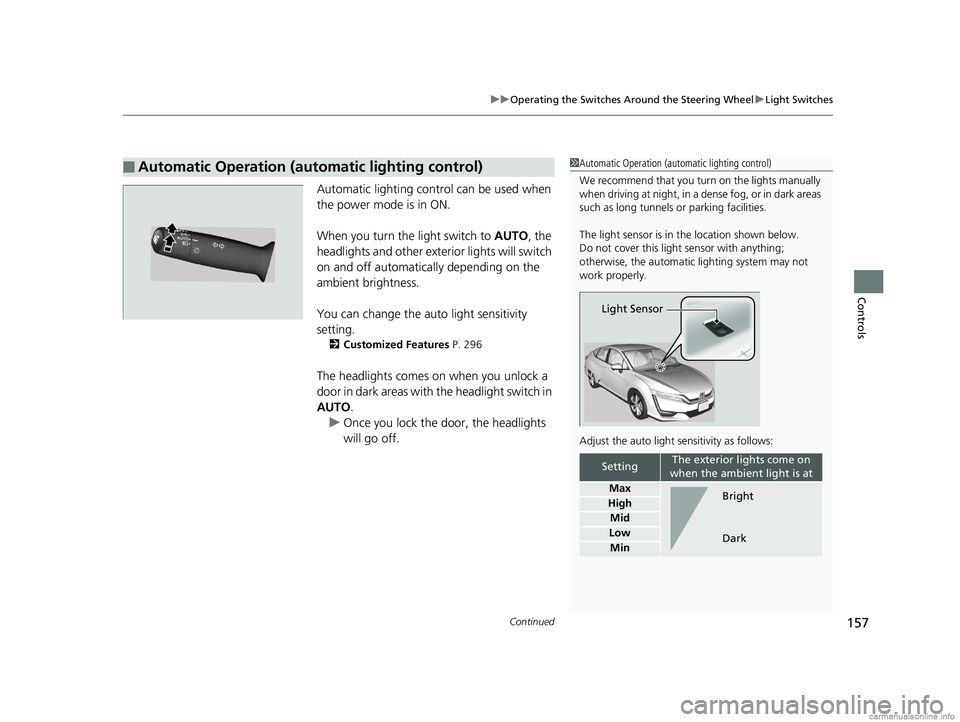
Automatic lighting control can be used when
the power mode is in ON.
When you turn the light switch to AUTO, the
headlights and other exterior lights will switch
on and off automatically depending on the
ambient brightness.
You can change the auto light sensitivity
setting.
2 Customized Features P. 296
The headlights comes on when you unlock a
door in dark areas with the headlight switch in
AUTO.
u Once you lock the door, the headlights
will go off.
■Automatic Operation (automatic lighting control)1Automatic Operation (aut omatic lighting control)
We recommend that you tu rn on the lights manually
when driving at night, in a dense fog, or in dark areas
such as long tunnels or parking facilities.
The light sensor is in the location shown below.
Do not cover this light sensor with anything;
otherwise, the automatic lighting system may not
work properly.
Adjust the auto light sensitivity as follows:
SettingThe exterior lights come on
when the ambient light is at
Max
High
Mid
Low
Min
Light Sensor
Bright
Dark
18 CLARITY ELECTRIC CSS-31TRV6100.book 157 ページ 2018年2月5日 月曜日 午後12時0分
Page 169 of 559
167
Controls
Adjusting the Mirrors
Interior Rearview Mirror
Adjust the angle of the rearview mirror when you are sitting in the correct driving
position.
When you are driving after dark, the
automatic dimming rearview mirror reduces
the glare from headlights behind you, based
on inputs from the mirror sensor. This feature
is always active.
■Automatic Dimming Rearview Mirror
1Adjusting the Mirrors
Keep the inside and out side mirrors clean and
adjusted for best visibility.
Adjust the mirrors before you start driving. 2 Front Seats P. 169
1Automatic Dimming Rearview Mirror
The auto dimming function cancels when the
transmission is in
(R.
Sensor Up
Down
18 CLARITY ELECTRIC CSS-31TRV6100.book 167 ページ 2018年2月5日 月曜日 午後12時0分
Page 176 of 559
174
uuAdjusting the Seats uRear Seats
Controls
Rear Seats
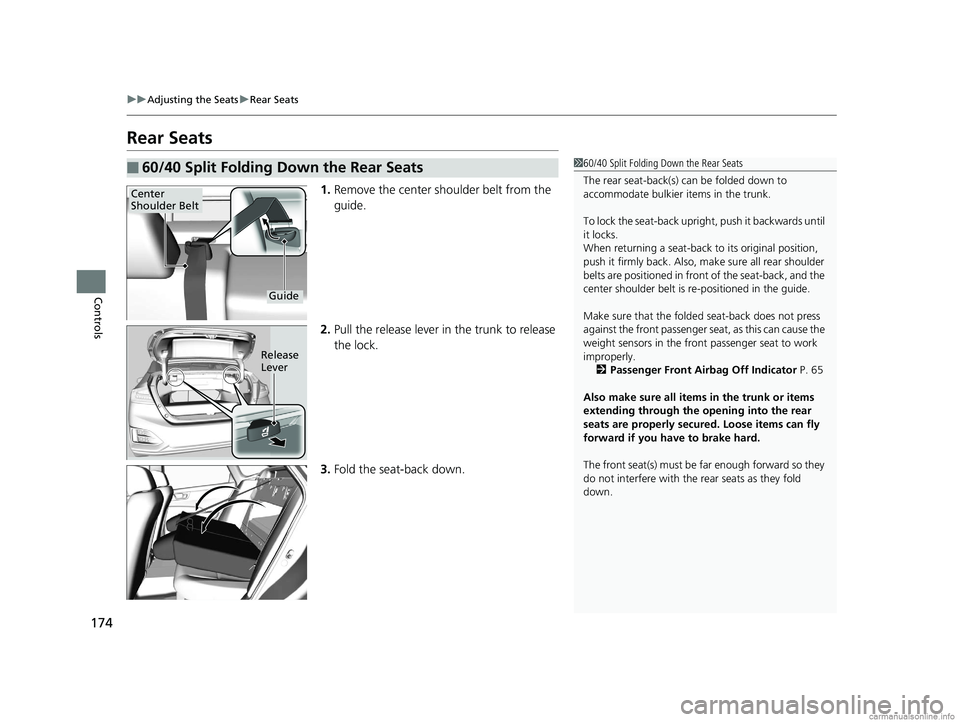
1. Remove the center shoulder belt from the
guide.
2. Pull the release lever in the trunk to release
the lock.
3. Fold the seat-back down.
■60/40 Split Folding Down the Rear Seats160/40 Split Folding Down the Rear Seats
The rear seat-back(s) can be folded down to
accommodate bulkier items in the trunk.
To lock the seat-back upri ght, push it backwards until
it locks.
When returning a seat-back to its original position,
push it firmly back. Also, m ake sure all rear shoulder
belts are positioned in front of the seat-back, and the
center shoulder belt is re -positioned in the guide.
Make sure that the folded seat-back does not press
against the front passenger se at, as this can cause the
weight sensors in the front passenger seat to work
improperly.
2 Passenger Front Airbag Off Indicator P. 65
Also make sure all items in the trunk or items
extending through the opening into the rear
seats are properly secured. Loose items can fly
forward if you have to brake hard.
The front seat(s) must be far enough forward so they
do not interfere with the rear seats as they fold
down.
Center
Shoulder Belt
Guide
Release
Lever
18 CLARITY ELECTRIC CSS-31TRV6100.book 174 ページ 2018年2月5日 月曜日 午後12時0分
Page 196 of 559
194
uuClimate Control System uAutomatic Climate Control Sensors
Controls
Automatic Climate Control Sensors
The automatic climate control system is
equipped with sensors. Do not cover or spill
any liquid on them.Sensor
Sensor
18 CLARITY ELECTRIC CSS-31TRV6100.book 194 ページ 2018年2月5日 月曜日 午後12時0分