2018 GMC SIERRA DENALI parking brake
[x] Cancel search: parking brakePage 329 of 505

GMC Sierra/Sierra Denali Owner Manual (GMNA-Localizing-U.S./Canada/
Mexico-11349177) - 2018 - CRC - 10/17/17
328 Driving and Operating CautionLeaving electrical equipment on
for extended periods will drain the
battery. Always turn off electrical
equipment when not in use and
do not use equipment that
exceeds the maximum amperage
rating of 30 amps for the auxiliary
battery provision.
Trailer Wiring Harness The vehicle is equipped with one of
the following wiring harnesses for
towing a trailer or hauling a slide-in
camper.
Basic Trailer Wiring
All regular, double cab, and crew
cab pickups have a seven-wire
trailer towing harness.
For vehicles not equipped with
heavy-duty trailering, the harness is
secured to the vehicle's frame
behind the spare tire mount. The
harness requires the installation of a
trailer connector, which is available
through your dealer. Use only a round, seven-wire
connector with flat blade terminals
meeting SAE J2863 specifications
for proper electrical connectivity.
The seven-wire harness contains
the following trailer circuits:
.
Green/Violet: Right Stop/Turn
Signal
.
Yellow/Gray: Left Stop/Turn
Signal
.
Gray/Brown: Taillamps/Parking
Lamps
.
White/Green: Back-up Lamps
.
Red/Green: Battery Feed
.
White: Ground
.
Blue: Electric Trailer Brake
The fuse for the electric trailer brake
circuit is installed in the underhood
electrical center, but the wires may
not be connected. They should be
connected by your dealer or a
qualified service center. To control
electric trailer brakes, a trailer brake
controller needs to be installed on
the vehicle by your dealer or a qualified service center, see
“ Electric Brake Control Wiring
Provisions ” later in this section.
Heavy-Duty Trailer Wiring Harness
Package
For vehicles equipped with
heavy-duty trailering, the harness
connector is mounted in the bumper.
Page 330 of 505

GMC Sierra/Sierra Denali Owner Manual (GMNA-Localizing-U.S./Canada/
Mexico-11349177) - 2018 - CRC - 10/17/17
Driving and Operating 329
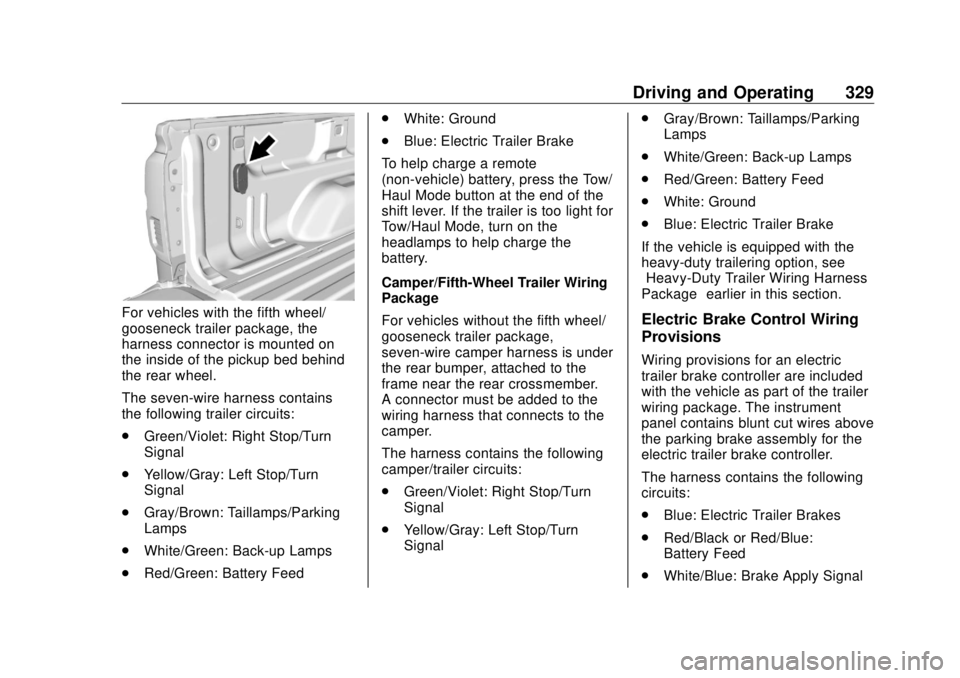
For vehicles with the fifth wheel/
gooseneck trailer package, the
harness connector is mounted on
the inside of the pickup bed behind
the rear wheel.
The seven-wire harness contains
the following trailer circuits:
.
Green/Violet: Right Stop/Turn
Signal
.
Yellow/Gray: Left Stop/Turn
Signal
.
Gray/Brown: Taillamps/Parking
Lamps
.
White/Green: Back-up Lamps
.
Red/Green: Battery Feed .
White: Ground
.
Blue: Electric Trailer Brake
To help charge a remote
(non-vehicle) battery, press the Tow/
Haul Mode button at the end of the
shift lever. If the trailer is too light for
Tow/Haul Mode, turn on the
headlamps to help charge the
battery.
Camper/Fifth-Wheel Trailer Wiring
Package
For vehicles without the fifth wheel/
gooseneck trailer package,
seven-wire camper harness is under
the rear bumper, attached to the
frame near the rear crossmember.
A connector must be added to the
wiring harness that connects to the
camper.
The harness contains the following
camper/trailer circuits:
.
Green/Violet: Right Stop/Turn
Signal
.
Yellow/Gray: Left Stop/Turn
Signal .
Gray/Brown: Taillamps/Parking
Lamps
.
White/Green: Back-up Lamps
.
Red/Green: Battery Feed
.
White: Ground
.
Blue: Electric Trailer Brake
If the vehicle is equipped with the
heavy-duty trailering option, see
“ Heavy-Duty Trailer Wiring Harness
Package ” earlier in this section.
Electric Brake Control Wiring
Provisions Wiring provisions for an electric
trailer brake controller are included
with the vehicle as part of the trailer
wiring package. The instrument
panel contains blunt cut wires above
the parking brake assembly for the
electric trailer brake controller.
The harness contains the following
circuits:
.
Blue: Electric Trailer Brakes
.
Red/Black or Red/Blue:
Battery Feed
.
White/Blue: Brake Apply Signal
Page 331 of 505

GMC Sierra/Sierra Denali Owner Manual (GMNA-Localizing-U.S./Canada/
Mexico-11349177) - 2018 - CRC - 10/17/17
330 Driving and Operating .
Black: Ground
Be sure to consult the aftermarket
electric brake controller owner ’ s
manual to determine wire color
coding of the electric trailer brake
controller. The wire colors on the
brake controller may be different
from the vehicle.
The electric trailer brake controller
should be installed by your dealer or
a qualified service center.
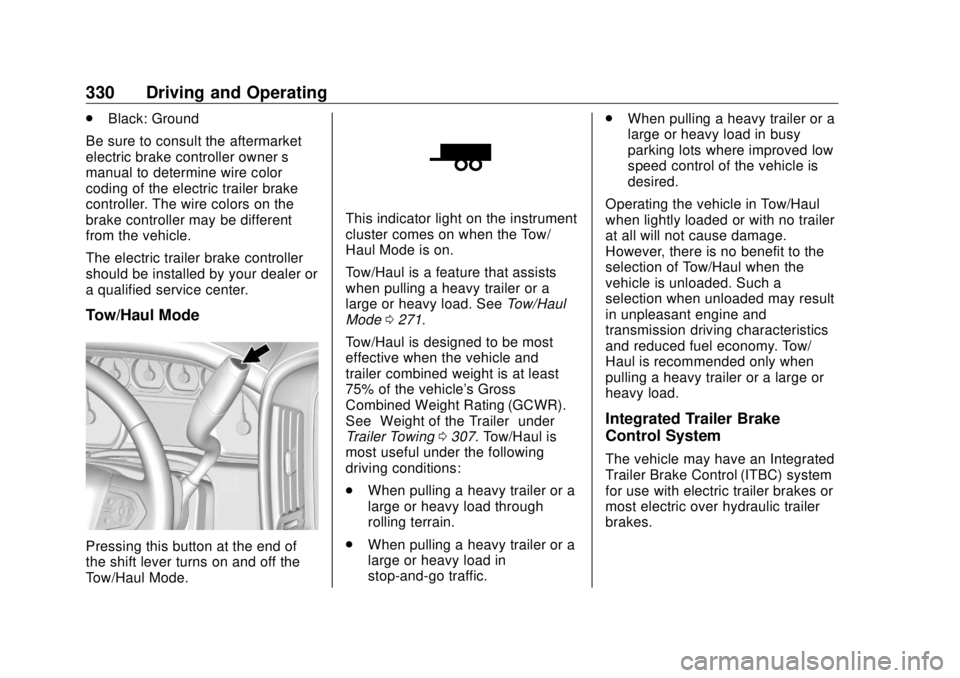
Tow/Haul Mode
Pressing this button at the end of
the shift lever turns on and off the
Tow/Haul Mode. This indicator light on the instrument
cluster comes on when the Tow/
Haul Mode is on.
Tow/Haul is a feature that assists
when pulling a heavy trailer or a
large or heavy load. See Tow/Haul
Mode 0 271 .
Tow/Haul is designed to be most
effective when the vehicle and
trailer combined weight is at least
75% of the vehicle's Gross
Combined Weight Rating (GCWR).
See “ Weight of the Trailer ” under
Trailer Towing 0 307 . Tow/Haul is
most useful under the following
driving conditions:
.
When pulling a heavy trailer or a
large or heavy load through
rolling terrain.
.
When pulling a heavy trailer or a
large or heavy load in
stop-and-go traffic. .
When pulling a heavy trailer or a
large or heavy load in busy
parking lots where improved low
speed control of the vehicle is
desired.
Operating the vehicle in Tow/Haul
when lightly loaded or with no trailer
at all will not cause damage.
However, there is no benefit to the
selection of Tow/Haul when the
vehicle is unloaded. Such a
selection when unloaded may result
in unpleasant engine and
transmission driving characteristics
and reduced fuel economy. Tow/
Haul is recommended only when
pulling a heavy trailer or a large or
heavy load.
Integrated Trailer Brake
Control System The vehicle may have an Integrated
Trailer Brake Control (ITBC) system
for use with electric trailer brakes or
most electric over hydraulic trailer
brakes.
Page 356 of 505

GMC Sierra/Sierra Denali Owner Manual (GMNA-Localizing-U.S./Canada/
Mexico-11349177) - 2018 - CRC - 10/17/17
Vehicle Care 355Caution (Continued)automatic transmission fluid listed
in Recommended Fluids and
Lubricants 0 456 .
Change the fluid and filter at the
scheduled maintenance intervals
listed in Maintenance Schedule
0 448 . Be sure to use the
transmission fluid listed in
Recommended Fluids and
Lubricants 0 456 .
How to Check Automatic
Transmission Fluid
Caution
Too much or too little fluid can
damage the transmission. Too
much can mean that some of the
fluid could come out and fall on
hot engine parts or exhaust
system parts, starting a fire. Too
little fluid could cause the
(Continued) Caution (Continued) transmission to overheat. Be sure
to get an accurate reading if
checking the transmission fluid.
Before checking the fluid level,
prepare the vehicle:
1. Start the engine and park the
vehicle on a level surface.
Keep the engine running.
2. Apply the parking brake and
place the shift lever in P (Park).
3. With your foot on the brake
pedal, move the shift lever
through each gear range,
pausing for about
three seconds in each range.
Then, move the shift lever back
to P (Park).
4. Allow the engine to idle (500 –
800 rpm) for at least
one minute. Slowly release the
brake pedal. 5. Keep the engine running and
check the transmission fluid
temperature on the Driver
Information Center (DIC).
See Driver Information Center
(DIC) (Uplevel and Denali
Cluster) 0 160 or Driver
Information Center (DIC) (Base
Level Cluster) 0 158 .
6. Using the transmission fluid
temperature reading, determine
and perform the appropriate
check procedure. If the
transmission fluid temperature
reading is not within the
required temperature ranges,
allow the vehicle to cool,
or operate the vehicle until the
appropriate transmission fluid
temperature is reached.
Cold Check Procedure
Use this procedure only as a
reference to determine if the
transmission has enough fluid to be
operated safely until a hot check
procedure can be made. The hot
check procedure is the most
accurate method to check the fluid
level. Perform the hot check
Page 375 of 505

GMC Sierra/Sierra Denali Owner Manual (GMNA-Localizing-U.S./Canada/
Mexico-11349177) - 2018 - CRC - 10/17/17
374 Vehicle Care .
Removal of the fan shroud,
if equipped.
Air Intake:
.
Removal of the air cleaner
silencer.
.
Modification of the air cleaner.
Exhaust:
.
Removal of the muffler and/or
resonator.
.
Removal of the exhaust pipes
and exhaust pipe clamps.
Starter Switch Check
{ Warning
When you are doing this
inspection, the vehicle could
move suddenly. If the vehicle
moves, you or others could be
injured.
1. Before starting this check, be
sure there is enough room
around the vehicle. 2. Apply both the parking brake
and the regular brake.
Do not use the accelerator
pedal, and be ready to turn off
the engine immediately if it
starts.
3. Try to start the engine in each
gear. The vehicle should start
only in P (Park) or N (Neutral).
If the vehicle starts in any other
position, contact your dealer for
service.
Automatic Transmission
Shift Lock Control
Function Check
{ Warning
When you are doing this
inspection, the vehicle could
move suddenly. If the vehicle
moves, you or others could be
injured. 1. Before starting this check, be
sure there is enough room
around the vehicle. It should be
parked on a level surface.
2. Apply the parking brake. Be
ready to apply the regular
brake immediately if the vehicle
begins to move.
3. With the engine off, turn the
ignition on, but do not start the
engine. Without applying the
regular brake, try to move the
shift lever out of P (Park) with
normal effort. If the shift lever
moves out of P (Park), contact
your dealer for service.
Ignition Transmission
Lock Check While parked and with the parking
brake set, try to turn the ignition off
in each shift lever position.
.
The ignition should turn off only
when the shift lever is in
P (Park).
.
The ignition key should come
out only when the ignition is off.
Page 376 of 505

GMC Sierra/Sierra Denali Owner Manual (GMNA-Localizing-U.S./Canada/
Mexico-11349177) - 2018 - CRC - 10/17/17
Vehicle Care 375Contact your dealer if service is
required.
Park Brake and P (Park)
Mechanism Check
{ WarningWhen you are doing this check,
the vehicle could begin to move.
You or others could be injured
and property could be damaged.
Make sure there is room in front
of the vehicle in case it begins to
roll. Be ready to apply the regular
brake at once should the vehicle
begin to move.
Park on a fairly steep hill, with the
vehicle facing downhill. Keeping
your foot on the regular brake, set
the parking brake.
.
To check the parking brake's
holding ability: With the engine
running and the transmission in
N (Neutral), slowly remove foot pressure from the regular brake
pedal. Do this until the vehicle is
held by the parking brake only.
.
To check the P (Park)
mechanism's holding ability:
With the engine running, shift to
P (Park). Then release the
parking brake followed by the
regular brake.
Contact your dealer if service is
required.
Wiper Blade Replacement Windshield wiper blades should be
inspected for wear or cracking.
Replacement blades come in
different types and are removed in
different ways. For proper
windshield wiper blade length and
type, see Maintenance
Replacement Parts 0 458 . CautionAllowing the wiper arm to touch
the windshield when no wiper
blade is installed could damage
the windshield. Any damage that
occurs would not be covered by
the vehicle warranty. Do not allow
the wiper arm to touch the
windshield.
To replace the windshield wiper
blade:
1. Pull the windshield wiper
assembly away from the
windshield.
Page 384 of 505

GMC Sierra/Sierra Denali Owner Manual (GMNA-Localizing-U.S./Canada/
Mexico-11349177) - 2018 - CRC - 10/17/17
Vehicle Care 383Fuses Usage
3 Antilock brake
system pump
4 Instrument
panel BEC 1
5 Passenger
motorized seat belt
6 4WD transfer case
electronic control
7 Electric park brake
8 Instrument
panel BEC 2
9 Driver motorized
seat belt
10 Rear window
defogger
11 Starter
12 Cooling fan 1
13 Cooling fan 2
14 Left trailer stop/
Turn signal lamps
15 Trailer parking
lamps Fuses Usage
16 Trailer reverse
lamps
17 Right trailer stop/
Turn signal lamps
18 Fuel pump
19 Integrated chassis
control module
20 Electronic
suspension control
module
21 Fuel pump power
module
22 Upfitter 1
23 Upfitter 2
24 Front wiper
25 Antilock brake
system valve
26 Upfitter 2
27 Upfitter 3
28 Right parking
lamps
29 Left parking lamps Fuses Usage
30 Upfitter 3
31 Upfitter 4
32 Upfitter 4
33 Reverse lamps
34 Engine control
module/Ignition
35 Air conditioning
clutch
36 Heated mirrors
37 Upfitter 1
38 Center
high-mounted
stoplamp
39 Miscellaneous/
Ignition
40 Transmission/
Ignition
41 Fuel pump 2
42 Cooling fan clutch
43 Engine
44 Fuel
injectors A – odd
Page 403 of 505

GMC Sierra/Sierra Denali Owner Manual (GMNA-Localizing-U.S./Canada/
Mexico-11349177) - 2018 - CRC - 10/17/17
402 Vehicle Care TPMS sensor. The malfunction
light and the DIC message
should go off after the road tire
is replaced and the sensor
matching process is performed
successfully. See "TPMS Sensor
Matching Process" later in this
section.
.
The TPMS sensor matching
process was not done or not
completed successfully after
rotating the tires. The
malfunction light and the DIC
message should go off after
successfully completing the
sensor matching process. See
"TPMS Sensor Matching
Process" later in this section.
.
One or more TPMS sensors are
missing or damaged. The
malfunction light and the DIC
message should go off when the
TPMS sensors are installed and
the sensor matching process is
performed successfully. See
your dealer for service.
.
Replacement tires or wheels do
not match the original equipment
tires or wheels. Tires and wheels other than those recommended
could prevent the TPMS from
functioning properly. See Buying
New Tires 0 408 .
.
Operating electronic devices or
being near facilities using radio
wave frequencies similar to the
TPMS could cause the TPMS
sensors to malfunction.
If the TPMS is not functioning
properly, it cannot detect or signal a
low tire pressure condition. See
your dealer for service if the TPMS
malfunction light and DIC message
come on and stay on.
Tire Fill Alert (If Equipped) This feature provides visual and
audible alerts outside the vehicle to
help when inflating an underinflated
tire to the recommended cold tire
pressure.
When the low tire pressure warning
light comes on:
1. Park the vehicle in a safe, level
place.
2. Set the parking brake firmly. 3. Place the vehicle in P (Park).
4. Add air to the tire that is
underinflated. The turn signal
lamp will flash.
When the recommended
pressure is reached, the horn
sounds once and the turn
signal lamp will stop flashing
and briefly turn solid.
Repeat these steps for all
underinflated tires that have
illuminated the low tire pressure
warning light.
If the tire is overinflated by more
than 35 kPa (5 psi), the horn will
sound multiple times and the turn
signal lamp will continue to flash for
eight seconds after filling stops. To
release and correct the pressure,
while the turn signal lamp is still
flashing, briefly press the center of
the valve stem. When the
recommended pressure is reached,
the horn sounds once.
If the turn signal lamp does not flash
within 15 seconds after starting to
inflate the tire, the tire fill alert has
not been activated or is not working.