2018 GENESIS G90 key
[x] Cancel search: keyPage 1 of 25

Scheduled Maintenance(Normal Usage)3.3T5.0L
Engine Oil & FilterReplace6,000 or 12 mos.Replace7,500 or 12 mos.
Fuel AdditivesAdd6,000 or 12 mos.Add7,500 or 12 mos.
Tire RotationPerform6,000 or 12 mos.Perform7,500 or 12 mos.
Vacuum Hose
Inspect6,000 or 12 mos.Inspect7,500 or 12 mos.
Air Conditioning Refrigerant
Brake Hoses & Lines
Drive Shafts & Boots
Exhaust Pipe & Muffler
Front Brake Disc/Pads, Calipers
Rear Brake Disc/Pads
Steering Gear Box, Linkage & Boots, Lower Arm Ball Joint, Upper Arm Ball Joint
Suspension Mounting Bolts
Propeller Shaft
Air Cleaner FilterInspect6,000 or 12 mos.Inspect7,500 or 12 mos.
Replace18,000 or 36 mos.Replace22,500 or 36 mos.
Climate Control Air Filter(For Evaporator and Blower Unit)Inspect6,000 or 12 mos.Replace7,500 or 12 mos.
Fuel Tank Air Filter
12,000 or 24 mos.Inspect15,000 or 24 mos.
Vapor Hose, Fuel Tank Cap, Fuel Tank
Brake Fluid
Parking Brake
Fuel Filter
Fuel Lines, Fuel Hoses & ConnectionsInspect24,000 or 48 mos.Inspect30,000 or 48 mos.Front(AWD)/Rear Differential Oil
Valve ClearanceInspect60,000 or 72 mos.--
Drive BeltsInspect
First60,000 or 72 mos.Inspect
First60,000 or 72 mos.
Subsequent, every12,000 or 24 mos.Subsequent, every15,000 or 24 mos.
Spark Plugs (Iridium Coated)Replace42,000Replace105,000
CoolantReplace
First120,000 or 120 mos.Replace
First120,000 or 120 mos.
Subsequent, every30,000 or 24 mos.Subsequent, every30,000 or 24 mos.
Automatic Transmission FluidNo check or services required for Normal Usage driving.
*See Owner’s Manual for details.
MAINTENANCE
NP150-G2017-B(Rev 06/23/17)Printing 06/26//17
Looking for more detailed information? This Quick Reference Guide does not replace your vehicle’s Owner’s Manual. If you require additional information or are unsure of a specific item, you should always refer to the vehicle’s Owner’s Manual or contact your authorized Dealer of Genesis Brand Products.
The information contained in this Quick Reference Guide was correct at the time of printing; however, specifications and equipment can change without notice. No warranty or g\
uarantee is being extended in this Quick Reference Guide, and Genesis Motors USA reserves the right to change product specifications and equipment at any time without incurring obligations. Some vehicles are shown with optional equipment. Specifications apply to U.S. vehicles only. Please contact your Dealer of Genesis Brand Products for current vehicle specifications.
☐ Tire Pressure Monitoring System (TPMS) - Page 33
☐ Genesis Connected Services - Page 15-16
☐ Explain Smart Drive Mode Function including SMART Icon
Color Changes - Page 37
☐ Wiper / Washer - Page 09
• To activate wipers move the switch down to one of three positions (AUTO, LO, HI)
• To adjust “AUTO” speed rotate dial
• To spray washer fluid, pull lever toward you
• Push lever up for a single wiper pass
- Assist with creating a Genesis Owners account- Assist with Genesis Connected Services enrollment- Show Genesis Connected Services Users Manual
- Encourage customers to press the Genesis Connected Services button
LOW TIRE PRESSURE INDICATOR: Illuminates if one or more of your tires is significantly under-inflated. Safely park the vehicle and check your tires as soon as possible, and inflate them to proper pressure.
NOTE: Tire pressure may vary in colder temperatures causing the
low tire pressure light to illuminate. Inflate tires according to the tire
pressure label located on the driver’s side door pillar.
TPMS MALFUNCTION INDICATOR: Illuminates when there is a
malfunction with the TPMS system. Have the system checked by an
authorized Dealer of Genesis Brand Products as soon as possible.
LOW TIRE PRESSURE POSITION INDICATOR: lndicates which tire is
significantly under-inflated by illuminating the corresponding position.
NOTE: TPMS is not a substitute for proper tire maintenance. It is the
driver’s responsibility to maintain correct tire pressure, even if under-
inflation has not reached the level to trigger illumination of the low tire
pressure indicator. Refer to the Owner’s Manual for further information.
WALK THE CUSTOMER THROUGH EACH OF
THE FOLLOWING KEY DELIVERY FEATURES
AUTO
LO
HI
MIST
OFF
GENESIS
G90
QUICK REFERENCE GUIDE
Page 3 of 25

126 3
9
AIRBAG
GENESIS12
6 3
9
AIRBAG
GENESIS
GETTING STARTEDDriver position memory system 03Front seat adjustment 04Headrest 05Seat belt adjustment 02Smart key 02
FEATURES AND CONTROLSAdaptive front lighting system (AFLS) 09 Automatic climate control 20-21Child-protector rear door lock 14Driver’s main controls 07Fuel filler door 06Head-up display 19Headlights 08Heated steering wheel 06Honmelink wireless garagecontrol system 15Instrument cluster 16 -17Instrument panel illumination 17Interior lights 11LCD display control 18LCD display modes 18Multi-view camera system 22 Parking assist system (PAS) 23Power trunk 12 Rear door window curtain 07Rearview camera 22Rear window curtain 07Seat warmer and cooler 14Smart trunk 13Steering wheel adjustments 06Sunroof 10Trunk lid control button 13Wiper and washer 09Wireless cellular phone charging system 23
MULTIMEDIAAux and USB port 31Genesis connected services 27-28Bluetooth operational tips 24Bluetooth phone operation 26Bluetooth phone pairing 26Navigation 30-31Steering wheel audio control 24Voice recognition tips 25
DRIVINGAdvanced smart cruise control system 39Audio mode 30Auto hold 32Automatic transmission 34Assist emergency braking (AEB) 35Blind spot detection system (BSD) 38Drive mode integrated control system 37Driver attention alert system 36Electric parking brake (EPB) 32Electronic stability control (ESC) 36Lane departure warning system (LDWS) 38Paddle shifter 35Tire pressure monitoring system (TPMS) 33
Headlights
Page 08
Fuel filler door
Page 06
Steering wheel adjustments
Page 06
Wiper and washer
Page 09
Advanced smart cruise control system
Page 39
Automatic climate control
Pages 20-21
Instrument cluster
Pages 16-17
* Some vehicles may not be equipped with all the listed features.
Use this Quick Reference Guide to learn about the features that will enhance your enjoyment of your Genesis. More detailed information about these features are available in your Owner’s Manual.
Steering wheel audio control
Page 24
Trunk release
Page 13
Automatic transmission
Page 34
AUX and USB port
Page 31
Driver’s main controls
Page 07
Table of contents
WARNING!
To reduce the risk of serious injury to yourself and others,
read and understand the important SAFETY INFORMATION
in your Owner’s Manual.
Page 4 of 25

Quick Reference Guide I 32 I Quick Reference Guide
A
GETTING STARTED
SMART KEY
Lock
Unlock
Trunk Open
Panic
Mechanical key
Press and hold the release button
A and remove the key.
NOTE:
User-selectable option; see the
Owner’s Manual for more details.
Vehicle must be in Park.
Setting seat position 1. Adjust the position of the driver’s
seat, outer side view mirror,
steering wheel, instrument panel
illumination and head-up display.
2. Press the SET button.
The system will beep once.
3. Press one of the memory buttons
(1, 2 or 3) within 4 seconds.
Recalling Press the desired memory button
(1,2 or 3). The system will beep once.
DRIVER MEMORY SYSTEM
Door Lock/Unlock
Smart key must be within range
Insert hand into door handle:
Once – Unlock driver’s door
Twice – Unlock all doors
Press the button to lock all doors.
SEAT BELT ADJUSTMENT (Front seat)
Pull up to raise.
Press button and
push down to
lower.
A
Genesis BrandG90
Page 6 of 25

Quick Reference Guide I 76 I Quick Reference Guide
FEATURES AND CONTROLS
FUEL FILLER DOOR
NOTE:
After adding fuel, always reinstall
the fuel cap onto the filler neck
by rotating it clockwise until it
clicks one time.
STEERING WHEEL ADJUSTMENTS
Tilt
NOTE:
Do not adjust while driving.
Toggle switch A to adjust
steering wheel.
Telescope
A
Folding outside mirrors
Press to fold/unfold mirrors.
Press the lock or unlock button
on the smart key, and the mirrors
will be folded or unfolded.
Outer side view mirror
• Press the L or R button.
• Adjust the mirror by using
the directional switch.
Power window lock switch
Disables the power window
switches on the passenger doors.
Door lock
Locks/unlocks all doors.
Window switches
• Front doors power window switches.
• Rear doors power window switches.
DRIVER’S MAIN CONTROLS
With windows closed, pull up to
raise or push down to lower the
rear door window curtain.
(Driver’s door)(Rear doors)
REAR DOOR WINDOW CURTAIN
Press to raise and lower the rear
window curtain.
Heated steering wheel button.
Pressing the heated steering wheel
button warms the steering wheel.
The indicator on the button is
illuminated.
HEATED STEERING WHEEL
NOTE:
Heated steering wheel includes Smart Logic that automatically adjust
setting. Please refer to your Owner’s Manual for further information.
REAR WINDOW CURTAIN
NOTE:
When Reverse is engaged, curtain will lower automatically.
Curtain will raise automatically when (forward) speeds reach 12 mph.
Genesis BrandG90
Page 8 of 25

Quick Reference Guide I 1110 I Quick Reference Guide
FEATURES AND CONTROLS
SUNROOF
To tilt
Press the switch up.
To close
Pull the switch forward.
Tilting the sunroof
Sliding the sunroof
To open
Press the switch rearward and past
the detent to open completely.
Front lamps
Rear room lamps
Turns the map lamp
on or off
Turns the room lamp
on or off
Turns all front lamps
on or off
The front or rear room lamp
will illuminate when the
doors are open or unlocked
with the smart key.
INTERIOR LIGHTS
Turns all rear room lamps
on or off
Turns the rear map lamp
and the door handle
lamps on or off
Turns room lamp on or off
Type A
Type B
To close
Press the switch forward past
the detent to close completely.
Genesis BrandG90
Page 9 of 25

Quick Reference Guide I 1312 I Quick Reference Guide
FEATURES AND CONTROLS
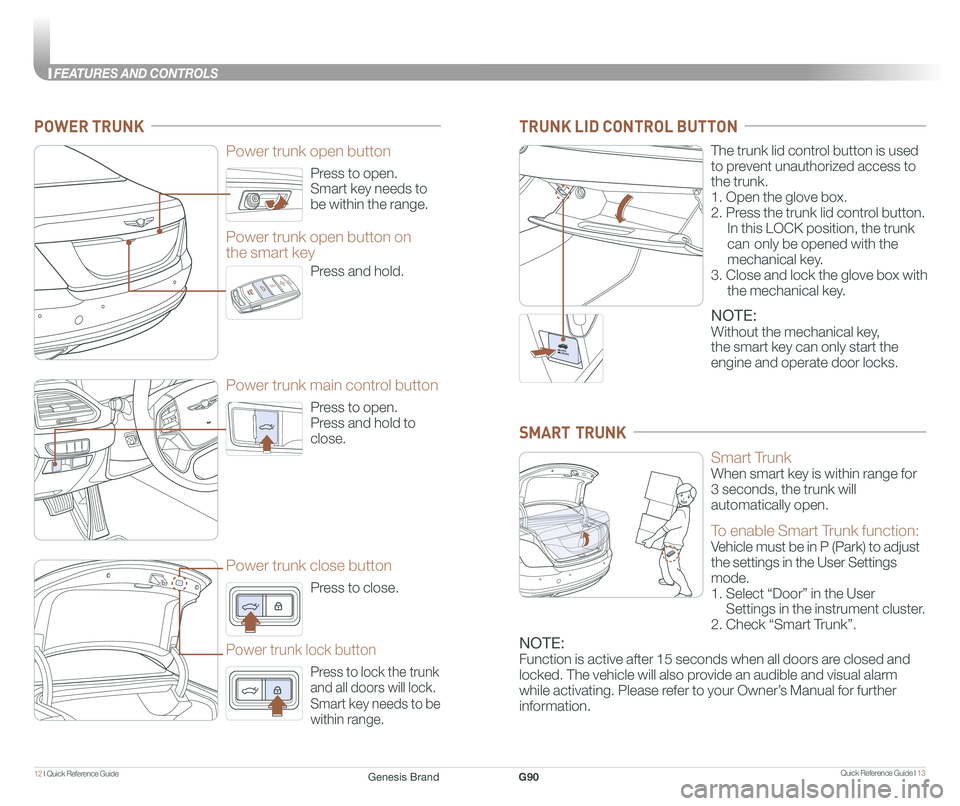
Press to open.
Smart key needs to
be within the range.
Power trunk open button
Press to open.
Press and hold to
close.
Power trunk main control button
Press to close.
Power trunk close button
Press to lock the trunk
and all doors will lock.
Smart key needs to be
within range.
Power trunk lock button
Press and hold.
Power trunk open button on
the smart key
POWER TRUNK
The trunk lid control button is used
to prevent unauthorized access to
the trunk.
1. Open the glove box.
2. Press the trunk lid control button.
In this LOCK position, the trunk
can only be opened with the
mechanical key.
3. Close and lock the glove box with
the mechanical key.
NOTE:
Without the mechanical key,
the smart key can only start the
engine and operate door locks.
TRUNK LID CONTROL BUTTON
Smart Trunk
When smart key is within range for
3 seconds, the trunk will
automatically open.
To enable Smart Trunk function:
Vehicle must be in P (Park) to adjust
the settings in the User Settings
mode.
1. Select “Door” in the User
Settings in the instrument cluster.
2. Check “Smart Trunk”.
NOTE:
Function is active after 15 seconds when all doors are closed and
locked. The vehicle will also provide an audible and visual alarm
while activating. Please refer to your Owner’s Manual for further
information.
SMART TRUNK
Genesis BrandG90
Page 10 of 25

Quick Reference Guide I 1514 I Quick Reference Guide
FEATURES AND CONTROLS
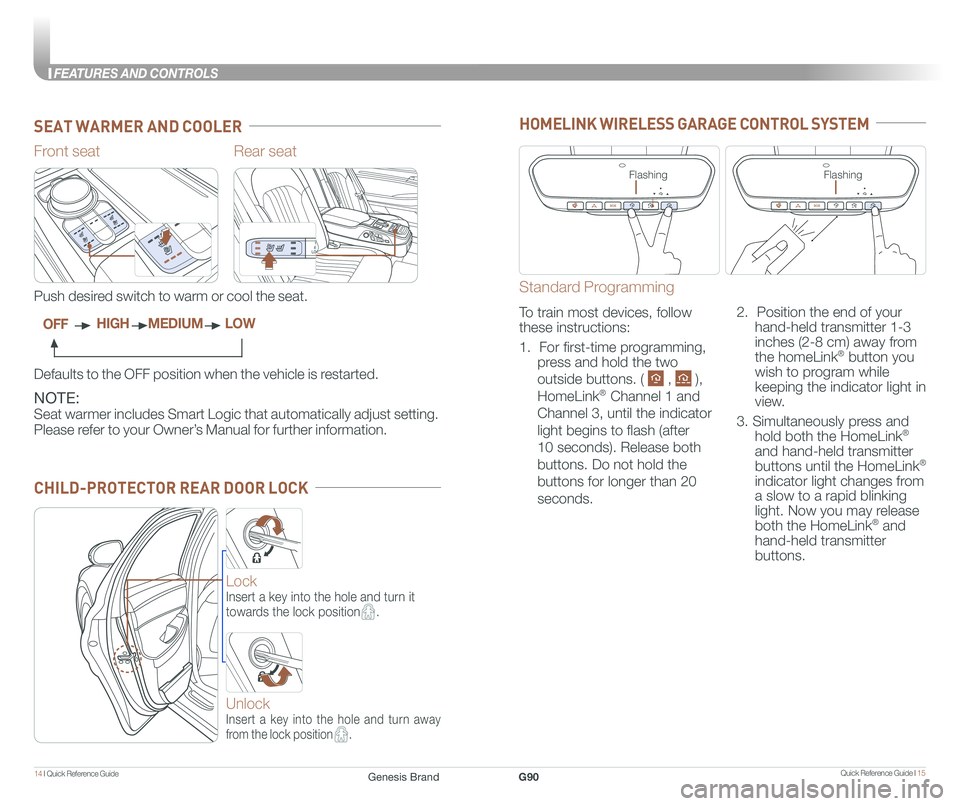
CHILD-PROTECTOR REAR DOOR LOCK
Rear seat
NOTE:
Seat warmer includes Smart Logic that automatically adjust setting.
Please refer to your Owner’s Manual for further information.
Front seat
Defaults to the OFF position when the vehicle is restarted.
Push desired switch to warm or cool the seat.
OFFHIGHMEDIUMLOW
SEAT WARMER AND COOLER
Lock
Insert a key into the hole and turn it
towards the lock position.
Unlock
Insert a key into the hole and turn away
from the lock position.
HOMELINK WIRELESS GARAGE CONTROL SYSTEM
Standard Programming
To train most devices, follow
these instructions:
1. For first-time programming,
press and hold the two
outside buttons. ( , ),
HomeLink® Channel 1 and
Channel 3, until the indicator
light begins to flash (after
10 seconds). Release both
buttons. Do not hold the
buttons for longer than 20
seconds.
2. Position the end of your
hand-held transmitter 1-3
inches (2-8 cm) away from
the homeLink® button you
wish to program while
keeping the indicator light in
view.
3. Simultaneously press and
hold both the HomeLink®
and hand-held transmitter
buttons until the HomeLink®
indicator light changes from
a slow to a rapid blinking
light. Now you may release
both the HomeLink® and
hand-held transmitter
buttons.
FlashingFlashing
Genesis BrandG90
Page 16 of 25

Quick Reference Guide I 2726 I Quick Reference Guide
MULTIMEDIA
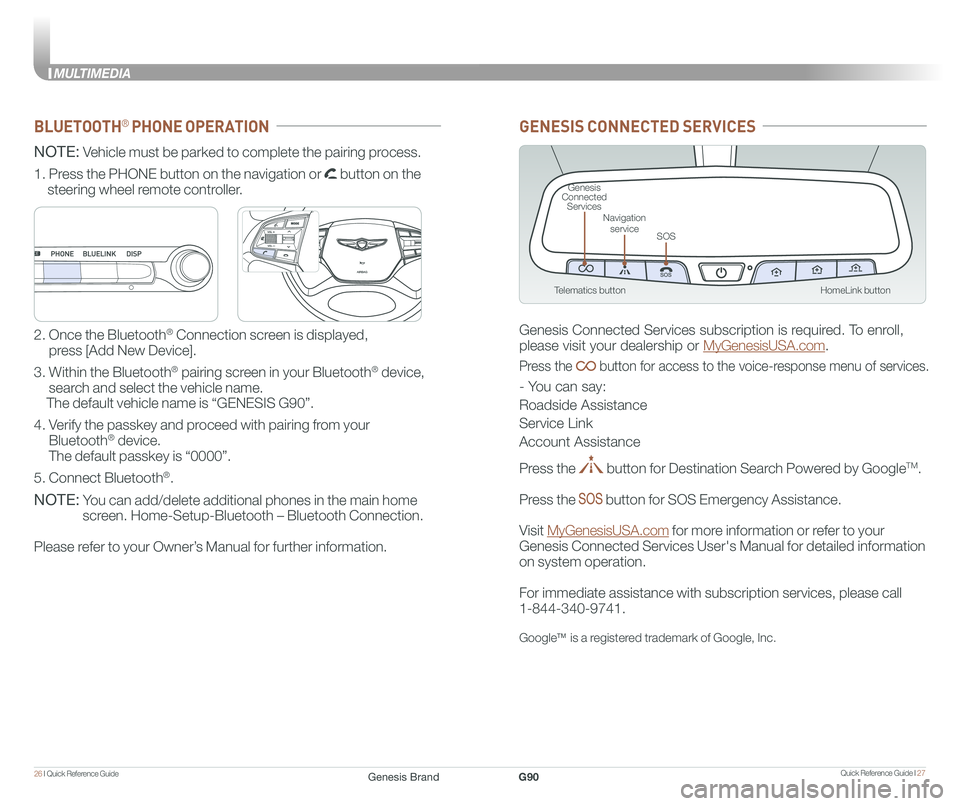
HomeLink button
Genesis Connected Services
SOS
Navigation service
Telematics button
GENESIS CONNECTED SERVICES
Genesis Connected Services subscription is required. To enroll,
please visit your dealership or MyGenesisUSA.com.
Press the button for access to the voice-response menu of services.
- You can say:
Roadside Assistance
Service Link
Account Assistance
Press the button for Destination Search Powered by GoogleTM.
Press the button for SOS Emergency Assistance.
Visit MyGenesisUSA.com for more information or refer to your
Genesis Connected Services User's Manual for detailed information
on system operation.
For immediate assistance with subscription services, please call
1-844-340-9741.
GoogleTM is a registered trademark of Google, Inc.
BLUETOOTH® PHONE OPERATION
NOTE: Vehicle must be parked to complete the pairing process.
NOTE: You can add/delete additional phones in the main home
screen. Home-Setup-Bluetooth – Bluetooth Connection.
Please refer to your Owner’s Manual for further information.
1. Press the PHONE button on the navigation or button on the
steering wheel remote controller.
2. Once the Bluetooth® Connection screen is displayed,
press [Add New Device].
3. Within the Bluetooth® pairing screen in your Bluetooth® device,
search and select the vehicle name.
The default vehicle name is “GENESIS G90”.
4. Verify the passkey and proceed with pairing from your
Bluetooth® device.
The default passkey is “0000”.
5. Connect Bluetooth®.
GENESIS
GENESIS
Genesis BrandG90