2018 GENESIS G80 light
[x] Cancel search: lightPage 3 of 25

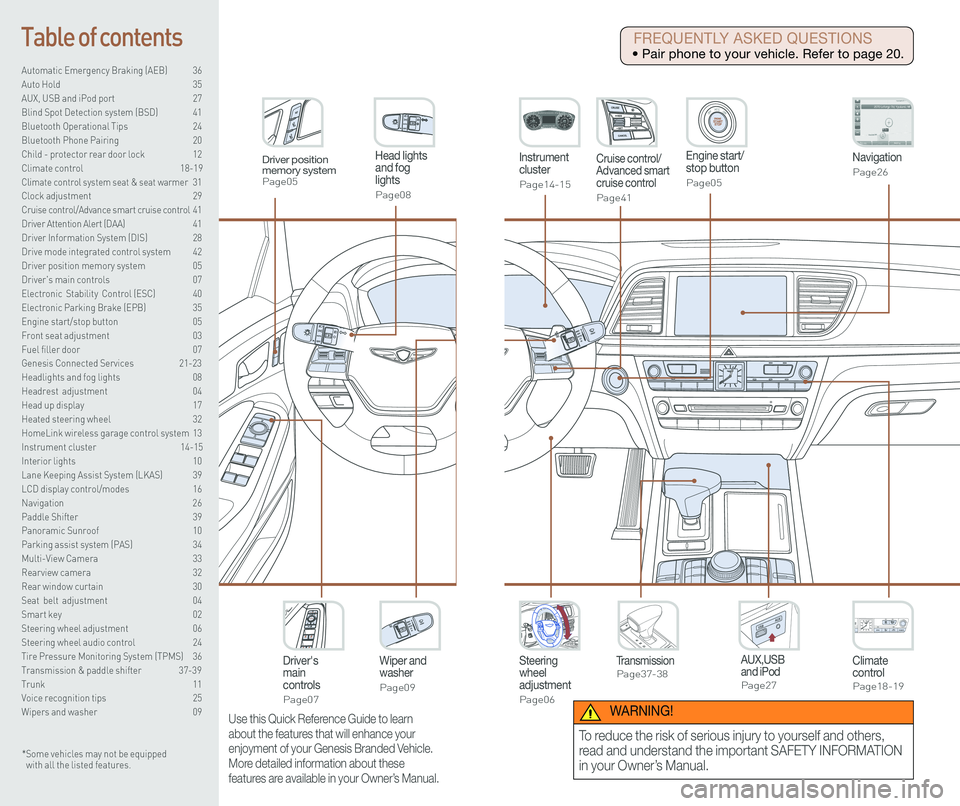
Steering wheel adjustment
Page06
Instrument cluster
Page14-15
Navigation
Page26
Head lights and fog lights
Page08
Climate controlPage18-19
Driver's main controls
Page07
Wiper and washer
Page09
TransmissionPage37-38
Table of contents
Automatic Emergency Braking (AEB) 36
Auto Hold 35
AUX, USB and iPod port 27
Blind Spot Detection system (BSD) 41
Bluetooth Operational Tips 24
Bluetooth Phone Pairing 20
Child - protector rear door lock 12
Climate control 18-19\
Climate control system seat & seat warmer 31
Clock adjustment 29
Cruise control/Advance smart cruise control 41
Driver Attention Alert (DAA) 41
Driver Information System (DIS) 28
Drive mode integrated control system 42
Driver position memory system 05
Driver's main controls 07
Electronic Stability Control (ESC) 40
Electronic Parking Brake (EPB) 35
Engine start/stop button 05
Front seat adjustment 03
Fuel filler door 07
Genesis Connected Services 21-23
Headlights and fog lights 08
Headrest adjustment 04
Head up display 17
Heated steering wheel 32
HomeLink wireless garage control system 13
Instrument cluster 14-15
Interior lights 10
Lane Keeping Assist System (LKAS) 39
LCD display control/modes 16
Navigation 26
Paddle Shifter 39
Panoramic Sunroof 10
Parking assist system (PAS) 34
Multi-View Camera 33
Rearview camera 32
Rear window curtain 30
Seat belt adjustment 04
Smart key 02
Steering wheel adjustment 06
Steering wheel audio control 24
Tire Pressure Monitoring System (TPMS) 36
Transmission & paddle shifter 37-39
Trunk 11
Voice recognition tips 25
Wipers and washer 09
Engine start/stop button
Page05
Cruise control/Advanced smart cruise control
Page41
AUX,USB and iPodPage27
Driver position memory systemPage05
* Some vehicles may not be equipped with all the listed features.
Use this Quick Reference Guide to learn
about the features that will enhance your
enjoyment of your Genesis Branded Vehicle.
More detailed information about these
features are available in your Owner’s Manual.
FREQUENTLY ASKED QUESTIONS
• Pair phone to your vehicle. Refer to page 20.
WARNING!
To reduce the risk of serious injury to yourself and others,
read and understand the important SAFETY INFORMATION
in your Owner’s Manual.
Page 6 of 25

FEATURES AND CONTROLS
Quick Reference Guide I 0706 I Quick Reference Guide
Set the angle 2 and distance 3
with the switch 1.
STEERING WHEEL ADJUSTMENTS
NOTE: Do not adjust while driving.
NOTE: Tighten fuel cap until one click is
heard.
Failure to do this may result in the
Check Engine Light illuminating.
FUEL FILLER DOOR
• Front power window switches.
•Press switch left/right to unfold/fold
mirrors.
• Rear power window switches.
• Press the L or R button to adjust the
mirror by using the directional switch.
If L or R button is still selected, both
mirrors will tilt downward when
reversing. Deselect L or R will disable
the auto tilt down feature.
Driver’s door
DRIVER'S MAIN CONTROLS
Outside Rearview Mirror
Press the lock or unlock button on the
smart key, and the mirrors will be
folded or unfolded when AUTO is set.
Power window lock button
Disables the power window switches
on the rear passenger doors.
Door Lock
Locks/unlocks all doors.
Window Switches
GENESIS
1
2
3
Page 7 of 25

Quick Reference Guide I 09
FEATURES AND CONTROLS
08 I Quick Reference Guide
WIPERS AND WASHER
Auto control wipe interval adjustment
Adjust the control knob.
Windshield washer
Pull the lever gently toward you to
spray washer fluid on the windshield
and to run the wipers1-3 cycles.
Headlamp washer
Fluid will spray on headlamp
assemblies when headlamps are
turned ON. Will activate only once for
every ignition key cycle or only once
every 15 minutes.
Fast wiper speed
Slow wiper speed
MIST - Single wipe
AUTO - Auto control wipe
LO - Low wiper speed
HI - High wiper speed
OFF
HEADLIGHTS AND FOG LIGHTS
Parking light position
Flashing high beam
DRL OFF position
Auto light position
Flashing high beam
Headlight position
Flashing high beam
Headlight delay
Headlights may stay on for 15 seconds after exiting and locking vehicle.\
Press the remote lock button twice to turn headlights off.
This feature can be enabled/disabled under the Lights menu in the User
Settings of the instrument cluster.
See Owner’s Manual for more detail.
Fog light
Turn signals and lane change
signals
Flashing high beam
PULL
PULLHigh beam
PUSH
GENESIS
Smart High Beam Function
1. Select auto position on stalk.
2. Push lever forward to engage Auto High beam.
3. Push lever forward again to disengage.
See Owner's Manual for more details.
Page 8 of 25

Quick Reference Guide I 11
FEATURES AND CONTROLS
10 I Quick Reference Guide
PANORAMIC SUNROOF
Sunshade
Sliding the sunroof
Tilting the sunroof
INTERIOR LIGHTS
Type A
Type B
1
1
1
1
2
2
3
3
Press the buttonto open the trunk.
Power trunk:To close, press and hold until trunk is fully closed.
TRUNK
Trunk main control button
Press to open.Smart key needs to bewithin range.
Use the mechanical key.
Trunk open button
Pressing the buttoncloses the power trunk automatically.
Power trunk close button
Pressing the button with the smart key in proximity locks all the doors and closes the power trunk automatically.
Power trunk lock button
Pressing the buttonfor more than 1second opens thepower trunkautomatically.
Trunk open button on
the smart key
GENESIS
Front Map Lamp ( )
Push the switch to turn the map
lamp on or off.
1
Front Door Lamp ( )
Lights will turn on when any door
is open.
2
Front Room Lamp ( )
Push the switch to turn the room
lamp on or off.
3
Page 9 of 25

Quick Reference Guide I 13
FEATURES AND CONTROLS
12 I Quick Reference Guide
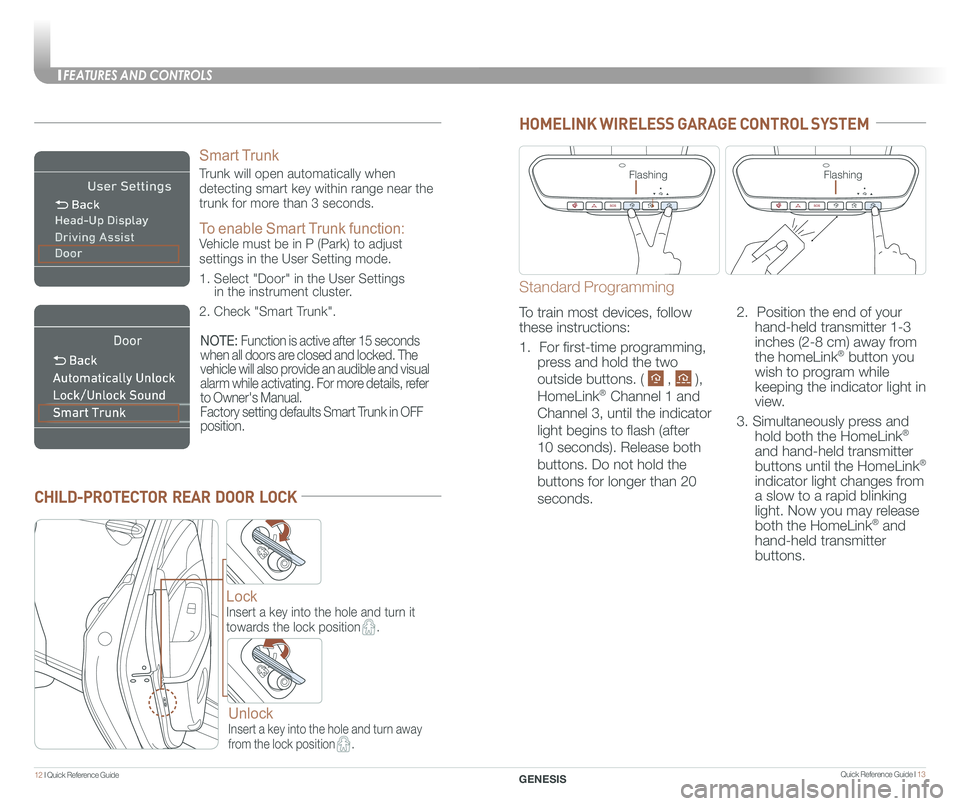
CHILD-PROTECTOR REAR DOOR LOCK
Lock
Insert a key into the hole and turn it
towards the lock position.
Unlock
Insert a key into the hole and turn away
from the lock position.
HOMELINK WIRELESS GARAGE CONTROL SYSTEM
GENESIS
Smart Trunk
Trunk will open automatically when
detecting smart key within range near the
trunk for more than 3 seconds.
To enable Smart Trunk function:
Vehicle must be in P (Park) to adjust
settings in the User Setting mode.
1. Select "Door" in the User Settings in the instrument cluster.
2. Check "Smart Trunk".
NOTE: Function is active after 15 seconds
when all doors are closed and locked. The
vehicle will also provide an audible and visual
alarm while activating. For more details, refer
to Owner's Manual.
Factory setting defaults Smart Trunk in OFF
position.
Standard Programming
To train most devices, follow
these instructions:
1. For first-time programming,
press and hold the two
outside buttons. ( , ),
HomeLink® Channel 1 and
Channel 3, until the indicator
light begins to flash (after
10 seconds). Release both
buttons. Do not hold the
buttons for longer than 20
seconds.
2. Position the end of your
hand-held transmitter 1-3
inches (2-8 cm) away from
the homeLink® button you
wish to program while
keeping the indicator light in
view.
3. Simultaneously press and
hold both the HomeLink®
and hand-held transmitter
buttons until the HomeLink®
indicator light changes from
a slow to a rapid blinking
light. Now you may release
both the HomeLink® and
hand-held transmitter
buttons.
FlashingFlashing
Page 10 of 25

Quick Reference Guide I 15
INSTRUMENT CLUSTER
14 I Quick Reference Guide GENESIS
Fuel gauge
TachometerSpeedometer
Engine coolant temperature gauge
Warning and
indicator lightsLCD display
(including trip computer)
Type A with 4.3" LCD Display
Type B with 7" LCD Display
Fuel gauge
TachometerSpeedometer
Engine coolant temperature gauge
Warning and
indicator lightsLCD display
(including trip computer)
Page 11 of 25

INSTRUMENT CLUSTER
Quick Reference Guide I 1716 I Quick Reference Guide
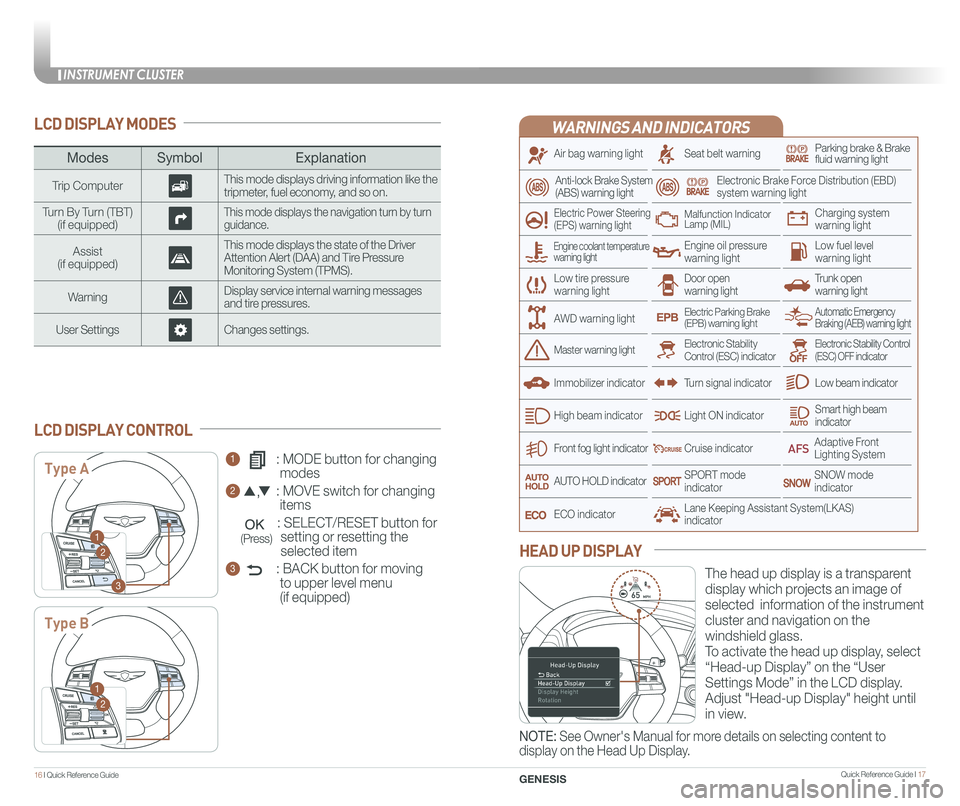
WARNINGS AND INDICATORS
Air bag warning light
Electric Power Steering (EPS) warning light
Seat belt warningParking brake & Brake fluid warning light
Electronic Brake Force Distribution (EBD) system warning light
Low tire pressurewarning lightTrunk open warning light
Low fuel level warning light
Front fog light indicator
Low beam indicator
Smart high beam indicator
SNOW modeindicator
Light ON indicator
ECO indicator
SPORT modeindicator
Anti-lock Brake System(ABS) warning light
High beam indicator
Door open warning light
Electronic Stability Control (ESC) indicatorMaster warning light
Automatic Emergency Braking (AEB) warning lightElectric Parking Brake(EPB) warning light
Engine oil pressure warning light
Charging system warning light
Immobilizer indicator
Malfunction IndicatorLamp (MIL)
Electronic Stability Control (ESC) OFF indicator
Cruise indicator
Lane Keeping Assistant System(LKAS)indicator
Adaptive Front Lighting System
AUTO HOLD indicator
Turn signal indicator
LCD DISPLAY MODES
The head up display is a transparent
display which projects an image of
selected information of the instrument
cluster and navigation on the
windshield glass.
To activate the head up display, select
“Head-up Display” on the “User
Settings Mode” in the LCD display.
Adjust "Head-up Display" height until
in view.
HEAD UP DISPLAY
1 : MODE button for changing
modes
2 : MOVE switch for changing
items
: SELECT/RESET button for
setting or resetting the
selected item
3 : BACK button for moving
to upper level menu
(if equipped)
LCD DISPLAY CONTROL
ModesSymbol Explanation
Trip ComputerThis mode displays driving information like the tripmeter, fuel economy, and so on.
Turn By Turn (TBT)(if equipped)This mode displays the navigation turn by turn guidance.
Assist(if equipped)
This mode displays the state of the Driver Attention Alert (DAA) and Tire Pressure Monitoring System (TPMS).
WarningDisplay service internal warning messages and tire pressures.
User SettingsChanges settings.
Type A
Type B
1
2
3
1
2
Engine coolant temperature warning light
AWD warning light
GENESIS
NOTE: See Owner's Manual for more details on selecting content to
display on the Head Up Display.
(Press)
Page 12 of 25

Quick Reference Guide I 19
CLIMATE CONTROL
1 8 I Quick Reference Guide
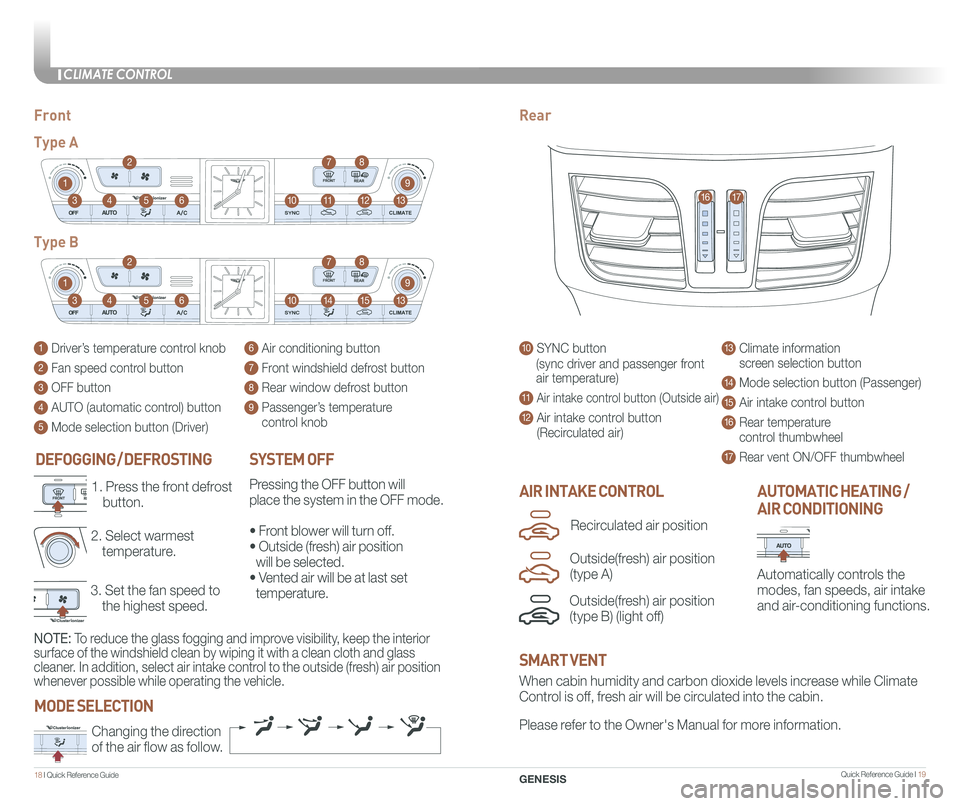
DEFOGGING / DEFROSTING
3. Set the fan speed to
the highest speed.
2. Select warmest
temperature.
1. Press the front defrost
button.AIR INTAKE CONTROL
SYSTEM OFF
Pressing the OFF button will
place the system in the OFF mode.
• Front blower will turn off.
• Outside (fresh) air position
will be selected.
• Vented air will be at last set
temperature.
Automatically controls the
modes, fan speeds, air intake
and air-conditioning functions.
AUTOMATIC HEATING /
AIR CONDITIONING
10 SYNC button
(sync driver and passenger front
air temperature)
11 Air intake control button (Outside air)
12 Air intake control button
(Recirculated air)
13 Climate information
screen selection button
14 Mode selection button (Passenger)
15 Air intake control button
16 Rear temperature
control thumbwheel
17 Rear vent ON/OFF thumbwheel
1 Driver’s temperature control knob
2 Fan speed control button
3 OFF button
4 AUTO (automatic control) button
5 Mode selection button (Driver)
6 Air conditioning button
7 Front windshield defrost button
8 Rear window defrost button
9 Passenger’s temperature
control knob
FrontRear
Type A
Type B
1
1
10
10
9
9
8
8
12
15
7
7
11
14
4
4
6
6
3
3
2
2
5
5
13
13
1617
When cabin humidity and carbon dioxide levels increase while Climate
Control is off, fresh air will be circulated into the cabin.
Please refer to the Owner's Manual for more information.Changing the direction
of the air flow as follow.
SMART VENT
MODE SELECTION
GENESIS
Outside(fresh) air position
(type B) (light off)
Recirculated air position
Outside(fresh) air position
(type A)
NOTE: To reduce the glass fogging and improve visibility, keep the interior
surface of the windshield clean by wiping it with a clean cloth and glas\
s
cleaner. In addition, select air intake control to the outside (fresh) air position
whenever possible while operating the vehicle.