2018 GENESIS G80 instrument cluster
[x] Cancel search: instrument clusterPage 3 of 25

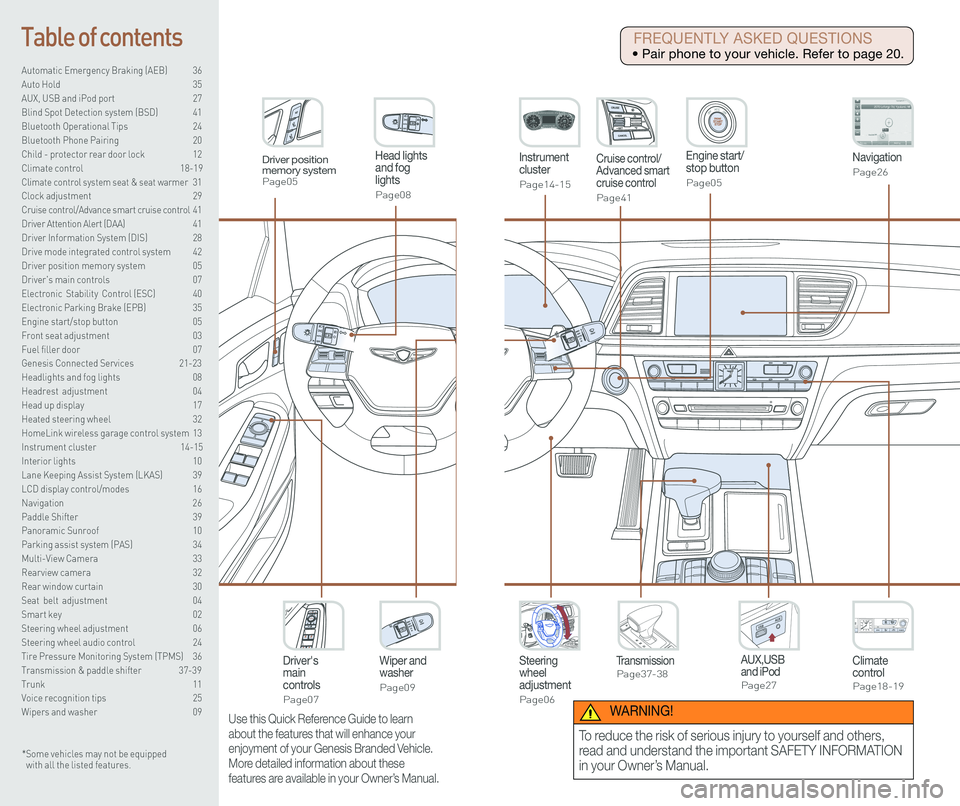
Steering wheel adjustment
Page06
Instrument cluster
Page14-15
Navigation
Page26
Head lights and fog lights
Page08
Climate controlPage18-19
Driver's main controls
Page07
Wiper and washer
Page09
TransmissionPage37-38
Table of contents
Automatic Emergency Braking (AEB) 36
Auto Hold 35
AUX, USB and iPod port 27
Blind Spot Detection system (BSD) 41
Bluetooth Operational Tips 24
Bluetooth Phone Pairing 20
Child - protector rear door lock 12
Climate control 18-19\
Climate control system seat & seat warmer 31
Clock adjustment 29
Cruise control/Advance smart cruise control 41
Driver Attention Alert (DAA) 41
Driver Information System (DIS) 28
Drive mode integrated control system 42
Driver position memory system 05
Driver's main controls 07
Electronic Stability Control (ESC) 40
Electronic Parking Brake (EPB) 35
Engine start/stop button 05
Front seat adjustment 03
Fuel filler door 07
Genesis Connected Services 21-23
Headlights and fog lights 08
Headrest adjustment 04
Head up display 17
Heated steering wheel 32
HomeLink wireless garage control system 13
Instrument cluster 14-15
Interior lights 10
Lane Keeping Assist System (LKAS) 39
LCD display control/modes 16
Navigation 26
Paddle Shifter 39
Panoramic Sunroof 10
Parking assist system (PAS) 34
Multi-View Camera 33
Rearview camera 32
Rear window curtain 30
Seat belt adjustment 04
Smart key 02
Steering wheel adjustment 06
Steering wheel audio control 24
Tire Pressure Monitoring System (TPMS) 36
Transmission & paddle shifter 37-39
Trunk 11
Voice recognition tips 25
Wipers and washer 09
Engine start/stop button
Page05
Cruise control/Advanced smart cruise control
Page41
AUX,USB and iPodPage27
Driver position memory systemPage05
* Some vehicles may not be equipped with all the listed features.
Use this Quick Reference Guide to learn
about the features that will enhance your
enjoyment of your Genesis Branded Vehicle.
More detailed information about these
features are available in your Owner’s Manual.
FREQUENTLY ASKED QUESTIONS
• Pair phone to your vehicle. Refer to page 20.
WARNING!
To reduce the risk of serious injury to yourself and others,
read and understand the important SAFETY INFORMATION
in your Owner’s Manual.
Page 7 of 25

Quick Reference Guide I 09
FEATURES AND CONTROLS
08 I Quick Reference Guide
WIPERS AND WASHER
Auto control wipe interval adjustment
Adjust the control knob.
Windshield washer
Pull the lever gently toward you to
spray washer fluid on the windshield
and to run the wipers1-3 cycles.
Headlamp washer
Fluid will spray on headlamp
assemblies when headlamps are
turned ON. Will activate only once for
every ignition key cycle or only once
every 15 minutes.
Fast wiper speed
Slow wiper speed
MIST - Single wipe
AUTO - Auto control wipe
LO - Low wiper speed
HI - High wiper speed
OFF
HEADLIGHTS AND FOG LIGHTS
Parking light position
Flashing high beam
DRL OFF position
Auto light position
Flashing high beam
Headlight position
Flashing high beam
Headlight delay
Headlights may stay on for 15 seconds after exiting and locking vehicle.\
Press the remote lock button twice to turn headlights off.
This feature can be enabled/disabled under the Lights menu in the User
Settings of the instrument cluster.
See Owner’s Manual for more detail.
Fog light
Turn signals and lane change
signals
Flashing high beam
PULL
PULLHigh beam
PUSH
GENESIS
Smart High Beam Function
1. Select auto position on stalk.
2. Push lever forward to engage Auto High beam.
3. Push lever forward again to disengage.
See Owner's Manual for more details.
Page 9 of 25

Quick Reference Guide I 13
FEATURES AND CONTROLS
12 I Quick Reference Guide
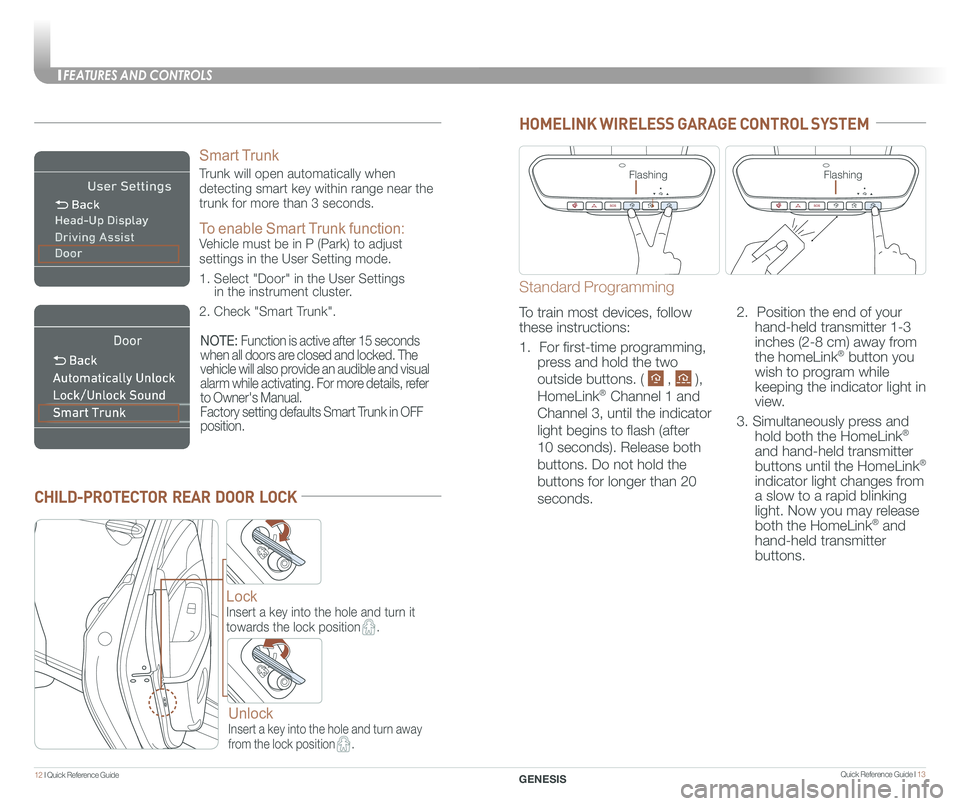
CHILD-PROTECTOR REAR DOOR LOCK
Lock
Insert a key into the hole and turn it
towards the lock position.
Unlock
Insert a key into the hole and turn away
from the lock position.
HOMELINK WIRELESS GARAGE CONTROL SYSTEM
GENESIS
Smart Trunk
Trunk will open automatically when
detecting smart key within range near the
trunk for more than 3 seconds.
To enable Smart Trunk function:
Vehicle must be in P (Park) to adjust
settings in the User Setting mode.
1. Select "Door" in the User Settings in the instrument cluster.
2. Check "Smart Trunk".
NOTE: Function is active after 15 seconds
when all doors are closed and locked. The
vehicle will also provide an audible and visual
alarm while activating. For more details, refer
to Owner's Manual.
Factory setting defaults Smart Trunk in OFF
position.
Standard Programming
To train most devices, follow
these instructions:
1. For first-time programming,
press and hold the two
outside buttons. ( , ),
HomeLink® Channel 1 and
Channel 3, until the indicator
light begins to flash (after
10 seconds). Release both
buttons. Do not hold the
buttons for longer than 20
seconds.
2. Position the end of your
hand-held transmitter 1-3
inches (2-8 cm) away from
the homeLink® button you
wish to program while
keeping the indicator light in
view.
3. Simultaneously press and
hold both the HomeLink®
and hand-held transmitter
buttons until the HomeLink®
indicator light changes from
a slow to a rapid blinking
light. Now you may release
both the HomeLink® and
hand-held transmitter
buttons.
FlashingFlashing
Page 10 of 25

Quick Reference Guide I 15
INSTRUMENT CLUSTER
14 I Quick Reference Guide GENESIS
Fuel gauge
TachometerSpeedometer
Engine coolant temperature gauge
Warning and
indicator lightsLCD display
(including trip computer)
Type A with 4.3" LCD Display
Type B with 7" LCD Display
Fuel gauge
TachometerSpeedometer
Engine coolant temperature gauge
Warning and
indicator lightsLCD display
(including trip computer)
Page 11 of 25

INSTRUMENT CLUSTER
Quick Reference Guide I 1716 I Quick Reference Guide
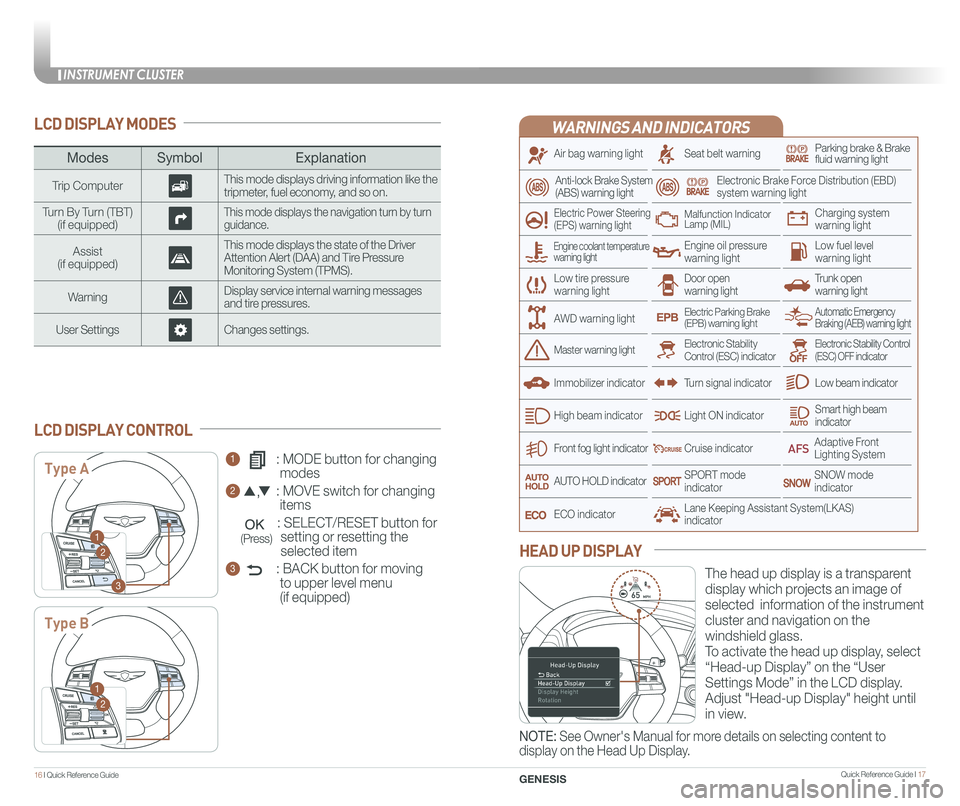
WARNINGS AND INDICATORS
Air bag warning light
Electric Power Steering (EPS) warning light
Seat belt warningParking brake & Brake fluid warning light
Electronic Brake Force Distribution (EBD) system warning light
Low tire pressurewarning lightTrunk open warning light
Low fuel level warning light
Front fog light indicator
Low beam indicator
Smart high beam indicator
SNOW modeindicator
Light ON indicator
ECO indicator
SPORT modeindicator
Anti-lock Brake System(ABS) warning light
High beam indicator
Door open warning light
Electronic Stability Control (ESC) indicatorMaster warning light
Automatic Emergency Braking (AEB) warning lightElectric Parking Brake(EPB) warning light
Engine oil pressure warning light
Charging system warning light
Immobilizer indicator
Malfunction IndicatorLamp (MIL)
Electronic Stability Control (ESC) OFF indicator
Cruise indicator
Lane Keeping Assistant System(LKAS)indicator
Adaptive Front Lighting System
AUTO HOLD indicator
Turn signal indicator
LCD DISPLAY MODES
The head up display is a transparent
display which projects an image of
selected information of the instrument
cluster and navigation on the
windshield glass.
To activate the head up display, select
“Head-up Display” on the “User
Settings Mode” in the LCD display.
Adjust "Head-up Display" height until
in view.
HEAD UP DISPLAY
1 : MODE button for changing
modes
2 : MOVE switch for changing
items
: SELECT/RESET button for
setting or resetting the
selected item
3 : BACK button for moving
to upper level menu
(if equipped)
LCD DISPLAY CONTROL
ModesSymbol Explanation
Trip ComputerThis mode displays driving information like the tripmeter, fuel economy, and so on.
Turn By Turn (TBT)(if equipped)This mode displays the navigation turn by turn guidance.
Assist(if equipped)
This mode displays the state of the Driver Attention Alert (DAA) and Tire Pressure Monitoring System (TPMS).
WarningDisplay service internal warning messages and tire pressures.
User SettingsChanges settings.
Type A
Type B
1
2
3
1
2
Engine coolant temperature warning light
AWD warning light
GENESIS
NOTE: See Owner's Manual for more details on selecting content to
display on the Head Up Display.
(Press)
Page 21 of 25

Quick Reference Guide I 37
DRIVING
36 I Quick Reference Guide GENESIS
AUTOMATIC EMERGENCY BRAKING (AEB)
The Automatic Emergency Braking
(AEB) helps avoid accidents by
identifying critical situations early and
warning the driver.
Also, the system helps reduce the
severity of crashes which cannot be
avoided by lowering the speed of
collision and, in some cases, by
preparing the vehicle and restraint
systems for impact.
TIRE PRESSURE MONITORING SYSTEM (TPMS)
LOW TIRE PRESSURE INDICATOR
Illuminates if one or more of your tires is significantly under-inflated.
TPMS MALFUNCTION INDICATOR Blinks for approximately one minute, then remains illuminated when
there is a malfunction with the TPMS. Inspect all tires and adjust tire
pressure to specification. If the lamp remains illuminated, have the
system checked by authorized retailer of Genesis Branded Products
as soon as possible.
Low Tire Pressure Position Telltale and
Tire Pressure Telltale
( Shown on the LCD display )
Low Tire Pressure Indicator /
TPMS Malfunction Indicator
NOTE: Vehicle must
be driven for accurate
tire pressure reading.
NOTE: System can be Enabled/
Disabled in the User Settings page
of the instrument cluster under
Driving Assist.
NOTE: Units can be changed in the User Settings page of the instrument
cluster under Other Features.
AUTOMATIC TRANSMISSION
() : Press the shift button, then move shift lever.
() : Depress the brake pedal, then move shift lever.
() : Move shift lever.
Move the shift lever from D (Drive) into the manual gate to select.
Move the shift lever forward (+) to up shift or rearward (–) to downshift.
Manual shift mode
Mechanical Type Shifter
Page 23 of 25

Quick Reference Guide I 41
The Driver Attention Alert (DAA) system displays the condition of the \
driver’s fatigue and inattention.
• Driver can adjust the Driver Attention Alert
System to the below settings. To adjust, go to
User Settings > Driving Assist > Driver
Attention Alert
Off - Driver Attention Alert system is
deactivated.
Normal - Driver Attention Alert system alerts
the driver of his/her fatigue level or inattentive
driving practices.
Early - Driver Attention Alert system alerts the
driver of his/her fatigue level or inattentive
driving practices faster than Normal mode.
The Driver Attention Alert system is operable,
when driving speed is between 40 mph and
110 mph .
40 I Quick Reference Guide
DRIVING
GENESIS
The BSD (Blind spot detection)
system uses a radar sensor to alert
the driver while driving.
It senses the rear side territory of the
vehicle and provides information to
the driver.
1 Blind spot detection
2 Lane change assist
3 Rear cross traffic alert
The BSD system will activate once vehicle speed exceeds 20 mph.
The rear cross traffic alert will activate, if vehicle is in reverse at speeds
below 6 mph and BSD is activated.
BLIND SPOT DETECTION SYSTEM (BSD)
DRIVER ATTENTION ALERT (DAA)
• To turn the BSD on, press the BSD
button. (indicator illuminated)
• To turn the BSD off, press the
BSD button again.
1
2
3
ELECTRONIC STABILITY CONTROL (ESC)
The ESC system is an electronic
system designed to help the driver
maintain vehicle control under
adverse conditions.
• To turn LKAS on,
press the LKAS switch.
• To turn LKAS off,
press the switch again.
The Lane Keeping Assist System
detects lane markers on the road,
and assists the driver’s steering to
help keep the vehicle between lanes.
LANE KEEPING ASSIST SYSTEM (LKAS)
ESC automatically selects the ON
position when the engine is started.
To turn off Traction Control
Press the ESC OFF button once.
To turn off Traction and Stability
Control
Press and hold the ESC OFF button
for more than 3 seconds.
NOTE: LKAS operates only when the
vehicle speed is above 38 mph and when
the LKAS indicator is green displayed in
the instrument cluster.
Refer to the Owner's Manual for more
detailed information.NOTE: LKAS Settings can be
adjusted in the User Settings page
of the instrument cluster under
Driving Assist.
Page 24 of 25

Quick Reference Guide I 4342I Quick Reference Guide
DRIVING
GENESIS
CRUISE CONTROL/ADVANCED SMART CRUISE CONTROL
Setting vehicle distance
(Advanced smart cruise
control only)
The vehicle to vehicle distance will
automatically activate when you set
the cruise speed.
This system assist you in setting the
distance from the vehicle ahead and
will maintain the selected distance
without you depressing the
accelerator or the brake pedal.
If your vehicle is equipped with Advanced smart cruise control and you
wish to eliminate the vehicle distance function, you can change cruise
control setting to a standard setting.
Press the Cruise Control button on the
steering wheel to turn on Cruise Control.
Then press and hold the vehicle distance
button for more than 2 seconds to toggle
between Smart Cruise Control (SCC) and
Cruise Control (CC) mode.
Please refer to your Owner's Manual for
more information.
Each time the vehicle distance set
button is pressed, the vehicle to
vehicle distance changes as follows:
The cruise control system allows
you to program the vehicle to
maintain a constant speed without
holding the accelerator pedal.
Distance 4
Distance 3
Distance 2
Distance 1
1 To On/Off the cruise control.
2 To Resume or Increase
the cruise control speed.
3 To Set or Decrease
the cruise control speed.
4 To Cancel the cruise control.
2
3
1
4
You can select the drive mode
according to your preference or the
road condition.
The drive mode defaults to the Normal
mode whenever the engine start/stop
button is turned to the ON position.
Each time you press the button, the
drive mode is changed as follows :
DRIVE MODE INTEGRATED CONTROL SYSTEM
Normal mode is not displayed on the instrument cluster.
Normal mode
Sport mode focuses on dynamic driving by automatically controlling the
steering wheel, engine and transmission system.
Sport mode
Snow mode helps you to drive more effectively on the slippery road
such as snowy or muddy road.
Press and hold the drive mode button to select the Snow mode.
Press the button again to return to previous mode.
Snow mode
Active ECO helps improve fuel efficiency by controlling certain engine
and transmission system operating parameters.
ECO mode
Normal mode
Sport mode ECO mode