Page 468 of 516
7-67
7
Maintenance
Fuse NameFuse ratingCircuit Protected
E-SHIFTER 110A Electronic ATM Shift Lever
SMART KEY 110A Start/Stop Button Switch
MODULE 710A Multi-View Camera Module, Sunroof Motor, Head-Up Display, Cooling Fan Controller,
Passenger Lumbar Support Unit
MODULE 810A Smart Key Control Module, BCM
MODULE 220A
Smart Key Control Module, Overhead Console Lamp, BCM, AMP
Digital Clock, Keyboard, I-BOX, A/V & Navigation Head Unit, Front Monitor, Electronic ATM Shift Lever,
Front Wireless Charger, Front Power Outlet & Cigarette Lighter, Multi-View Camera Module,
Metal Core Block (PCB #1 - Power Outlet Relay)
P/SEAT DRV 130A Driver IMS Control Module, Driver Power Seat Relay Box
P/SEAT PASS 130A Passenger Power Seat Relay Box
DOOR LAMP10A Driver/Passenger Door Module, Rear Door Module LH/RH
BRAKE SWITCH10A Smart Key Control Module, Stop Lamp Switch
A/CON20A Metal Core Block (PCB #1 - Blower Relay), Ionizer, CO2 Sensor, A/C Control Module
Page 479 of 516
7-78
Maintenance
✽ ✽
NOTICE
We recommend that the headlamp
aiming be adjusted after an accident
or after the headlamp assembly is
reinstalled at an authorized retailer
of Genesis Branded products.
Headlamp
1. Turn off the engine.
2. Open the hood.
3. Remove the socket from the
assembly by turning the socket
counterclockwise until the tabs on
the socket align with the slots on
the assembly.
4. Remove the connector (A) and
pull the BI-FUNCTION lamp.
5. Connect the BI-FUNCTION lamp
to the cable and install the con-
nector (A).
6. Install the socket in the assembly
by aligning the tabs on the socket
with the slots in the assembly.Push the socket into the assembly
and turn the socket clockwise.
If the headlamp (LED) does nut oper-
ate, have the vehicle checked by an
autorized retailer of Genesis
Branded products.
ODH073064L
A
A
Page 480 of 516

7-79
7
Maintenance
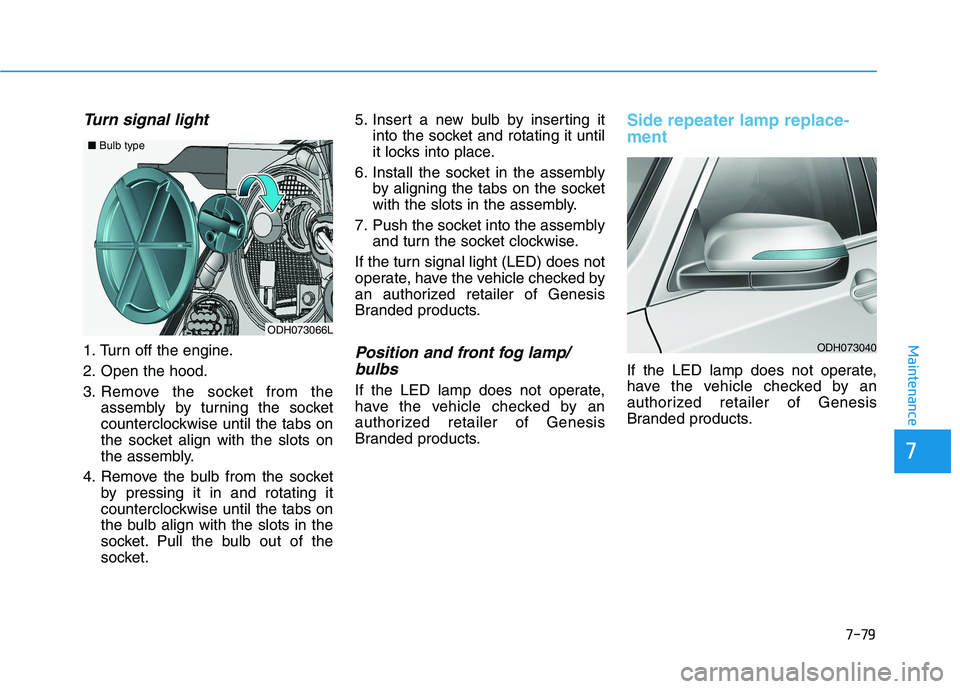
Turn signal light
1. Turn off the engine.
2. Open the hood.
3. Remove the socket from the
assembly by turning the socket
counterclockwise until the tabs on
the socket align with the slots on
the assembly.
4. Remove the bulb from the socket
by pressing it in and rotating it
counterclockwise until the tabs on
the bulb align with the slots in the
socket. Pull the bulb out of the
socket.5. Insert a new bulb by inserting it
into the socket and rotating it until
it locks into place.
6. Install the socket in the assembly
by aligning the tabs on the socket
with the slots in the assembly.
7. Push the socket into the assembly
and turn the socket clockwise.
If the turn signal light (LED) does not
operate, have the vehicle checked by
an authorized retailer of Genesis
Branded products.Position and front fog lamp/
bulbs
If the LED lamp does not operate,
have the vehicle checked by an
authorized retailer of Genesis
Branded products.
Side repeater lamp replace-
ment
If the LED lamp does not operate,
have the vehicle checked by an
authorized retailer of Genesis
Branded products.
ODH073066L ■Bulb type
ODH073040
Page 481 of 516
7-80
Maintenance
Rear combination light bulb
replacement
Type A
(1) Stop/tail light
(2) Turn signal light
(3) Back-up light
(4) Side marker
Type B
(1) Stop/tail light
(2) Turn signal light
(3) Back-up light
(4) Side marker
Rear turn signal lamp
Type A
1. Open the trunk lid.
2. Open the service cover.
3. Remove the socket from the
assembly by turning the socket
counterclockwise until the tabs on
the socket align with the slots on
the assembly.
4. Remove the bulb from the socket
by pressing it in and rotating it
counterclockwise until the tabs on
the bulb align with the slots in the
socket. Pull the bulb out of the
socket.ODH073041 ■Type A
ODH073041 ■Type BODH073067L
Page 482 of 516

7-81
7
Maintenance
5. Insert a new bulb by inserting it
into the socket and rotating it until
it locks into place.
6. Install the socket in the assembly
by aligning the tabs on the socket
with the slots in the assembly.
Push the socket into the assembly
and turn the socket clockwise.
7. Install the service cover by putting
it into the service hole.
Type B
If the LED lamp does not operate,
have the vehicle checked by an
authorized retailer of Genesis
Branded products.
Back up lamp
Type A
1. Open the trunk.
2. Loosen the retaining screw of the
trunk lid cover and then remove
the cover.
3. Remove the socket from the
assembly by turning the socket
counter clockwise until the tabs on
the socket align with the slots on
the assembly.
4. Remove the bulb by pulling it
straight out.
5. Insert a new bulb by inserting it
into the socket and rotating it until
it locks into place.6. Install the socket into the assem-
bly by aligning the tabs on the
socket with the slots in the assem-
bly. Push the socket into the
assembly and turn the socket
clockwise.
7. Reinstall the trunk lid cover by
pushing in the screw.
Type B
If the LED lamp does not operate,
have the vehicle checked by an
authorized retailer of Genesis
Branded products.
Stop and tail lamp
If the lamp does not operate, have
the vehicle checked by an authorized
retailer of Genesis Branded prod-
ucts.
ODH073068L
Page 512 of 516

I-5
If the engine overheats ......................................................6-7
If the engine will not start.................................................6-3
If the engine doesn't turn over or turns over slowly ....6-3
If the engine turns over normally but doesn't start ......6-3
If you have a flat tire ......................................................6-15
Changing tires ............................................................6-16
Jack and tools .............................................................6-15
Jack label ....................................................................6-21
Important safety precautions.............................................2-2
Air bag hazards ............................................................2-2
Always wear your seat belt ..........................................2-2
Control your speed .......................................................2-3
Driver distraction..........................................................2-2
Keep your vehicle in safe condition.............................2-3
Restrain all children .....................................................2-2
In case of an emergency while driving .............................6-2
If the engine stalls at a crossroad or crossing ..............6-2
If the engine stalls while driving..................................6-2
If you have a flat tire while driving .............................6-3
Instrument cluster ...........................................................3-58
Gauges ........................................................................3-60
Instrument Cluster Control .........................................3-59
LCD Display Control .................................................3-59
Instrument panel overview ........................................1-5, 1-6Interior features .............................................................3-155
Bag hanger................................................................3-159
Clock ........................................................................3-158
Clothes hanger ..........................................................3-158
Cup holder ................................................................3-155
Floor mat anchor(s) ..................................................3-159
Luggage net holder ...................................................3-162
Power outlet..............................................................3-156
Rear curtain ..............................................................3-160
Side curtain...............................................................3-161
Sunvisor ....................................................................3-156
USB Charger ............................................................3-158
Interior overview...............................................................1-4
Jump starting .....................................................................6-4
Push-starting .................................................................6-6
I
Index
I
J
Page:
< prev 1-8 9-16 17-24