2018 FORD TRANSIT brake
[x] Cancel search: brakePage 244 of 521

Do not use supplemental transmission
fluid additives, treatments or cleaning
agents. The use of these materials may
affect transmission operation and result
in damage to internal transmission
components.
BRAKE FLUID CHECK
WARNING: Do not use any fluid
other than the recommended brake fluid
as this will reduce brake efficiency. Use of
incorrect fluid could result in the loss of
vehicle control, serious personal injury or
death. WARNING: Only use brake fluid from
a sealed container. Contamination with
dirt, water, petroleum products or other
materials may result in brake system
damage or failure. Failure to adhere to this
warning could result in the loss of vehicle
control, serious personal injury or death. WARNING: Do not allow the fluid to
touch your skin or eyes. If this happens,
rinse the affected areas immediately with
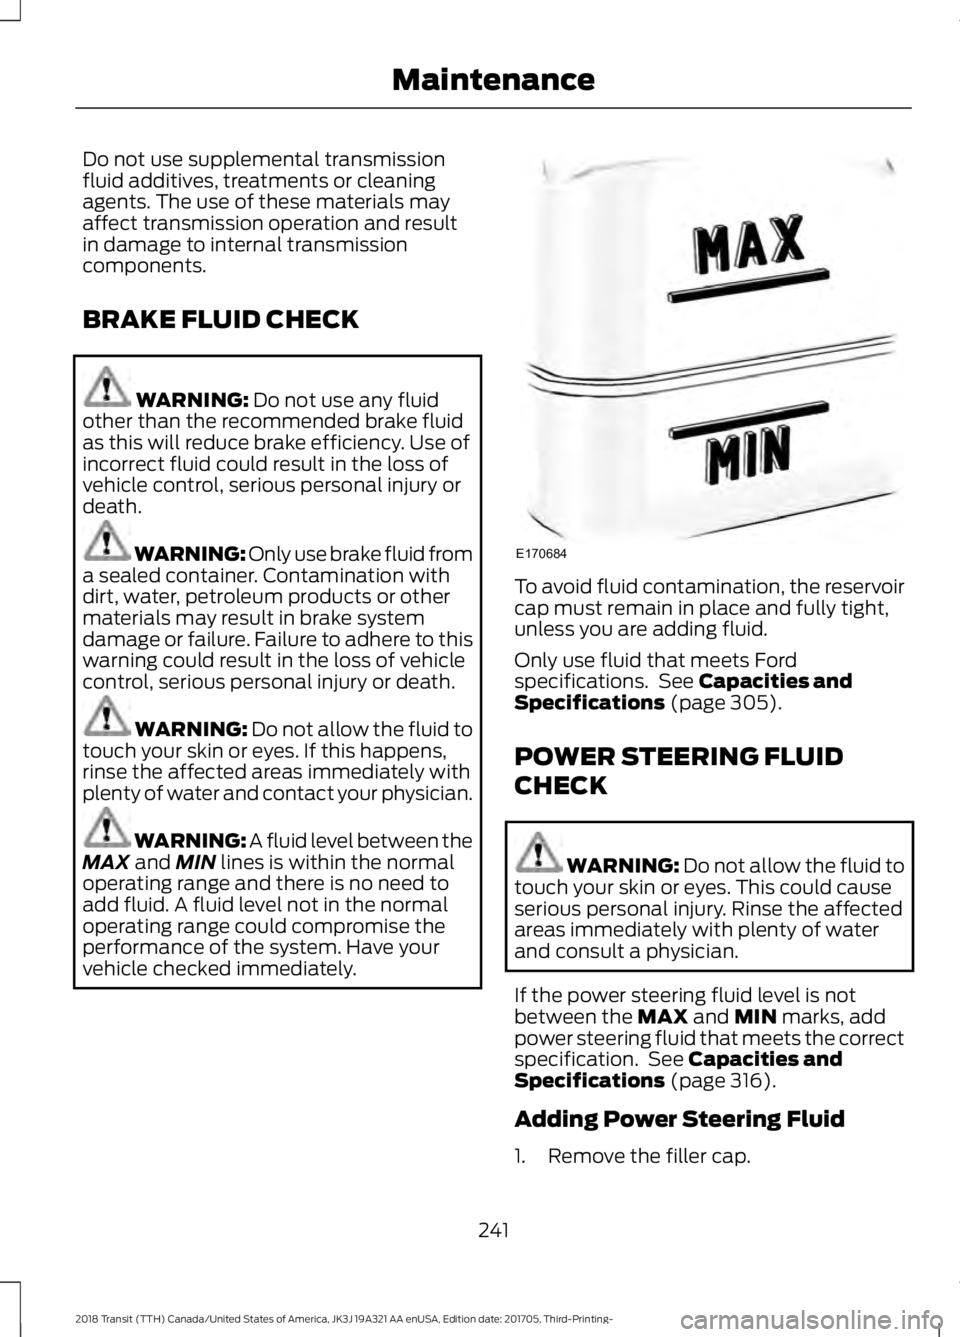
plenty of water and contact your physician. WARNING: A fluid level between the
MAX
and MIN lines is within the normal
operating range and there is no need to
add fluid. A fluid level not in the normal
operating range could compromise the
performance of the system. Have your
vehicle checked immediately. To avoid fluid contamination, the reservoir
cap must remain in place and fully tight,
unless you are adding fluid.
Only use fluid that meets Ford
specifications. See
Capacities and
Specifications (page 305).
POWER STEERING FLUID
CHECK WARNING: Do not allow the fluid to
touch your skin or eyes. This could cause
serious personal injury. Rinse the affected
areas immediately with plenty of water
and consult a physician.
If the power steering fluid level is not
between the
MAX and MIN marks, add
power steering fluid that meets the correct
specification. See
Capacities and
Specifications (page 316).
Adding Power Steering Fluid
1. Remove the filler cap.
241
2018 Transit (TTH) Canada/United States of America, JK3J 19A321 AA enUSA, Edition date: 201705, Third-Printing- MaintenanceE170684
Page 255 of 521

3.
Turn the bulb holder counterclockwise
and remove it. Tail and brake lamp.
A
Reversing lamp.
B
Rear clearance lamp.
C
4. Remove the bulb by pulling it straight
out.
Central High Mounted Brake Lamp
This is not a serviceable item, see an
authorized dealer if it fails. License Plate Lamp
1. Carefully release the spring clip.
2. Remove the lamp.
3.
Turn the bulb holder counterclockwise
and remove it. Pull the bulb straight
out.
Interior Lamp
Vehicles with Interior Sensors 1. Carefully remove the lens.
2. Remove the bulb.
252
2018 Transit (TTH) Canada/United States of America, JK3J 19A321 AA enUSA, Edition date: 201705, Third-Printing- Maintenance3
E175745 A
B
C
4
E175746 3
2
1
E72789 1
2
E154370
Page 257 of 521

Exterior Lamps
Power (Watt)
Specification
Lamp
5
168
Front side marker lamp.
5
W5W
Front I.D. lamp.
55
H11
Headlamp low beam and Daytime
running lamp.
60
9005
Headlamp high beam.
21
3457NAK
Front direction indicator.
5
W5W
Side direction indicator.
5
W5W
Front clearance lamp (Exterior mirror).
26/6
3057K
Brake, rear and direction indicator
lamp.
5
168
Rear clearance lamp.
26
3057K
Reversing lamp.
5
W5W
License plate lamp.
Note: If your vehicle is fitted with LED lamps these are not serviceable items, see an
authorized dealer if they fail.
Interior Lamps Power (watt)
Specification
Lamp
6
W6W
Front interior lamp.
6
Festoon
Front interior lamp. Vehicles with
category 1 alarm.
6
W6W
Map lamp.
10
211 Festoon
Side door entrance lamp.
10
211 Festoon
Luggage compartment lamp.
Note: If your vehicle is fitted with LED lamps these are not serviceable items, see an
authorized dealer if they fail.
254
2018 Transit (TTH) Canada/United States of America, JK3J 19A321 AA enUSA, Edition date: 201705, Third-Printing- Maintenance
Page 269 of 521

CLEANING THE WHEELS
1. Regularly clean them with a wheel
cleaner. We recommend that you use
Ford approved wheel cleaner if
available.
2. Remove dirt and brake dust with a sponge.
3. Remove tar and grease with a bug and
tar remover. We recommend that you
use Ford approved bug and tar remover
if available.
4. Thoroughly rinse the wheels with water
after cleaning.
If you intend on parking your vehicle for an
extended period after cleaning the wheels
with a wheel cleaner, drive your vehicle for
a few minutes before doing so. This
reduces the risk of corrosion of the brake
discs, brake pads and linings.
Do not clean the wheels when they are hot.
Note: Some car washes could damage
wheel rims and covers.
Note: Using non-recommended cleaners,
harsh cleaning products, chrome wheel
cleaners or abrasive materials could
damage wheel rims and covers.
VEHICLE STORAGE
If you plan on storing your vehicle for 30
days or more, read the following
maintenance recommendations to make
sure your vehicle stays in good operating
condition.
We engineer and test all motor vehicles
and their components for reliable, regular
driving. Under various conditions,
long-term storage may lead to degraded
engine performance or failure unless you
use specific precautions to preserve engine
components. General
•
Store all vehicles in a dry, ventilated
place.
• Protect from sunlight, if possible.
• If vehicles are stored outside, they
require regular maintenance to protect
against rust and damage.
Body
• Wash your vehicle thoroughly to
remove dirt, grease, oil, tar or mud from
exterior surfaces, rear-wheel housing
and the underside of front fenders.
• Periodically wash your vehicle if it is
stored in exposed locations.
• Touch-up exposed or primed metal to
prevent rust.
• Cover chrome and stainless steel parts
with a thick coat of auto wax to prevent
discoloration. Re-wax as necessary
when you wash your vehicle.
• Lubricate all hood, door and luggage
compartment hinges and latches with
a light grade oil.
• Cover interior trim to prevent fading.
• Keep all rubber parts free from oil and
solvents.
Engine
• Change the engine oil and filter prior to
storage because used engine oil
contains contaminates which may
cause engine damage.
• Start the engine every 15 days for a
minimum of 15 minutes. Run at fast idle
with the climate controls set to defrost
until the engine reaches normal
operating temperature.
266
2018 Transit (TTH) Canada/United States of America, JK3J 19A321 AA enUSA, Edition date: 201705, Third-Printing- Vehicle Care
Page 270 of 521

•
With your foot on the brake, shift
through all the gears while the engine
is running.
• We recommend that you change the
engine oil before you use your vehicle
again.
Fuel system
• Fill the fuel tank with high-quality fuel
until the first automatic shutoff of the
fuel pump nozzle.
Cooling system
• Protect against freezing temperatures.
• When removing your vehicle from
storage, check coolant fluid level.
Confirm that there are no cooling
system leaks and that fluid is at the
recommended level.
Battery
• Check and recharge as necessary. Keep
connections clean.
• If storing your vehicle for more than 30
days without recharging the battery,
we recommend that you disconnect
the battery cables to maintain battery
charge for quick starting.
Note: It is necessary to reset memory
features if battery cables are disconnected.
Brakes
• Make sure the brakes and parking brake
release fully.
Tires
• Maintain recommended air pressure. Miscellaneous
•
Make sure all linkages, cables, levers
and pins under your vehicle are covered
with grease to prevent rust.
• Move vehicles at least 25 ft (7.5 m)
every 15 days to lubricate working parts
and prevent corrosion.
Removing Vehicle From Storage
When your vehicle is ready to come out of
storage, do the following:
• Wash your vehicle to remove any dirt
or grease film build-up on window
surfaces.
• Check windshield wipers for any
deterioration.
• Check under the hood for any foreign
material that may have collected
during storage such as mice or squirrel
nests.
• Check the exhaust for any foreign
material that may have collected
during storage.
• Check tire pressures and set tire
inflation per the Tire Label.
• Check brake pedal operation. Drive
your vehicle
15 ft (4.5 m) back and
forth to remove rust build-up.
• Check fluid levels (including coolant,
oil and gas) to make sure there are no
leaks, and fluids are at recommended
levels.
• If you remove the battery, clean the
battery cable ends and check for
damage.
Contact an authorized dealer if you have
any concerns or issues.
267
2018 Transit (TTH) Canada/United States of America, JK3J 19A321 AA enUSA, Edition date: 201705, Third-Printing- Vehicle Care
Page 282 of 521

You are strongly urged to buy a
reliable tire pressure gauge, as
automatic service station gauges
may be inaccurate. We
recommend the use of a digital or
dial-type tire pressure gauge
rather than a stick-type tire
pressure gauge.
Use the recommended cold
inflation pressure for optimum tire
performance and wear.
Under-inflation or over-inflation
may cause uneven treadwear
patterns.
Always inflate the tires to the
recommended inflation pressure
even if it is less than the maximum
inflation pressure information
found on the tire. The
recommended tire inflation
pressure is found on the Safety
Compliance Certification Label
(affixed to either the door hinge
pillar, door-latch post, or the door
edge that meets the door-latch
post, next to the driver seating
position), or Tire Label which is
located on the B-Pillar or the edge
of the driver door. Failure to follow
the tire pressure
recommendations can cause
uneven treadwear patterns and
adversely affect the way your
vehicle handles
Note:
Do not reduce tire pressure
to change the ride characteristics
of your vehicle. If you do not
maintain the tire pressures as
specified by Ford, your vehicle may
experience a condition known as
shimmy. This will cause severe
vibration and oscillations in the
steering wheel when your vehicle
travels over a bump or dip in the
road and is unable to dampen out
by itself. Significantly
under-inflated tires, incorrect tire
usage or any vehicle modifications
such as lift-kits can cause your
vehicle to shimmy. If your vehicle
begins to shimmy, slowly reduce
the speed of your vehicle by
pressing the brake pedal or
releasing the accelerator pedal. As
your vehicle speed reduces the
shimmy will cease.
The maximum inflation pressure
is the tire manufacturer's
maximum permissible pressure or
the pressure at which the
maximum load can be carried by
the tire. This pressure is normally
higher than the manufacturer ’s
recommended cold inflation
pressure, which can be found on
the Safety Compliance
Certification Label (affixed to
either the door hinge pillar,
door-latch post, or the door edge
that meets the door-latch post,
next to the driver seating
position), or Tire Label which is
located on the B-Pillar or the edge
279
2018 Transit (TTH) Canada/United States of America, JK3J 19A321 AA enUSA, Edition date: 201705, Third-Printing- Wheels and Tires
Page 290 of 521

WARNING: If you choose to install
snow tires on your vehicle, they must be
the same size, construction, and load range
as the original tires listed on the tire
placard, and they must be installed on all
four wheels. Mixing tires of different size
or construction on your vehicle can
adversely affect your vehicle's handling
and braking, and may lead to loss of
vehicle control. WARNING:
Only fit snow chains to
specified tires.
The tires on your vehicle have all-weather
treads to provide traction in rain and snow.
However, in some climates, you may need
to use snow tires, snow chains or cables.
If you use snow chains or cables, we
recommended that steel wheels of the
same size and specifications are used,
snow chains or cables may damage alloy
wheels.
Follow these guidelines when using snow
chains or cables:
• Avoid fully loading your vehicle.
• Only certain snow chains or cables
have been approved by Ford as safe
for use on vehicles with either 235/65
R16C or 195/75 R16C tires.
• Snow chains or cables must be
mounted in pairs on the rear tires only.
• Do not use snow chains or cables on
dual rear alloy wheels.
• Install snow chains or cables securely,
make sure they do not touch any wiring,
brake lines or fuel lines.
• Use only SAE Class S snow chains,
snow cables or equivalent that
measure
0.4 in (10 mm) or less in
dimension as measured on the sidewall
of the tire. •
Do not exceed
30 mph (48 km/h) or
the maximum speed recommended by
the snow chains or cables
manufacturer, whichever is less.
• Purchase snow chains or cables from
a manufacturer that clearly labels the
body to tire dimension restrictions.
• Remove the snow chains or cables
when they are no longer needed.
• Do not use snow chains or cables on
dry roads.
• If you have any questions regarding
snow chains or cables, see an
authorized dealer.
TIRE PRESSURE MONITORING
SYSTEM
(If Equipped) WARNING:
The tire pressure
monitoring system is not a substitute for
manually checking tire pressures. You
should periodically check tire pressures
using a pressure gauge. Failure to correctly
maintain tire pressures could increase the
risk of tire failure, loss of control, vehicle
rollover and personal injury. WARNING:
Do not use tire sealants
as they may damage the tire pressure
monitoring system. WARNING:
If the tire pressure
monitor sensor becomes damaged it may
not function.
287
2018 Transit (TTH) Canada/United States of America, JK3J 19A321 AA enUSA, Edition date: 201705, Third-Printing- Wheels and Tires
Page 295 of 521

1. Drive your vehicle above 20 mph
(32 km/h) for at least two minutes and
then park in a safe location where you
can easily get to all four tires and have
access to a tire inflation pump.
2. Switch the ignition off.
3. Switch the ignition on with the engine off.
4. Turn the hazard flashers on then off three times, this must be completed
within 10 seconds. If the reset mode
has been entered successfully, the horn
will chirp once and the system indicator
will flash. If this does not occur, repeat
the procedure from step 2. If after
repeated attempts to enter the reset
mode, the horn does not chirp and the
system indicator does not flash, have
your vehicle checked by an authorized
dealer as soon as possible.
5. Train the system sensors in the tires using the following reset sequence
starting with the left front tire and
following a clockwise order: Left front,
right front, right rear, left rear.
6. Remove the valve cap from the valve stem on the left front tire. Decrease the
air pressure until the horn chirps.
Note: The single horn chirp confirms that
the sensor identification code has been
learned by your vehicle for this position. If a
double horn chirp is heard, the reset
procedure was unsuccessful and must be
repeated.
7. Remove the valve cap from the valve stem on the right front tire. Decrease
the air pressure until the horn chirps.
8. Remove the valve cap from the valve stem on the right rear tire. Decrease the
air pressure until the horn chirps. 9. Remove the valve cap from the valve
stem on the left rear tire. Decrease the
air pressure until the horn chirps.
Training is complete when the horn
chirps after the last system sensor (left
rear) has been trained and the system
indicator stops flashing.
10. Switch the ignition off. If two short horn chirps are heard, the reset
procedure was unsuccessful and
must be repeated.
Note: If after repeating the procedure two
short horn chirps are heard again, have your
vehicle checked by an authorized dealer as
soon as possible.
11. Set all four tires to the correct pressure
See Maintenance (page
229). or the tire inflation pressure label
(located on the edge of driver door or
the B-Pillar).
CHANGING A ROAD WHEEL WARNING:
Do not use tire sealants
as they may damage the tire pressure
monitoring system. WARNING:
If the tire pressure
monitor sensor becomes damaged it may
not function.
Note: The tire pressure monitoring system
indicator light will illuminate when the spare
tire is in use. To restore the full function of
the monitoring system, all road wheels
equipped with tire pressure monitoring
sensors must be mounted on this vehicle.
If you get a flat tire while driving, do not
apply the brake heavily. Instead, gradually
decrease your speed. Hold the steering
wheel firmly and slowly move to a safe
place on the side of the road.
292
2018 Transit (TTH) Canada/United States of America, JK3J 19A321 AA enUSA, Edition date: 201705, Third-Printing- Wheels and Tires