2018 FORD TRANSIT warning
[x] Cancel search: warningPage 252 of 521

4. Disconnect the electrical connectors.
Note:
When you install the headlamp, make
sure that you correctly attach the electrical
connector.
Note: When you install the headlamp, make
sure that you correctly engage its locating
points.
CHANGING A BULB WARNING: Switch all of the lamps
and the ignition off. Failure to follow this
warning could result in serious personal
injury. WARNING: Bulbs become hot when
in use. Let them cool down before you
remove them.
Use the correct specification bulb. See
Bulb Specification Chart
(page 253).
The following instructions describe how to
remove the bulbs. Install in the reverse
order unless otherwise stated.
Note: LED lamps are not serviceable. See
an authorized dealer. Headlamp
Parking lamp and direction
indicator lamp.
A
Headlamp high beam.
B
Headlamp low beam and
daytime running lamp.
C
Side marker lamp.
D
Note: You may have to remove a cover to
gain access to the bulb.
Side Marker Lamp 1. Remove the headlamp. See
Removing a Headlamp
(page 248).
2. Turn the bulb holder counterclockwise
and remove it.
3. Remove the bulb by pulling it straight out.
249
2018 Transit (TTH) Canada/United States of America, JK3J 19A321 AA enUSA, Edition date: 201705, Third-Printing- MaintenanceE169200 E175739
BCD
A 3
E175740
2
Page 258 of 521
CHANGING THE ENGINE AIR
FILTER - 3.2L POWER STROKE
DIESEL
WARNING: To reduce the risk of
vehicle damage and personal burn injuries,
do not start your engine with the air cleaner
removed and do not remove it while the
engine is running.
Note: Failure to use the correct air filter
element may result in severe engine
damage. The vehicle warranty may be void
for any damage to the engine if the correct
air filter element is not used.
Note: After operating the vehicle up to
200 mi (320 km)
in heavy snowfall, we
recommend that you open the hood at the
earliest opportunity and clear the snow and
ice from air filter housing. Do not remove the
foam filter. The foam filter must be in place
at all times.
Only use the specified air filter.
See
Capacities and Specifications (page
305).
Change the air filter element and foam
filler at the proper interval. See Scheduled
Maintenance
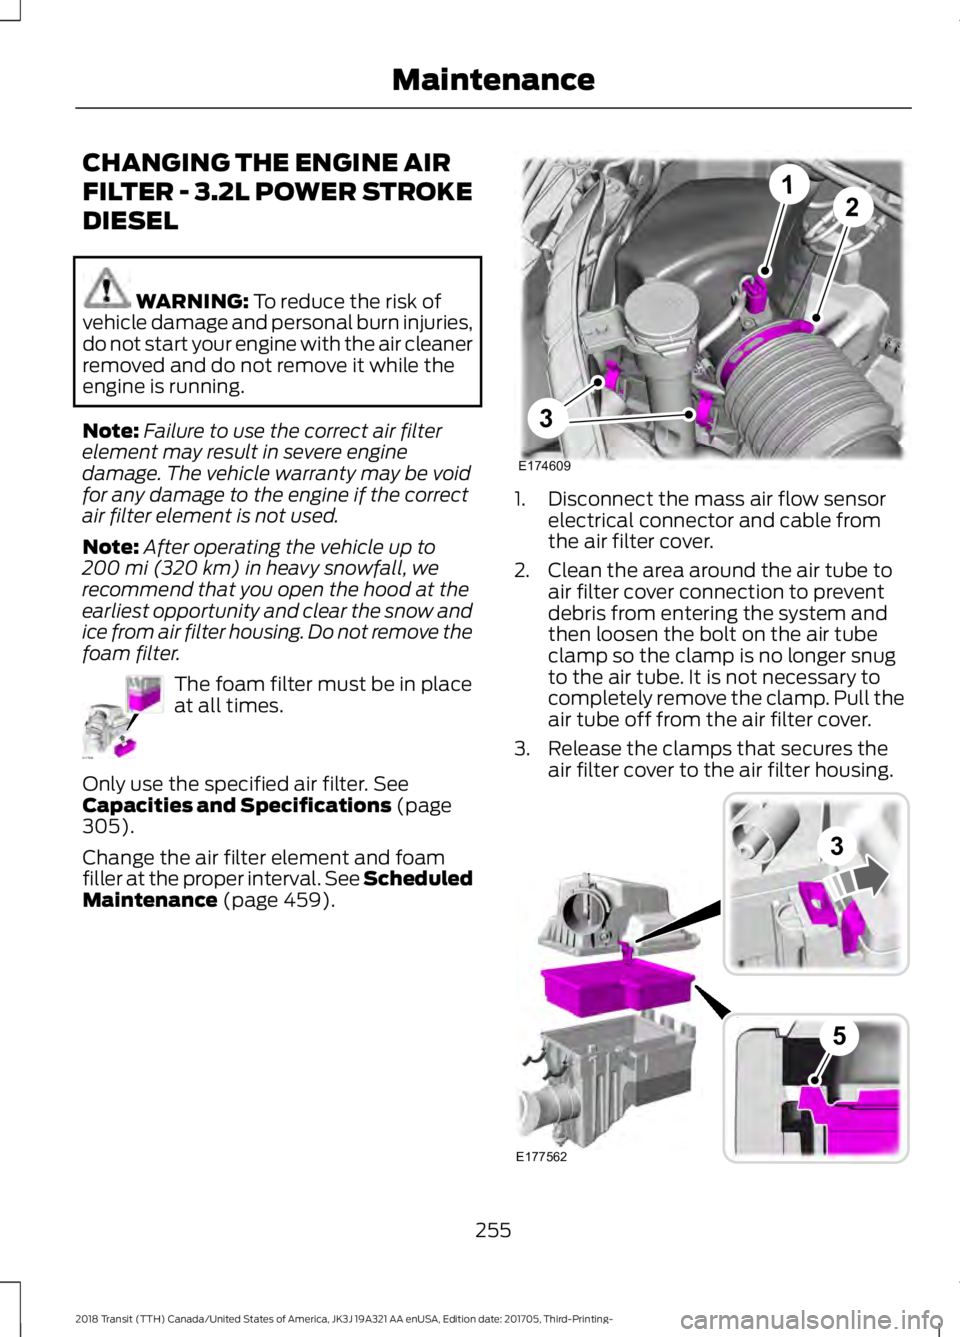
(page 459). 1. Disconnect the mass air flow sensor
electrical connector and cable from
the air filter cover.
2. Clean the area around the air tube to air filter cover connection to prevent
debris from entering the system and
then loosen the bolt on the air tube
clamp so the clamp is no longer snug
to the air tube. It is not necessary to
completely remove the clamp. Pull the
air tube off from the air filter cover.
3. Release the clamps that secures the air filter cover to the air filter housing. 255
2018 Transit (TTH) Canada/United States of America, JK3J 19A321 AA enUSA, Edition date: 201705, Third-Printing- MaintenanceE177563 E174609
12
3 E177562
3
5
Page 259 of 521
4.
Carefully lift the air filter housing cover.
Remove the air filter element from the
air filter housing.
5. Install a new air filter element. Make sure that the groove seal on the
pleated paper filter traps both sides of
the vertical partition of the air box.
6. Replace the air filter housing. Engage the clamps that secure the air filter
housing cover to the air filter housing.
Be careful not to crimp the filter
element edges between the air filter
housing and cover. Make sure that the
tabs on the edge are correctly aligned
into the slots.
7. Slip the air tube onto the air filter cover
and snugly tighten the bolt on the air
tube clamp, but do not overtighten.
8. Reconnect the mass air flow sensor electrical connector to the outlet tube.
Make sure the locking tab on the
connector is in the locked position.
CHANGING THE ENGINE AIR
FILTER - 3.5L ECOBOOST™ WARNING: To reduce the risk of
vehicle damage and personal burn injuries,
do not start your engine with the air cleaner
removed and do not remove it while the
engine is running.
Note: Failure to use the correct air filter
element may result in severe engine
damage. The vehicle Warranty may be void
for any damage to the engine if the correct
air filter element is not used.
Only use the specified air filter.
See
Capacities and Specifications (page
305).
Change the air filter element at the proper
interval.
See Scheduled Maintenance
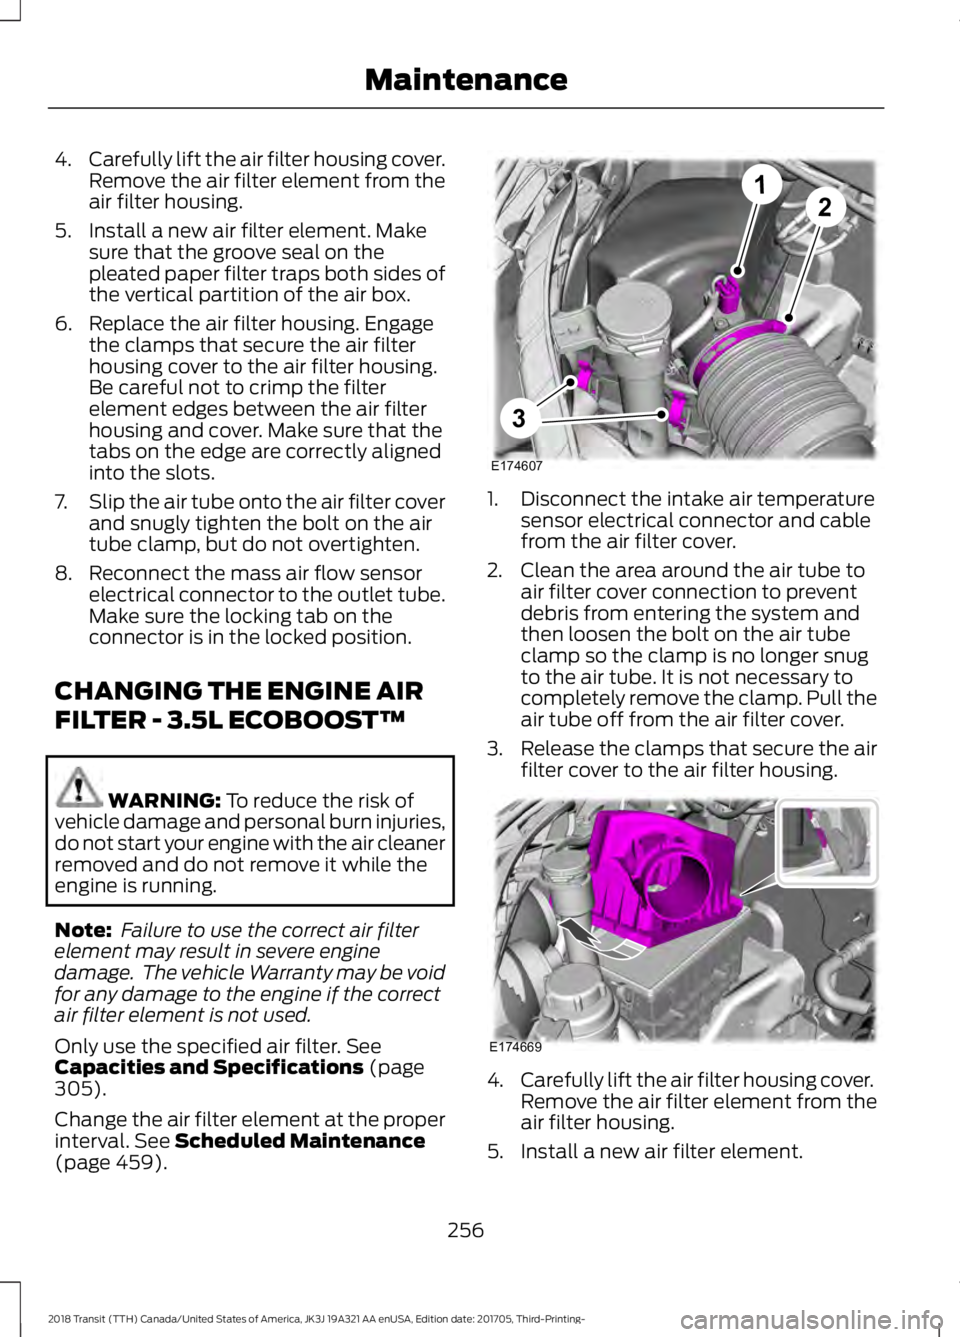
(page 459). 1. Disconnect the intake air temperature
sensor electrical connector and cable
from the air filter cover.
2. Clean the area around the air tube to air filter cover connection to prevent
debris from entering the system and
then loosen the bolt on the air tube
clamp so the clamp is no longer snug
to the air tube. It is not necessary to
completely remove the clamp. Pull the
air tube off from the air filter cover.
3. Release the clamps that secure the air
filter cover to the air filter housing. 4.
Carefully lift the air filter housing cover.
Remove the air filter element from the
air filter housing.
5. Install a new air filter element.
256
2018 Transit (TTH) Canada/United States of America, JK3J 19A321 AA enUSA, Edition date: 201705, Third-Printing- MaintenanceE174607
12
3 E174669
Page 260 of 521
6. Replace the air filter housing cover.
Engage the clamps that secure the air
filter housing cover to the air filter
housing. Be careful not to crimp the
filter element edges between the air
filter housing and cover. Make sure
that the tabs on the edge are correctly
aligned into the slots.
7. Slip the air tube onto the air filter cover
and snugly tighten the bolt on the air
tube clamp, but do not overtighten.
8. Reconnect the intake air temperature sensor electrical connector to the
outlet tube. Make sure the locking tab
on the connector is in the locked
position.
CHANGING THE ENGINE AIR
FILTER - 3.7L WARNING: To reduce the risk of
vehicle damage and personal burn injuries,
do not start your engine with the air cleaner
removed and do not remove it while the
engine is running.
Note: Failure to use the correct air filter
element may result in severe engine
damage. The vehicle Warranty may be void
for any damage to the engine if the correct
air filter element is not used.
Only use the specified air filter. See
Capacities and Specifications
(page
305).
Change the air filter element at the proper
interval. See
Scheduled Maintenance
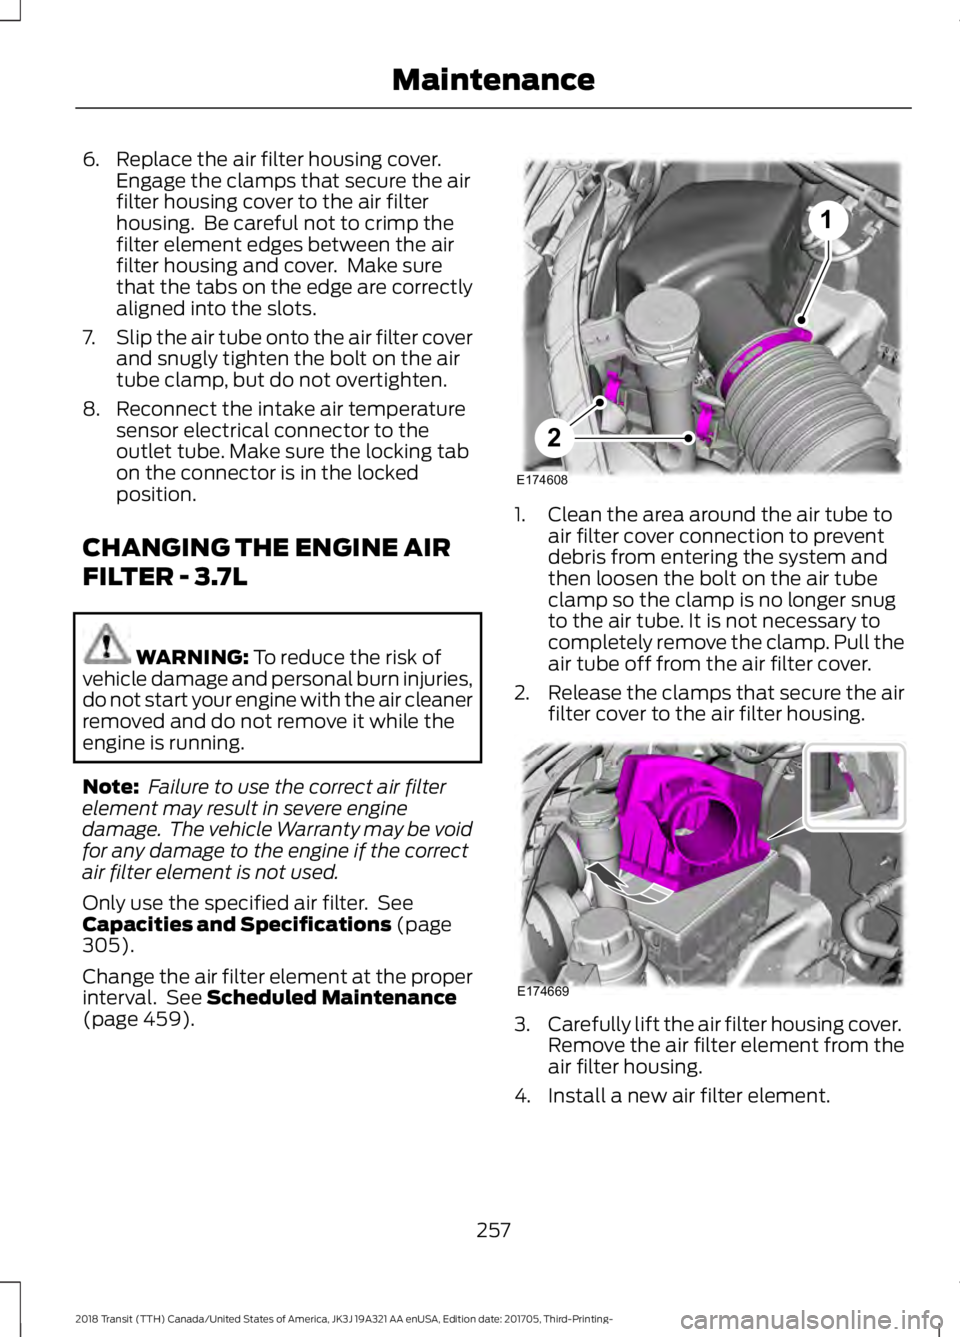
(page 459). 1. Clean the area around the air tube to
air filter cover connection to prevent
debris from entering the system and
then loosen the bolt on the air tube
clamp so the clamp is no longer snug
to the air tube. It is not necessary to
completely remove the clamp. Pull the
air tube off from the air filter cover.
2. Release the clamps that secure the air
filter cover to the air filter housing. 3.
Carefully lift the air filter housing cover.
Remove the air filter element from the
air filter housing.
4. Install a new air filter element.
257
2018 Transit (TTH) Canada/United States of America, JK3J 19A321 AA enUSA, Edition date: 201705, Third-Printing- Maintenance1
2
E174608 E174669
Page 265 of 521
Note:
Do not apply cleaning product to hot
surfaces and do not leave cleaning product
on chrome surfaces for a period of time
exceeding that which is recommended.
Note: Industrial-strength (heavy-duty)
cleaners, or cleaning chemicals, may cause
damage over a period of time.
Body Paintwork Preservation
We recommend that you wax the
paintwork once or twice a year.
Note: Do not apply polish in strong sunlight
as this dries the polish too quickly.
Note: Do not allow polish to come in
contact with plastic surfaces as it can be
difficult to remove.
Note: Do not apply polish to the windshield
or rear window. A contaminated windshield
or contaminated wiper blades may lead to
increased wiper noise, reduced wipe quality
or reduced rain sensor performance.
Sliding Door Tracks (If Equipped) WARNING: Do not open or close the
sliding doors when your hands are near the
tracks or rollers.
To clean the sliding door tracks, wipe the
surface using a clean, cotton cloth with a
mild soap and water solution.
Do not use a commercial or high-pressure
washer.
WAXING
Regular waxing is necessary to protect your
car's paint from the elements. We
recommend that you wash and wax the
painted surface once or twice a year. When washing and waxing, park your
vehicle in a shaded area out of direct
sunlight. Always wash your vehicle before
applying wax.
•
Use a quality wax that does not contain
abrasives.
• Follow the manufacturer ’s instructions
to apply and remove the wax.
• Apply a small amount of wax in a
back-and-forth motion, not in circles.
• Do not allow wax to come in contact
with any non-body (low-gloss black)
colored trim. The wax will discolor or
stain the parts over time.
•Roof racks.
• Bumpers.
• Grained door handles.
• Side moldings.
• Mirror housings.
• Windshield cowl area.
• Do not apply wax to glass areas.
• After waxing, your car's paint should
feel smooth, and be free of streaks and
smudges.
CLEANING THE ENGINE
Engines are more efficient when they are
clean because grease and dirt buildup keep
the engine warmer than normal.
When washing:
• Take care when using a power washer
to clean the engine. The high-pressure
fluid could penetrate the sealed parts
and cause damage.
• Do not spray a hot engine with cold
water to avoid cracking the engine
block or other engine components.
262
2018 Transit (TTH) Canada/United States of America, JK3J 19A321 AA enUSA, Edition date: 201705, Third-Printing- Vehicle Care
Page 267 of 521

Seatbelts
WARNING: Do not use cleaning
solvents, bleach or dye on the vehicle's
seatbelts, as these actions may weaken
the belt webbing. WARNING:
On vehicles equipped
with seat-mounted airbags, do not use
chemical solvents or strong detergents.
Such products could contaminate the side
airbag system and affect performance of
the side airbag in a crash.
Note: Do not use abrasives, or chemical
solvents to clean them.
Note: Do not allow moisture to penetrate
the seatbelt retractor mechanism.
Cleaning may safely be carried out using
mild soap and water. Let them dry
naturally, away from artificial heat.
Leather Interior
(If Equipped)
Follow the same procedure as cleaning
leather seats for cleaning leather
instrument panels and leather interior trim
surfaces.
Suede Micro Fiber Fabric
(If Equipped)
Note: Do not steam clean.
Note: To avoid spots or discoloration, clean
the entire surface.
Do not use the following products:
• Leather care products.
• Household cleaners.
• Alcoholic solutions.
• Spot removers.
• Shoe polish. To clean:
•
Remove dust and loose dirt with a
vacuum cleaner.
• Wipe the surface with a soft, damp
cloth and a mild soap and water
solution. Dry the area with a clean, soft
cloth.
• If a ring forms on the fabric after spot
cleaning, clean the entire area
immediately, but do not soak or the
ring will set.
Instrument Cluster Screens, LCD
Screens and Radio Screens
Note: Do not use abrasives, alcoholic
solvents or chemical solvents to clean the
instrument cluster screens, LCD screens or
radio screens. These cleaning products can
damage the screens.
Clean the instrument panel and cluster
lens with a clean, damp and soft cloth,
then use a clean, dry and soft cloth to dry
these areas.
Do not spray any liquid directly onto the
screens.
Do not use a microfiber cloth to clean the
bezel around the display screens as it could
damage the surface.
Rear Windows
Note: Do not use any abrasive materials to
clean the interior of the rear windows.
Note: Do not install stickers or labels to the
interior of the rear windows.
Storage Compartments, Cup
Holders and Ashtrays
To clean:
• Take out any removable inserts.
• Wipe the surface with a soft, damp
cloth and a mild soap and water
solution. Dry the area with a clean, soft
cloth.
264
2018 Transit (TTH) Canada/United States of America, JK3J 19A321 AA enUSA, Edition date: 201705, Third-Printing- Vehicle Care
Page 268 of 521
CLEANING THE INSTRUMENT
PANEL AND INSTRUMENT
CLUSTER LENS
WARNING: Do not use chemical
solvents or strong detergents when
cleaning the steering wheel or instrument
panel to avoid contamination of the airbag
system.
Note: Follow the same procedure as
cleaning leather seats for cleaning leather
instrument panels and leather interior trim
surfaces.
Clean the instrument panel and cluster
lens with a clean, damp and soft cloth,
then use a clean, dry and soft cloth to dry
these areas.
• Avoid cleaners or polishes that increase
the gloss of the upper portion of the
instrument panel. The dull finish in this
area helps protect you from
undesirable windshield reflection.
• Do not use any household cleaning
products or glass cleaners as these
may damage the finish of the
instrument panel, interior trim and
cluster lens.
• Wash or wipe your hands clean if you
have been in contact with certain
products such as insect repellent and
suntan lotion to avoid possible damage
to the interior painted surfaces.
• Do not allow air fresheners and hand
sanitizers to spill onto interior surfaces.
If a spill occurs, wipe off immediately.
Your warranty may not cover these
damages.
If a staining liquid like coffee or juice has
been spilled on the instrument panel or on
interior trim surfaces: 1. Wipe up spilled liquid using a clean,
soft cloth as quickly as possible.
2. Use Motorcraft Premium Leather and Vinyl Cleaner or a commercially
available leather cleaning product for
automotive interiors. Test any cleaner
or stain remover on an inconspicuous
area.
3. Alternatively, wipe the surface with a clean, soft cloth and a mild soap and
water solution. Dry the area with a
clean, soft cloth.
4. If necessary, apply more soap and water solution or cleaning product to
a clean, soft cloth and press it onto the
soiled area. Allow this to set at room
temperature for 30 minutes.
5. Remove the soaked cloth, then with a clean, damp cloth, use a rubbing
motion for 60 seconds on the soiled
area.
6. Dry the area with a clean, soft cloth.
REPAIRING MINOR PAINT
DAMAGE
Authorized dealers have touch-up paint to
match your vehicle ’s color. Your vehicle
color code is printed on a sticker on the
front, left-hand side door jamb. Take your
color code to your authorized dealer to
make sure you get the correct color.
Before repairing minor paint damage, use
a cleaner such as Motorcraft Bug and Tar
Remover to remove particles such as bird
droppings, tree sap, insect deposits, tar
spots, road salt and industrial fallout.
Always read the instructions before using
cleaning products.
265
2018 Transit (TTH) Canada/United States of America, JK3J 19A321 AA enUSA, Edition date: 201705, Third-Printing- Vehicle Care
Page 271 of 521
GENERAL INFORMATION
Notice to Utility Vehicle, Van and
Truck Owners
WARNING: Utility vehicles have a
significantly higher rollover rate than other
types of vehicles. To reduce the risk of
serious injury or death from a rollover or
other crash you must avoid sharp turns and
abrupt maneuvers, drive at safe speeds for
the conditions, keep tires properly inflated,
never overload or improperly load your
vehicle, and make sure every passenger is
properly restrained. WARNING:
In a rollover crash, an
unbelted person is significantly more likely
to die than a person wearing a seat belt.
All occupants must wear seat belts.
Children and infants must use appropriate
restraints to minimize the risk of injury or
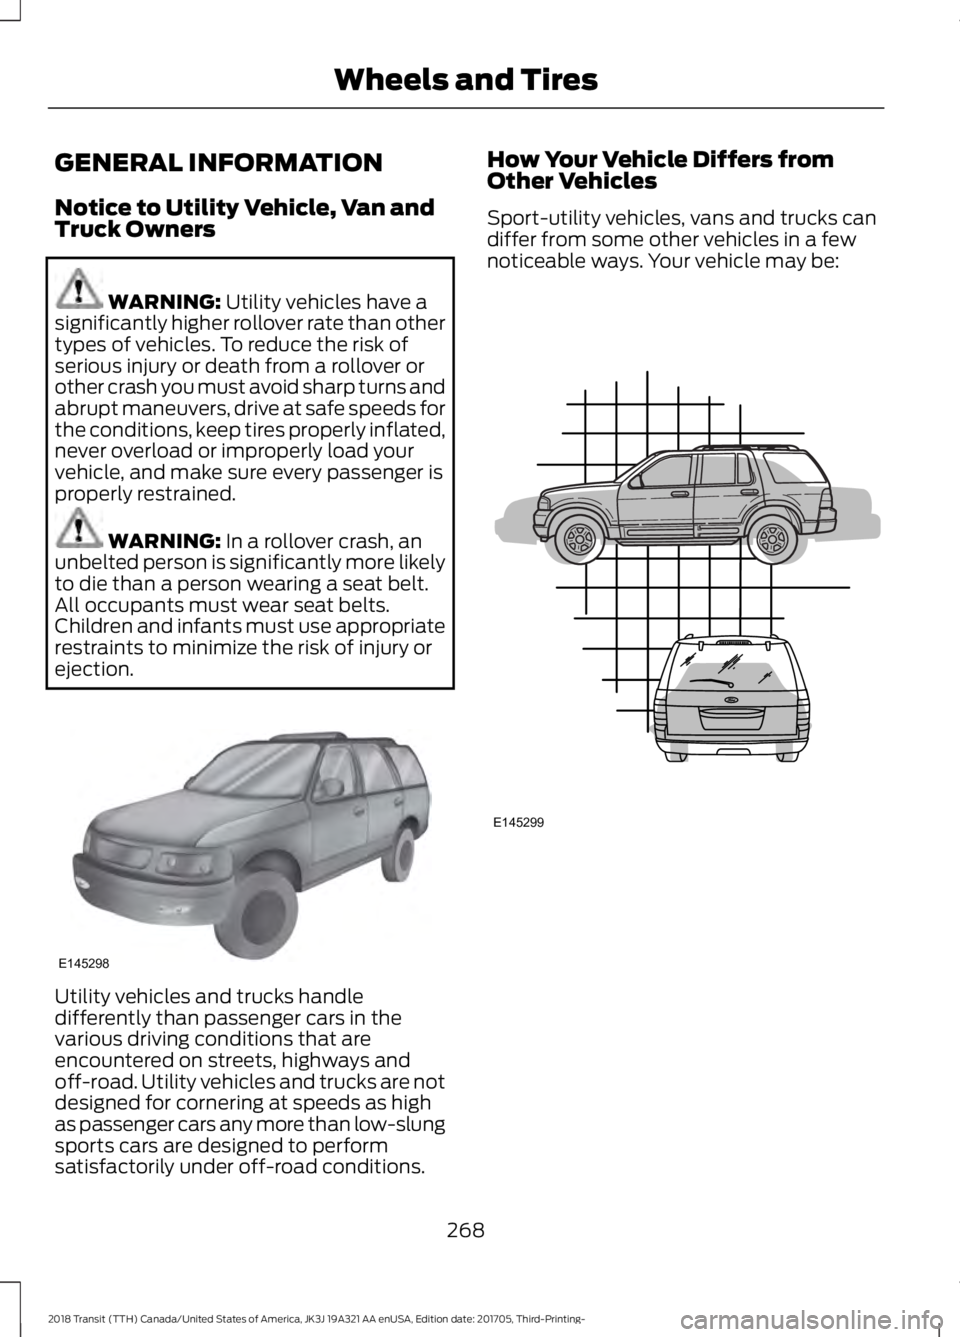
ejection. Utility vehicles and trucks handle
differently than passenger cars in the
various driving conditions that are
encountered on streets, highways and
off-road. Utility vehicles and trucks are not
designed for cornering at speeds as high
as passenger cars any more than low-slung
sports cars are designed to perform
satisfactorily under off-road conditions. How Your Vehicle Differs from
Other Vehicles
Sport-utility vehicles, vans and trucks can
differ from some other vehicles in a few
noticeable ways. Your vehicle may be:
268
2018 Transit (TTH) Canada/United States of America, JK3J 19A321 AA enUSA, Edition date: 201705, Third-Printing- Wheels and TiresE145298 E145299