2018 FORD FOCUS ELECTRIC clock
[x] Cancel search: clockPage 29 of 375
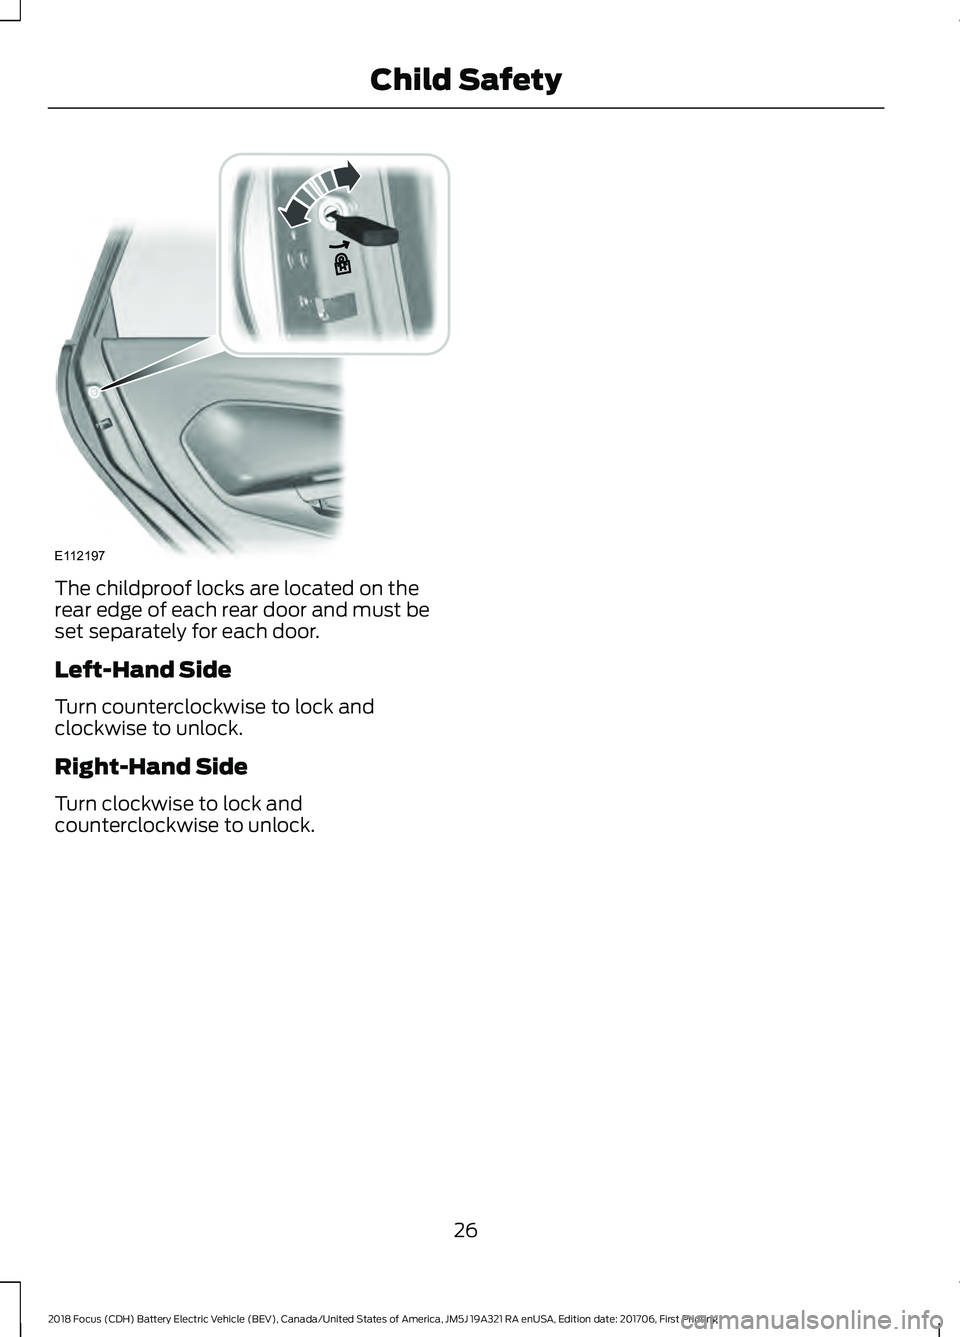
The childproof locks are located on the
rear edge of each rear door and must be
set separately for each door.
Left-Hand Side
Turn counterclockwise to lock and
clockwise to unlock.
Right-Hand Side
Turn clockwise to lock and
counterclockwise to unlock.
26
2018 Focus (CDH) Battery Electric Vehicle (BEV), Canada/United States of America, JM5J 19A321 RA enUSA, Edition date: 201706, First Printing Child SafetyE112197
Page 175 of 375
Note:
Coolant expands when it is hot. The
level may extend beyond the MAX mark.
When the electric motor is cold, check the
concentration and level of the coolant at
the intervals listed in the scheduled
maintenance information. See Scheduled
Maintenance
(page 320).
Maintain coolant concentration within
48% to 50%, which equates to a freeze
point between -30°F (-34°C) and -34°F
(-37°C). Coolant concentration should be
checked using a refractometer. We do not
recommend the use of hydrometers or
coolant test strips for measuring coolant
concentration.
Adding Coolant WARNING
Do not remove the coolant reservoir
cap when the cooling system is hot.
Wait 10 minutes for the cooling
system to cool down. Cover the coolant
reservoir cap with a thick cloth to prevent
the possibility of scalding and slowly
remove the cap. Failure to follow this
instruction could result in personal injury. Note:
Automotive fluids are not
interchangeable. Take care not to put
coolant in the windshield washer fluid
reservoir or windshield washer fluid in the
coolant reservoir.
Note: Do not use stop leak pellets, cooling
system sealants, or non-specified additives
as they can cause damage to the electric
motor cooling or heating systems. Resulting
component damage may not be covered by
the vehicle Warranty.
It is very important to use prediluted
coolant approved to the correct
specification in order to avoid plugging the
small passageways in the electric motor
cooling system. See
Capacities and
Specifications (page 221). Do not mix different colors or types of coolant in your
vehicle. Mixing of coolants or using an
incorrect coolant may harm the electric
motor or cooling system components and
may not be covered by the vehicle
Warranty.
Note:
If prediluted coolant is not available,
use the approved concentrated coolant
diluting it to 50/50 with distilled water. See
Capacities and Specifications (page 221
).
Using water that has not been deionised
may contribute to deposit formation,
corrosion and plugging of the small cooling
system passageways.
Note: Coolants marketed for all makes and
models may not be approved to Ford
specifications and may cause damage to
the cooling system. Resulting component
damage may not be covered by the vehicle
Warranty.
If the coolant level is at or below the
minimum mark, add prediluted coolant
immediately.
To top up the coolant level do the
following:
1. Unscrew the cap slowly. Any pressure escapes as you unscrew the cap.
2. Add prediluted coolant approved to the correct specification. See
Capacities and Specifications (page
221
).
3. Add enough prediluted coolant to reach the correct level.
4. Replace the coolant reservoir cap, turn
it clockwise until you feel a strong
resistance.
5. Check the coolant level in the coolant reservoir the next few times you drive
your vehicle. If necessary, add enough
prediluted coolant to bring the coolant
level to the correct level.
172
2018 Focus (CDH) Battery Electric Vehicle (BEV), Canada/United States of America, JM5J 19A321 RA enUSA, Edition date: 201706, First Printing Maintenance
Page 178 of 375
Your vehicle is fitted with a Motorcraft
maintenance-free battery which normally
does not require additional water.
Note:
After cleaning or replacing the
battery, make sure you reinstall the battery
cover or shield.
When a battery replacement is required,
you must use a recommended
replacement battery that matches the
electrical requirements of the vehicle.
Note: Contact an authorized dealer for low
voltage battery access, testing or
replacement.
To make sure the battery management
system works correctly, do not connect an
electrical device ground connection
directly to the low voltage battery negative
post. This can cause inaccurate
measurements of the battery condition
and potential incorrect system operation.
Note: If you add electrical accessories or
components to the vehicle, it may adversely
affect the low voltage battery performance
and durability. This may also affect the
performance of other electrical systems in
the vehicle.
For longer, trouble-free operation, keep the
top of the battery clean and dry.
If you see any corrosion on the battery or
terminals, remove the cables from the
terminals and clean with a wire brush. You
can neutralize the acid with a solution of
baking soda and water.
A computer electronically controls your
vehicle. The power of the low voltage
battery maintains the memory of some
settings, for example, clock setting or radio
presets. When the low voltage battery is
disconnected and then connected, these
settings erase.
To restore the settings, do the following:
1. Apply the parking brake.
2. Shift into park (P) or neutral (N). 3. Switch off all accessories.
4. Press the brake pedal and start your
vehicle.
5. Reset the clock.
6. Reset the bounce-back feature. See Power Windows (page 71).
7. Reset the radio station presets. See Audio System
(page 223).
Make sure that you dispose of old batteries
in an environmentally friendly way. Seek
advice from your local authority about
recycling old batteries.
If storing your vehicle for more than 30
days without recharging the battery, we
recommend that you disconnect the
battery cables to maintain battery charge
for quick starting.
CHECKING THE WIPER
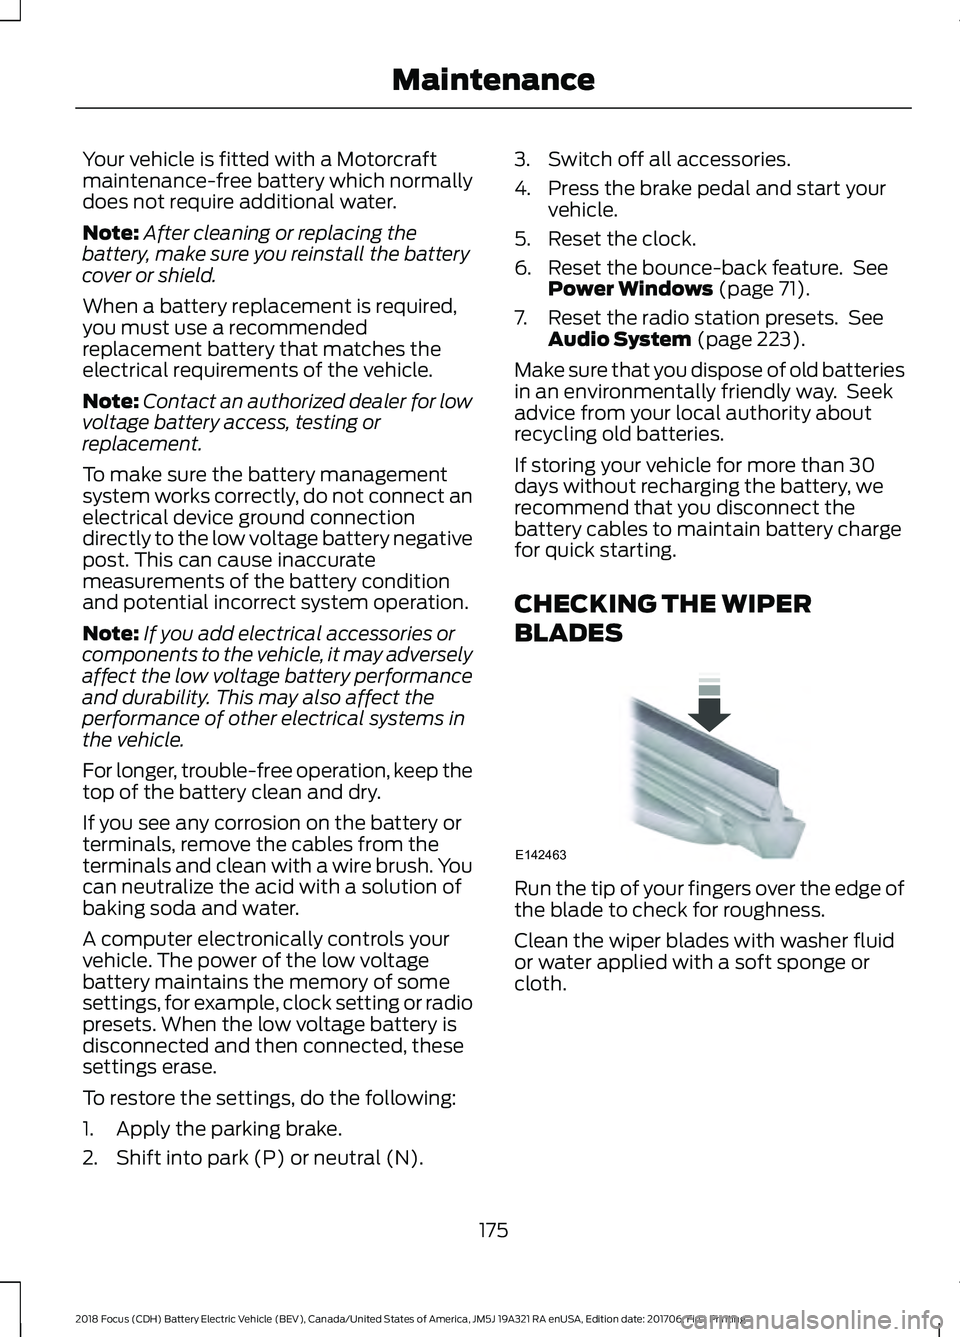
BLADES Run the tip of your fingers over the edge of
the blade to check for roughness.
Clean the wiper blades with washer fluid
or water applied with a soft sponge or
cloth.
175
2018 Focus (CDH) Battery Electric Vehicle (BEV), Canada/United States of America, JM5J 19A321 RA enUSA, Edition date: 201706, First Printing MaintenanceE142463
Page 181 of 375
Note:
There may be an identifying mark on
the lens to help you locate the center of the
bulb.
Note: To see a clearer light pattern while
adjusting one headlamp, you may want to
block the light from the other headlamp.
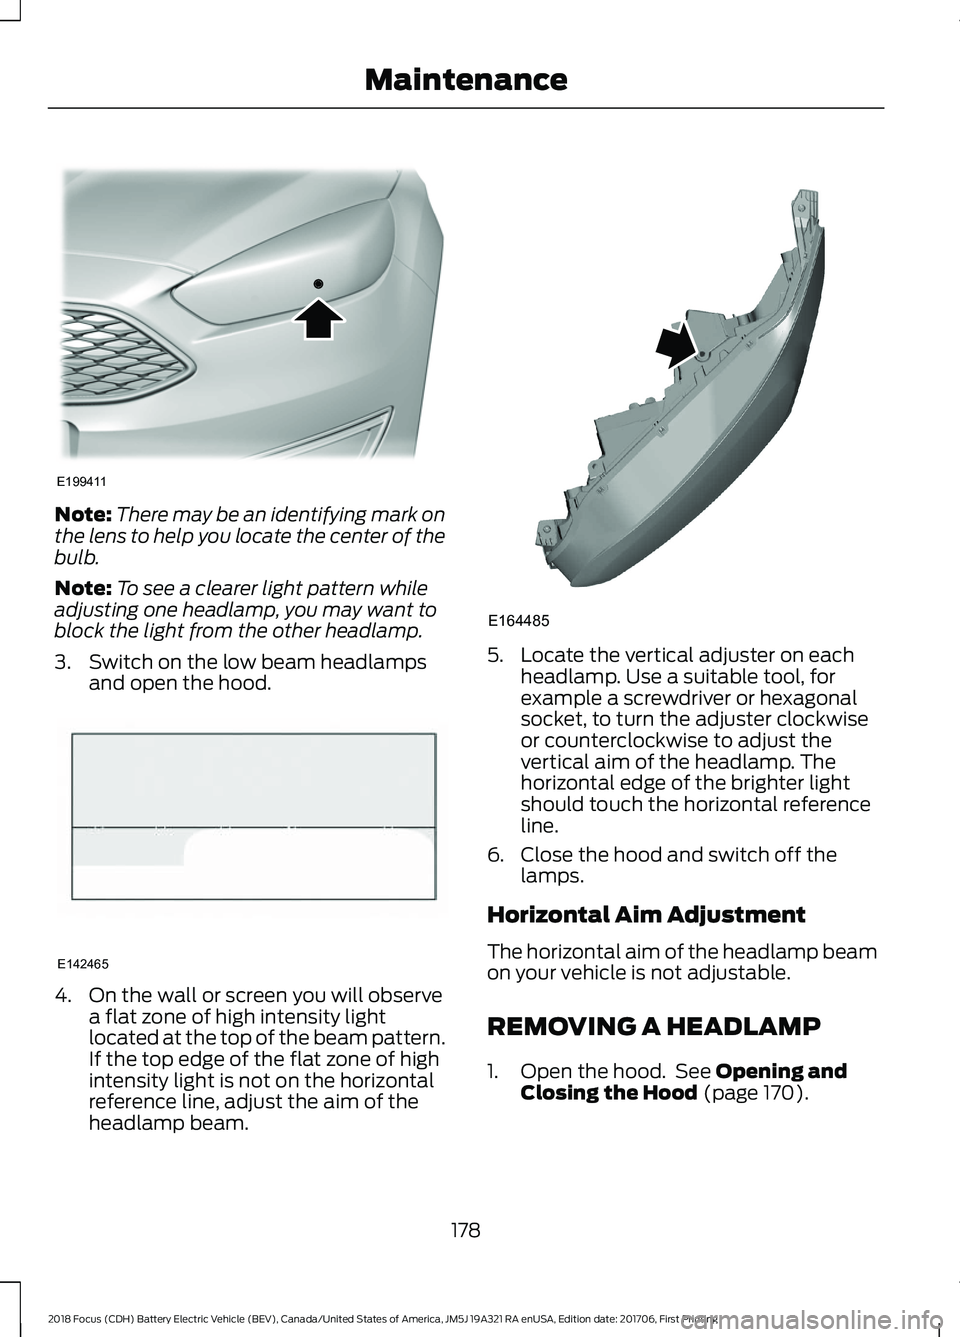
3. Switch on the low beam headlamps and open the hood. 4. On the wall or screen you will observe
a flat zone of high intensity light
located at the top of the beam pattern.
If the top edge of the flat zone of high
intensity light is not on the horizontal
reference line, adjust the aim of the
headlamp beam. 5. Locate the vertical adjuster on each
headlamp. Use a suitable tool, for
example a screwdriver or hexagonal
socket, to turn the adjuster clockwise
or counterclockwise to adjust the
vertical aim of the headlamp. The
horizontal edge of the brighter light
should touch the horizontal reference
line.
6. Close the hood and switch off the lamps.
Horizontal Aim Adjustment
The horizontal aim of the headlamp beam
on your vehicle is not adjustable.
REMOVING A HEADLAMP
1. Open the hood. See Opening and
Closing the Hood (page 170).
178
2018 Focus (CDH) Battery Electric Vehicle (BEV), Canada/United States of America, JM5J 19A321 RA enUSA, Edition date: 201706, First Printing MaintenanceE199411 E142465 E164485
Page 183 of 375
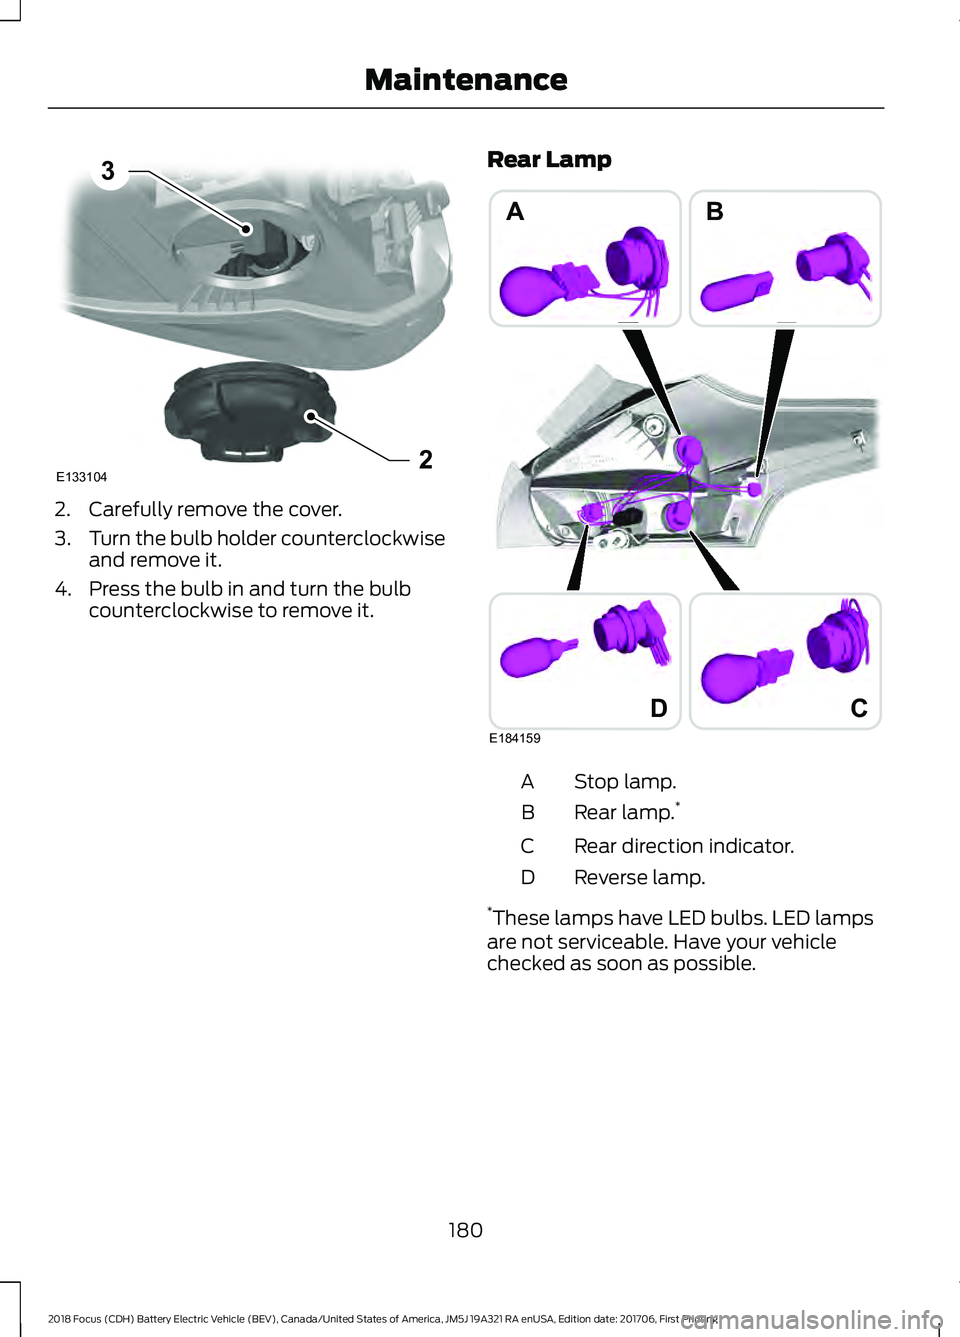
2. Carefully remove the cover.
3.
Turn the bulb holder counterclockwise
and remove it.
4. Press the bulb in and turn the bulb counterclockwise to remove it. Rear Lamp Stop lamp.
A
Rear lamp. *
B
Rear direction indicator.
C
Reverse lamp.
D
* These lamps have LED bulbs. LED lamps
are not serviceable. Have your vehicle
checked as soon as possible.
180
2018 Focus (CDH) Battery Electric Vehicle (BEV), Canada/United States of America, JM5J 19A321 RA enUSA, Edition date: 201706, First Printing MaintenanceE1331042
3 D
AB
E184159
C
Page 184 of 375
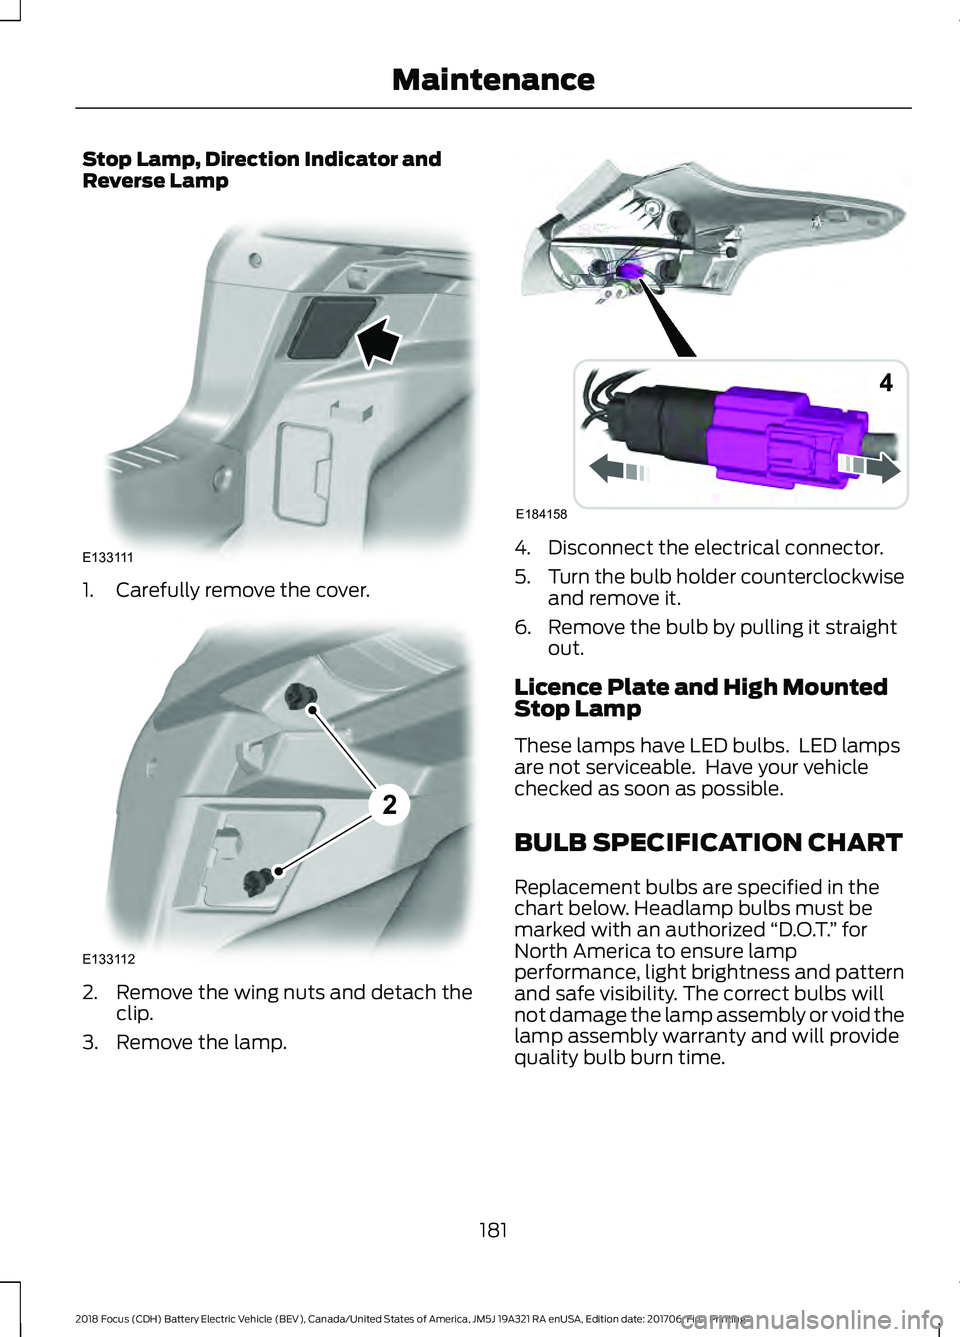
Stop Lamp, Direction Indicator and
Reverse Lamp
1. Carefully remove the cover.
2. Remove the wing nuts and detach the
clip.
3. Remove the lamp. 4. Disconnect the electrical connector.
5.
Turn the bulb holder counterclockwise
and remove it.
6. Remove the bulb by pulling it straight out.
Licence Plate and High Mounted
Stop Lamp
These lamps have LED bulbs. LED lamps
are not serviceable. Have your vehicle
checked as soon as possible.
BULB SPECIFICATION CHART
Replacement bulbs are specified in the
chart below. Headlamp bulbs must be
marked with an authorized “D.O.T.” for
North America to ensure lamp
performance, light brightness and pattern
and safe visibility. The correct bulbs will
not damage the lamp assembly or void the
lamp assembly warranty and will provide
quality bulb burn time.
181
2018 Focus (CDH) Battery Electric Vehicle (BEV), Canada/United States of America, JM5J 19A321 RA enUSA, Edition date: 201706, First Printing MaintenanceE133111 E133112
2 E184158
4
Page 196 of 375
* When inflation only is required
for a tire or other objects, the
selector must be in the Air
position.
What to Do When a Tire Is
Punctured
Repair a tire puncture within the tire's tread
area in two stages with the kit.
• In the first stage, inflate the tire with a
sealing compound and air. After you
inflate the tire, you will need to drive
the vehicle a short distance (about 4
miles [6 kilometers]) to distribute the
sealant in the tire.
• In the second stage, check the tire
pressure and adjust, if necessary, to the
vehicle's specified tire inflation
pressure.
First Stage: Inflating the Tire with
Sealing Compound and Air WARNINGS
Do not stand directly over the kit
while inflating the tire. If you notice
any unusual bulges or deformations
in the tire's sidewall during inflation, stop
and call roadside assistance. If the tire does not inflate to the
recommended tire pressure within
15 minutes, stop and call roadside
assistance. Do not run the engine during kit
operation unless the vehicle is
outdoors or in a well-ventilated area.
Preparation: Park the vehicle in a safe, level
and secure area, away from moving traffic.
Switch the hazard lights on. Apply the
parking brake and switch the engine off.
Inspect the flat tire for visible damage. Sealant compound contains latex. Use
appropriate precautions to avoid any
allergic reactions.
Do not remove any foreign object that has
pierced the tire. If a puncture is located in
the tire sidewall, stop and call roadside
assistance.
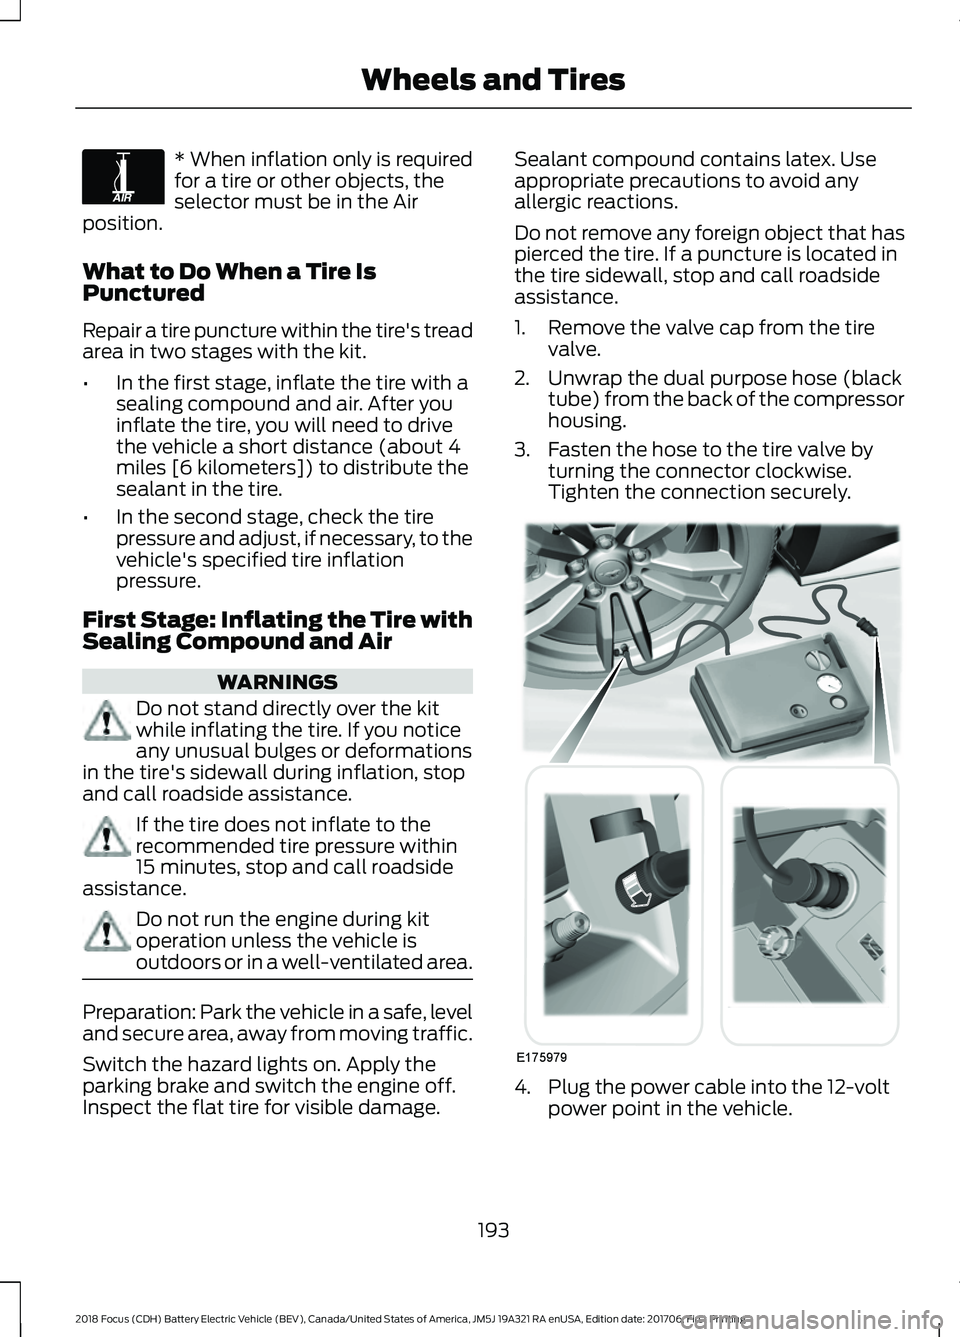
1. Remove the valve cap from the tire
valve.
2. Unwrap the dual purpose hose (black tube) from the back of the compressor
housing.
3. Fasten the hose to the tire valve by turning the connector clockwise.
Tighten the connection securely. 4. Plug the power cable into the 12-volt
power point in the vehicle.
193
2018 Focus (CDH) Battery Electric Vehicle (BEV), Canada/United States of America, JM5J 19A321 RA enUSA, Edition date: 201706, First Printing Wheels and TiresE175978 E175979
Page 197 of 375
5. Remove the warning sticker found on
the canister and place it on the top of
the instrument panel or the center of
the dash.
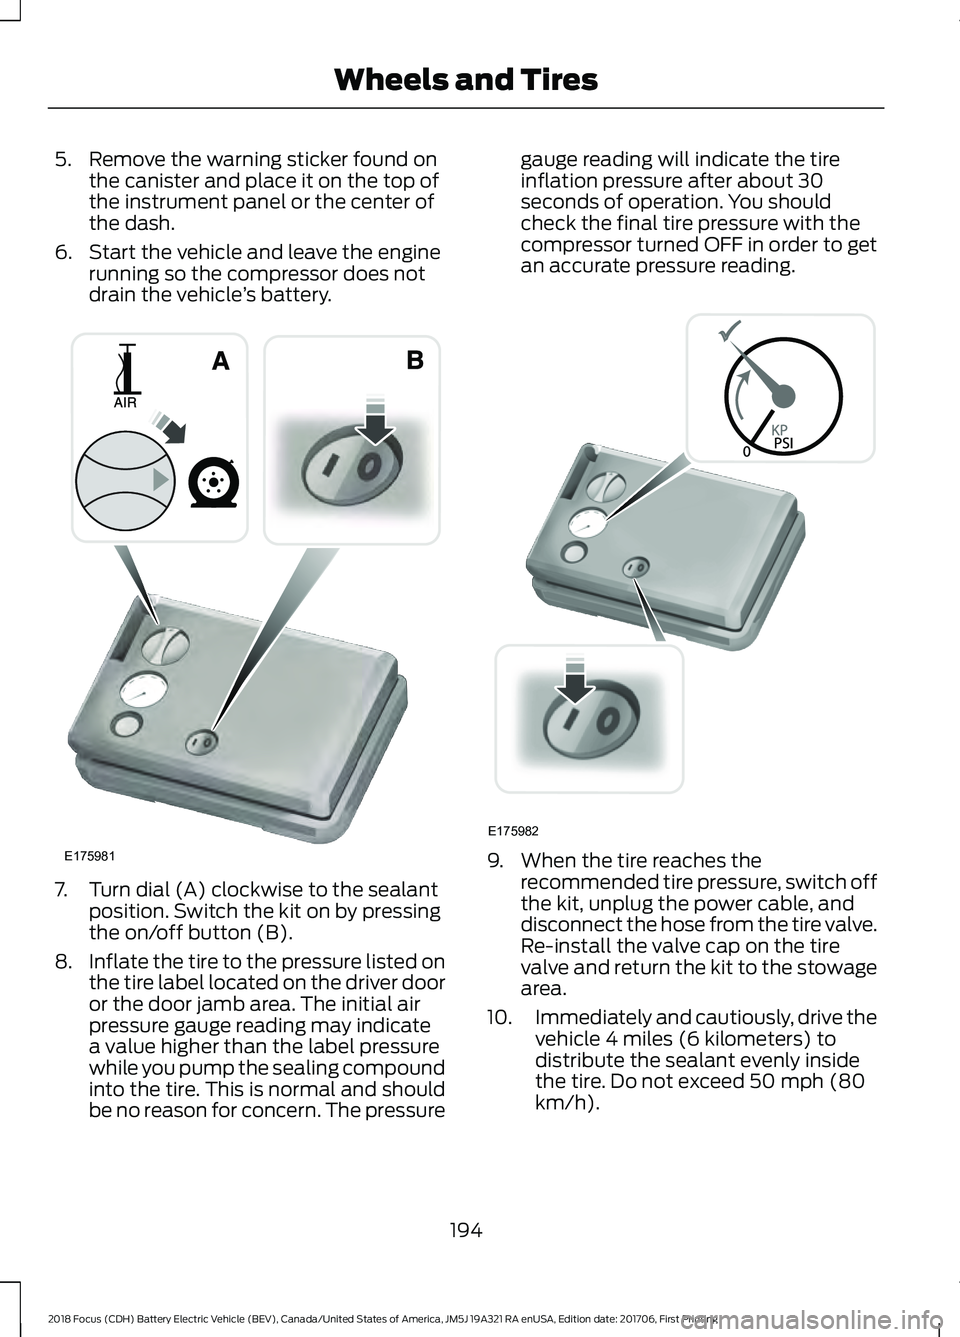
6. Start the vehicle and leave the engine running so the compressor does not
drain the vehicle ’s battery. 7. Turn dial (A) clockwise to the sealant
position. Switch the kit on by pressing
the on/off button (B).
8. Inflate the tire to the pressure listed on
the tire label located on the driver door
or the door jamb area. The initial air
pressure gauge reading may indicate
a value higher than the label pressure
while you pump the sealing compound
into the tire. This is normal and should
be no reason for concern. The pressure gauge reading will indicate the tire
inflation pressure after about 30
seconds of operation. You should
check the final tire pressure with the
compressor turned OFF in order to get
an accurate pressure reading.
9. When the tire reaches the
recommended tire pressure, switch off
the kit, unplug the power cable, and
disconnect the hose from the tire valve.
Re-install the valve cap on the tire
valve and return the kit to the stowage
area.
10. Immediately and cautiously, drive the
vehicle 4 miles (6 kilometers) to
distribute the sealant evenly inside
the tire. Do not exceed 50 mph (80
km/h).
194
2018 Focus (CDH) Battery Electric Vehicle (BEV), Canada/United States of America, JM5J 19A321 RA enUSA, Edition date: 201706, First Printing Wheels and TiresE175981 E175982