2018 FORD F450 SUPER DUTY low beam
[x] Cancel search: low beamPage 93 of 656

Headlamp Flasher
Slightly pull the lever toward you and
release it to flash the headlamps.
AUTOLAMPS (If Equipped)
WARNING
The system does not relieve you of
your responsibility to drive with due
care and attention. You may need to
override the system if it does not turn the
headlamps on in low visibility conditions,
for example daytime fog. When the lighting control is in the
autolamps position, the headlamps turn
on in low light situations, or when the
wipers turn on. The headlamps remain on for a period of
time after you switch the ignition off. Use
the information display controls to adjust
the period of time that the headlamps
remain on.
Note:
If you switch the autolamps on, you
cannot switch the high beams on until the
system turns the low beams on.
Windshield Wiper Activated
Headlamps
When you switch the autolamps on, the
headlamps turn on within 10 seconds of
switching the wipers on. They turn off
approximately 60 seconds after you switch
the windshield wipers off.
The headlamps do not turn on with the
wipers:
• During a single wipe.
• When using the windshield washers.
• If the wipers are in intermittent mode.
Note: If you switch the autolamps and the
autowipers on, the headlamps turn on when
the windshield wipers continuously operate.
INSTRUMENT LIGHTING
DIMMER
Note: When disconnecting the battery or
when it runs out of charge, the illuminated
components turn to the maximum setting.
90
Super Duty (TFE) Canada/United States of America, enUSA, Edition date: 201709, First Printing LightingE163268 E142451
Page 95 of 656

If the daytime running lamps are off in the
information display, the lamps stay off in
all switch positions.
AUTOMATIC HIGH BEAM
CONTROL (If Equipped)
WARNING
The system does not relieve you of
your responsibility to drive with due
care and attention. You may need to
override the system if it does not turn the
high beams on or off. The system turns on high beams if it is dark
enough and no other traffic is present. If it
detects an approaching vehicle
’s
headlamps or tail lamps, or street lighting
ahead, the system turns off high beams
before they can distract other road users.
Low beams remain on.
Note: The system may not operate properly
if the sensor is blocked. Keep the windshield
free from obstruction or damage.
Note: The system may not operate properly
in cold or inclement conditions. You can
switch on the high beams by overriding the
system.
Note: If the system detects a blockage, for
example bird droppings, bug splatter, snow
or ice, the system goes into low beam mode
until you clear the blockage. A message may
appear in the information display if the
camera is blocked.
Note: Using much larger tires or equipping
vehicle accessories such as snowplows can
modify your vehicle's ride height and
degrade automatic high beam control
performance.
A camera sensor, centrally mounted
behind the windshield of your vehicle,
continuously monitors conditions to turn
the high beams on and off. Once the system is active, the high beams
turn on if:
•
The ambient light level is low enough.
• There is no traffic in front of your
vehicle.
• The vehicle speed is greater than
approximately 32 mph (51 km/h).
The high beams turn off if:
• The ambient light level is high enough
that high beams are not required.
• The system detects an approaching
vehicle's headlamps or tail lamps.
• The vehicle speed falls below
approximately
27 mph (44 km/h).
• The system detects severe rain, snow
or fog.
• The camera is blocked.
Switching the System On and Off
Switch the system on using the information
display. See Information Displays (page
114
). Switch the lighting control to the
autolamps position. See
Autolamps
(page 90).
Overriding the System
When you switch on the high beams,
pushing or pulling the stalk provides a
temporary override to low beam.
92
Super Duty (TFE) Canada/United States of America, enUSA, Edition date: 201709, First Printing LightingE142451
Page 112 of 656

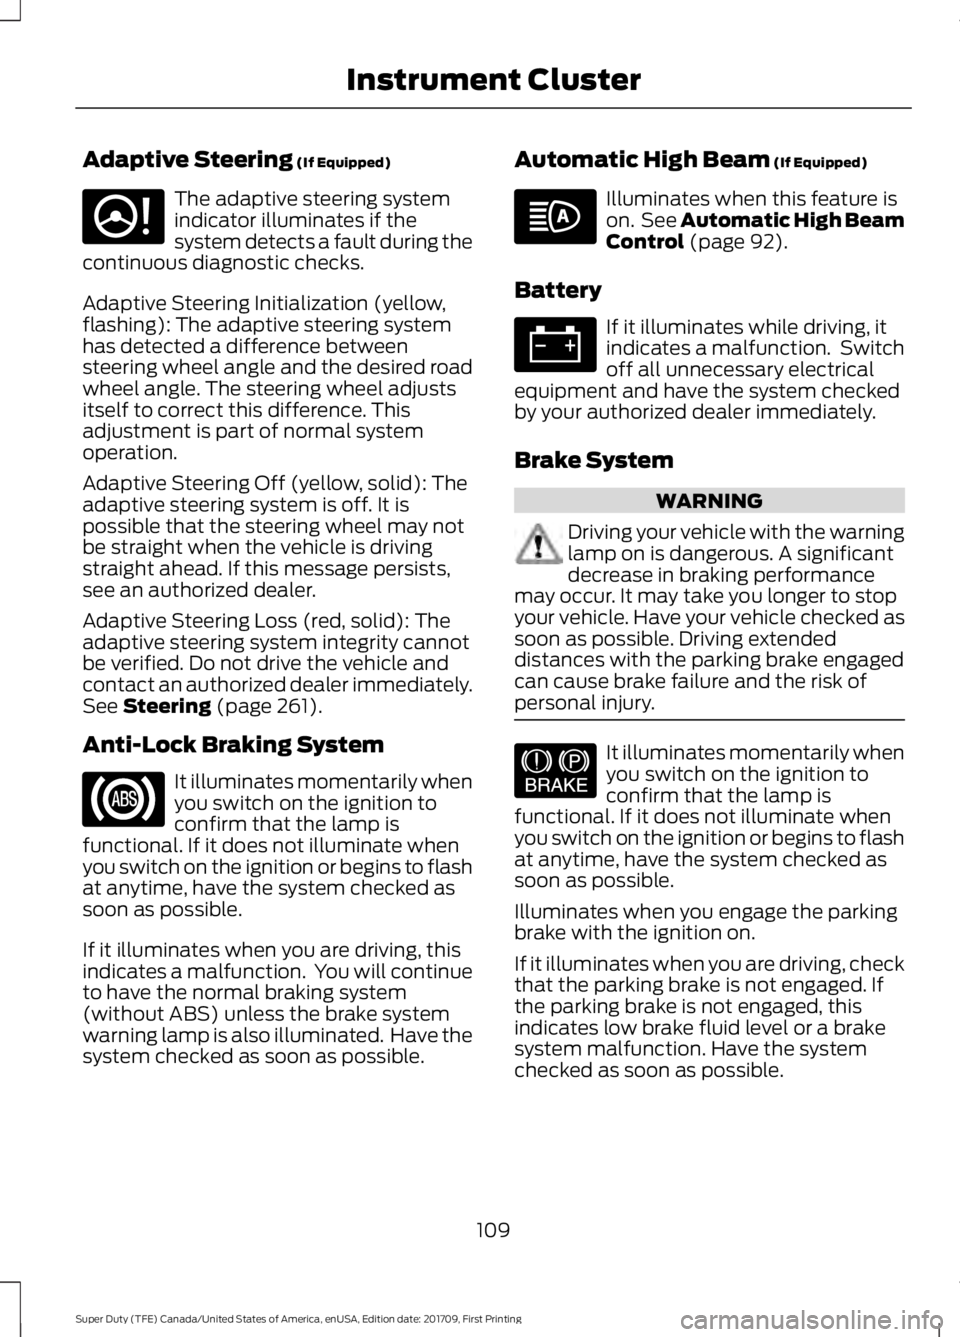
Adaptive Steering (If Equipped)
The adaptive steering system
indicator illuminates if the
system detects a fault during the
continuous diagnostic checks.
Adaptive Steering Initialization (yellow,
flashing): The adaptive steering system
has detected a difference between
steering wheel angle and the desired road
wheel angle. The steering wheel adjusts
itself to correct this difference. This
adjustment is part of normal system
operation.
Adaptive Steering Off (yellow, solid): The
adaptive steering system is off. It is
possible that the steering wheel may not
be straight when the vehicle is driving
straight ahead. If this message persists,
see an authorized dealer.
Adaptive Steering Loss (red, solid): The
adaptive steering system integrity cannot
be verified. Do not drive the vehicle and
contact an authorized dealer immediately.
See
Steering (page 261).
Anti-Lock Braking System It illuminates momentarily when
you switch on the ignition to
confirm that the lamp is
functional. If it does not illuminate when
you switch on the ignition or begins to flash
at anytime, have the system checked as
soon as possible.
If it illuminates when you are driving, this
indicates a malfunction. You will continue
to have the normal braking system
(without ABS) unless the brake system
warning lamp is also illuminated. Have the
system checked as soon as possible. Automatic High Beam
(If Equipped) Illuminates when this feature is
on. See
Automatic High Beam
Control (page 92).
Battery If it illuminates while driving, it
indicates a malfunction. Switch
off all unnecessary electrical
equipment and have the system checked
by your authorized dealer immediately.
Brake System WARNING
Driving your vehicle with the warning
lamp on is dangerous. A significant
decrease in braking performance
may occur. It may take you longer to stop
your vehicle. Have your vehicle checked as
soon as possible. Driving extended
distances with the parking brake engaged
can cause brake failure and the risk of
personal injury. It illuminates momentarily when
you switch on the ignition to
confirm that the lamp is
functional. If it does not illuminate when
you switch on the ignition or begins to flash
at anytime, have the system checked as
soon as possible.
Illuminates when you engage the parking
brake with the ignition on.
If it illuminates when you are driving, check
that the parking brake is not engaged. If
the parking brake is not engaged, this
indicates low brake fluid level or a brake
system malfunction. Have the system
checked as soon as possible.
109
Super Duty (TFE) Canada/United States of America, enUSA, Edition date: 201709, First Printing Instrument ClusterE223375 E144522
Page 132 of 656

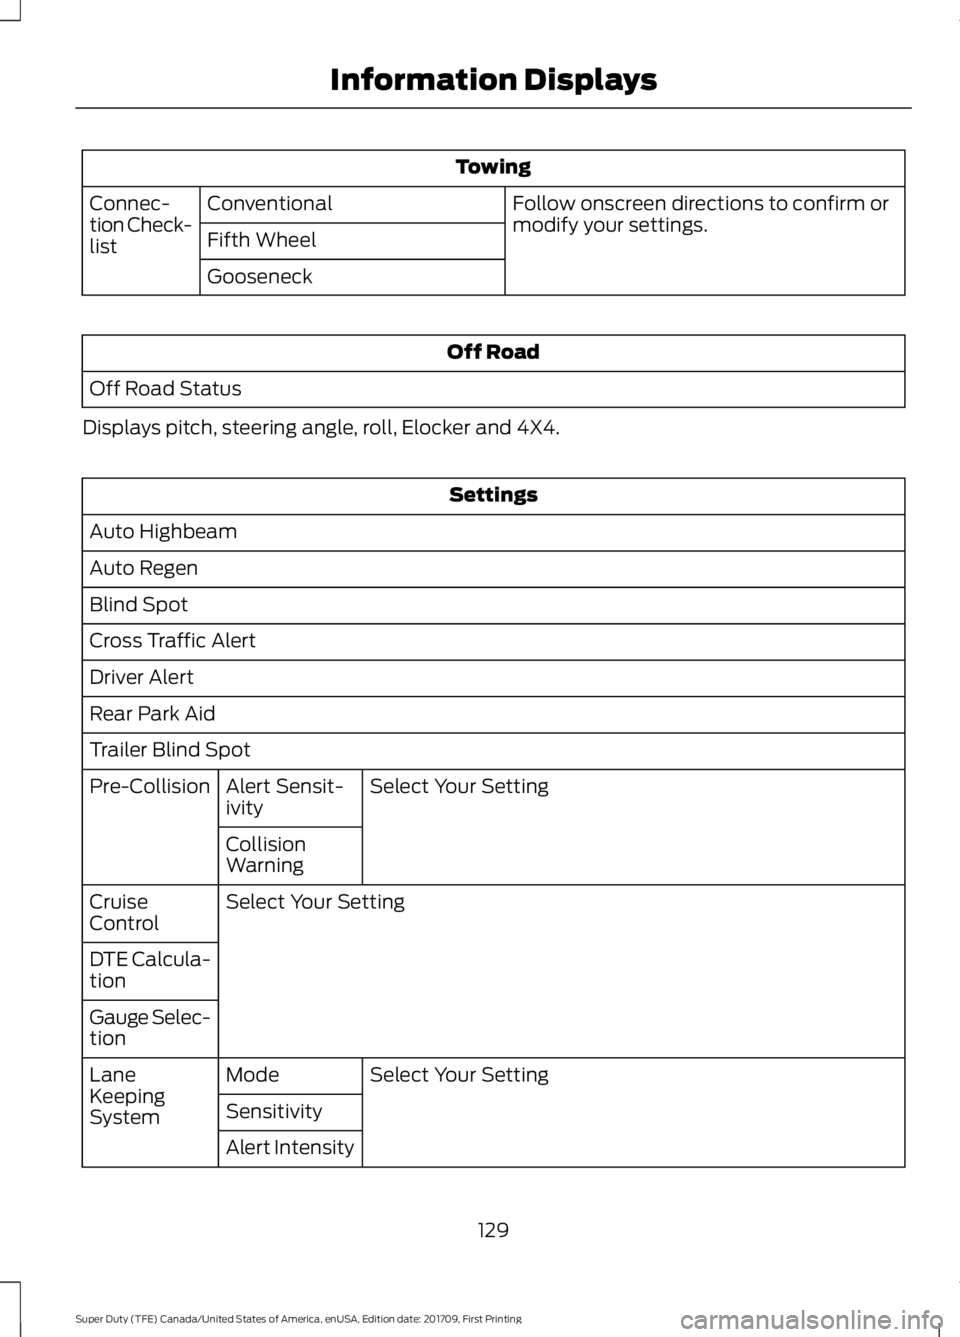
Towing
Follow onscreen directions to confirm or
modify your settings.
Conventional
Connec-
tion Check-
list Fifth Wheel
Gooseneck Off Road
Off Road Status
Displays pitch, steering angle, roll, Elocker and 4X4. Settings
Auto Highbeam
Auto Regen
Blind Spot
Cross Traffic Alert
Driver Alert
Rear Park Aid
Trailer Blind Spot Select Your Setting
Alert Sensit-
ivity
Pre-Collision
Collision
Warning
Select Your Setting
Cruise
Control
DTE Calcula-
tion
Gauge Selec-
tion
Select Your Setting
Mode
Lane
Keeping
System Sensitivity
Alert Intensity
129
Super Duty (TFE) Canada/United States of America, enUSA, Edition date: 201709, First Printing Information Displays
Page 249 of 656

USING ADAPTIVE CRUISE
CONTROL (If Equipped)
WARNINGS
Always pay close attention to
changing road conditions when using
adaptive cruise control. The system
does not replace attentive driving. Failing
to pay attention to the road may result in
a crash, serious injury or death. Do not use the adaptive cruise
control when entering or leaving a
highway, on roads with intersections
or roundabouts or non-vehicular traffic or
roads that are winding, slippery, unpaved,
or steep slopes. Do not use the system in poor
visibility, for example fog, heavy rain,
spray or snow.
Do not use the system when towing
a trailer with aftermarket trailer
brake controls. Aftermarket trailer
brakes will not function properly when you
switch the system on because the brakes
are electronically controlled. Failing to do
so may result in loss of vehicle control,
which could result in serious injury. Do not use tire sizes other than those
recommended because this can
affect the normal operation of the
system. Failure to do so may result in a loss
of vehicle control, which could result in
serious injury. Adaptive cruise control may not
detect stationary or slow moving
vehicles below
6 mph (10 km/h).
Adaptive cruise control does not
detect pedestrians or objects in the
road.
Adaptive cruise control does not
detect oncoming vehicles in the
same lane. WARNINGS
Adaptive cruise control is not a crash
warning or avoidance system.
Do not use adaptive cruise control
with a snow plow blade installed.
Note:
It is your responsibility to stay alert,
drive safely and be in control of the vehicle
at all times.
The system adjusts your vehicle speed to
maintain the set gap between you and the
vehicle in front of you in the same lane.
You can select four gap settings.
The system uses a radar sensor that
projects a beam directly in front of your
vehicle. The adaptive cruise controls are on the
steering wheel.
Switching Adaptive Cruise Control
On
Press ON.
The indicator, current gap setting
and set speed appear in the
information display.
246
Super Duty (TFE) Canada/United States of America, enUSA, Edition date: 201709, First Printing Cruise Control
(If Equipped)E183737 E144529
Page 330 of 656

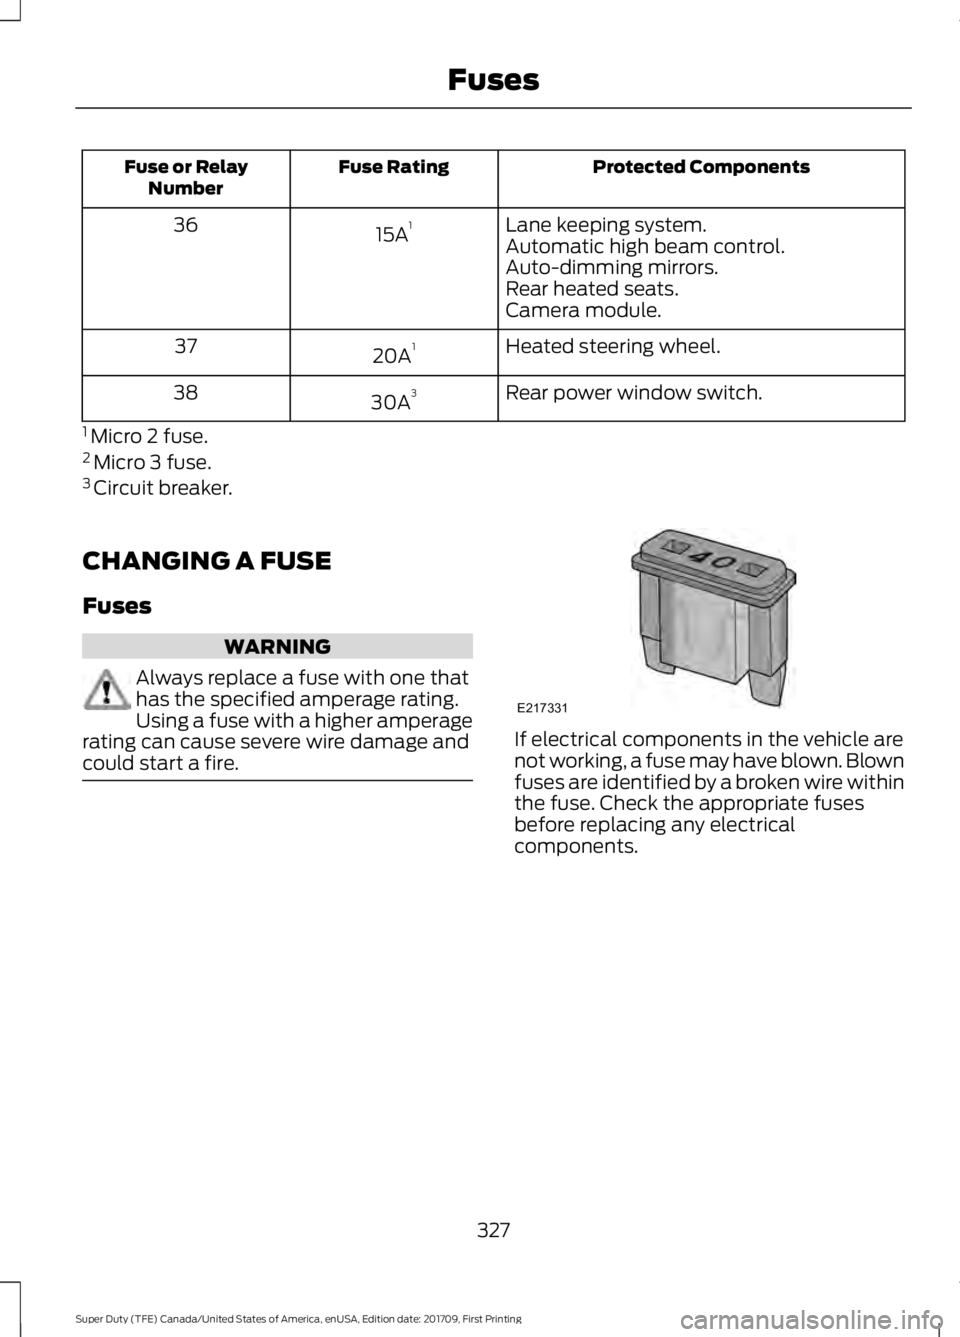
Protected Components
Fuse Rating
Fuse or Relay
Number
Lane keeping system.
15A 1
36
Automatic high beam control.
Auto-dimming mirrors.
Rear heated seats.
Camera module.
Heated steering wheel.
20A 1
37
Rear power window switch.
30A 3
38
1 Micro 2 fuse.
2 Micro 3 fuse.
3 Circuit breaker.
CHANGING A FUSE
Fuses WARNING
Always replace a fuse with one that
has the specified amperage rating.
Using a fuse with a higher amperage
rating can cause severe wire damage and
could start a fire. If electrical components in the vehicle are
not working, a fuse may have blown. Blown
fuses are identified by a broken wire within
the fuse. Check the appropriate fuses
before replacing any electrical
components.
327
Super Duty (TFE) Canada/United States of America, enUSA, Edition date: 201709, First Printing FusesE217331
Page 360 of 656

Headlamp Aiming Target
8 feet (2.4 meters)
A
Center height of lamp to ground
B
25 feet (7.6 meters)
C
Horizontal reference line
D
Vertical Aim Adjustment Procedure
1. Park the vehicle directly in front of a wall or screen on a level surface,
approximately 25 feet (7.6 meters)
away.
2. Measure the height of the headlamp bulb center from the ground and mark
an 8 foot (2.4 meter) horizontal
reference line on the vertical wall or
screen at this height.
Note: To see a clearer light pattern for
adjusting, you may want to block the light
from one headlamp while adjusting the
other.
3. Turn on the low beam headlamps to illuminate the wall or screen and open
the hood. 4. On the wall or screen you will observe
a flat zone of high intensity light
located at the top of the right hand
portion of the beam pattern. If the top
edge of the high intensity light zone is
not at the horizontal reference line, the
headlamp will need to be adjusted. 5. Locate the vertical adjuster on each
headlamp. Using a Phillips #2
screwdriver, turn the adjuster either
clockwise or counterclockwise in order
to adjust the vertical aim of the
headlamp.
Note: A. LED headlamp.
B. Halogen headlamp.
357
Super Duty (TFE) Canada/United States of America, enUSA, Edition date: 201709, First Printing MaintenanceE142592 E142465 A
B
E223774
Page 417 of 656

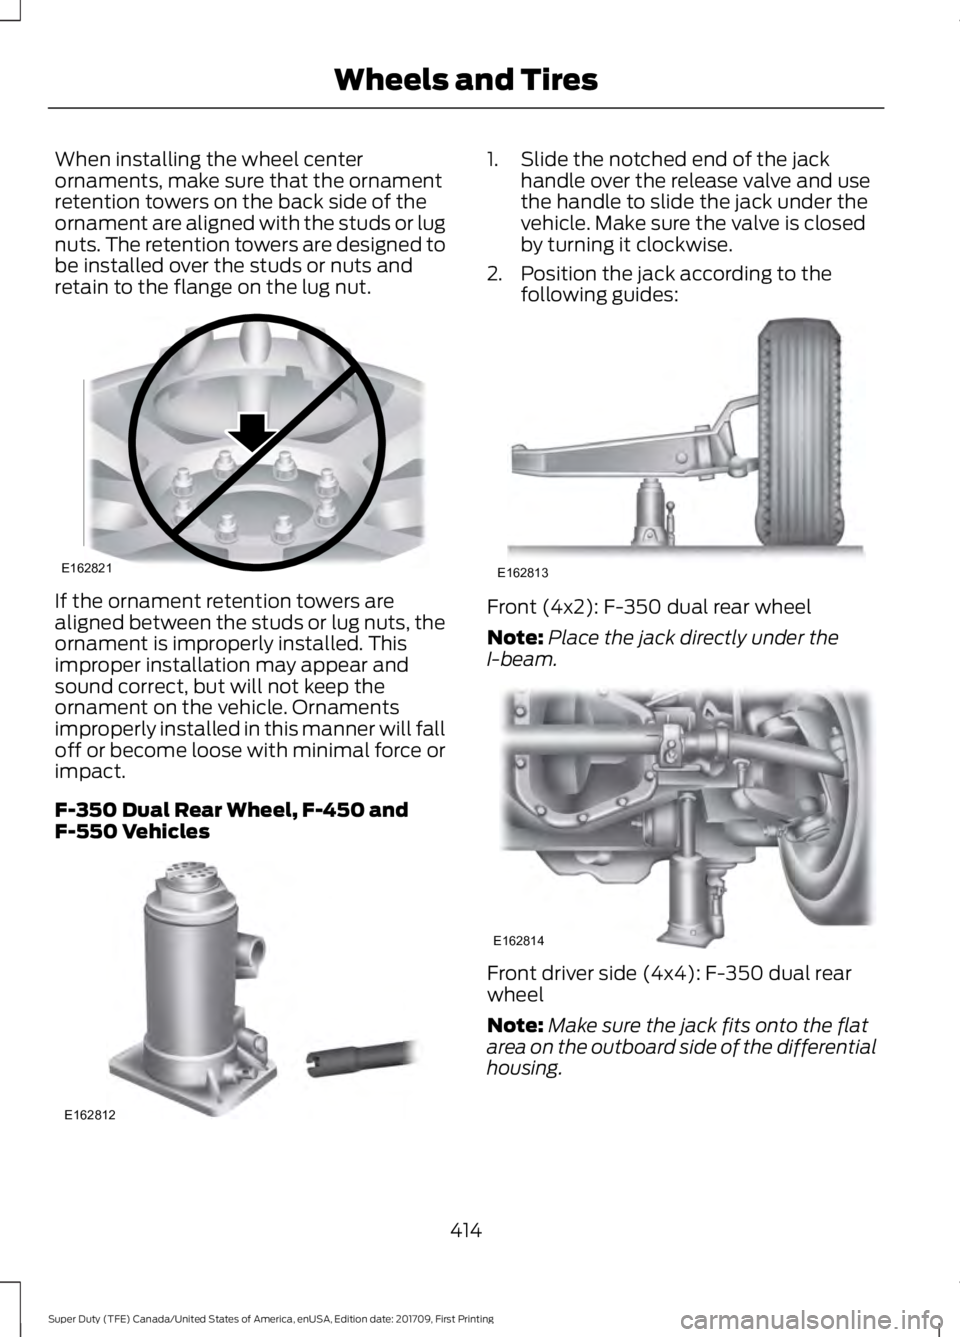
When installing the wheel center
ornaments, make sure that the ornament
retention towers on the back side of the
ornament are aligned with the studs or lug
nuts. The retention towers are designed to
be installed over the studs or nuts and
retain to the flange on the lug nut.
If the ornament retention towers are
aligned between the studs or lug nuts, the
ornament is improperly installed. This
improper installation may appear and
sound correct, but will not keep the
ornament on the vehicle. Ornaments
improperly installed in this manner will fall
off or become loose with minimal force or
impact.
F-350 Dual Rear Wheel, F-450 and
F-550 Vehicles 1. Slide the notched end of the jack
handle over the release valve and use
the handle to slide the jack under the
vehicle. Make sure the valve is closed
by turning it clockwise.
2. Position the jack according to the following guides: Front (4x2): F-350 dual rear wheel
Note:
Place the jack directly under the
I-beam. Front driver side (4x4): F-350 dual rear
wheel
Note:
Make sure the jack fits onto the flat
area on the outboard side of the differential
housing.
414
Super Duty (TFE) Canada/United States of America, enUSA, Edition date: 201709, First Printing Wheels and TiresE162821 E162812 E162813 E162814