2018 FORD F250 SUPER DUTY tire type
[x] Cancel search: tire typePage 43 of 656
Seatbelt Locking Modes
WARNING
If your vehicle is involved in a crash,
have the seatbelts and associated
components inspected as soon as
possible. Failure to follow this instruction
could result in personal injury or death. All safety restraints in the vehicle are
combination lap and shoulder belts. The
driver seatbelt has the first type of locking
mode, and the front outboard passenger
and rear seat seatbelts have both types of
locking modes described as follows:
Vehicle Sensitive Mode
This is the normal retractor mode, which
allows free shoulder belt length
adjustment to your movements and
locking in response to vehicle movement.
For example, if the driver brakes suddenly,
turns a corner sharply, or the vehicle
receives an impact of about 5 mph
(8 km/h) or more, the combination
seatbelts lock to help reduce forward
movement of the driver and passengers.
In addition, the retractor is designed to lock
if you pull the webbing out too quickly. If
the seatbelt retractor locks, slowly lower
the height adjuster to allow the seatbelt
to retract. If the retractor does not unlock,
pull the seatbelt out slowly then feed a
small length of webbing back toward the
stowed position. For rear seatbelts, recline
the rear seat backrest or push the seat
backrest cushion away from the seatbelt.
Feed a small length of webbing back
toward the stowed position.
Automatic Locking Mode
In this mode, the shoulder belt
automatically pre-locks. The belt still
retracts to remove any slack in the
shoulder belt. The automatic locking mode
is not available on the driver seatbelt. When to Use the Automatic Locking
Mode
Use this mode any time you install a child
safety seat in a front outboard passenger
seating position in a Regular Cab,
SuperCab, SuperCrew or any rear seating
position of a SuperCab or SuperCrew. The
optional front seat's center seatbelt has a
cinch mechanism. Properly restrain
children 12 years old and under in a rear
seat whenever possible. See
Child Safety
(page 19).
How to Use the Automatic Locking
Mode
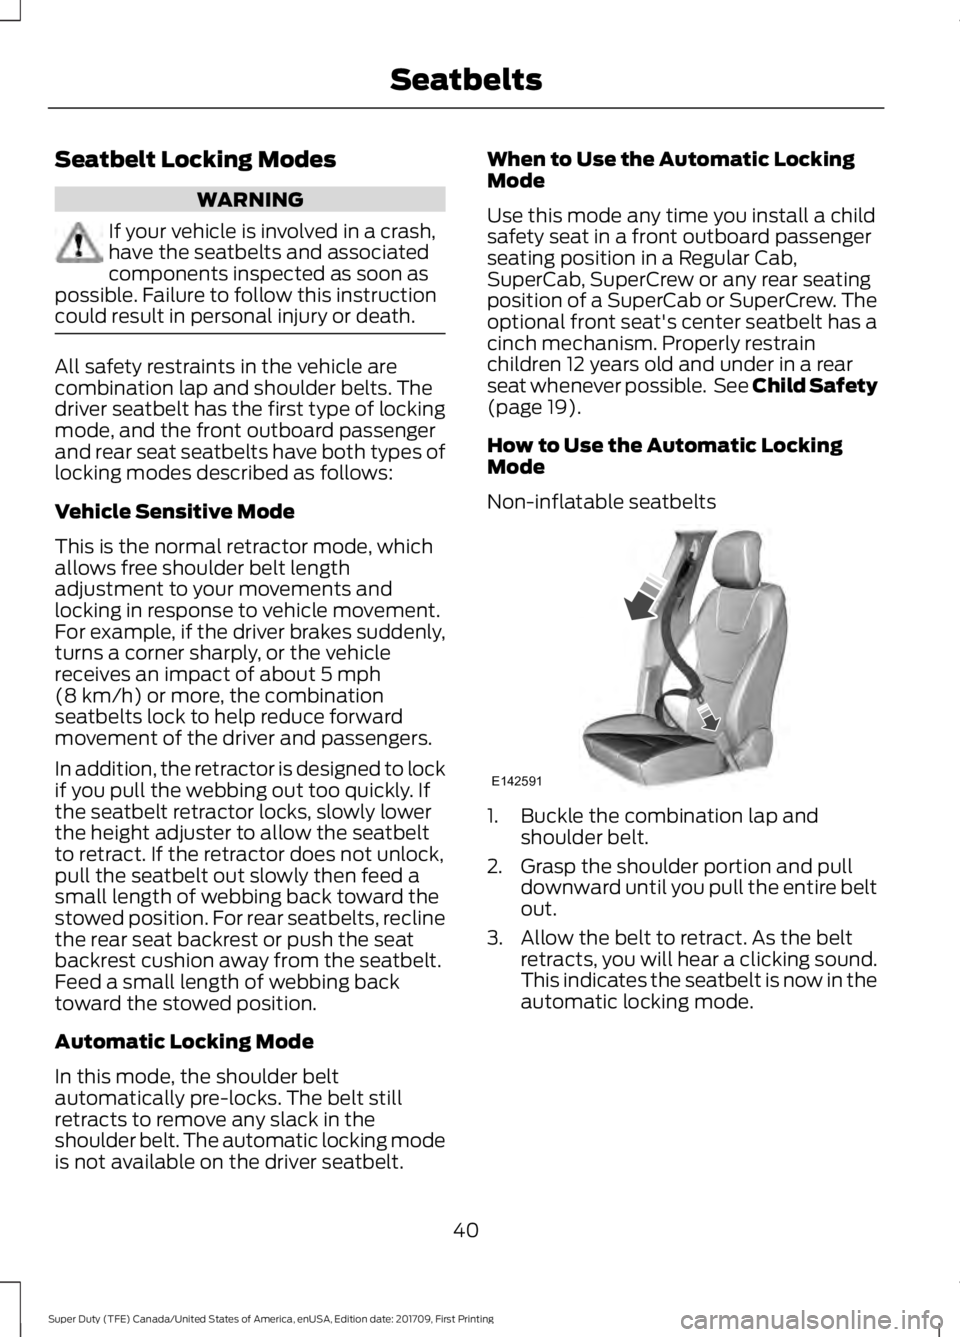
Non-inflatable seatbelts 1. Buckle the combination lap and
shoulder belt.
2. Grasp the shoulder portion and pull downward until you pull the entire belt
out.
3. Allow the belt to retract. As the belt retracts, you will hear a clicking sound.
This indicates the seatbelt is now in the
automatic locking mode.
40
Super Duty (TFE) Canada/United States of America, enUSA, Edition date: 201709, First Printing SeatbeltsE142591
Page 119 of 656
Fuel Economy
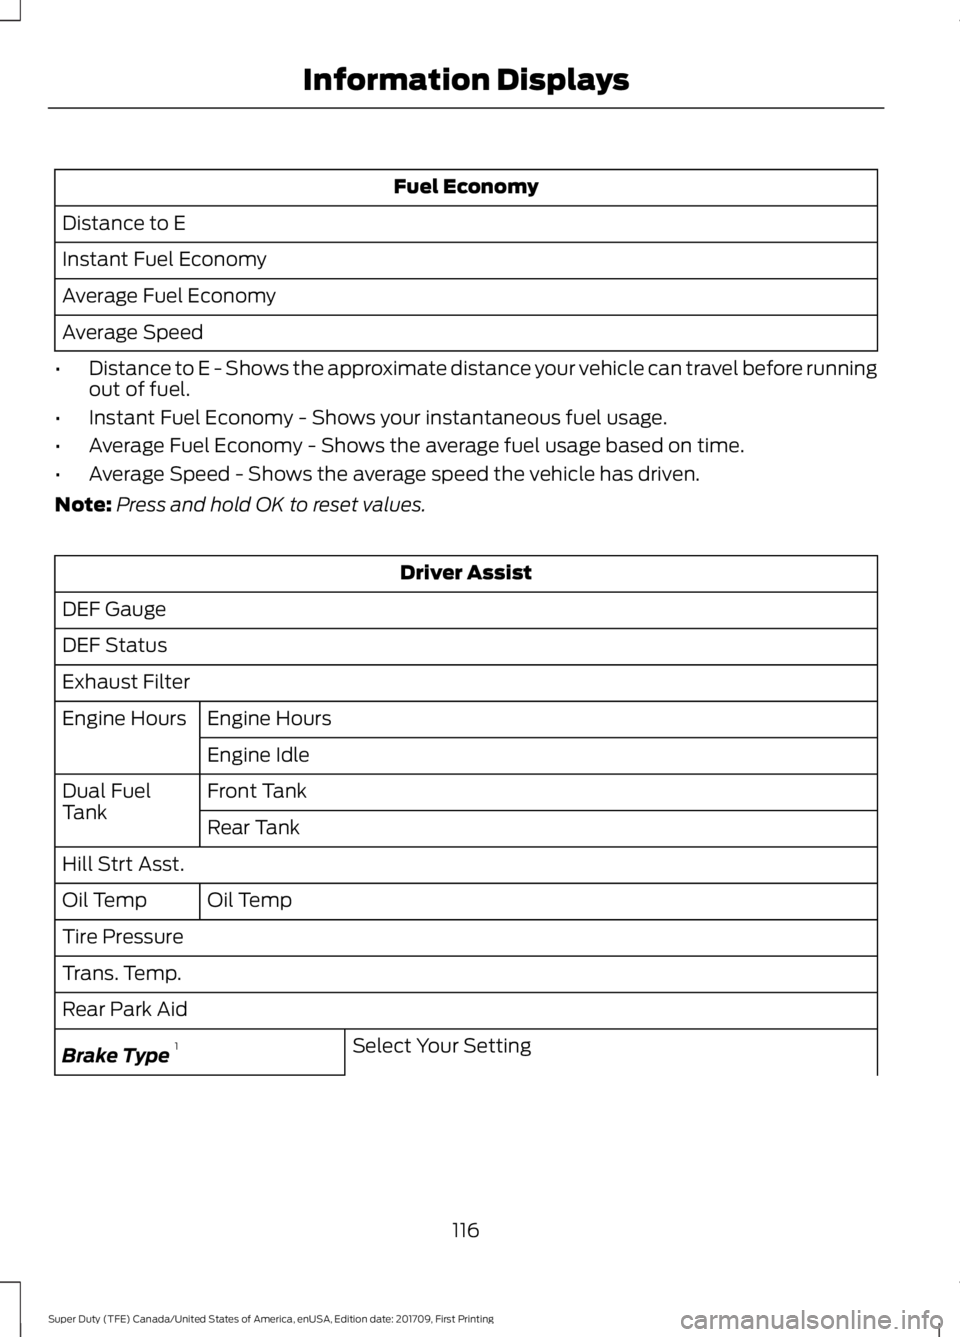
Distance to E
Instant Fuel Economy
Average Fuel Economy
Average Speed
• Distance to E - Shows the approximate distance your vehicle can travel before running
out of fuel.
• Instant Fuel Economy - Shows your instantaneous fuel usage.
• Average Fuel Economy - Shows the average fuel usage based on time.
• Average Speed - Shows the average speed the vehicle has driven.
Note: Press and hold OK to reset values. Driver Assist
DEF Gauge
DEF Status
Exhaust Filter Engine Hours
Engine Hours
Engine Idle
Front Tank
Dual Fuel
Tank
Rear Tank
Hill Strt Asst. Oil Temp
Oil Temp
Tire Pressure
Trans. Temp.
Rear Park Aid
Select Your Setting
Brake Type 1
116
Super Duty (TFE) Canada/United States of America, enUSA, Edition date: 201709, First Printing Information Displays
Page 121 of 656
Settings
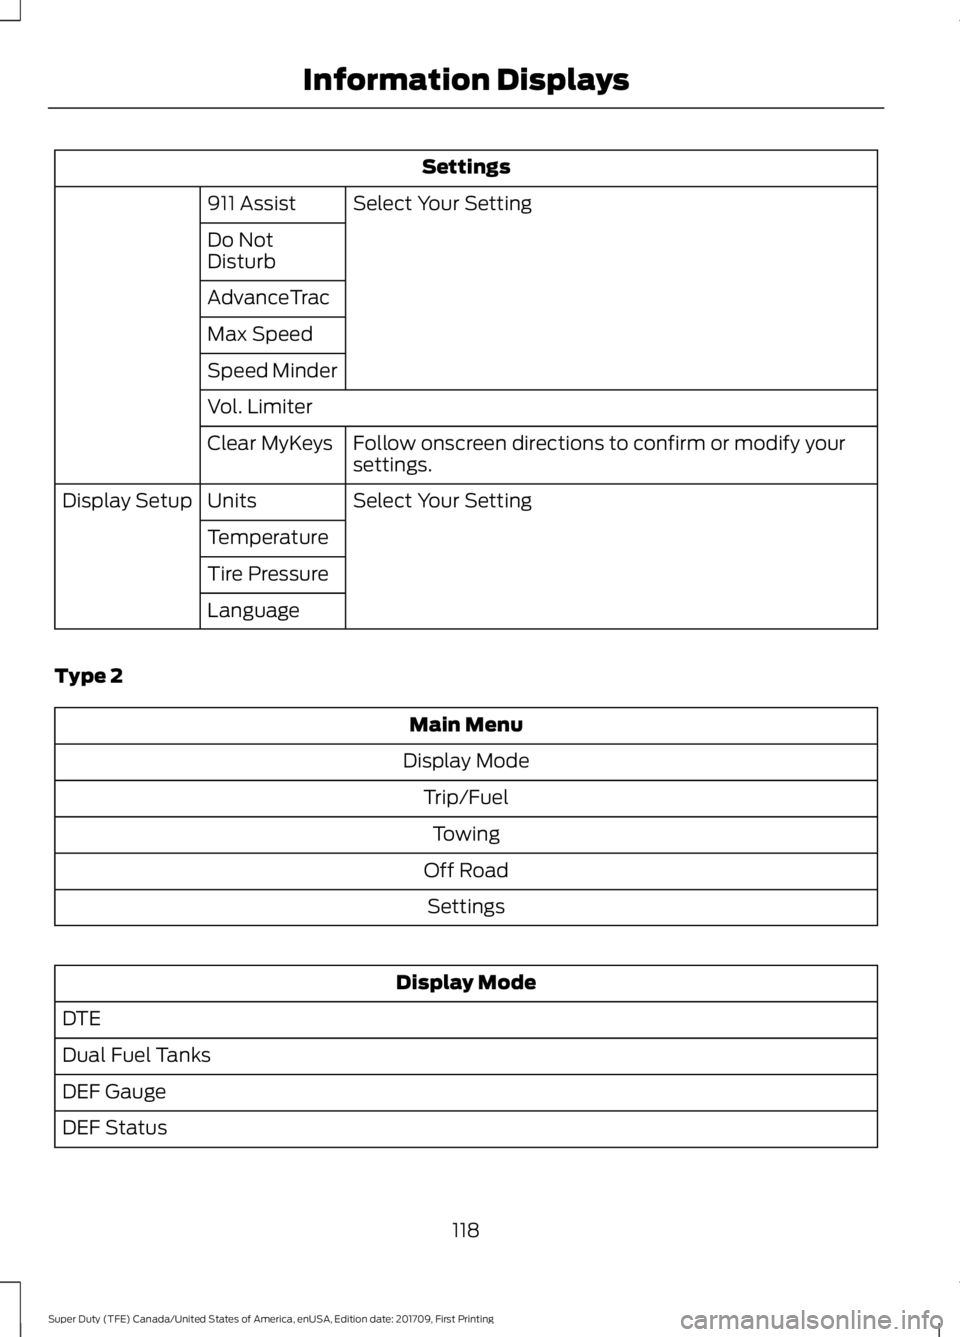
Select Your Setting
911 Assist
Do Not
Disturb
AdvanceTrac
Max Speed
Speed Minder
Vol. Limiter
Follow onscreen directions to confirm or modify your
settings.
Clear MyKeys
Select Your Setting
Units
Display Setup
Temperature
Tire Pressure
Language
Type 2 Main Menu
Display Mode Trip/FuelTowing
Off Road Settings Display Mode
DTE
Dual Fuel Tanks
DEF Gauge
DEF Status
118
Super Duty (TFE) Canada/United States of America, enUSA, Edition date: 201709, First Printing Information Displays
Page 131 of 656
Towing
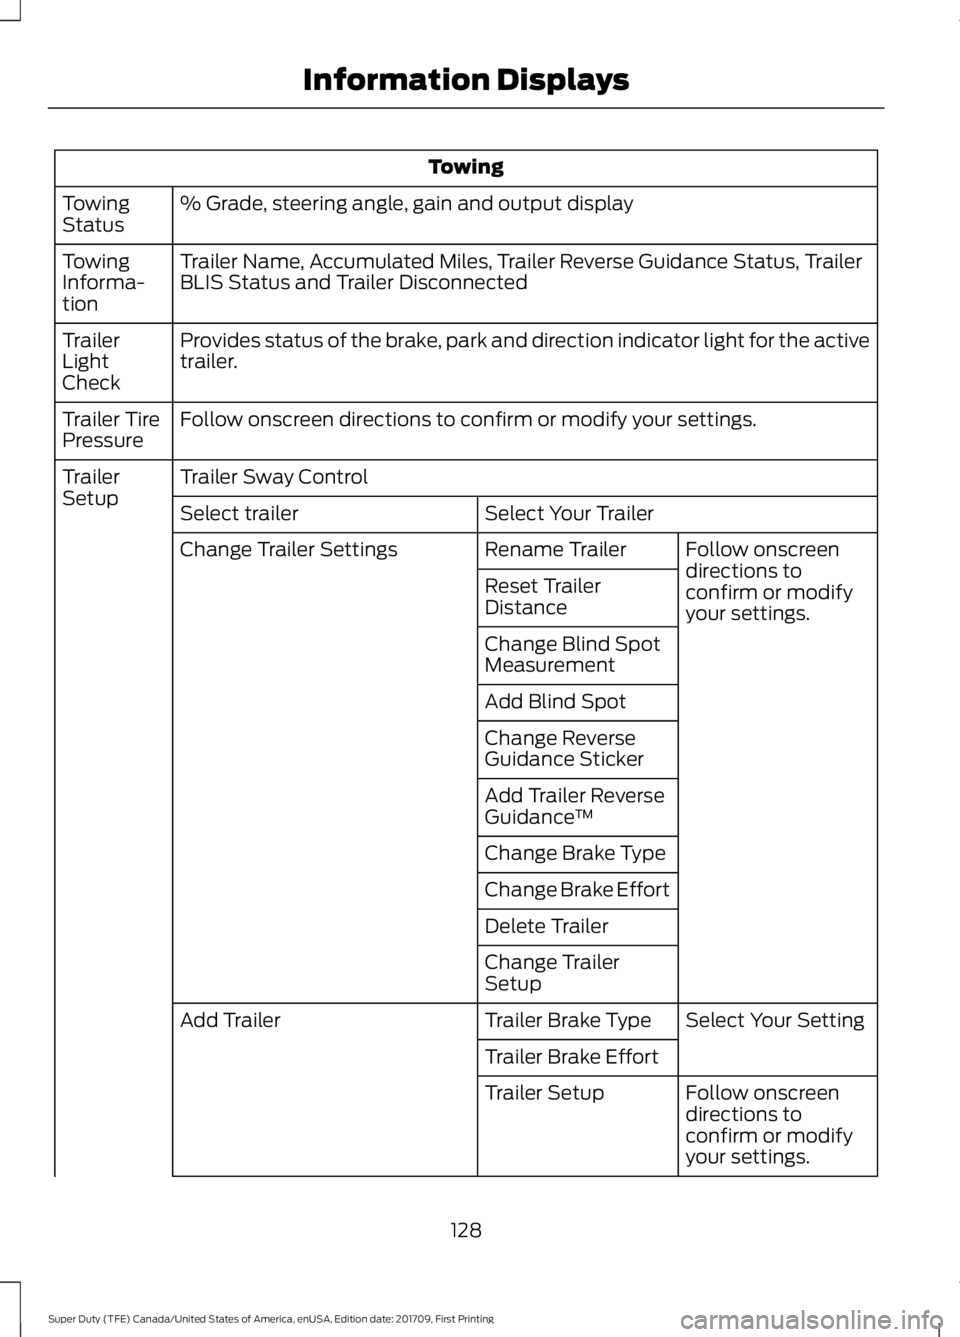
% Grade, steering angle, gain and output display
Towing
Status
Trailer Name, Accumulated Miles, Trailer Reverse Guidance Status, Trailer
BLIS Status and Trailer Disconnected
Towing
Informa-
tion
Provides status of the brake, park and direction indicator light for the active
trailer.
Trailer
Light
Check
Follow onscreen directions to confirm or modify your settings.
Trailer Tire
Pressure
Trailer Sway Control
Trailer
Setup
Select Your Trailer
Select trailer
Follow onscreen
directions to
confirm or modify
your settings.
Rename Trailer
Change Trailer Settings
Reset Trailer
Distance
Change Blind Spot
Measurement
Add Blind Spot
Change Reverse
Guidance Sticker
Add Trailer Reverse
Guidance™
Change Brake Type
Change Brake Effort
Delete Trailer
Change Trailer
Setup Select Your Setting
Trailer Brake Type
Add Trailer
Trailer Brake EffortFollow onscreen
directions to
confirm or modify
your settings.
Trailer Setup
128
Super Duty (TFE) Canada/United States of America, enUSA, Edition date: 201709, First Printing Information Displays
Page 134 of 656
Settings
AdvanceTrac
Max Speed
Speed Minder
Volume Limiter Follow onscreen directions to confirm
or modify your settings.
Clear MyKeys
Select Your Setting
Units
Display Setup
Temperature
Tire Pressure
Language
INFORMATION MESSAGES
Note: Depending on your vehicle options
and instrument cluster type, not all of the
messages will display or be available. The
information display may abbreviate or
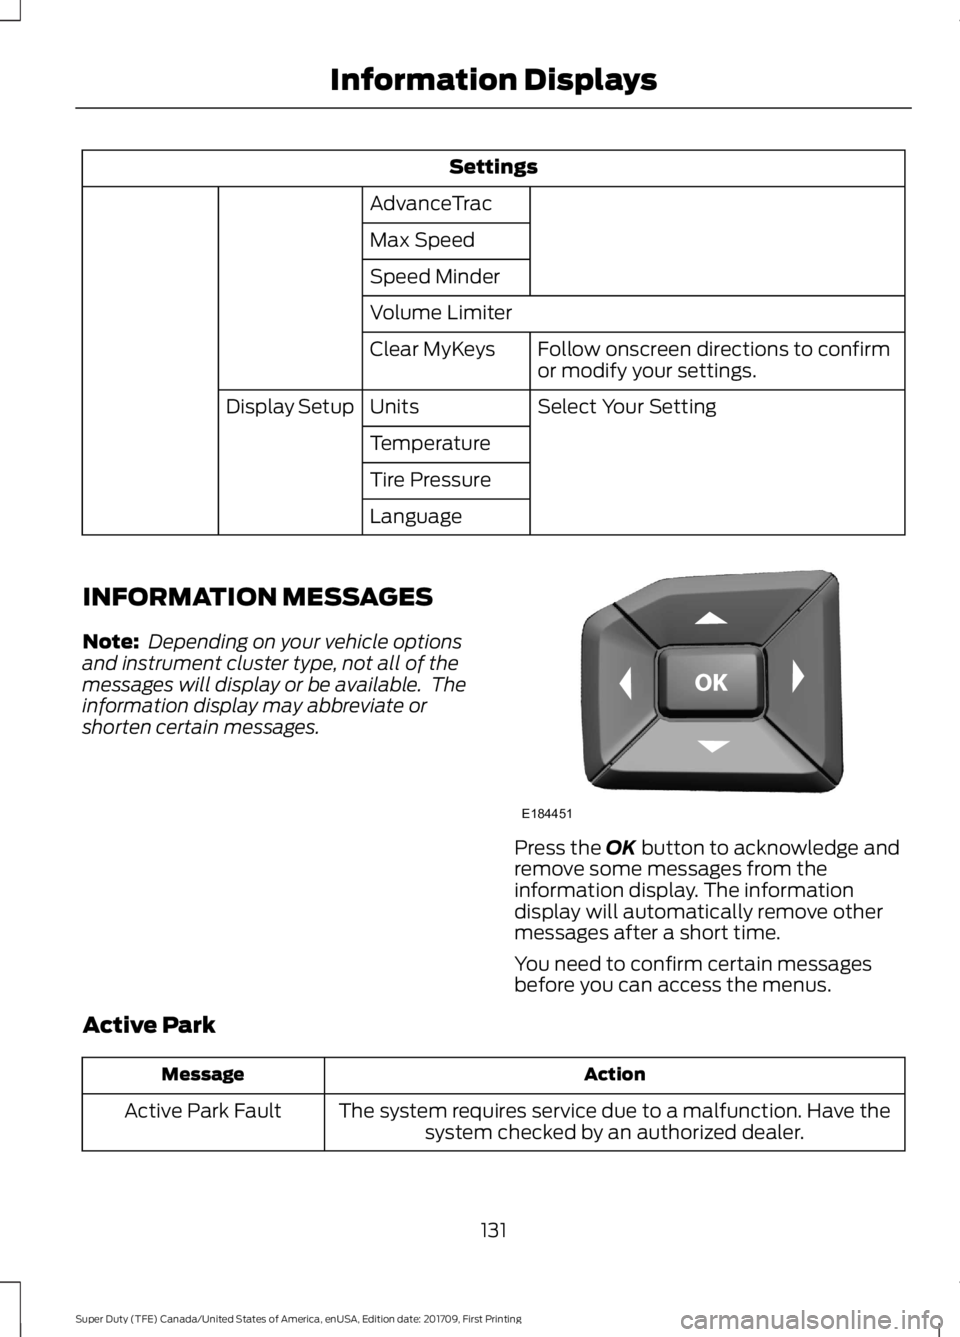
shorten certain messages. Press the OK button to acknowledge and
remove some messages from the
information display. The information
display will automatically remove other
messages after a short time.
You need to confirm certain messages
before you can access the menus.
Active Park Action
Message
The system requires service due to a malfunction. Have thesystem checked by an authorized dealer.
Active Park Fault
131
Super Duty (TFE) Canada/United States of America, enUSA, Edition date: 201709, First Printing Information DisplaysE184451
Page 219 of 656
USING FOUR-WHEEL DRIVE
Note:
For important information regarding
the safe operation of this type of vehicle,
see General Information in the Wheels and
Tires chapter.
Note: Do not use 4H or 4L mode on dry,
hard surfaced roads. Doing so can produce
excessive noise, increase tire wear and may
damage drive components. 4X4 mode is
only intended for consistently slippery or
loose surfaces. Use of 4L mode on these
surfaces may produce some noise (such as
occasional clunks), but will not damage
drive components.
Note: If 4X4 low is selected while the
vehicle is moving above 3 mph (5 km/h),
the 4WD system will not perform a shift.
This is normal and should be no reason for
concern. Refer to Shifting to or from 4L (4X4
Low) for proper operation.
Note: You can switch on and switch off the
electronic locking differential by pulling the
4WD control (4WD vehicles) or turning the
electronic locking differential control (2WD
vehicles). See
Electronic Locking
Differential (page 225).
Manual Shift On Stop (MSOS)
4WD system
(If Equipped)
Note: The vehicle should not be driven in
4X4 High or 4X4 Low modes with the hub
locks set to FREE as this condition may
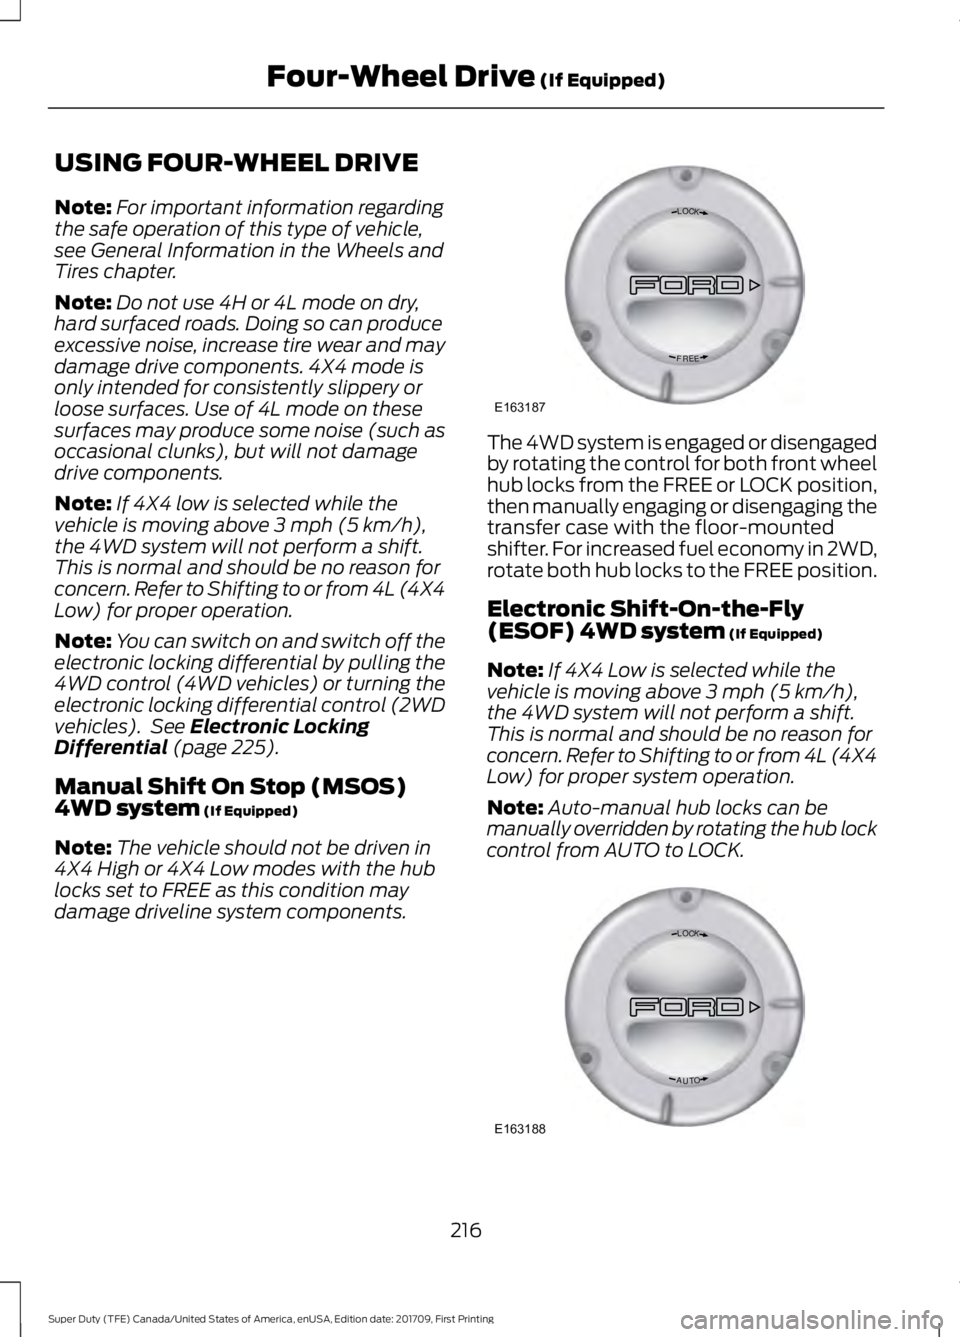
damage driveline system components. The 4WD system is engaged or disengaged
by rotating the control for both front wheel
hub locks from the FREE or LOCK position,
then manually engaging or disengaging the
transfer case with the floor-mounted
shifter. For increased fuel economy in 2WD,
rotate both hub locks to the FREE position.
Electronic Shift-On-the-Fly
(ESOF) 4WD system
(If Equipped)
Note: If 4X4 Low is selected while the
vehicle is moving above
3 mph (5 km/h),
the 4WD system will not perform a shift.
This is normal and should be no reason for
concern. Refer to Shifting to or from 4L (4X4
Low) for proper system operation.
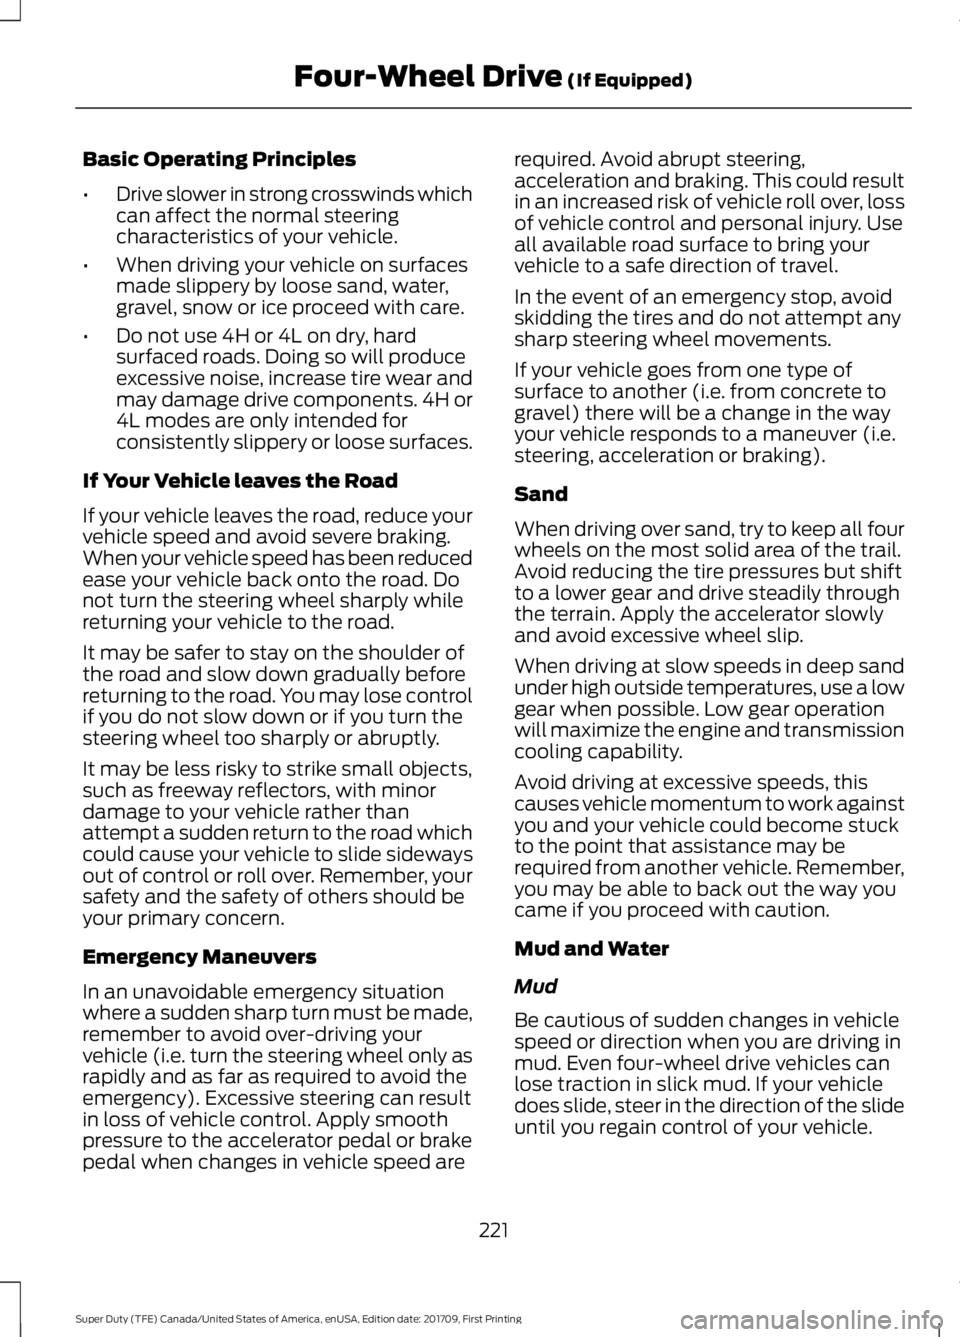
Note: Auto-manual hub locks can be
manually overridden by rotating the hub lock
control from AUTO to LOCK. 216
Super Duty (TFE) Canada/United States of America, enUSA, Edition date: 201709, First Printing Four-Wheel Drive
(If Equipped)LOC K
EERF
E163187 LOC K
OTUA
E163188
Page 224 of 656
Basic Operating Principles
•
Drive slower in strong crosswinds which
can affect the normal steering
characteristics of your vehicle.
• When driving your vehicle on surfaces
made slippery by loose sand, water,
gravel, snow or ice proceed with care.
• Do not use 4H or 4L on dry, hard
surfaced roads. Doing so will produce
excessive noise, increase tire wear and
may damage drive components. 4H or
4L modes are only intended for
consistently slippery or loose surfaces.
If Your Vehicle leaves the Road
If your vehicle leaves the road, reduce your
vehicle speed and avoid severe braking.
When your vehicle speed has been reduced
ease your vehicle back onto the road. Do
not turn the steering wheel sharply while
returning your vehicle to the road.
It may be safer to stay on the shoulder of
the road and slow down gradually before
returning to the road. You may lose control
if you do not slow down or if you turn the
steering wheel too sharply or abruptly.
It may be less risky to strike small objects,
such as freeway reflectors, with minor
damage to your vehicle rather than
attempt a sudden return to the road which
could cause your vehicle to slide sideways
out of control or roll over. Remember, your
safety and the safety of others should be
your primary concern.
Emergency Maneuvers
In an unavoidable emergency situation
where a sudden sharp turn must be made,
remember to avoid over-driving your
vehicle (i.e. turn the steering wheel only as
rapidly and as far as required to avoid the
emergency). Excessive steering can result
in loss of vehicle control. Apply smooth
pressure to the accelerator pedal or brake
pedal when changes in vehicle speed are required. Avoid abrupt steering,
acceleration and braking. This could result
in an increased risk of vehicle roll over, loss
of vehicle control and personal injury. Use
all available road surface to bring your
vehicle to a safe direction of travel.
In the event of an emergency stop, avoid
skidding the tires and do not attempt any
sharp steering wheel movements.
If your vehicle goes from one type of
surface to another (i.e. from concrete to
gravel) there will be a change in the way
your vehicle responds to a maneuver (i.e.
steering, acceleration or braking).
Sand
When driving over sand, try to keep all four
wheels on the most solid area of the trail.
Avoid reducing the tire pressures but shift
to a lower gear and drive steadily through
the terrain. Apply the accelerator slowly
and avoid excessive wheel slip.
When driving at slow speeds in deep sand
under high outside temperatures, use a low
gear when possible. Low gear operation
will maximize the engine and transmission
cooling capability.
Avoid driving at excessive speeds, this
causes vehicle momentum to work against
you and your vehicle could become stuck
to the point that assistance may be
required from another vehicle. Remember,
you may be able to back out the way you
came if you proceed with caution.
Mud and Water
Mud
Be cautious of sudden changes in vehicle
speed or direction when you are driving in
mud. Even four-wheel drive vehicles can
lose traction in slick mud. If your vehicle
does slide, steer in the direction of the slide
until you regain control of your vehicle.
221
Super Duty (TFE) Canada/United States of America, enUSA, Edition date: 201709, First Printing Four-Wheel Drive (If Equipped)
Page 279 of 656
Step 2: Follow the Information Display
Prompts
1. Use the steering wheel controls to
navigate to the towing menu.
2. Select Trailer Setup from the available
options.
3. Select Add a Trailer and press OK to confirm.
4. The system asks you to name the trailer. Use the steering wheel controls
to choose from the alphanumeric
characters. Press the right arrow to
advance to the next character. When
you finish naming the trailer, press OK
to confirm.
5. Select the type of brake system for your trailer. Select DEFAULT if your
trailer has electric, surge or no brakes.
Press OK to select and advance to the
next screen
Note: The default option is low. This is
recommended for most trailers. If the
trailer's brakes require more initial voltage,
or if you prefer more aggressive braking, then
select the other options as required.
6. The system asks you to select your trailer type. You can use the system
with conventional, fifth wheel and
goose neck trailers. For fifth wheel and
goose neck trailers, set up and sticker
placement are not required, however
some of the features do not operate
automatically with these trailer types.
Use the steering wheel controls to
select your trailer type.
Note: You can still manually control the
camera views on the touchscreen to help
you reverse goose neck and fifth wheel
trailers.
7. If your vehicle includes a blind spot information system, the system
prompts you to setup the trailer blind
spot feature. See Blind Spot
Information System (page 254). 8. A message appears in the information
display asking if you want to add trailer
reverse guidance. Select Yes to
continue.
9. Straighten out the trailer, if necessary.
10. The information display directs you to the quick start guide for how to
proceed. The steps are also shown
here.
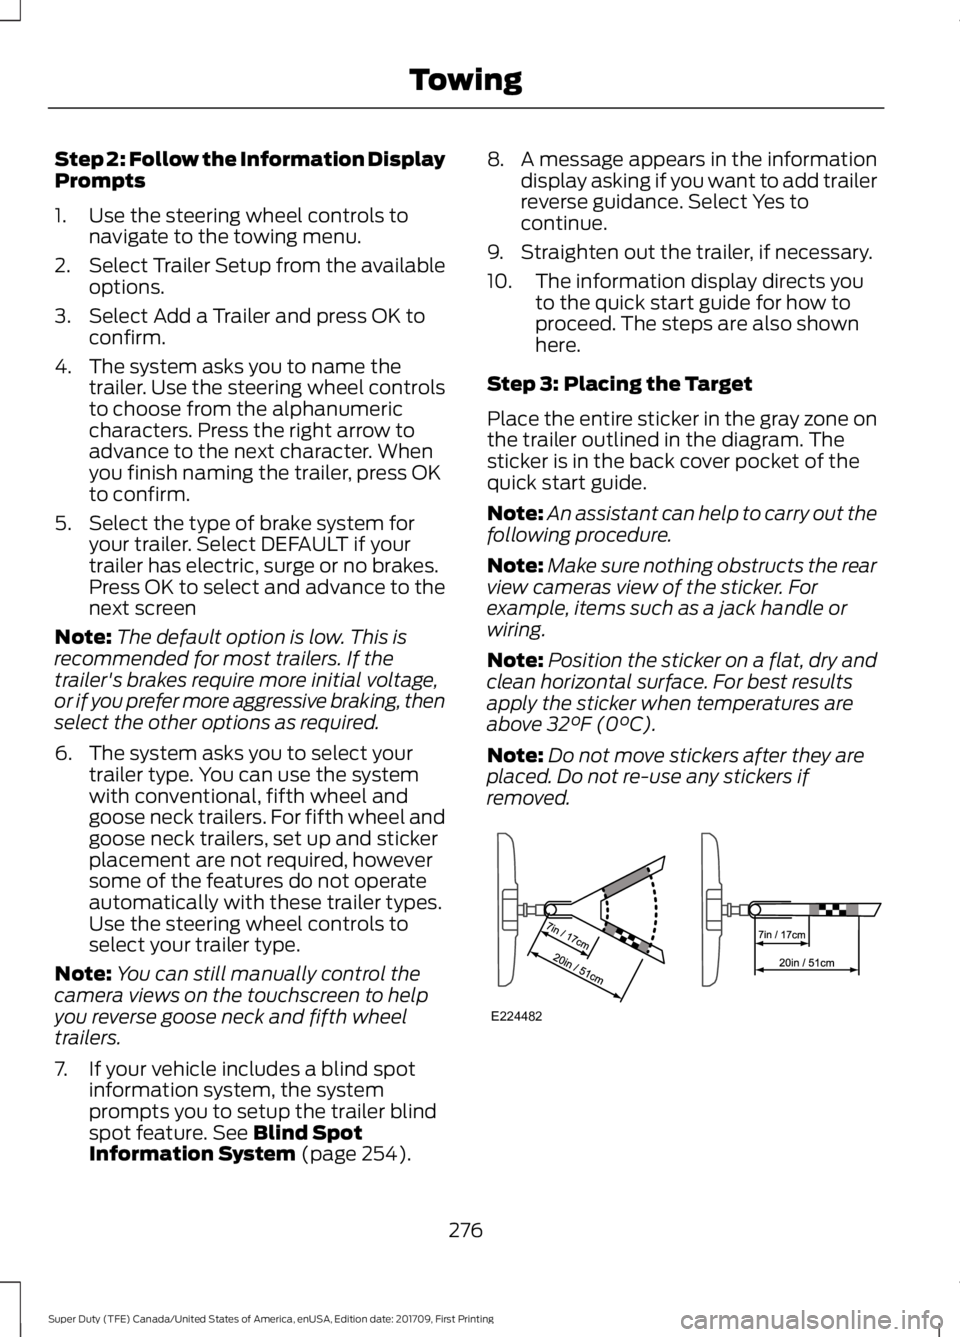
Step 3: Placing the Target
Place the entire sticker in the gray zone on
the trailer outlined in the diagram. The
sticker is in the back cover pocket of the
quick start guide.
Note: An assistant can help to carry out the
following procedure.
Note: Make sure nothing obstructs the rear
view cameras view of the sticker. For
example, items such as a jack handle or
wiring.
Note: Position the sticker on a flat, dry and
clean horizontal surface. For best results
apply the sticker when temperatures are
above
32°F (0°C).
Note: Do not move stickers after they are
placed. Do not re-use any stickers if
removed. 276
Super Duty (TFE) Canada/United States of America, enUSA, Edition date: 201709, First Printing TowingE224482